
Related Manuals for Xilinx ZC706


Summary of Contents for Xilinx ZC706
- Page 1 ZC706 Restoring Flash Contents October 2014 XTP247...
-
Page 2: Revision History
NOTICE OF DISCLAIMER: The information disclosed to you hereunder (the “Information”) is provided “AS-IS” with no warranty of any kind, express or implied. Xilinx does not assume any liability arising from your use of the Information. You are responsible for obtaining any rights you may require for your use of this Information. - Page 3 Overview Xilinx ZC706 Board Software Requirements ZC706 Setup Restoring ZC706 QSPI Flash References Note: This presentation applies to the ZC706...
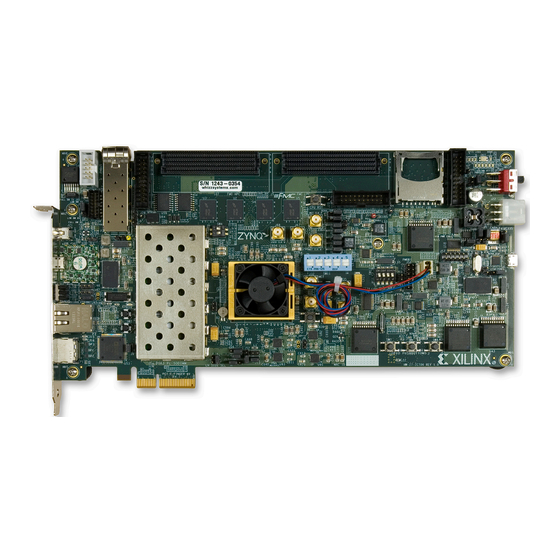
- Page 4 ZC706 Board...
-
Page 5: Vivado Software Requirements
Vivado Software Requirements Xilinx Vivado Design Suite 2014.3, Design Edition + SDK – Combined installer Note: Presentation applies to the ZC706... - Page 6 ZC706 Setup Set the JTAG Select Switch, SW4, to 01 – If using a Platform Cable USB (II) JTAG Cable, set SW4 to 10 Note: Presentation applies to the ZC706...
- Page 7 ZC706 Setup Connect a USB Type-A to Micro-B cable to the USB JTAG (Digilent) connector on the ZC706 board – Connect this cable to your PC – Power on the ZC706 board...
- Page 8 ZC706 Setup Connect a USB Type-A to Mini-B cable to the USB UART connector on the ZC706 board – Connect this cable to your PC – Power on the ZC706 board for UART Drivers Installation...
- Page 9 ZC706 Setup Install USB UART Drivers – Refer to UG1033 for details on installing the USB to UART Drivers Note: Presentation applies to the ZC706...
- Page 10 ZC706 Setup Reboot your PC if necessary Right-click on My Computer and select Properties – Select the Hardware tab – Click on Device Manager Note: Presentation applies to the ZC706...
- Page 11 ZC706 Setup Expand the Ports Hardware – Right-click on Silicon Labs CP210x USB to UART Bridge and select Properties Note: Presentation applies to the ZC706...
- Page 12 ZC706 Setup Under Port Settings tab – Click Advanced – Set the COM Port to an open Com Port setting from COM1 to COM4 Note: Presentation applies to the ZC706...
- Page 13 ZC706 Setup Refer to UG1036 regarding Tera Term installation Board Power must be on before starting Tera Term Start the Terminal Program – Select your USB Com Port – Set the baud to 115200 Note: Presentation applies to the ZC706...
-
Page 14: Restoring Zc706 Qspi Flash
Restoring ZC706 QSPI Flash... - Page 15 Restoring ZC706 QSPI Flash Set the SW11 DIP switches to: 00000 Note: Presentation applies to the ZC706...
- Page 16 Restoring ZC706 QSPI Flash Unzip the ZC706 Restoring Flash Design Files (2014.3 C) ZIP file to your C:\ drive – Available through http://www.xilinx.com/zc706 Note: Presentation applies to the ZC706...
- Page 17 Restoring ZC706 QSPI Flash Open a Windows prompt Cycle ZC706 Power if any programs have been run Program the QSPI Flash cd C:\zc706_restore_flash program_dual_qspi.bat Note: Takes about 3 minutes...
- Page 18 Restoring ZC706 QSPI Flash Set the SW11 DIP switches to boot from QSPI: 00010 Note: Presentation applies to the ZC706...
- Page 19 Restoring ZC706 QSPI Flash View initial BIST screen Note: Presentation applies to the ZC706...
- Page 20 References...
- Page 21 References 7 Series Configuration – 7 Series FPGAs Configuration User Guide – UG470 • http://www.xilinx.com/support/documentation/user_guides/ ug470_7Series_Config.pdf...
- Page 22 Documentation...
- Page 23 Documentation Zynq-7000 – Zynq-7000 All Programmable SoC • http://www.xilinx.com/products/silicon-devices/soc/zynq-7000/index.htm ZC706 Documentation – Zynq-7000 AP SoC ZC706 Evaluation Kit • http://www.xilinx.com/products/boards-and-kits/EK-Z7-ZC706-G.htm – ZC706 Getting Started Guide – UG961 • http://www.xilinx.com/support/documentation/boards_and_kits/zc706/14_7/ ug961-zc706-GSG.pdf – ZC706 User Guide – UG954 • http://www.xilinx.com/support/documentation/boards_and_kits/zc706/ ug954-zc706-eval-board-xc7z045-ap-soc.pdf...
Need help?
Do you have a question about the ZC706 and is the answer not in the manual?
Questions and answers