
Related Manuals for Luxul XMS-1010P


Summary of Contents for Luxul XMS-1010P
-
Page 1: Quick Install Guide
QUICK INSTALL GUIDE 10-Port/8 PoE+ Gigabit Managed Switch XMS-1010P Includes: XMS-1010P„10-Port/8„PoE+„Gigabit„Managed„Switch „ „ Rack-mount„hardware„and„rubber„feet „ „ Power„cable„ „ „... -
Page 2: Setup And Configuration
SETUP AND CONFIGURATION Physical Installation The„XMS-1010P„can„be„rack-mounted„or„used„as„a„desktop„switch.„Install„the„ XMS-1010P„in„a„stable/safe„place„to„avoid„any„possible„damage.„Make„sure„ there„is„adequate„space„around„the„XMS-1010P„for„ventilation„and„proper„ heat„dissipation;„Luxul„recommends„at„least„4-6„inches„around„all„sides.„Avoid„ placement„in„direct„sunlight.„Do„not„place„heavy„articles„on„the„XMS-1010P„ and„verify„the„ground„connection„of„the„outlet„is„functioning„properly. Desktop/Shelf Installation For„desktop/shelf„installation,„attach„the„four„rubber„feet„to„the„corner„inden- tations„on„the„bottom„of„the„XMS-1010P,„then„place„the„switch„horizontally„ on„a„solid,„level„platform. Rack Installation Use„the„included„L„brackets„for„convenient„installation„in„a„19-inch„server„or„ audio„rack.„As„shown„below,„use„four„screws„to„attach„the„L-shaped„brackets„ on„either„sides„of„the„XMS-1010P,„and„horizontally„insert„the„switch„into„the„ rack.„Use„your„desired„hardware„to„affix„the„switch„supports„to„the„rack.„ Attach feet for desktop installation Install brackets for rack-mounting... -
Page 3: Network Cabling
This is normal as the XMS-1010P initialization and startup completes. NOTE: The XMS-1010P has an internal 130W power supply. For optimal switch performance, do not exceed 115W combined consumption of all external PoE devices. -
Page 4: Getting Connected
Preparing for Access IP Addressing If„the„XMS-1010P„is„connected„to„a„network„with„a„192.168.0.X„address„ scheme,„and„your„computer„shares„a„similar„address„on„the„same„network,„ you„can„skip„to„the„next„step,„Access and Setup . Note: If another device on your network shares the 192.168.0.3 address, you’ll need to temporarily reassign or remove that device while you configure the XMS-1010P. If„your„network„uses„an„address„scheme„other„than„192.168.0.X,„you’ll„ need„to„set„a„temporary„static„IP„address„on„the„computer„you’re„using„for„ configuration.„To„do„so,„set„the„IP„address„of„your„computer„to„an„address„ in„the„192.168.0.X„range,„then„set„the„Gateway/Router„address„to„192.168.0.3„ (the„default„IP„address„of„the„XMS-1010P). Once„you’re„finished„configuring„the„switch,„you„can„return„your„comput- er’... -
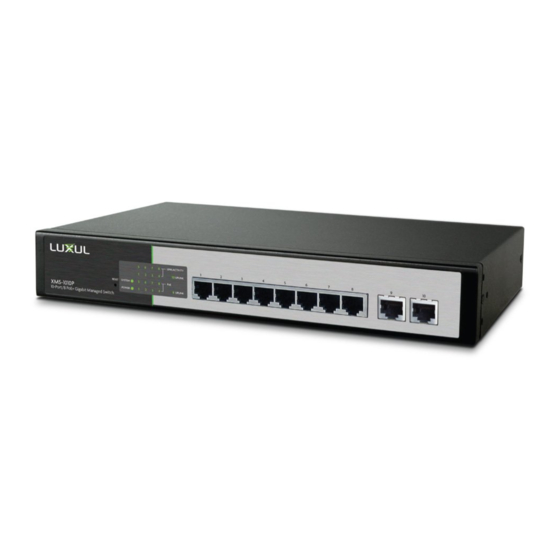
Page 5: Hardware Operation
Logging In To„access„the„XMS-1010P„web„configuration,„open„your„web„browser„and„enter„ the„switch’ s „default„192.168.0.3„IP„address„in„the„address„field.„Log„in„to„the„ switch„using„the„default„user„name„and„password: Default IP: 192.168.0.3 „ Username: admin Password: admin Select„the„menu„items„on„the„left„to„view„and/or„modify„the„configuration. Hardware Operation The„front„panel„of„the„XMS-1010P„switch„includes„eight„10/100/1000„Mbps„RJ- 45„PoE+„ports,„two„Gigabit„uplink„ports,„and„a„set„of„LED„indicators„on„the„left„ side.„Each„1000„Mbps„PoE+„port„has„one„Link/Activity„LED,„one„1000„Mbps„LED„ and„one„PoE„LED.„There„are„also„two„uplink„LEDs,„one„Power„LED,„one„System„ LED„and„a„reset„button. XMS-1010P Front Panel Status indicators Each„port„has„one„Link/Activity„LED,„one„1000Mbps„LED„and„one„PoE„LED.„In„ addition,„there„are„two„SFP„LEDs,„one„Power„LED,„one„System„LED,„and„a„Reset„ button„to„reboot„the„device„or„restore„factory„default„settings.„The„green„LED„ indicators„show„the„working„status„of„the„switch.„The„following„table„describes„ the„LED„functionality:„... - Page 6 Indicator State Description POWER The„XMS-1010P„is„switched„on.„„ XMS-1010P„is„switched„off„or„not„connected„to„AC„ power.„Check„power„connections„and„power„switch„ at„the„back„of„the„unit.„ Link/Act There„is„a„device„connected„to„the„port.„ Flashing Port„is„receiving„or„transmitting„data. No„device„is„connected„to„the„port.„ 1000„Mbps On A„1000„Mbps-capable„device„is„connected.„„ No„device„is„connected„and/or„the„device„is„not„ 1000„Mbps-capable.„ A„PoE-enabled„device„is„connected„and„the„switch„is„ supplying„power„to„the„device. No„PoE-enabled„device„is„connected„or„PoE„is„not„ enabled„on„this„port SYSTEM The„XMS-1010P„is„booting.„ Flashing The„XMS-1010P„is„running„normally.„ The„XMS-1010P„is„in„startup„and„initialization„process„ or„is„not„on.„ At„startup,„port„LEDs„will„flash„for„1„second„as„a„self„test.
-
Page 7: Reset Button
To Reset the Switch:„With„the„XMS-1010P„powered„on,„press„the„„ „ Reset„button. CAUTION: Do not hold the button for more than a second. Doing so could erase all settings and restore factory defaults. To Restore the Default Settings:„With„the„XMS-1010P„powered„on,„ „ press„and„hold„the„Reset„button„until„the„status„of„the„System„LED„ shows„the„following:„On„–„flashing„–„off.„Once„you„see„the„flash„ sequence,„release„the„Reset„button„and„the„switch„automatically„ restores„factory„default„settings.„Once„the„System„LED„starts„flashing„ again,„the„XMS-1010P„is„set„to„factory„defaults. -
Page 8: Legal And Regulatory Information
LEGAL AND REGULATORY INFORMATION No„part„of„this„publication,„or„any„other„publication„may„be„modified„or„ adapted„in„any„way,„for„any„purposes„without„permission„in„writing„from„ Luxul.„The„material„in„this„manual„is„subject„to„change„without„notice.„Luxul„ reserves„the„right„to„make„changes„to„any„product„to„improve„reliability,„ function,„or„design.„No„license„is„granted,„either„expressly„or„by„implication„ or„otherwise„under„any„Luxul„intellectual„property„rights.„An„implied„license„ only„exists„for„equipment,„circuits„and„subsystems„contained„in„this„or„any„ Luxul„product.„ FCC Compliance This„device„complies„with„Part„15„of„the„FCC„Rules.„Operation„is„subject„ to„the„following„two„conditions:„(1)„this„device„may„not„cause„harmful„ interference,„and„(2)„this„device„must„accept„any„interference„received,„ including„interference„that„may„cause„undesired„operation. Hereby,„Luxul,„14203„Minuteman„Drive,„Suite„201,„Draper,„Utah,„ 84020,„declares„that„this„Luxul„XMS-1010P„is„in„compliance„with„the„ essential„requirements„and„other„relevant„provisions„of„Directive„ 1995/5/EC. For„a„copy„of„this„report„send„a„self„addressed„stamped„envelope„„ to:„Luxul„CE,„14203„Minuteman„Drive,„Suite„201,„Draper,„Utah,„84020. Industry„Canada„(RSS-Gen„Issue„4) CAN„ICES-3(B)/NMB-3(B)„ Sales Technical Support P:„801-822-5450„ P:„801-822-5450„Option„3„ E:„sales@luxul.com E:„support@luxul.com © 2016 Luxul. All Rights Reserved. LUX-QIG-XMS-1010P 0161609...
Need help?
Do you have a question about the XMS-1010P and is the answer not in the manual?
Questions and answers