Kyocera FS-6020 Service Manual
Hide thumbs
Also See for FS-6020:
- Operation manual (110 pages) ,
- Installation manual (28 pages) ,
- Brochure & specs (2 pages)
Table of Contents
Advertisement
Advertisement
Table of Contents

Subscribe to Our Youtube Channel
Related Manuals for Kyocera FS-6020


Summary of Contents for Kyocera FS-6020
-
Page 1: Service Manual
SERVICE MANUAL Published in December 2007 Rev. 3... - Page 2 Revision history Revison Date Replaced pages Remarks 8-Oct-2002 17-Feb-2003 1-1-3 10-Mar-2003 1-7-1, 1-7-2, 1-7-4 4 November 2004 1-4-7, 1-4-8, 1-4-9, 1-4-10 3 December 2007 1-5-19 to 1-5-26...
-
Page 3: Safety Precautions
Safety precautions This booklet provides safety warnings and precautions for our service personnel to ensure the safety of their customers, their machines as well as themselves during maintenance activities. Service personnel are advised to read this booklet carefully to familiarize themselves with the warnings and precautions described here before engaging in maintenance activities. - Page 4 Safety warnings and precautions Various symbols are used to protect our service personnel and customers from physical danger and to prevent damage to their property. These symbols are described below: DANGER: High risk of serious bodily injury or death may result from insufficient attention to or incorrect compliance with warning messages using this symbol.
-
Page 5: Installation Precautions
1. Installation Precautions WARNING • Do not use a power supply with a voltage other than that specified. Avoid multiple connections to one outlet: they may cause fire or electric shock. When using an extension cable, always check that it is adequate for the rated current..................... •... -
Page 6: Precautions For Maintenance
2. Precautions for Maintenance WARNING • Always remove the power plug from the wall outlet before starting machine disassembly....• Always follow the procedures for maintenance described in the service manual and other related brochures............................• Under no circumstances attempt to bypass or disable safety features including safety mechanisms and protective circuits. - Page 7 • Do not pull on the AC power cord or connector wires on high-voltage components when removing them; always hold the plug itself....................... • Do not route the power cable where it may be stood on or trapped. If necessary, protect it with a cable cover or other appropriate item.
-
Page 8: Table Of Contents
FS-6020 CONTENTS 1-1 Specifications 1-1-1 Specifications ............................1-1-1 1-1-2 Parts names ............................1-1-4 (1) Printer ............................. 1-1-4 (2) Operation panel ..........................1-1-5 1-1-3 Machine cross section .......................... 1-1-6 1-1-4 Drive system ............................1-1-7 (1) Drive system ........................... 1-1-7 1-2 Handling Precautions 1-2-1 Process unit ............................ -
Page 9: Assembly And Disassembly
FS-6020 1-5-3 Electrical problems ..........................1-5-17 (1) Even if the top cover is closed, the message “Close top cover” remains......1-5-17 (2) Even if the rear cover is closed, the message “Close rear cover” remains......1-5-17 (3) The message “Paper Jam” remains................... 1-5-17 (4) The message “Face-down tray paper full”... - Page 10 FS-6020 1-6-8 PWBs ..............................1-6-25 (1) Detaching and refitting the main PWB ..................1-6-25 (2) Detaching and refitting the engine/high voltage PWB ..............1-6-26 (3) Detaching and refitting the power source PWB ................1-6-29 1-7 Firmware 1-7-1 Downloading firmware .......................... 1-7-1 (1) Format for the firmware files ......................
- Page 11 FS-6020 Timing chart No. 16 MP tray feeding, two letter size papers ..............2-4-16 Timing chart No. 17 MP tray feeding, two legal size papers ..............2-4-17 Timing chart No. 18 MP tray feeding, two ledger size papers ..............2-4-18 Timing chart No.
- Page 12 This page is intentionally left blank.
-
Page 13: Specifications
FS-6020 1-1-1 Specifications Type ..........Desktop Printing system ......Electrophotographic printing Paper ..........Cassette: Plain paper (60 to 90 g/m Recycled paper (60 to 90 g/m Thick paper (90 to 105 g/m2) MP tray: Plain paper (60 to 90 g/m... - Page 14 Fonts: (1) Western fonts Bitmap fonts: 1 Line Printer bitmap fonts Outline fonts: 80 outline fonts 79 bitmap emulate downloadable font: Kyocera Mita format/HP format c) Graphic: (1) Raster graphic: 75, 100, 150, *200, 300, 600* dpi (*200 dpi is supported when the resolution is 600 dpi.) (2) Vector graphic: Line, Box, Circle, Arc, Fill pattern etc.
- Page 15 FS-6020 Power source ......... 120 V AC, 60 Hz (U.S.A./Canada) 220-240 V AC, 50/60 Hz (European countries) Power consumption ......Maximum: 961 W Normal operating: 382 W Ready: 21 W EcoPower: 8 W Current ........... 10.8 A: 21 W (U.S.A./Canada) 7.2 A: 21 W (European countries)
-
Page 16: Parts Names
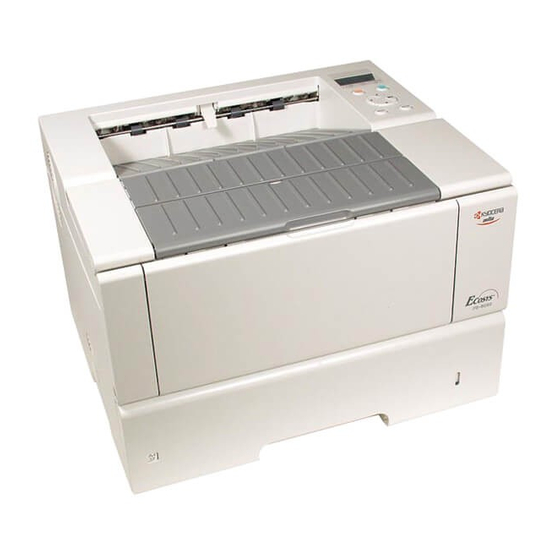
FS-6020 1-1-2 Parts names (1) Printer Figure 1-1-1 1 Operation panel 9 AC inlet 2 Front cover 0 Rear cover 3 Top cover ! Optional interface slot 4 Face-down tray @ Memory card slot 5 MP tray # Parallel interface... - Page 17 FS-6020 (2) Operation panel Figure 1-1-2 1 Message display 9 CANCEL key 2 Interface indicator 0 MENU key 3 Paper size indicator ! M key 4 Paper type indicator @ N key 5 READY indicator # O key 6 DATA indicator...
-
Page 18: Machine Cross Section
FS-6020 1-1-3 Machine cross section Laser output path Paper path Paper path (optional paper feeder and duplexer) Figure 1-1-3 Machine cross section 1 Paper cassette 2 Paper feed section 3 Conveying section 4 MP tray 5 MP tray feed section... -
Page 19: Drive System
FS-6020 1-1-4 Drive system (1) Drive system A Driving is linked with the process unit (drum). ° fl · fi ‚ Œ & ¤ ⁄ ‹ › Figure 1-1-4 1 Drive assembly @ Free gear Z34S ¤ Middle feed clutch (gear) - Page 20 FS-6020 This page is intentionally left blank. 1-1-8...
-
Page 21: Process Unit
FS-6020 1-2-1 Process unit Note the following when handling or storing the process unit. • When removing the process unit, never expose the drum surface to strong direct light. • Avoid abrupt changes in temperature and humidity. • Avoid exposure to any substance which is harmful to or may affect the quality of the drum. - Page 22 FS-6020 This page is intentionally left blank. 1-2-2...
-
Page 23: Unpacking And Installation
FS-6020 1-3-1 Unpacking and installation (1) Installation procedure Start Unpacking. Installing the toner container. Connecting the printer cable. Connecting the power cord. Loading paper. Printing a status page for test. Completion of the machine installation. 1-3-1... - Page 24 FS-6020 Unpacking. Unpack as shown in the figure below. Figure 1-3-1 Unpacking Separation charger cleaning brush Power cord Operation Guide Kyocera Mita digital library CD-ROM Printer FS-6020 Toner container TK-400 Figure 1-3-2 Shipped components 1-3-2...
- Page 25 FS-6020 Installing the toner container. 1. Open the top cover. 2. Turn the lock lever to the UNLOCK position. (LOCK position at shipping) Lock lever Figure 1-3-3 3. Shake the toner container more than ten times to loosen the toner.
- Page 26 FS-6020 4. Remove the protective seal from the toner container. Toner container Protective seal Figure 1-3-5 5. Install the toner container into the printer. 6. Push the upper part of the toner container on Toner container which “PUSH HERE” is printed until the container clicks.
- Page 27 FS-6020 Connecting the printer cable. For connection to a computer, parallel interface or USB interface can be used in the standard USB interface USB interface configuration. If an optional network interface card connector cable or serial interface card is installed, network connection or serial interface connection is available.
- Page 28 FS-6020 Loading paper. 1. Remove the cassette from the printer. 2. Adjust the paper guides and the paper stopper according to the paper size to be used. Paper guides 3. Set the stack of paper that does not exceed the...
- Page 29 FS-6020 Printing a status page for test. 1. Turn on the printer power switch. Initialization of the machine will start. The message will change from “Self test” to “Please Wait Adding toner” and then change to “Ready” when initialization is complete (after approximately 15 minutes).
-
Page 30: Installing Expansion Memory (Optional)
FS-6020 1-3-2 Installing expansion memory (optional) Procedure 1. Turn off the printer power switch. Cautions Do not insert or remove expansion memory while the printer power is on. Doing so may cause damage to the printer or the expansion memory. -
Page 31: Installing Network Interface Card (Optional)
FS-6020 1-3-3 Installing network interface card (optional) Procedure 1. Remove the two screws and then remove the IB-22 Optional interface slot optional interface slot cover. 2. Insert the network interface card into the optional interface slot. 3. Use the two screws to secure the network interface card. -
Page 32: Installing Hard Disk Unit (Optional)
FS-6020 1-3-4 Installing hard disk unit (optional) Procedure 1. Remove one screw and then remove the optional interface slot cover. Screw Optional interface slot cover Figure 1-3-15 2. Insert the hard disk unit into the hard disk socket. 3. Reattach the optional interface slot cover to its original position. -
Page 33: Installing Memory Card (Optional)
FS-6020 1-3-5 Installing memory card (optional) Procedure 1. Turn off the printer power switch. Cautions Do not insert or remove a memory card while the printer power is on. Doing so may cause damage to the printer or the memory card. - Page 34 FS-6020 This page is intentionally left blank. 1-3-12...
-
Page 35: Service Mode
FS-6020 1-4-1 Service mode The printer is equipped with various service modes that can be accessed with MENU key operation on the operation panel. (1) Executing service mode Message display Ready --- A4 PLAIN 1 Press the MENU key. Print... - Page 36 FS-6020 Service items Description Printing a status page for service purpose >>Print Description Status Page Prints a status page for service purpose. The status page includes various printer settings and service data. Purpose To acquire printer setting environment and service data information.
- Page 37 FS-6020 Service items Description Details of service information Service information [0104/0086][C2][34.00EFLB][03/03] Total page 9690 /t/P00/S00/F00/N00/D20:lotte 7 8 9 0 /0020/0020/1061/0811/ /AAAAAAA/AAAAAAA/ /AAAAAAA/AAAAAAA/AAAAAAA/AAAAAAA/AAAAAAA/AAAAAAA/ /AAAAAAA/AAAAAAA/AAAAAAA/AAAAAAA/AAAAAAA/AAAAAAA/ /AAAAAAA/AAAAAAA/AAAAAAA/ & /AAAAAAA/ /0000/0000/0000/0000/0000/ /RS2/FF/[0003-0003]/AI.E/81/06 ) ⁄ ¤ ‹ › fi /8088808880808000/8088808880808000/8088808880808000/8088808880808000 fl /00800080/00008000/00000080/80000000/00000000/00000000/00000000/ ‡ /03030303/03030303/03030303/03000000/00000000/03030303/03030303/ °...
- Page 38 Bit 4 = 0: Kyocera; 1: OEM Bit 5 = 0: For Europe; 1: For US Bit 6 = 0: Non MICR mode; 1: MICR mode Bit 7 = 0: Kyocera; 1: Kyocera Mita Second byte: Displayed in OEM mode only. 5 Total page...
- Page 39 FS-6020 Service items Description Item Description & Duplexer life counter /Duplexer (total)/Duplexer (small)/Duplexer (large)/ * “Total” is calculated by adding the number for “small” to 2 × number for “large” (double count). * “Small” means sizes of which the length in the sub-scan direction is less than 335 mm (length of legal size), and “large”...
- Page 40 FS-6020 Service items Description Printing a test pattern for detecting eraser lamp disconnection >>Eraser Description Prints a page that includes a test pattern (black bar with approximately 1 cm width) using high voltage output control of engine/high voltage PWB. If the eraser operates normally, the black bar is printed.
- Page 41 FS-6020 Service items Description Printing an event log (EVENT LOG) >>Print Description Event Log Prints the history of paper misfeeds and self-diagnostic errors including up to 16 items from the latest occurrence of such an error. (If the number of errors exceeds 16, errors will be deleted sequentially from the oldest one.)
- Page 42 FS-6020 Service items Description Table 1-4-2 Code table 1 Code digit and Details of code description Identification 02: (Fixed) code Error type 11: Paper misfeed (hexa- decimal) Paper 31: Cassette 1 Printer misfeed 32: Cassette 2 location 33: Cassette 3...
- Page 43 FS-6020 Service items Description Code digit and Details of code description Main cause 10: Paper does not arrive at the registration sensor. of paper 11: Paper does not pass the registration sensor. misfeed 12: Paper remains at the registration sensor when power is turned on.
- Page 44 FS-6020 Service items Description Table 1-4-3 Code table 2 Code digit and Details of code description 1 Identification code 02: (Fixed) (hexadecimal) 2 Error type (hexadecimal) 01: Self-diagnostic error 00: Unused 4 Self-diagnostic error code 4 digits self-diagnostic error code...
-
Page 45: Paper Misfeed Detection
FS-6020 1-5-1 Paper misfeed detection (1) Paper misfeed indication When a paper misfeed occurs, the printer immediately stops printing and displays the paper misfeed message on the operation panel. To remove paper misfed in the printer, open the front cover or the rear cover or pull out the paper cassette. -
Page 46: Self-Diagnosis
FS-6020 1-5-2 Self-diagnosis (1) Self-diagnostic function This printer is equipped with a self-diagnostic function. When a problem is detected, the printer stops printing and an error message is displayed on the operation panel. An error message consists of a message prompting contact to service personnel, total print count, and a four-digit error code (2 digits for F0 only) indicating the type of the error. -
Page 47: Error Code 2000 [E1] (Main Motor Error)
FS-6020 (1-1) Error code 2000 [E1] (main motor error) Detection conditions • The main motor ready signal (MOTRDYN) does not become ready (low level) a specified time after the main motor drive signal (MOTONN) is turned on. • The main motor ready signal (MOTRDYN) does not become ready (low level) a specified time after the main motor drive signal (MOTONN) is turned off. -
Page 48: Error Code 4000 [E2] (Polygon Motor Error)
FS-6020 (1-2) Error code 4000 [E2] (polygon motor error) Detection conditions • The polygon motor ready signal (MOTRDYN) does not become ready (L level) within a specified time after the polygon motor drive signal (POLONN) is turned on (L level). -
Page 49: Error Code 4200 [E3] (Laser Output Error)
FS-6020 (1-3) Error code 4200 [E3] (laser output error) Detection conditions • The pin photo signal (PDN) is not output within a specified time after the polygon motor ready signal (MOTRDYN) becomes ready (L level). Corrective measures * Possible defective locations... -
Page 50: Error Code 6000 [E4] (Fixing Heater Lamp/Fixing Thermistor Error)
FS-6020 (1-4) Error code 6000 [E4] (fixing heater lamp/fixing thermistor error) Detection conditions • The fixing thermistor disconnection detection circuit in the engine/high voltage PWB outputs the disconnection detection signal (THDEAD) to the CPU more than a specified time after power is turned on. -
Page 51: Error Code 6020 [A2] (Abnormally High Fixing Temperature Error)
FS-6020 (1-5) Error code 6020 [A2] (abnormally high fixing temperature error) Detection conditions • The fixing heater lamp runaway protection circuit in the engine/high voltage PWB outputs continuously the abnormally high temperature detection signal (HTEMPN) to the CPU for a longer time than specified. -
Page 52: Error Code 6400 [A0] (Fixing Heater Lamp Control Zero-Cross Signal Detection Error)
FS-6020 (1-6) Error code 6400 [A0] (fixing heater lamp control zero-cross signal detection error) Detection conditions • The zero-cross signal (ZCROSS) that is output from the power source PWB and input to the CPU on the engine/high voltage PWB is not input for a specified time. -
Page 53: Error Code F010 [F1] (Code Rom Checksum Error)
FS-6020 (1-8) Error code F010 [F1] (code ROM checksum error) Detection conditions • Checksum of the code ROM PWB attached to the socket (YS1) on the main PWB malfunctions. Corrective measures * Possible defective locations Start (causes) • Code ROM PWB •... -
Page 54: Error Code F020 [F2] (Main Pwb Ram Checksum Error)
FS-6020 (1-9) Error code F020 [F2] (main PWB RAM checksum error) Detection conditions Checksum in the standard RAM mounted on the main PWB or in optional expansion memory is not correct. Corrective measures * Possible defective locations Start (causes) • Main PWB •... -
Page 55: Error Code F030 [F3] (Main Pwb Controller Error)
FS-6020 (1-10) Error code F030 [F3] (main PWB controller error) Detection conditions • The controller (CPU) on the main PWB malfunctions. Corrective measures * Possible defective locations (causes) • Main PWB • Replace the main PWB. (See page 1-6-25.) (1-11) Error code F040 [E0] (communication error between engine/high voltage PWB and main PWB... -
Page 56: Error Code F050 [E6] (Engine/High-Voltage Flash Memory Checksum Error)
FS-6020 (1-12) Error code F050 [E6] (engine/high-voltage flash memory checksum error) Detection conditions • Checksum of the program built in the CPU on the engine/high voltage PWB is not correct. Corrective measures * Possible defective locations (causes) • Engine/high voltage PWB •... -
Page 57: Error Code 0420 [C0]
FS-6020 (1-14) Error code 0420 [C0] (serial communication error between paper feeder and engine/high voltage PWB) Detection conditions • Communication ready signal time-out occurs continuously more than specified times in serial communication with an optional paper feeder that is recognized by the CPU on the engine/high voltage PWB. - Page 58 FS-6020 Continued from the previous page Is the paper feeder installed properly to the printer? Reinstall the paper feeder. (Refer to the installation guide.) Is the duplexer installed? Reinstall the duplexer. (Refer to the installation guide.) Is there any damage to...
-
Page 59: Error Code 1210 [C2] (Duplexer Slide Guide Home Position Detection Error)
FS-6020 (1-15) Error code 1210 [C2] (duplexer slide guide home position detection error) Detection conditions • The duplexer drive PWB of the optional duplexer cannot detect the home position of the slide guide. Corrective measures Start Carry out the following check referring to the service manual of the duplexer. -
Page 60: Error Code 2610 [B2] (Paper Feeder 1 Feed Motor Error)
FS-6020 (1-16) Error code 2610 [B2] (paper feeder 1 feed motor error) Detection conditions • When the paper feeder drive PWB of the optional paper feeder 1 drives the feed motor, no proper clock pulse is input from the feed motor clock sensor. -
Page 61: Electrical Problems
FS-6020 1-5-3 Electrical problems Problem Causes Check procedures/corrective measures Defective top cover If 24 V DC is not output to pin No. 6 of the YC4 connector on the Even if the top cover interlock switch. engine/high voltage PWB when the top cover is closed, replace is closed, the the engine/high voltage PWB. -
Page 62: The Message "Self Test" Remains When The Printer Is Started
FS-6020 Problem Causes Check procedures/corrective measures Defective face-down tray If the level at pin No. 2 of the YC13 connector on the engine/ The message paper full sensor. high voltage PWB remains low when the actuator of the face- down tray paper full sensor is not operating, replace the face- “Face-down tray... -
Page 63: Image Formation Problems
FS-6020 1-5-4 Image formation problems (1) No image appears. (2) No image appears. (3) Image is light as a (4) Background is gray. (entirely white) (entirely black) whole. See page 1-5-20. See page 1-5-20. See page 1-5-21. See page 1-5-21. - Page 64 FS-6020 (1) No image appears. Causes (entirely white) 1. No transfer bias output. 2. No laser output. 3. No developing bias output. Causes Check procedures/corrective measures 1. No transfer bias output. Check the contact of the transfer bias output terminals. If any A.
- Page 65 FS-6020 Causes (3) Image is light as a whole. 1. Insufficient toner. 2. Deterioration of toner. 3. Defective transfer bias output. 4. Dirty main charger wire. 5. EcoPrint mode activated. Causes Check procedures/corrective measures 1. Insufficient toner. If a message indicating need to add toner is displayed on the operation panel, replace the toner container.
-
Page 66: One Side Of The Print Image Is Darker Than The Other
FS-6020 (6) A black line appears Causes longitudinally. 1. Defective main charger cleaner setting position. 2. Dirty or flawed drum. 3. Deformed or worn cleaning blade. 4. Dirty main charger wire. Causes Check procedures/corrective measures 1. Defective main charger cleaner setting Return the main charger cleaner to its home position. -
Page 67: Black Dots Appear On The Image
FS-6020 (9) Black dots appear Causes on the image. 1. Dirty or flawed drum. 2. Deformed or worn cleaning blade. 3. Dirty fixing unit separator. Causes Check procedures/corrective measures 1. Dirty or flawed drum. Perform drum surface refreshing. (See page 1-4-6.) If the drum is flawed, replace the process unit. -
Page 68: Paper Creases
FS-6020 (12)Paper creases. Causes 1. Paper curled. 2. Paper damp. 3. Defective fixing pressure spring. 4. Defective paper separation in the fixing unit. Causes Check procedures/corrective measures 1. Paper curled. Check the paper storage conditions. 2. Paper damp. Check the paper storage conditions. -
Page 69: Fixing Is Poor
FS-6020 (15)Fixing is poor. Causes 1. Wrong type of paper. 2. Defective fixing pressure spring. 3. Flawed press roller. 4. Defective fixing heater lamp. Causes Check procedures/corrective measures 1. Wrong type of paper. Check to see if the paper meets the specifications. - Page 70 FS-6020 This page is intentionally left blank. 1-5-26...
-
Page 71: Precautions For Assembly And Disassembly
FS-6020 1-6-1 Precautions for assembly and disassembly (1) Precautions • Be sure to turn the power switch off and disconnect the power plug before starting disassembly. • When handling PWBs (printed wiring boards), do not touch connectors with bare hands. It will damage the PWB. -
Page 72: Covers
FS-6020 1-6-2 Covers (1) Detaching and refitting the top cover Procedure 1. Open the front and top covers and remove Top cover Screw the two screws. 2. Push the top cover to rear, and remove the two inner hooks. Screw 3. -
Page 73: Detaching And Refitting The Left Cover
FS-6020 (2) Detaching and refitting the left cover Procedure 1. Remove the top cover (see page 1-6-2). 2. Remove the rear cover (see page 1-6-5). 3. Draw the paper cassette. 4. Remove the four inner hooks and remove the left cover. -
Page 74: Detaching And Refitting The Right Cover
FS-6020 (3) Detaching and refitting the right cover Procedure 1. Remove the top cover (see page 1-6-2). 2. Remove the rear cover (see page 1-6-5). 3. Draw the paper cassette. 4. Remove one screw and then remove the optional interface slot cover. -
Page 75: Detaching And Refitting The Rear Cover
FS-6020 (4) Detaching and refitting the rear cover Procedure 1. Open the rear cover and remove the axes from holes of the frame. Axis Rear cover Axis Figure 1-6-4 1-6-5... -
Page 76: Detaching And Refitting The
FS-6020 (5) Detaching and refitting the front cover Procedure 1. Open the front cover. 2. Push the claws and then pull up the right and left hinge pins. 3. Remove the front cover. Left hinge pin Front cover Claw Right hinge pin... -
Page 77: Paper Feed Section
FS-6020 1-6-3 Paper feed section (1) Detaching and refitting the feed and pickup rollers Perform the following procedure when the feed roller or pickup roller is to be checked or replaced. Procedure 1. Draw the paper cassette. 2. Push the stopper and then slide the shaft to the stopper side. -
Page 78: Detaching And Refitting The Paper Feed Unit
FS-6020 (2) Detaching and refitting the paper feed unit Perform the following procedure when the paper feed unit is to be checked or replaced. Procedure 1. Remove the top cover (see page 1-6-2). 2. Remove the left cover (see page 1-6-3). - Page 79 FS-6020 7. Turn the bottom of the printer upward. 8. Remove the two screws and the remove the paper feed unit. 9. Refit all the removed parts. Screws Feed unit Figure 1-6-9 1-6-9...
-
Page 80: Detaching And Refitting The Mp Tray Feed Roller
FS-6020 (3) Detaching and refitting the MP tray feed roller Perform the following procedure when the MP tray feed roller is to be checked or replaced. Procedure 1. Remove the process unit. 2. Remove one stop ring. 3. Remove the MP tray feed roller from the shaft. -
Page 81: Detaching And Refitting The Mp Tray Feed Unit
FS-6020 (4) Detaching and refitting the MP tray feed unit Perform the following procedure when the MP tray feed unit is to be checked or replaced. Procedure 1. Remove the top cover (see page 1-6-2). Stop ring 2. Remove the left cover (see page 1-6-3). - Page 82 FS-6020 9. Remove the two connectors from the engine/ high voltage PWB. Connectors Engine/high voltage PWB Figure 1-6-13 10. Remove the two screws and then the MP tray feed unit. 11. Replace or check the MP tray feed unit. 12. Refit all the removed parts.
-
Page 83: Detaching And Refitting The Retard Roller
FS-6020 (5) Detaching and refitting the retard roller Perform the following procedure when the retard roller is to be checked or replaced. Procedure 1. Draw the paper cassette. 2. Remove the retard roller holder from the paper feed cassette. 3. Remove the retard roller from the holder. -
Page 84: Detaching And Refitting The Drive Assembly
FS-6020 (6) Detaching and refitting the drive assembly Perform the following procedure when the drive assembly is to be checked or replaced. Procedure 1. Remove the three hooks of ground springs. 2. Remove the feed clutch and middle feed clutch. -
Page 85: Laser Scanner Unit Section
FS-6020 1-6-4 Laser scanner unit section (1) Detaching and refitting the laser scanner unit Perform the following procedure when the laser scanner unit is to be checked or replaced. Procedure 1. Remove the top cover (see page 1-6-2). 2. Remove the right cover (see page 1-6-4). -
Page 86: Process Unit Section
FS-6020 1-6-5 Process unit section (1) Detaching and refitting the main charger unit Perform the following procedure when the main charger unit is to be checked or replaced. Procedure 1. Remove the process unit. 2. Push the claw and remove the cap. -
Page 87: Transfer/Separation Section
FS-6020 1-6-6 Transfer/separation section (1) Detaching and refitting the transfer roller and separation charger unit Perform the following procedure when the transfer roller or separation charger unit is to be checked or replaced. Procedure 1. Remove the process unit. 2. Open the upper paper chute. -
Page 88: Fixing Section
FS-6020 1-6-7 Fixing section (1) Detaching and refitting the fixing unit Perform the following procedure when the fixing unit is to be checked or replaced. Procedure 1. Remove the top cover (see page 1-6-2). 2. Remove the left cover (see page 1-6-3). -
Page 89: Detaching And Refitting The Fixing Heater Lamp
FS-6020 (2) Detaching and refitting the fixing heater lamp Perform the following procedure when the fixing heater lamp is to be checked or replaced. Procedure 1. Remove the fixing unit (see page 1-6-18). 2. Remove the two screws and then divide into... - Page 90 FS-6020 3. Remove one screw and then the terminal. Screw Terminal Figure 1-6-23 4. Remove one screw and then pull the fixing Screw heater lamp. 5. Check or replace the fixing heater lamp. 6. Refit all the removed parts. Fixing heater lamp...
-
Page 91: Detaching And Refitting The Heat Roller
FS-6020 (3) Detaching and refitting the heat roller Perform the following procedure when the heat roller is to be checked or replaced. Procedure 1. Remove the fixing unit (see page 1-6-18). 2. Remove the fixing heater lamp. 3. Pull the left and right heat roller bushes up and then remove the heat roller. -
Page 92: Detaching And Refitting The Press Roller
FS-6020 (4) Detaching and refitting the press roller Perform the following procedure when the press roller is to be checked or replaced. Procedure 1. Divide the fixing unit into the upper fixing frame and the lower fixing frame (see page 1- 6-19). -
Page 93: Detaching And Refitting The Fixing Thermistor And Separator
FS-6020 (5) Detaching and refitting the fixing thermistor and separator Perform the following procedure when the fixing thermistor and separator are to be checked or replaced. Procedure 1. Divide the fixing unit into the upper fixing frame and the lower fixing frame (see page 1- 6-19). -
Page 94: Detaching And Refitting The Fixing Thermostat
FS-6020 (6) Detaching and refitting the fixing thermostat Perform the following procedure when the fixing thermostat is to be checked or replaced. Procedure 1. Remove the heat roller (see page 1-6-24). 2. Remove the two screws and then the terminal plate and round terminal. -
Page 95: Pwbs
FS-6020 1-6-8 PWBs (1) Detaching and refitting the main PWB Perform the following procedure when the main PWB is to be checked or replaced. Procedure 1. Remove the top cover (see page 1-6-2). 2. Remove the left cover (see page 1-6-3). -
Page 96: Detaching And Refitting The Engine/High Voltage Pwb
FS-6020 (2) Detaching and refitting the engine/high voltage PWB Perform the following procedure when the engine/high voltage PWB is to be checked or replaced. Procedure 1. Remove the top cover (see page 1-6-2). 2. Remove the left cover (see page 1-6-3). - Page 97 FS-6020 7. Remove the feed unit (see page 1-6-8). Bottom frame 8. Remove the middle roller guide. 9. Remove the seven screws and then the bottom frame plate. Screws Screws Middle roller guide Figure 1-6-34 10. Remove the two connectors from the engine/ high voltage PWB.
- Page 98 FS-6020 12. Remove EEPROM (U3) from the socket of the engine/high voltage PWB. 13. Replace EEPROM (U3) to the socket of the new engine/high voltage PWB. 14. Attach the new engine/high voltage PWB and refit all the removed parts. Engine/high voltage PWB...
-
Page 99: Detaching And Refitting The Power Source Pwb
FS-6020 (3) Detaching and refitting the power source PWB Perform the following procedure when the power source PWB is to be checked or replaced. Procedure 1. Remove the top cover (see page 1-6-2). 2. Remove the left cover (see page 1-6-3). - Page 100 FS-6020 This page is intentionally left blank. 1-6-30...
-
Page 101: Firmware
System firmware file name example s96k9100PS3.bcmp Compression Boot program attached PS3 version Version code: Version 91.00 Kyocera Mita ID code Product code: 96= FS-6020 System firmware Operation panel message data file name example dm9602.spa Language code jpn: Japanese dan: Dutch... -
Page 102: Downloading Firmware Via The Parallel Interface
FS-6020 (2) Downloading firmware via the parallel interface To download the system firmware using the parallel interface, use the procedure below. Connecting the parallel printer cable 1. Turn printer and PC power off. 2. Connect the parallel printer cable between the PC and the printer. -
Page 103: Downloading Firmware Using The Memory Card
FS-6020 (3) Downloading firmware using the memory card The procedure below provides how to download firmware from a memory card. Formatting the memory card 1. Turn printer power on. 2. Insert the memory card into the printer's Memory card memory card slot. - Page 104 FS-6020 Copying firmware files to the memory card 1. Insert the memory card to the PC’s slot or to the adaptor. To PC 2. Copy the firmware file to download to the root Memory card directory of the memory card.
-
Page 105: Downloading The Message Data
FS-6020 (4) Downloading the message data To download the new message data, progress the following procedures. Connecting the parallel printer cable 1. Turn OFF the power supply switch to the printer and computer. 2. Connect the parallel printer cable between the computer and printer. - Page 106 FS-6020 This page is intentionally left blank. 1-7-6...
-
Page 107: Paper Feed/Conveying Section
FS-6020 2-1-1 Paper feed/conveying section Paper feed/conveying section consists of the paper feed unit that feeds paper from the paper cassette and the MP tray paper feed unit that feeds paper from the MP tray, and the conveying section that conveys the fed paper to the transfer/ separation section. - Page 108 FS-6020 Engine/high Main PWB voltage PWB FDDRN YC18-4 PAPVOL1 YC10-2 PAPVOL2 YC10-3 CAS0-2 YC7-1,2,4 Feed clutch Paper gauge sensor PWB Paper gauge sensor 1 and 2 Cassette size switch Figure 2-1-2 Paper feed section block diagram 2-1-2...
-
Page 109: Mp Tray Feed Section
FS-6020 (2) MP tray feed section The MP tray can contain about 100 pages. Feeding is performed by the rotation of the MP tray feed roller from the MP tray. Function of the MP tray friction pad prevents papers from multiple feeding. -
Page 110: Conveying Section
FS-6020 (3) Conveying section The conveying section consists of the parts shown in the following illustration and conveys papers from the cassette or the MP tray to the transfer/separation section when papers are fed, or while refeeding when the optional duplexer is operated. -
Page 111: Process Unit Section
FS-6020 2-1-2 Process unit section For the process unit, many sections related to the printing process are gathered up as one unit such as the development section, main charger section, drum section, cleaning section and toner container TK-400. The electrical part in the... - Page 112 FS-6020 Toner container TK-400 Engine/high voltage PWB Toner sensor Developing roller TNEMP YC8-2 Developing bias output (B)OUT Developing bias output wave form (DC and AC) 1.5 kV±50 V AC 350 V±5 V DC (2.4 kHz, duty: 50%) Figure 2-1-8 Development section block diagram...
-
Page 113: Main Charger/Drum Section
FS-6020 (2) Main charger/drum section Main charger unit consists of the main charger shield, main charger wire, grid and wire cleaner, and electrostatically charges the drum surface uniformly to prepare for the formation of electrostatic latent images by the irradiation of laser light. - Page 114 FS-6020 Main charging output (M)OUT 327±10 µA 386±10 µA 401±10 µA 415±10 µA Control signal MHVDR MSEL1 (Logic) MSEL2 MHVDR High (M)OUT Main charging output MSEL1 voltage MSEL2 (U1) circuit Main charger shield Main charger grid Zener diode HVGND Drum...
-
Page 115: Laser Scanner Unit Section
FS-6020 2-1-3 Laser scanner unit section (1) Laser scanner unit Print data is processed as the image data by the main PWB and sent to the laser scanner unit (LSU). The laser scanner unit forms the electrostatic latent image on the drum surface by turning on/off the laser light according to the image data. - Page 116 FS-6020 Polygon mirror f-θ main lens Laser beam f-θ sub lens Drum Figure 2-1-14 f-θ lens 2-1-10...
- Page 117 Figure 2-1-15 Image resolution Smoothing (KIR) The printer applies the KIR (Kyocera Image Refinement) to the smoothing processing, which is the exclusive image processing technology developed by Kyocera Mita Corporation. This function corrects the jaggy part of image (jagged lines) on slant lines or curves, which is easy to notice, to the smooth line by embedding small dots.
-
Page 118: Transfer/Separation Section
FS-6020 2-1-4 Transfer/separation section Transfer/separation section consists of the transfer roller and separation charger brush. The transfer bias is loaded to the transfer roller by the high voltage output from the engine/high voltage PWB and the toner on the drum is attracted to the transfer roller side due to the electric potential difference and then transferred to the paper. -
Page 119: Cleaning Section
FS-6020 2-1-5 Cleaning section The cleaning section consists of the following parts and removes the residual toner on the drum after transferring the toner from the drum to the paper and collects it as a waste toner. The eraser light emission removes the residual electrical charge on the drum surface. - Page 120 FS-6020 Toner container TK-400 1 Toner feed 2 Toner agitation 3 Developing/Cleaning Toner reservoir 4 Vertical conveying of the waste toner 5 Conveying of the waste toner 6 Gathering of the waste toner Cleaner screw Waste toner reservoir Waste toner conveying belt...
-
Page 121: Fixing Section
FS-6020 2-1-6 Fixing section The fixing section consists of the following parts and fixes the toner that is transferred to the paper at the transfer/ separation section. The paper sent from the transfer/separation section is interleaved between the heat roller and the press roller. - Page 122 FS-6020 Engine/high voltage PWB Power source PWB HEATON YC4-8 CN3-8 ZCROSS YC4-7 CN3-7 120 V AC/220-240 V AC CN2-1 120 V AC/220-240 V AC CN2-3 THERM YC5-1 Fixing thermostat Fixing thermistor EXIT YC11-2 Fixing heater lamp Eject sensor Figure 2-1-24 Fixing unit block diagram...
-
Page 123: Face-Down Eject/Feedshift Section
FS-6020 2-1-7 Face-down eject/feedshift section The face-down eject/feedshift section consists of the vertical path assembly that conveys the paper which is fixed with toner at the fixing section to the face-down tray, and the feedshift guide that operates when duplex printing is performed (when the optional duplexer is equipped). - Page 124 FS-6020 Face-down tray Engine/high paper full sensor voltage PWB FDPFULN YC4-8 Feedshift Duplex unit guide drive PWB CN2-2 Feedshift solenoid Duplexer (option) Figure 2-1-26 Face-down eject/feedshift section block diagram 2-1-18...
-
Page 125: Electrical Parts Layout
FS-6020 2-2-1 Electrical parts layout (1) Main frame ‡ fl & fi ‹ › ⁄ ¤ Figure 2-2-1 Main frame 1. Main PWB [KP-935] ........Controls the software such as the print data processing and provides the interface with computers. - Page 126 FS-6020 23. Registration clutch ........Controls the second paper feed. 24. MP tray feed solenoid ........Controls the primary paper feed from the MP tray. 25. Optional interface connector 1 ..... Connects the signal lead and power source cord with the optional paper feeder.
- Page 127 FS-6020 (2) Process unit, laser scanner unit and fixing unit Fixing unit Laser scanner unit Process unit Figure 2-2-2 Process unit, laser scanner unit and fixing unit 1. APC PWB [KP-986] ........Controls the laser output. 2. PD PWB [KP-638] ........Detects the horizontal synchronous signal.
- Page 128 FS-6020 This page is intentionally left blank. 2-2-4...
-
Page 129: Power Source Pwb
FS-6020 2-3-1 Power source PWB Power source PWB Inrush current limit/rectification Power power smoothing circuit Rear cover switch 24 V DC rectification/ source interlock smoothing output circuit Noise switch TH1,TH2 +24V1 filter circuit D200 (L1, L2) C201 C202 C203 5 V DC rectification/... - Page 130 FS-6020 Figure 2-3-2 Power source PWB silk-screen diagram Connector Pin No. Signal Voltage Description LIVE 120/220-240 V AC AC power input NEUTRAL 120/220-240 V AC AC power input AC inlet LIVE 120/220-240 V AC Power supply for fixing heater lamp...
-
Page 131: Engine/High Voltage Pwb
FS-6020 2-3-2 Engine/high voltage PWB Engine/high voltage PWB Clutch <Engine circuit section> solenoid REGPAP Registration sensor HANDSN, FDPFULN, EXIT Switch CAS0-2, PAPVOL1-2 sensor SBSY, SDIR, EGIRN, PDMASKN, EGSO SCKN, EGSI Main PWB TNEMP Toner sensor MIDDRN, FEDDRN,REGDRN, MPFSOL FANDRN, PFANDRN... -
Page 132: Fixing Heater Lamp Control Circuit
FS-6020 (1) Fixing heater lamp control circuit Engine/high voltage PWB Power source PWB AC power Pulse Zero source cross signal ZCROSS detection circuit (U1) Fixing heater lamp ON circuit HEATON +5V1 Fixing heater lamp ON - HTEMPN Runaway prevention -... -
Page 133: Fixing Heater Lamp Lighting Runaway Prevention - Fixing Thermistor Disconnection Detection Circuit
FS-6020 (2) Fixing heater lamp lighting runaway prevention - fixing thermistor disconnection detection circuit AC power source Engine/high voltage PWB Fixing heater lamp ON circuit HEATON Power source +5V1 THERM Fixing Fixing heater lamp ON - thermistor Runaway prevention circuit... -
Page 134: Interlock Switch - Eco-Power Circuit
FS-6020 (3) Interlock switch - eco-power circuit Engine/high voltage PWB Power source PWB Fixing +24V2 heater lamp control circuit +24V +24V1 +24V3 +24V4 Top cover interlock Eco-power switch ON/OFF circuit +24V Rear cover interlock ECOPOWER switch (U1) 24 V DC... -
Page 135: Optional Equipment Identification Circuit
FS-6020 (4) Optional equipment identification circuit Engine/high voltage PWB (Printer) CPU (U1) output Optional equipment CPU(U1) to select SEL0 SEL1 SEL2 SEL3 SDI/SDO SEL0 SEL1 SEL2 SEL3 Paper feeder 1 Paper feeder 2 Buffer Digital Paper feeder 3 transistor (Logical... - Page 136 FS-6020 EEPROM Figure 2-3-8 Engine/high voltage PWB silk-screen diagram 2-3-8...
- Page 137 FS-6020 Connector Pin No. Signal Voltage Description 5 V DC 5 V DC power Ground Ground Connected WRSO 0/5 V DC(pulse) Data input signal to the ROM WRSI 0/5 V DC(pulse) Data output signal writer 0/5 V DC(pulse) Clock signal for read/write...
- Page 138 FS-6020 Connector Pin No. Signal Voltage Description +24V3 24 V DC 24 V DC power supply for main motor YC12 Ground Ground Connected MMOTONN 0/5 V DC Main motor: On/Off to the main MMOTRDYN 0/5 V DC Main motor ready signal...
-
Page 139: Main Pwb
FS-6020 2-3-3 Main PWB Digital transistor USBINIT YC17 USBDP FPRSTN FPCLK Operation USBDN USB interface FPDIR panel PWB VBUS FPDAT YC10 OUTPEN Digital transistor EBIU data bus APC PWB VDFONSPL,VDATAP,VDATAN CDD15-8 EDB31-24 EBIU address bus EBA22,EBA10-1 YC11 PD PWB EBOEN1,EBWEN1... - Page 140 FS-6020 Figure 2-3-10 Main PWB silk-screen diagram 2-3-12...
-
Page 141: Timing Chart No. 1 Paper Cassette Feeding, Two A4 Size Papers
FS-6020 Timing chart No. 1 Paper cassette feeding, two A4 size papers 2-4-1... -
Page 142: Timing Chart No. 2 Paper Cassette Feeding, Two A4R Size Papers
FS-6020 Timing chart No. 2 Paper cassette feeding, two A4R size papers 2-4-2... -
Page 143: Timing Chart No. 3 Paper Cassette Feeding, Two A3 Size Papers
FS-6020 Timing chart No. 3 Paper cassette feeding, two A3 size papers 2-4-3... -
Page 144: Timing Chart No. 4 Paper Cassette Feeding, Two B5 Size Papers
FS-6020 Timing chart No. 4 Paper cassette feeding, two B5 size papers 2-4-4... -
Page 145: Timing Chart No. 5 Paper Cassette Feeding, Two B4 Size Papers
FS-6020 Timing chart No. 5 Paper cassette feeding, two B4 size papers 2-4-5... -
Page 146: Timing Chart No. 6 Paper Cassette Feeding, Two Letter Size Papers
FS-6020 Timing chart No. 6 Paper cassette feeding, two letter size papers 2-4-6... -
Page 147: Timing Chart No. 7 Paper Cassette Feeding, Two Letter R Size Papers
FS-6020 Timing chart No. 7 Paper cassette feeding, two letter R size papers 2-4-7... -
Page 148: Timing Chart No. 8 Paper Cassette Feeding, Two Legal Size Papers
FS-6020 Timing chart No. 8 Paper cassette feeding, two legal size papers 2-4-8... -
Page 149: Timing Chart No. 9 Paper Cassette Feeding, Two Ledger Size Papers
FS-6020 Timing chart No. 9 Paper cassette feeding, two ledger size papers 2-4-9... -
Page 150: Timing Chart No. 10 Mp Tray Feeding, Two A4 Size Papers
FS-6020 Timing chart No. 10 MP tray feeding, two A4 size papers 2-4-10... -
Page 151: Timing Chart No. 11 Mp Tray Feeding, Two A4R Size Papers
FS-6020 Timing chart No. 11 MP tray feeding, two A4R size papers 2-4-11... -
Page 152: Timing Chart No. 12 Mp Tray Feeding, Two A3 Size Papers
FS-6020 Timing chart No. 12 MP tray feeding, two A3 size papers 2-4-12... -
Page 153: Timing Chart No. 13 Mp Tray Feeding, Two B5 Size Papers
FS-6020 Timing chart No. 13 MP tray feeding, two B5 size papers 2-4-13... -
Page 154: Timing Chart No. 14 Mp Tray Feeding, Two B4 Size Papers
FS-6020 Timing chart No. 14 MP tray feeding, two B4 size papers 2-4-14... -
Page 155: Timing Chart No. 15 Mp Tray Feeding, Two Letter R Size Papers
FS-6020 Timing chart No. 15 MP tray feeding, two letter R size papers 2-4-15... -
Page 156: Timing Chart No. 16 Mp Tray Feeding, Two Letter Size Papers
FS-6020 Timing chart No. 16 MP tray feeding, two letter size papers 2-4-16... -
Page 157: Timing Chart No. 17 Mp Tray Feeding, Two Legal Size Papers
FS-6020 Timing chart No. 17 MP tray feeding, two legal size papers 2-4-17... -
Page 158: Timing Chart No. 18 Mp Tray Feeding, Two Ledger Size Papers
FS-6020 Timing chart No. 18 MP tray feeding, two ledger size papers 2-4-18... -
Page 159: Timing Chart No. 19 Mp Tray Feeding, Two Custom Size Papers
FS-6020 Timing chart No. 19 MP tray feeding, two custom size papers 2-4-19... -
Page 160: Wiring Diagram
FS-6020 Wiring diagram 2-4-20... -
Page 161: Repetitive Defects Gauge
FS-6020 Repetitive defects gauge First occurrence of defect 37.7 mm [Upper registration roller] 50.2 mm [Lower registration roller/Transfer roller] 62.8 mm [Developing roller] 73.2 mm [Heat roller] 78.5 mm [Press roller] 94.4 mm [Drum] 2-4-21... - Page 162 This page is intentionally left blank.
Need help?
Do you have a question about the FS-6020 and is the answer not in the manual?
Questions and answers