Table of Contents
Advertisement
Advertisement
Table of Contents

Subscribe to Our Youtube Channel
Related Manuals for Medeli DP-268


Summary of Contents for Medeli DP-268
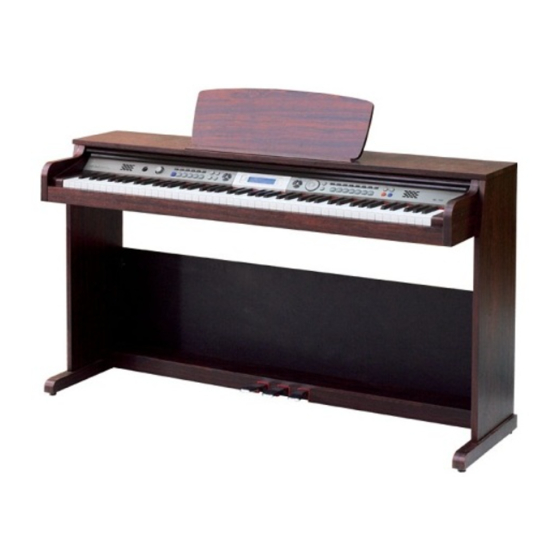
- Page 2 Congratulations Congratulation on your purchase of the professional digital piano. This piano is an easy-to-use digital piano. Inside the slim cabinet, it has so many professional and modernized preset styles and songs, easy but powerful functions, and features that enhance your performance.
- Page 3 Important Notes Please read the following carefully before use: Do not expose the piano to high temperature, direct sunlight and excessively dusty places. Do not place the piano too close to other electrical appliances such as television and radio. It may cause interference. Do not place the piano to excessive humid area.
-
Page 4: Other Functions
Main Features Keyboard: ● 88-keys touch response keyboard with 3 touch levels. Display: ● Multi-function LCD display. Operation: ● Friendly user-interface, using dial or add/sub button to select styles, songs and voices. Voices: ● 210 voices. 16 voices can be selected by direct select button. Styles: ●... -
Page 5: Table Of Contents
Contents Set-up Guide Mixer General Guide 9-10 Memory 26-27 - Memory Bank The Connectors 11-12 - Store/Load Parameter Using the AC power jack - Memory Data - Using headphones jack - Clear Memory Data - Using AUX.OUT jack One Touch Setting - Using the foot pedals Record - Using the MIDI IN/OUT jacks... -
Page 6: Set-Up Guide
Set-up Guide Before assembly, please make sure that all of the following items are present. 1.Piano Cabinet 7.Screw 6X30(X4) Φ 2.Right Side Panel 8. Screw (X5) Φ4 15 3.Left Side panel 9. Adhesive Clamp X2 4.Big Rear Panel 10.Power Supply Cable 5.Pedal Box 11.Screw 6 (X2) - Page 7 Set-up Guide Side Panel and Pedal Box assembly Place the pedal box on the two side panels and then use screws to fasten the side panels. 7.Screws 6X30(X4) Φ 4PCS NOTE: Please use the screws that be supplied, do not use the other screws. Rear Panel assembly Fix the rear panel to the side panels with 2 screws and to the bottom of the rear panel with 5 screws.
- Page 8 Set-up Guide Attach the Piano Cabinet Place the piano cabinet on the stand, fix it using four screws. 6.Screws (X4) Hook B 2X 2PCS ( ) HookB HookA 2X 2PCS ( ) HookA Fix the cables Attach 2 adhesive clamps on right and the left side panels to fix the cables. Insert the DIN plug of pedal cable into the proper socket of cabinet.
-
Page 9: General Guide
General Guide Plane Control Panel Music Stand Headphones Jack Piano Keyboard Rear Panel Pedal Jack MIDI Jack Power Supply Cable AUX. OUT Jack Front Panel Soft Pedal Sostenuto Pedal Sustain Pedal... -
Page 10: Power Switch And Master Volume
General Guide Control Panel ACC. VOL V OLUME 001 8 Beat 034 Rock 062 Swing 087 Tango 096 March 102 S.Waltz POW ER MIXER FUNCTI ON 008 Pop16Bt1 044 Disco 083 Rhumba 091 Samba 099 Polka 112 Dandut2 FIL L A F ILL B START/ STOP S YNC... -
Page 11: The Connectors
The Connectors Using the AC power jack VOLUME POWER 1、 Ensure the piano is turned Turn the volume switch 2、 off when connecting and anti-clockwise to reach disconnectiong the power. the minimum volume level. Turn off Set to minimum 3、 Plug the power cable into 4、... -
Page 12: Using The Foot Pedals
The connectors Using the foot pedals Connect the plug of the foot pedal unit to the pedal jack on the rear panel. You will experience the sustain/soft/sostenuto effect. NOTE: When the sustain pedal is pressed, notes continue to play after their keys have been released. Releasing the pedal will silence the sustained notes. -
Page 13: Basic Operation
Basic Operation Power Switch and Master Volume 1、 First, make sure the correct connections. POWER STYLE SONG FILE TEMPO VEL MEASURE BEAT MEMORY TICK O.TS. card 2、 Turn the [POWER] switch on. The LCD display lights up. Turn on LCD lights up Use the [VOLUME] control switch to adjust the volume 3、... -
Page 14: Voice And Effects
Voices and Effects There are 210 voices in total (see appendix). Select a Voice 1、 A.B.C. DUAL When power on, the default VOICE R1 is No.001, the VOICE R1 flag lit up and the voice name appears on LCD. FILLA SPLIT STYLE SONG FILE TEMPO VEL... -
Page 15: Lower Voice/Split Point
Voices and Effect 2、 Select the dual voice number Press [ ] / [ ] button , or turn the dial to select the + - dual voice number. The default dual voice number is No. 50 Strings2. A.B.C. DUAL FILL A SPLIT STYLE SONG FILE... -
Page 16: Auto Accompaniment
Auto Accompaniment Select a Style There are 120 styles in total, from 001 to 120 (see appendix). A.B.C. DUAL FILL A SPLIT STYLE SONG FILE When power on, the default style number is 001. TEMPO VEL MEASURE BEAT 1、 MEMORY FILL B TOUCH TICK O.TS. -
Page 17: Start The Style
Auto Accompaniment Start the Style Start immediately: 1、 Start the style immediately Press [START/STOP] button to start the style(only drum). A.B.C. DUAL FILL A SPLIT STYLE SONG FILE TE MPO VE L MEASURE BEAT MEMOR Y FILL B TOUCH TICK O.TS. card MELODY OFF RECORD... -
Page 18: Fill A/B
Auto Accompaniment FILL A/B 1、 In NORMAL mode, press [FILL A] button to insert 1 measure fill and LCD flashes 'FILL A'. After one measure is over, it will smoothly lead to NORMAL style. Flashing A.B.C. DUAL 2、 In NORMAL mode, press [FILL B] button to insert 1 FILL A SPLIT measure fill and LCD flashes 'FILL B'. -
Page 19: Accomp Volume
Auto Accompaniment Accomp Volume 1、 You can change the general volume of style through Accompaniment volume adjustment. STYLE SONG FILE TEMPO VE L MEASURE BEAT MEMO RY TICK O.TS. ca rd 2、 Press the [ACCOMP ] / [ACCOMP ] button to adjust +... -
Page 20: Chord Recognize
Auto Accompaniment Chord Recognize "A.B.C." is disabled during the default setting. Press [A.B.C./MELODY OFF] button to turn on this "auto bass chord" function; the A.B.C. flag on the LCD is lightened. The left section of the keyboard is known as the "chord area", while playing the chord, both the A.B.C. -
Page 21: Chord Basics
Auto Accompaniment Chord Basics Three or more notes played together constitute a chord " ". The most basic chord type is the "triad" consisting three notes: the root, third, and fifth degrees of the corresponding scale. A "C major triad", for example, is made up of the notes C (the root), E(the third note of the C major scale),and G (the fifth note of the C major scale). -
Page 22: Metronome
Auto Accompaniment METRONOME Press [METRO] button to turn on metronome and the 1、 metronome sound will be played. STYLE SONG FI LE TEMP O VEL MEASURE BEAT MEMORY TICK O.TS. card D SP 2、 In the Function menu, you can adjust the beat with dial, [+]/[-]. -
Page 23: Transpose
Function Transpose SYNC. STOP In TRANSPOSE menu, the value of transpose appears on the LCD. STYLE SONG FILE T EMP O V EL MEA SU RE BEAT MEMORY TICK O.TS. card You can press [ ] / [ ] button or dial to adjust the +... -
Page 24: Split Point
Function Split Point In split point menu, press [ ] and [ ] button or + - dial or press the key to set its value. STYLE SONG FILE Parameter Range: from 1 to 88, the default value is 34. TEMPO VEL MEAS URE BE AT... -
Page 25: Mixer
MIXER Press [MIXER] button to enter the menu of MIXER. The default option of the menu is Drum volume. When you enter this menu next time, you will find the option is the same as last time. STYLE SONG FILE TEMP O V EL MEA SURE BEAT... -
Page 26: Memory
Memory Memory can be used to memorize 16 complete control - panel setups (4 banks with 4 presets each) that you can recall whenever needed. Memory Bank A.B.C. DUAL FILL A SPLIT STYLE SONG FILE TEMPO VEL MEASURE BEAT MEMO RY FILL B TOUCH TICK O.T S. -
Page 27: Clear Memory Data
Memory Clear Memory Data POWER 1、 Press [STORE] and [M1] together, then turn on the piano, the default data will be loaded to the piano. Press together Turn on POWER Press [ ] and [ ] together, then turn on the piano, the 2、... -
Page 28: Record
Record Record Waiting A.B.C. DUAL FILL A SPLIT STYLE SONG FILE 1、 Press [RECORD] to enter record waiting mode, the REC f TEMPO VEL MEASURE BEAT MEMO RY FILL B TOUCH TICK O.T S. lag lit up on LCD, the beat starts flashing. card MELODY OFF RECORD... -
Page 29: Song
Song The piano has 60 songs with MELODY OFF function, which allows you to listen to the Song playback without the melody ,useful for you to play with the song. 1、 Press [SONG] to enter song mode, the flag of song lit up TEMPO VEL MEASURE BEAT... -
Page 30: Midi
MIDI What is MIDI Musical Instrument Digital Interface. The standard interface between PC and Electronic instrument. 1、 It is equipped with standard MIDI interface, including 1 MIDI IN and 1 MIDI OUT. 2、 Connection 3、 It can connect with PC or other MIDI equipment. MIDI Connection 1、... -
Page 31: Specifications
Specifications 1 Keyboard............: 88 Keys, 3 kinds of touch level. 2 Voices............: 210 Voices. 120 Voices. 3 Styles............: 3 Demos 60 Songs. , 4 Demo/Song..........: 64-note turn off DSP effect 38-note turn on DSP effect . ( )、 ( ) 5 Polyphony..........: Multi-functional LCD display with blue backlit. -
Page 32: Appendix 1-Voice List
Appendix 1- Voice List NAME NAME NAME Squa re Acoustic Gran d Piano Violin Sawt ooth Viola Bright Acoustic Piano Calli ope Cello Electric Grand Piano Chiff Contrabass Honky - Tonk P iano Charang Tremolo Strings Electric P iano 1 Voice Pizzica to Strings Electric P iano 2... - Page 33 Appendix 1- Voice List NAME NAME N AME S eashore Solidwa Bellpad Bird Tw eet Overdriven Synpad Telephone Ring Guitar2 Hornpad Tremolo Helicopte r Newagpad Guitar Applaus e Bagpipe Funk Guitar Gun shot chinese instrument Bass Cymbal Ke ybord PI PA Synth Bass 3 Pianostr YUE QIN...
-
Page 34: Appendix 2-Style List
Appendix 2-Style List NAME NAME NAME 8 BEAT & 16 BEAT Country Folk 6/8 Rock 8 Beat 2/4 Country Rock & Roll Guitar Pop 1 Country Pop 2 70’s Rock & Roll 8 Beat Disco Country Shuffle Rock Shuffle 8 Beat Dance C ountryQ uick S teps 4/4 Blues 60’s 8 Beat... -
Page 35: Appendix 3-Demo List
Appendix 3-Song List SONG 附录六 歌曲( )中英文对照表 N AME NAME Happy New Year PIANO For Alice It`S Beginn ing To Look A Lot Like Christmas Habanera Jeanie With The Light Four Little Swans Brown Hair Moseta Dance My Bonnie Germanic Dance Song Of The Pearlfisher Turkish March The Stage Coach... -
Page 36: Appendix 5-Chord Chart
Appendix 5-Chord List C Madd9... -
Page 37: Appendix 6-Midi Implementation
Appendix 6-MIDI Implementation Chart Function Transmitted Re cog ni zed Re marks B asic Default 1-16ch Channel Changed 1- 16ch 1- 16ch Default × M ode Messages × × Altered *********** × Note 9-120 0- 127 Number : Tr ue voice 0- 127 *********** Velocity:...
Need help?
Do you have a question about the DP-268 and is the answer not in the manual?
Questions and answers
How to remove a pattern for a dp268
To remove a pattern (recorded data) on the Medeli DP-268, follow these steps:
1. Press and hold the [STORE] button and the [M1] button together.
2. While holding them, turn on the piano.
3. The default data will be loaded, and the recorded song will be erased.
This clears the memory data including main voice, dual voice, left-hand voice, styles, tempo, and other settings.
This answer is automatically generated