Table of Contents
Advertisement
Quick Links
Advertisement
Table of Contents

Related Manuals for Medeli DP 100


Summary of Contents for Medeli DP 100
- Page 2 Important Notes Your piano will give you years of playing pleasure if you follow the simple rules given below: Location Cleaning Clean the unit with a soft dry cloth. Do not expose the unit to the following A slightly damp cloth may remove conditions to avoid deformation, stubborn grime and dirt.
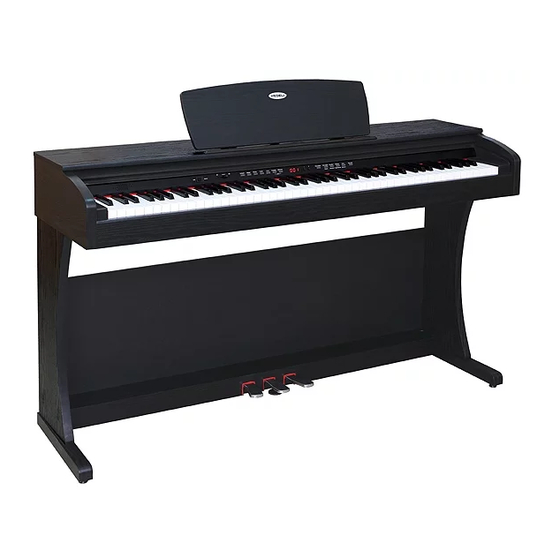
- Page 3 Summarize This piano is a easy-to-use digital piano with expert design to match the rich sounds and premium play. This piano features an 88-note hammer-action keyboard and USB MIDI. 9 voices and the most useful piano functions, not too much, it just gives you what you need. You are recommended to study this manual carefully before using the unit.
-
Page 4: Table Of Contents
Conent Set-up Guide General Guide The Connectors 10-11 - Using power jack - Using headphones jacks - Using the AUX.OUT Jacks - Using the foot pedals - Using the USB port (MIDI IN/OUT) Operation 12-17 - Power on & Master Volume - Voices and Effects 12-15 - Metronome... -
Page 5: Set-Up Guide
Set-up Guide Open the package, and check whether the following parts are available: 1. Piano body 6. Hand screws(4pcs) 2. Big Rear Panel 7. Screws 6x30 (4pcs) 3. Pedal Box 8. Screws 4x15(8pcs) 4. Right Side Panel 9. Screw caps (4pcs) 5. - Page 6 Set-up Guide Side Panel and Pedal Box Assembly Place the pedal box on the two side panels and then use screws to fasten the side panels. Screw caps 4PCS Screws 6x30 4PCS Rear Panel Assembly Fit the rear panel into the side panel brackets and fasten with the screws. Screws 4x15 8PCS 4x15 8PCS...
- Page 7 Set-up Guide Attach The Piano Cabinet Place the piano cabinet on the stand, fix it using four hand screws. Hand Screws 4PCS Fix the cable Locate the unit to the desired place and rotate the height adjustment screw until supports the Insert the DIN plug of pedal cable into the pedal box, preventing the pedal box from ben- proper socket of cabinet.
-
Page 8: General Guide
General Guide Top View AUX.OUT AUX.OUT Rear View Front View Power Jack Control Panel Music Stand Soft Pedal Piano Keyboard Sostenuto Pedal Headphones Jack Sustain Pedal Pedal Jack USB Port (MIDI IN/OUT) Pedal Height Aux Out Right Aux Out Left Adjustment Screw... - Page 9 General Guide Control Panel POWER SWITCH MASTER VOLUME TRANSPOSE TUNE REVERB TOUCH TEMPO RECORD METRONOME PLAY LED DISPLAY + / - VOICE DIRECT SELECT BUTTONS VOICE DEMO...
-
Page 10: The Connectors
The Connectors Using power jack This piano can be powered by current from a standard household wall outlet by using the specified AC adaptor. The power jack is located on the rear panel of the piano body. AUX.OUT AUX.OUT Make sure that only the AC adaptor specified for this piano is used. -
Page 11: Using The Aux.out Jacks
The connector Using the AUX.OUT jacks Connect the rear-panel AUX.OUT jack to amplified speakers, amplifiers or domestic hi-fi-units for external amplification. AUX.OUT AUX.OUT NOTE: Connect both left(L) and right(R) channels for the stereo effect. If you only connect either one of the channels, the connected channel will only take effect. -
Page 12: Operation
Operation Power on & Master Volume [POWER] Turn the switch to on. The LED display lightens up. Turn the power switch on Push the sliding bar rightwards, the whole volume becomes increase, push it leftwards, the whole volume becomes decrease. The level decreases The level increases Press the... - Page 13 Operation VOICE DEMO There are 9 Demonstrations for each of the panel voice. [VOICE DEMO] You can press button, the Demonstration Press it to play the demo. of the current voice will play. [VOICE DEMO] When playing the VOICE DEMO, press again to exit the demo mode.
- Page 14 Operation TUNE You can change the TUNE of the entire keyboard with TUNE function. [TUNE] Press the button, LED displays current tune value temporarily. Press to increase the value and Press to decrease the value, the maximal range to be adjusted is from -50 to +50 semitones, the default value is 0.
- Page 15 Operation REVERB REVERB effect will make the keyboard sound much more fully and widely. [REVERB] Press the button , LED displays current reverb value temporarily. Press the button to change the reverb level, it changes from 0 to 31. Press it to increase the value In REVERB setting, press the button simulta- neously to set the value to default.
-
Page 16: Metronome
Operation Metronome [METRONOME] Press the button to turn on the metron- ome. Press the button again to turn off the metronome. [METRONOME] Hold and press the button for 2 second to enter into BEAT SELECT status, LED displays current beat value temporarily. Press and hold for 2 second to enter into BEAT SELECT status [+] [-]... -
Page 17: Record
Operation Record There is one track real-time record. NOTE: The recorded data will not be lost when you turn off the power. Hold on the button together and power on the piano, it will erase all the recorded data. Waiting for recording: [RECORD] Press the button for the first time to enter... -
Page 18: Specifications
Specifications Keyboard 88 keys, 3 kinds of touch level. Voice 9 voices, d emonstration for each of the panel voice. Display LED display. Switch and Buttons POWER SWITCH, VOLUME SWITCH, TRANSPOSE, TEMPO TUNE, REVERB, TOUCH, RECORD, PLAY, METRONOME, +, -, VOICES DIRECT SELECT. Transpose 12 semi tones Pedals... -
Page 19: Midi Implementation Chart
MIDI Implementation Chart Function Remarks Transmitted Recognized Basic Default 1-16ch 1-16ch Channel Changed Default Mode Messages Altered *********** Note 9-120 0-127 *********** 0-127 Number : True voice Velocity : Note on 9nH,V=1-127 9nH,V=1-127 Note off 9nH,V= 0 (9nH,V=0; 8nH,V=0-127) After Key s Touch Ch s... - Page 20 Version: G03...
Need help?
Do you have a question about the DP 100 and is the answer not in the manual?
Questions and answers