Table of Contents
Advertisement
Quick Links
Download this manual
See also:
User Manual
VIA P4M266A/P4X266E chipset Motherboard
http://www.manuallib.com/file/2414879
From ManualLib.com
ManualLib.com collects and classifies the global product
instrunction manuals to help users access anytime and
anywhere, helping users make better use of products.
Home: http://www.manuallib.com/ Chinese: http://www.shuomingshuku.com/
This Manual: http://www.manuallib.com/file/2414879
Advertisement
Table of Contents

Related Manuals for VIA Technologies P4M266A


Summary of Contents for VIA Technologies P4M266A
- Page 1 VIA P4M266A/P4X266E chipset Motherboard http://www.manuallib.com/file/2414879 From ManualLib.com ManualLib.com collects and classifies the global product instrunction manuals to help users access anytime and anywhere, helping users make better use of products. Home: http://www.manuallib.com/ Chinese: http://www.shuomingshuku.com/ This Manual: http://www.manuallib.com/file/2414879...
- Page 2 Electronic Emission Notices Electronic Emission Notices Electronic Emission Notices Electronic Emission Notices Electronic Emission Notices Federal Communications Commission (FCC) Statement Federal Communications Commission (FCC) Statement Federal Communications Commission (FCC) Statement Federal Communications Commission (FCC) Statement Federal Communications Commission (FCC) Statement This equipment has been tested and found to comply with the limits for a Class B digital device, pursuant to Part 15 of FCC Rules.
-
Page 3: Table Of Contents
T T T T T able of Contents able of Contents able of Contents able of Contents able of Contents HARDWARE CONFIGURATION HARDWARE CONFIGURATION HARDWARE CONFIGURATION HARDWARE CONFIGURATION HARDWARE CONFIGURATION ............................................20 ............Key Features ..................20 MOTHERBOARD LAYOUT MOTHERBOARD LAYOUT MOTHERBOARD LAYOUT... - Page 4 SLOTS SLOTS SLOTS ............................................................................24 SLOTS SLOTS ....................CPU INSTALLATION CPU INSTALLATION ..............................CPU INSTALLATION CPU INSTALLATION CPU INSTALLATION ............................................25 INSTALL DDR DIMM INSTALL DDR DIMM INSTALL DDR DIMM INSTALL DDR DIMM INSTALL DDR DIMMs s s s s ............................
-
Page 5: Hardware Configuration Hardware Configuration
Features Features Features : : : : : Features Chipset Chipset Chipset Chipset Chipset • VIA® P4M266A/P4X266E chipset. Processor Processor Processor Processor Processor • Supports the Intel® Celeron® , Pentium® 4 processors in the 478-pin package. • Supports PSB(Processor System Bus) frequency of 400/533MHz. - Page 6 Expanded USB Support Expanded USB Support Expanded USB Support Expanded USB Support Expanded USB Support • Includes 3 UHCI host controllers,increasing the number of external ports to six. • Includes 1 EHCI USB2.0 Host Controller that supports all six ports (Bandwidth shared between six ports).
- Page 7 Integrated ProSavage DDR 2D/3D/Video Accelerator (For P4M266A Integrated ProSavage DDR 2D/3D/Video Accelerator (For P4M266A Integrated ProSavage DDR 2D/3D/Video Accelerator (For P4M266A Integrated ProSavage DDR 2D/3D/Video Accelerator (For P4M266A Integrated ProSavage DDR 2D/3D/Video Accelerator (For P4M266A only) only) only) only) only) •...
-
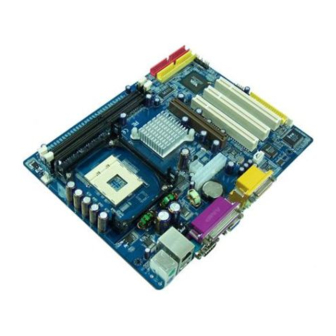
Page 8: Motherboard Layout
Motherboard Layout Motherboard Layout Motherboard Layout Motherboard Layout Motherboard Layout The following diagrams show the relative positions of the jumpers, connectors, major components and memory banks on the motherboard. # The LAN, VGA, CN11, AUX1 and CN16 connectors are optional. # The ALC650/655 embeds an internal analog switch (by driver software) to share LINE input with Surround output, and share MIC input with CENTER/LFE output. -
Page 9: Rear Prear Panel Rear Panel Anel Anel
Rear Panel Rear Panel Rear Panel Rear Panel Rear Panel The back panel provides the following connectors: Mouse Connector Mouse Connector Mouse Connector Mouse Connector Mouse Connector The mainboard provides a standard PS/2 mouse mini DIN connector for ® attaching a PS/2 mouse.You can plug a PS/2 mouse directly into this ®... - Page 10 Serial Port Connector: COM1 Serial Port Connector: COM1 Serial Port Connector: COM1 Serial Port Connector: COM1 Serial Port Connector: COM1 The Port is 16550A high speed communication ports that send/receive 16 bytes FIFOs. You can attach a serial mouse or other serial devices directly to the connectors.
-
Page 11: Connectors
Connectors Connectors Connectors Connectors Connectors The mainboard provides connectors to connect to FDD, IDE HDD, USB Ports, CPU/System FAN, etc. Floppy Disk Drive Connector:FDD1 The mainboard provides a standard floppy disk drive connector that supports 360K, 720K, 1.2M, 1.44M and 2.88M floppy disk types. Hard Disk Connectors:IDE1&IDE2 The mainboard has a 32-bit Enhanced PCI IDE and Ultra DMA 33/66/100 /133 controller that provides PIO mode 0~4, Bus Master, and Ultra DMA 33/66... -
Page 12: Fan Power Connectors: Cpufan/Sysfan/Wol1
Fan Power Connectors:CPUFAN/SYSFAN The CPUFAN (processor fan), SYSFAN (system fan) support system cool -ing fan with +12V.It supports three-pin head connector. When connecting the wire to the connectors, always take note that the red wire is the positive and should be connected to the +12V, the black wire is Ground and should be connected to GND. -
Page 13: Cd-In Connectors:cds1
CD-IN Connector: CDS1 The connector is for CD-ROM Drive. AUX-IN Connector: AUX1 (optional) The connector is for Audio Device. AUX1 CDS1 CDS1 : CD-IN CDS1 : CD-IN CDS1 : CD-IN CDS1 : CD-IN CDS1 : CD-IN Assignment CD-L CD-R A A A A A UX1 : A UX1 : A UX1 : A UX1 : AUX... -
Page 14: Separate 6-Channels Connector:cn11(Optional)
Separate 6-channels Connector: CN11(optional) This mainboard has a 3x2 pin-header which can provide separate surround L/R, center and subwoofer connection rather than sharing with Mic-in and Line-in. CN11 CN11 CN11 CN11 CN11 5 5 5 5 5 1 1 1 1 1 6 6 6 6 6 2 2 2 2 2 CN11 Description... -
Page 15: Front Panel Audio Header:cn12
Front Panel Audio Header: CN12 Front Panel Audio Header: CN12 Front Panel Audio Header: CN12 Front Panel Audio Header: CN12 Front Panel Audio Header: CN12 This mainboard supports front panel microphone and speaker out ports. If your computer case has these ports,connect them to CN12. CN12 CN12 CN12... -
Page 16: Usb Connectors:usb2/Usb3
USB Connector: USB2/USB3 USB Connector: USB2/USB3 USB Connector: USB2/USB3 USB Connector: USB2/USB3 USB Connector: USB2/USB3 This mainboard has USB ports. Some computer cases have a special module that mounts USB ports at the front of the case. If you have this kind of case, use auxiliary USB connector USB2,USB3 to connect the front ounted ports to the mainboard. -
Page 17: Front Panel Headers:fp1
Front Panel Header: FP1 Front Panel Header: FP1 Front Panel Header: FP1 Front Panel Header: FP1 Front Panel Header: FP1 The mainboard provides one front panel connector. SPEAKER IRRX IRTX RESET PWR_SW PW_LED- HDD_LED- PW_LED+ HDD_LED+ Technical Reference Booklet This Manual: http://www.manuallib.com/file/2414879... -
Page 18: Jumper Setting
Jumper Setting Jumper Setting Jumper Setting Jumper Setting Jumper Setting This chapter explains how to configure the motherboard’s hardware. Before using your computer, make sure all jumpers and DRAM modules are set correctly. Refer to this chapter whenever in doubt. JBAT1 J20 - Keyboard Power Select J20 - Keyboard Power Select... -
Page 19: Slots
Slots Slots Slots Slots Slots The motherboard provides one AGP slot and three 32-bit PCI bus slots. AGP Slot AGP Slot AGP Slot AGP Slot AGP Slot PCI Slots PCI Slots PCI Slots PCI Slots PCI Slots AGP (Accelerated Graphics Port) Slot AGP (Accelerated Graphics Port) Slot AGP (Accelerated Graphics Port) Slot AGP (Accelerated Graphics Port) Slot... -
Page 20: Cpu Installation
CPU Installation CPU Installation CPU Installation CPU Installation CPU Installation Please refer to the following steps to install the CPU. 1. Please turn off the power and unplug the power cord before installing the CPU. Pull the lever sideways away from the socket. Make sure to raise the lever up to a 90 degree angle. - Page 21 4. Press the CPU down firmly into the socket and close the lever. As the CPU is likely to move while the lever is being closed, always close the lever with your fingers pressing tightly on top of the CPU to make sure the CPU is properly and completely embedded into the socket.
- Page 22 6. Use one end of the clip to hook the latch of the CPU sliding plate and then hook the other three latch to fix the cooling fan set. At last, connect the fan to the power supply connector provided on your mainboard. CPU Installation This Manual: http://www.manuallib.com/file/2414879...
-
Page 23: Install Ddr Dimms S S S S
Install DDR DIMMs Install DDR DIMMs Install DDR DIMMs Install DDR DIMMs Install DDR DIMMs Please follow the following step to install DDR DIMMs. 1. Locate the DDR DIMM sockets. 2. Holding the DDR DIMM by the edges, remove it from its antistatic package. 3. -
Page 24: Bios Setup
BIOS Setup BIOS Setup BIOS Setup BIOS Setup BIOS Setup This chapter discusses Award’s Setup Program built into the ROM BIOS. The Setup Program allows users to modify the basic system configuration. This special information is then stored in battery-backed RAM, which retains the setup information when the power is turned off. -
Page 25: Main Menu
Main Menu Main Menu Main Menu Main Menu Main Menu Once you enter the Award BIOS CMOS Setup Utility, the Main Menu will appear on the screen. The Main Menu allows you to select from various setup functions and two exit choices. -
Page 26: Standard Cmos Features
Load Fail-Safe The BIOS defaults have been set by the manufacturer and represent Defaults settings which provide the minimum requirements for your system to operate. Load Optimized The chipset defaults are settings which provide for maximum Defaults system performance. While Award has designed the custom BIOS to maximize performance, the manufacturer has the right to change these defaults to meet its needs. -
Page 27: Advanced Bios Features
Date The date format is <day-of-the-week>. <month> <day> <year>. Time The time format is <hour> <Minute> <second> displayed in 24-hour military-time clock. For example, 1 p. m. is displayed as 13:00:00. Primary These categories identify the types of the two channels that Master/Primary have been installed in the computer. -
Page 28: Set Supervisor/User Password
Set Supervisor/User Password Set Supervisor/User Password Set Supervisor/User Password Set Supervisor/User Password Set Supervisor/User Password You can set either supervisor or user password, or both of them. The difference between them are: Supervisor Password : You can enter the Setup Program and change the options of the setup menus. -
Page 29: Flash Update Procedure
Flash Update Procedure Flash Update Procedure Flash Update Procedure Flash Update Procedure Flash Update Procedure A program AWDFLASH.EXE is included in the utility diskette or CD (X:\Utility\ AWDFLASH.EXE). The user is recommended to follow the procedure below to update the flash BIOS. (X: your CD driver letter).
Need help?
Do you have a question about the P4M266A and is the answer not in the manual?
Questions and answers