Table of Contents
Advertisement
Advertisement
Table of Contents

Related Manuals for D-Link DCS-5025L


Summary of Contents for D-Link DCS-5025L
- Page 1 Version 1.00 | 11/19/2015 User Manual HD Pan, Tilt & Zoom Wi-Fi Camera DCS-5025L...
-
Page 2: Manual Overview
Manual Overview D-Link reserves the right to revise this publication and to make changes in the content hereof without obligation to notify any person or organization of such revisions or changes. Information in this document may become obsolete as our services and websites develop and change. -
Page 3: Table Of Contents
WPS - Push Button Setup ............22 Firmware Upgrade ..............56 Mounting the Camera...............23 Status ....................57 mydlink ...................25 Device Info ................57 Active User ................58 Configuration ..............26 Help ..................59 Using the Web Configuration Interface ......26 Live Video ..................27 Troubleshooting ..............60 Setup Wizard ................29 D-Link DCS-5025L User Manual... - Page 4 Table of Contents Technical Specifications ..........63 Regulatory Statements ...........65 D-Link DCS-5025L User Manual...
-
Page 5: Product Overview
Section 1 - Product Overview Package Contents Micro-USB Power Adapter DCS-5025L HD Pan, Tilt & Zoom Wi-Fi Camera Camera Base and Mounting Kit Quick Install Guide Quick Install Card CAT5 Ethernet Cable If any of the above items are missing, please contact your reseller. -
Page 6: System Requirements
Visit www.java.com to download the latest version. • Broadband Internet connection Computer with: • Internet Explorer 8 or higher (ActiveX) mydlink Website Requirements • Firefox 12 or higher • Safari 6 or higher • Chrome 20 or higher D-Link DCS-5025L User Manual... -
Page 7: Introduction
Introduction Congratulations on your purchase of the DCS-5025L HD Pan, Tilt & Zoom Wi-Fi Camera. The DCS-5025L is a versatile and unique solution for your home or small office. Unlike a standard webcam, the DCS-5025L is a complete system with a built-in CPU, web server, and wireless networking device that transmits high-quality video images for security and surveillance. -
Page 8: Features
Pan/Tilt for Wide Viewing Area Patrol a large area with one camera thanks to the DCS-5025L’s pan and tilt functions. You can use the web interface to manually adjust the camera lens position, or set up to 24 pre-defined preset positions, enabling you to quickly move to frequently viewed points of interest. - Page 9 Micro-USB Powered for Convenience For added convenience, the DCS-5025L can be powered via any Micro-USB cable, so you don’t have to worry about looking for a matching power adapter when setting it up for use. Simply use the included or standard Micro-USB cable and plug it into any USB power adapter or powered USB port and it’ll be powered on and ready for use.
-
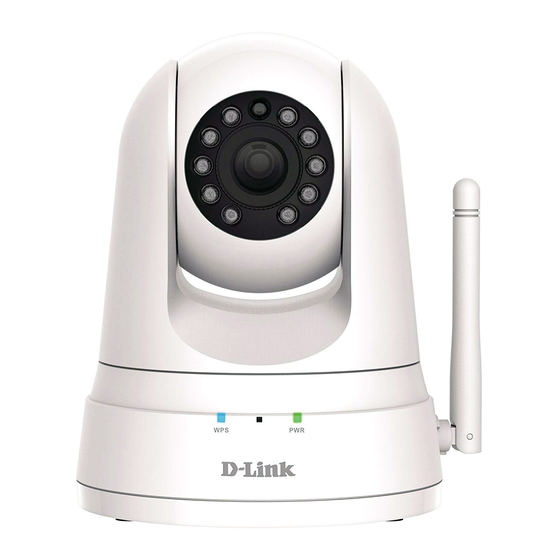
Page 10: Hardware Overview
Indicates the WPS connection status of the camera. Microphone Records audio from the surrounding area. Infrared LEDs Illuminate the camera’s field of view in low light environments.. Power and Link LED Indicates the camera’s current status. D-Link DCS-5025L User Manual... -
Page 11: Rear View
Ethernet Port RJ45 connector for Ethernet. Reset Button Press and hold this button for 10 seconds to reset the camera. Micro-USB Port Connect a Micro-USB cable here to power on the camera. D-Link DCS-5025L User Manual... -
Page 12: Installation
Installation There are three ways to set up your camera: • Mobile App Setup: You can set up your DCS-5025L with the free mydlink Home app. Refer to Mobile App Setup on page 13. • Zero Configuration Setup: If you have a mydlink-enabled router (D-Link cloud router), this is the easiest way to set up your camera. -
Page 13: Mobile App Setup
Home compatible devices. Search for the free mydlink Home app on the App Store or Google Play and download it to your smartphone or tablet. You can also use a QR code reading app to scan the corresponding code for your device below. mydlink Home D-Link DCS-5025L User Manual... -
Page 14: Mydlink™ Home
Sign In. If you don’t have one, sign up for a free mydlink account by tapping the Sign Up! link. Step 4: The My Devices page will appear. Tap Add a new device. To add your DCS-5025L, follow the steps in the Setup Wizard that appears. D-Link DCS-5025L User Manual... -
Page 15: Zero Configuration Setup
Connect your camera to your mydlink-enabled Cloud Router and Zero Configuration will automatically configure your DCS-5025L and add the camera to your mydlink account. After a short period of time, you will be able to remotely access your camera from the website http://www.mydlink.com to manage and monitor your DCS-5025L. - Page 16 Click the notification to continue. DCS-5025L A summary and confirmation notification will appear with the automatically configured details. Make a note of the details and click Yes to add the camera to your account. DCS-5025L D-Link DCS-5025L User Manual...
- Page 17 26 for advanced configuration of your camera. Note: If the live image is blurry or out of focus, you can manually adjust the focus by rotating the manual focus bezel surrounding the camera lens. D-Link DCS-5025L User Manual...
-
Page 18: Camera Setup Wizard
Simply click Set up your Cloud Camera to go through the Setup Wizard, which will guide you step-by-step through the installation process from connecting your hardware to configuring your camera and registering it with your mydlink account. D-Link DCS-5025L User Manual... -
Page 19: Mac Users
SetupWizard file to start the wizard. After about 20-30 seconds, the Setup Wizard will open, which will guide you step-by-step through the installation process from connecting your hardware to configuring your camera and registering it with your mydlink account. D-Link DCS-5025L User Manual... -
Page 20: Manual Hardware Installation
You can use WPS to connect your camera to your network wirelessly. For more information, refer to WPS - Push Button Setup on page 22. If your router does not support WPS, you will still be able to set up your camera’s wireless settings in the camera’s web interface. D-Link DCS-5025L User Manual... -
Page 21: Wireless Installation Considerations
Section 2 - Installation Wireless Installation Considerations Your D-Link Wireless Network Camera lets you access your network using a wireless connection from anywhere within the operating range of your wireless network. However, the number, thickness and location of walls, ceilings, or other objects that the wireless signals must pass through, may limit the range. -
Page 22: Wps - Push Button Setup
WPS feature. If you are not sure where the WPS button is on your router, please refer to your router’s User Manual. The DCS-5025L will automatically create a secure wireless connection to your router. While connecting, the blue LED will flash and your camera will reboot. -
Page 23: Mounting The Camera
If desired, the power and Ethernet cables can be concealed behind the mounting bracket. Run the cables through the back of the mounting bracket, securing them with the built-in guides. Be sure to leave enough cable length protruding from the top to allow connection to the camera. D-Link DCS-5025L User Manual... - Page 24 Using the supplied thumbscrew, fasten the camera to the mounting bracket. Connect the power and Ethernet cables to the camera. Adjust the angle of the arm on the mounting bracket as required. Tighten the thumbscrew to lock the arm in place. D-Link DCS-5025L User Manual...
-
Page 25: Mydlink
After registering your DCS-5025L camera with a mydlink account in the Camera Installation Wizard, you will be able to remotely access your camera from the www.mydlink.com website. After signing in to your mydlink account, you will see a screen similar... -
Page 26: Configuration
After completing the Camera Installation Wizard, your camera is ready to use. The camera’s built-in web configuration interface is designed to allow you to easily access and configure your DCS-5025L. There are two ways in which you can access your camera’s web configuration interface:... -
Page 27: Live Video
Language: You can select the desired language for the web interface from this drop-down menu. Zoom: Click on these buttons to adjust the level of digital zoom applied to the image D-Link DCS-5025L User Manual... - Page 28 If you have set the night mode to manual, the night mode feature can be toggled using these buttons. Note: If the live image is blurry or out of focus, you can manually adjust the focus by rotating the manual focus bezel surrounding the camera lens. D-Link DCS-5025L User Manual...
-
Page 29: Setup Wizard
Manual Internet Connection Setup. Note: To register your camera with mydlink and enable its mydlink-related features, you will need to use the Camera Installation Wizard. Please refer to Camera Setup Wizard on page 18 for more details. D-Link DCS-5025L User Manual... -
Page 30: Internet Connection Setup Wizard
Internet Connection Setup Wizard This wizard will guide you through a step-by-step process to configure your new D-Link Camera and connect the camera to the Internet. Click Next to continue. Select what kind of Internet connection your camera should use: •... - Page 31 Configure the correct time to ensure that all events are triggered, captured, and scheduled at the right time. Click Next to continue. This page displays your configured settings. Click Apply to save and activate your changes, or click Back to change your settings. DCS-5025L D-Link DCS-5025L User Manual...
-
Page 32: Network Setup
PPPoE: If you need to connect to the Internet using a PPoE connection, click on the PPPoE radio button and enter the username and password provided to you by your Internet Service Provider or Network Administrator. D-Link DCS-5025L User Manual... - Page 33 You can also enable UPnP port forwarding. Bonjour Enable this setting to allow your camera to be discovered by Settings: the Bonjour service. You can also specify a Bonjour name for the device. D-Link DCS-5025L User Manual...
-
Page 34: Wireless Setup
Wireless Select the wireless security mode used by your wireless network. Security If you select WEP or WPA-PSK/WPA2-PSK, enter the password Mode: for your wireless network in the text box that appears. D-Link DCS-5025L User Manual... -
Page 35: Extender Setup
You will need to add this information for each wireless device that connects to this Extended network. Maximum Set the maximum number of clients that are allowed to connect Clients to the extended network. Allowed to Connect: D-Link DCS-5025L User Manual... - Page 36 WPA/WPA2 encryption. • WPA/WPA2 - This is currently the most advanced encryption method. Enter a Pre-shared Key (PSK/ password) in the text box provided. Wireless clients will require this password in order to access your extended network. D-Link DCS-5025L User Manual...
-
Page 37: Dynamic Dns (Ddns)
Enter your username or e-mail used to connect to the DDNS. Password: Enter your password used to connect to the DDNS server. Timeout: This allows you to specify the periodic update time for the DDNS address. D-Link DCS-5025L User Manual... -
Page 38: Image Setup
-5 and +5. Contrast Allows you to adjust the contrast level. Select a setting between Control: -5 and +5. Saturation Allows you to adjust the saturation level. Select a setting Control: between -5 and +5. D-Link DCS-5025L User Manual... -
Page 39: Video
Medium, Low, and Very Low. Default View Select the default encoding to use when viewing your video Mode: on the Live Video page. Light Select the frequency used by your lighting and power to help Frequency: reduce image flicker. D-Link DCS-5025L User Manual... -
Page 40: Audio
This section allows you to adjust the audio settings for your camera. Note: Please wait a few seconds for the camera to adjust the audio after making changes. You may Enable or Disable the camera audio feed. Audio Settings: Volume Select the desired volume percentage level. Settings: D-Link DCS-5025L User Manual... -
Page 41: Motion Detection
Schedule that you define. Sensitivity: Specify the amount of difference required to determine whether there was motion. Detection Use your mouse to click on the areas of the video that you would Areas: like to monitor for motion. D-Link DCS-5025L User Manual... -
Page 42: Sound Detection
Specify the volume level that a sound must exceed in order to Level: trigger the sound detection feature. The graph at the bottom of the page will show the current volume levels being detected by the camera. D-Link DCS-5025L User Manual... -
Page 43: Mail
Step 1 - Enter “smtp.gmail.com” in SMTP Server Address. Step 2 - Change the SMTP server port number from 25 to 465. Step 3 - Enter your gmail e-mail address in Sender E-mail Address. D-Link DCS-5025L User Manual... - Page 44 You can choose whether to e-mail a snapshot immediately, or e-mail 6 snapshots together, with 3 frames before and after motion/sound was detected. You can also set the Frame interval time to specify how far apart the snapshots should be. D-Link DCS-5025L User Manual...
- Page 45 Video Limit video clips to an e-mail settings you specify. account: Test E-mail This will send a test e-mail according to the e-mail settings you Account: have specified above. D-Link DCS-5025L User Manual...
-
Page 46: Ftp
Image Frequency specified. • Choosing Schedule will allow you to schedule when to start and stop the uploading of snapshots. • Select Motion/Sound Detection if you would like the camera to upload images only when motion is detected. D-Link DCS-5025L User Manual... - Page 47 Clicking on the Test button will send a test JPEG snapshot to Test FTP Server: the FTP server specified above to make sure that your settings are correct. D-Link DCS-5025L User Manual...
- Page 48 Specify the maximum file size and duration of the videos to be uploaded. Clicking on the Test button will send a test JPEG snapshot to Test FTP Server: the FTP server specified above to make sure that your settings are correct. D-Link DCS-5025L User Manual...
-
Page 49: Time And Date
If Synchronize NTP Server is disabled, you can set the date and time manually. You can also click on the Copy Your Computer’s and Time Time Settings to automatically set the date and time based on Manually: your computer’s settings. D-Link DCS-5025L User Manual... -
Page 50: Day/Night Mode
This sets the camera to always use Night mode. Mode: Day Mode This sets the camera to use Day mode during the times you Schedule: specify, and will switch to Night mode outside the times you specify. D-Link DCS-5025L User Manual... -
Page 51: Camera Control
• Select the number of the position that you would like to specify. • Use the pan/tilt wheel to move the camera’s lens to the desired preset position. D-Link DCS-5025L User Manual... - Page 52 • Enter a name to help you easily identify the preset. • Click on the Set button to save the preset. • Any pre-saved positions can be cleared by selecting the desired preset and clicking on the Clear button. D-Link DCS-5025L User Manual...
-
Page 53: Maintenance
You can create new users to provide viewing access for your Account: camera’s video. User accounts will only be able to access the Live Video section of the web configuration interface, but cannot access any other parts or change any settings. D-Link DCS-5025L User Manual... - Page 54 Add. A maximum of 8 user accounts can be created. Displays the account names of authorized users. You can modify or delete an account by clicking on its modify or delete icon. D-Link DCS-5025L User Manual...
-
Page 55: System
Please note that this will erase any Default: changes you have made to the settings of the camera. Reboot The Click the Reboot the Device button to reboot the camera. Device: D-Link DCS-5025L User Manual... -
Page 56: Firmware Upgrade
Section 3 - Configuration Firmware Upgrade Your current firmware version and date will be displayed on your screen. You may go to the D-Link Support Page to check for the latest firmware versions available. To upgrade the firmware on your DCS-5025L, download the latest firmware from the D-Link Support Page to your local hard drive. -
Page 57: Status
Section 3 - Configuration Status Device Info This section displays all the detailed information about your device and network settings. D-Link DCS-5025L User Manual... -
Page 58: Active User
Section 3 - Configuration Active User This page lists all the active users’ information including the User Name, IP address, and the time that camera access began. D-Link DCS-5025L User Manual... -
Page 59: Help
Section 3 - Configuration Help This page lists all the topics and links to respective helpful instructions for each feature. D-Link DCS-5025L User Manual... -
Page 60: Troubleshooting
It is therefore recommended that you make a record of the password for future reference. To reset your camera, please use an unfolded paperclip to press and hold the RESET button for at least 10 seconds while your camera is plugged in. D-Link DCS-5025L User Manual... - Page 61 It could be that the image sensor has become overloaded when it has been exposed to bright light such as direct exposure to sunlight or halogen lights. Reposition the camera into a more shaded area immediately, as prolonged exposure to bright lights will damage the sensor. D-Link DCS-5025L User Manual...
- Page 62 Also, check that you have the latest version of Java installed. Java can be downloaded from http://www.java.com If you are using Internet Explorer with a version number 6 or lower, then you will need to upgrade your Web browser software in order to view the streaming video transmitted by the Network Camera. D-Link DCS-5025L User Manual...
-
Page 63: Technical Specifications
• MJPEG • NTP Client (D-Link) • JPEG for still images • DNS Client Video Features • DDNS Client (Dyndns and D-Link) • Adjustable image size and quality • SMTP Client • Time stamp and text overlay • FTP Client •... - Page 64 • Camera Only - 116.4 x 109.1 x 133.6 mm (4.58 x 4.29 x 5.26 inches) • Camera Including Mounting Bracket - 116.4 x 109.1 x 230.0 mm (4.58 x 4.29 x 9.06 inches) Weight • Device: 292.4 grams (0.64 lbs) • Stand: 60.8 grams (0.13 lbs) D-Link DCS-5025L User Manual...
- Page 65 Note The country code selection is for non-USA models only and is not available to all USA models. Per FCC regulations, all WiFi product marketed in the USA must be fixed to USA operational channels only. D-Link DCS-5025L User Manual...
- Page 66 (ii) pour les dispositifs munis d'antennes amovibles, le gain maximal d'antenne permis pour les dispositifs utilisant les bandes de 5250 à 5350 MHz et de 5470 à 5725 MHz doit être conforme à la limite de la p.i.r.e; D-Link DCS-5025L User Manual...
- Page 67 Appendix B - Regulatory Information NCC 警語 : 以下警語適用台灣地區 經型式認證合格之低功率射頻電機,非經許可,公司、商號或使用者均不得擅自變更頻率、加大功率或變更原設計之 特性及功能。低功率射頻電機之使用不得影響飛航安全及干擾合法通信;經發現有干擾現象時,應立即停用,並改善 至無干擾時方得繼續使用。前項合法通信,指依電信法規定作業之無線電通信。低功率射頻電機須忍受合法通信或工 業、科學及醫療用電波輻射性電機設備之干擾。 本模組於取得認證後將依規定於模組本體標示審驗合格標籤系統廠商應於平台上標示「本產品內含射頻模 組: <CCAFXXLPXXXXTX>」字樣 電磁波曝露量MPE標準值(MPE) 1 mW/cm ,送測產品實值為 0 mW/cm D-Link DCS-5025L User Manual...
- Page 68 This device is restricted from functioning in Ad-hoc mode while operating in 5 GHz. Ad-hoc mode is direct peer-to-peer communication between two client devices without an Access Point. • Access points will support DFS (Dynamic Frequency Selection) and TPC (Transmit Power Control) functionality as required when operating in 5 GHz within the EU. D-Link DCS-5025L User Manual...
- Page 69 Spectrum Regulation MHz, Europa (ETSI) max. EIRP Innenbereich max. EIRP Außenbereich Europa 2400 - 2483.5 MHz 100 mW 100 mW 2400 - 2454 MHz 100 mW 100 mW Frankreich 2454 - 2483.5 MHz 100 mW 10 mW D-Link DCS-5025L User Manual...
- Page 70 D-Link hereby, declares that this <###> is in compliance with the essential requirements and other relevant English provisions of Directive 1999/5/EC. Por medio de la presente D-Link declara que el <###> cumple con los requisitos esenciales y cualesquiera otras Español [Spanish] disposiciones aplicables o exigibles de la Directiva 1999/5/CE.
- Page 71 Português [Portuguese] 1999/5/CE. Slovensko [Slovenian] D-Link izjavlja, da je ta <###> v skladu z bistvenimi zahtevami in ostalimi relevantnimi določili direktive 1999/5/ES. Slovensky [Slovak] D-Link týmto vyhlasuje, že <###> spĺňa základné požiadavky a všetky príslušné ustanovenia Smernice 1999/5/ES. D-Link vakuuttaa täten että <###> tyyppinen laite on direktiivin 1999/5/EY oleellisten vaatimusten ja sitä...
-
Page 72: Safety Instructions
Please adhere to the following safety guidelines to help ensure your own personal safety and protect your system from potential damage. Any acts taken that are inconsistent with ordinary use of the product, including improper testing, etc., and those not expressly approved by D-Link may result in the loss of product warranty. - Page 73 Do not spill food or liquids on your system components, and never operate the device in a wet environment. If the device gets wet, see the appropriate section in your troubleshooting guide or contact your trained service provider. • Use the device only with approved equipment. D-Link DCS-5025L User Manual...
- Page 74 3. Handle all sensitive components in a static-safe area. If possible, use antistatic floor pads, workbench pads, and an antistatic grounding strap. Environmental This product may contain a battery. Recycle or dispose of batteries in accordance with the battery manufacturer's instructions and local/national disposal and recycling regulations. For more information, please refer to the warranty guide. D-Link DCS-5025L User Manual...
- Page 75 D-Link designs and builds its products to be as environmentally friendly as possible, by using recyclable, low toxic materials in both products and packaging. D-Link recommends that you always switch off or unplug your D-Link products when they are not in use. By doing so you will help to save energy and reduce CO2 emissions.
- Page 76 D-Link et l’environnement Chez D-Link, nous sommes conscients de l'impact de nos opérations et produits sur l'environnement et nous engageons à le réduire. Pour limiter cet impact, D-Link conçoit et fabrique ses produits de manière aussi écologique que possible, en utilisant des matériaux recyclables et faiblement toxiques, tant dans ses produits que ses emballages.
- Page 77 D-Link zijn producten zo milieuvriendelijk mogelijk, door het gebruik van recycleerbare producten met lage toxiciteit in product en verpakking. D-Link raadt aan om steeds uw D-Link producten uit te schakelen of uit de stekker te halen wanneer u ze niet gebruikt. Door dit te doen bespaart u energie en beperkt u de CO2-emissies.
- Page 78 D-Link a životní prostředí Ve společnosti D-Link jsme si vědomi vlivu našich provozů a výrobků na životní prostředí a snažíme se o minimalizaci těchto vlivů. Proto své výrobky navrhujeme a vyrábíme tak, aby byly co nejekologičtější, a ve výrobcích i obalech používáme recyklovatelné a nízkotoxické materiály.
- Page 79 D-Link produkter som er så miljøvennlig som mulig, ved å bruke resirkulerbare, lav-toksiske materialer både i produktene og forpakningen. D-Link anbefaler at du alltid slår av eller frakobler D-Link-produkter når de ikke er i bruk. Ved å gjøre dette hjelper du å spare energi og å redusere CO2-utslipp.
- Page 80 D-Link sine produkter, så de er så miljøvenlige som muligt, ved at bruge genanvendelige materialer med lavt giftighedsniveau i både produkter og emballage. D-Link anbefaler, at du altid slukker eller frakobler dine D-Link-produkter, når de ikke er i brug. Ved at gøre det bidrager du til at spare energi og reducere CO2-udledningerne.
- Page 81 D-Link och miljön På D-Link förstår vi och är fast beslutna att minska den påverkan våra verksamheter och produkter kan ha på miljön. För att minska denna påverkan utformar och bygger D-Link sina produkter för att de ska vara så miljövänliga som möjligt, genom att använda återvinningsbara material med låg gifthalt i både produkter och förpackningar.
Need help?
Do you have a question about the DCS-5025L and is the answer not in the manual?
Questions and answers