Table of Contents
Advertisement
Quick Links
Advertisement
Table of Contents

Related Manuals for Alpine X701D/INE-W997D


Summary of Contents for Alpine X701D/INE-W997D
- Page 1 8-INCH ADVANCED NAVI STATION 7-INCH ADVANCED NAVI STATION...
- Page 3 ENGLISH...
-
Page 7: Points To Observe For Safe Usage
They contain instructions on how to use this product suggestions if the navigation system instructs you to perform an in a safe and effective manner. Alpine cannot be responsible for unsafe or illegal manoeuvre, places you in an unsafe situation, or problems resulting from failure to observe the instructions in this routes you into an area which you consider unsafe. - Page 8 INSTALL THE PRODUCT CORRECTLY SO THAT THE DRIVER CANNOT WATCH USE THIS PRODUCT FOR MOBILE 12V APPLICATIONS. TV/VIDEO UNLESS THE VEHICLE IS STOPPED AND THE EMERGENCY BRAKE IS APPLIED. MAKE THE CORRECT CONNECTIONS. BEFORE WIRING, DISCONNECT THE CABLE FROM THE NEGATIVE BATTERY DO NOT WATCH VIDEO WHILE DRIVING.
- Page 9 NOTICE CAUTION Product Cleaning HALT USE IMMEDIATELY IF A PROBLEM APPEARS. Temperature Maintenance HAVE THE WIRING AND INSTALLATION DONE BY EXPERTS. Protecting the USB connector USE SPECIFIED ACCESSORY PARTS AND INSTALL THEM SECURELY. ARRANGE THE WIRING SO IT IS NOT CRIMPED OR PINCHED BY A SHARP METAL EDGE.
- Page 10 • Windows Media, and the Windows logo are trademarks, or registered trademarks of Microsoft Corporation in the United Alpine accepts no responsibility for lost data, etc., even if data, etc., is States and/or other countries. lost while using this product.
- Page 11 Favourite Function • Frequently used functions and useful functions can be customised for your convenience. • You can register up to 54 functions. • You cannot register a function more than once. About Swiping the Touch Screen...
- Page 12 Switching the Audio Sources Screen to a Dedicated Screen *1 The Search mode differs depending on the audio source. For details, see the operating instructions of the audio source. *2 The screen also switches by pressing the Menu button.
-
Page 13: About Dual Screen
About Dual Screen * Touch [ ], or swipe to the left to switch to the Navigation menu screen. For details of navigation operations, refer to “Navigation System OM” in the CD-ROM. • When is not displayed, touch [... -
Page 14: Location Of Controls
Location of Controls * For details, see “About Vehicle Interlock Function” (page 87). -
Page 15: Turning Power On Or Off
Turning Power On or Off Initial System Start-Up RESET RESET • When turned on, the system displays the last screen that was displayed before the ignition key was turned off. For example, if the unit is in radio mode when ignition is turned off, it will remain in radio mode when ignition is turned back on. -
Page 16: Touch Screen Operation
Touch Screen Operation Switching Sources (AUDIO) • Be sure to touch the onscreen button lightly with the pad of your finger (AUDIO) to avoid scratching the display. *1 When no USB flash drive/iPod/HDMI device/Smartphone/Bluetooth compatible device is connected, this option is not available. *2 The name set for “HDMI Setup (page 44)/AUX Setup”... - Page 17 Operating the Function Button on the Audio/ About Basic Operation for List Screen Video Main Screen • When the next selection item does not exist, the list item is not displayed. • Depending on the Audio source, the Function mode displays from the beginning.
- Page 18 About the Shortcut Setup Screen • When Setting the Rear Seat Entertainment is “Off, ” you cannot change the screen. For details on Rear Seat Entertainment setting, see “Rear Seat Entertainment Setup” (page 47). *1 You can perform a more detailed set up in “Sounds Setup” (page 31). *2 You cannot switch when Front/Rear Sync in “Adjusting the Parametric Equalizer Curve (Dual HD EQ)”...
- Page 19 Setting contents: Standard (Initial setting) / Punch / Rich / Mid Bass / Low Bass *1 The visual source that can be output to the Rear monitor is “HDMI/ DVD, ” “iPod Video, ” and “AUX. ” When the unit plays back the visual source, you can only select the same visual source as the unit.
- Page 20 • The source icon displayed in the Edit Menu screen is displayed only when usable setup and conditions of each Audio source are fulfilled. For details on setup and conditions of each audio source, see “Switching Sources” (page 16). • Swiping to the right or left in the Audio source select area, you can change one audio source at a time.
- Page 21 About the Indicator Display Opening screen Customisation - BMP image - Image size: 800 × 480 pixels (RGB 24 bit or less/number of colour bit: 24, 8, 1 bit) - Compression format: non-compressed - Folder name* : OPENINGFILE - File name* : openingfile.bmp [OK] [OK]...
- Page 22 How to Input Characters and Numbers (Keypad)
- Page 23 Editing the Favourite Screen ] (Edit) Using the Favourite Function (Favourite) Setting item: Item registration / Item name change / Icon change / Layout change / Item deletion [OK] • If you touch [ ] (Cancel) while editing, the screen switches to the previous Favourite Edit screen.
- Page 24 *1 You can choose the frequency from Preset 1 - 12, registered into each FM1/FM2/MW/LW band of Radio. *2 You can choose a channel registered to Presets 1 - 18. • You can also register directly by touching [ ] in the Audio source screen.
- Page 25 • When you move to other pages, switch pages, or when you make a new page and move to another, drag to the end of the screen, and lift your finger after the page changes. [ ] (Delete) ] (Delete All)
- Page 26 • The application programme and related specifications and data may be deleted or terminated without notice. • Some Alpine TuneIt App functions may not be available if the Smartphone is not in a service area or receives no signal. Adjusting the sound via the Smartphone •...
- Page 27 • Touch [ ] to return to previous screen. • Depending on the status, contents of message and photo may not be displayed. • In some situations, such as the unit is powered off or during a call, etc., Notification of the Smartphone will not be prompted by this unit. •...
- Page 28 [Wireless] Setup Operation MENU • You can also display the menu screen, by touching [ on the lower part of the Audio source screen or by swiping upward. [Setup] * This setting is only available when “Bluetooth” is set to “On” ( [ ] [ ] [ ] [ ] •...
-
Page 29: Bluetooth Setup
] (Audio) [ ] (Hands-free) ] (Both) Bluetooth Setup [Bluetooth] • You can register up to 5 Bluetooth compatible mobile phones. • The Bluetooth registration process differs depending on the device version and SSP (Simple Secure Pairing). If a 4 or 6 character Passcode appears on this device, enter the Passcode using the Bluetooth compatible device. - Page 30 Setting item: Setting item: iPhone Auto Pairing Default Phonebook Encoding Setting contents: Setting contents: On / Off (Initial setting) Latin-1 / Latin-9 (Initial setting) / Russian / Chinese / Thai / Arabic / UTF-8 / UTF-16LE / UTF-16BE • This setting supports iPhones with iOS Ver.5.5 or later. •...
- Page 31 *1 You can make this setting in the Sound Setup screen of the Shortcut Setup. For details, see “Sound Setup Function” (page 18). *2 You can also make the setting in the Bal./Fad. screen. For details on how to adjust, see “Setting the Balance/Fader/Rear [General] Speaker/Subwoofer”...
- Page 32 Setting item: MX HD • When the Defeat setting is “On, ” you cannot perform the set up. • When the Sound Setup of the Shortcut Setup is selected to “BASS ENGINE SQ, ” you cannot perform the set up. •...
- Page 33 Adjustable frequency bands: 20 Hz to 20 kHz (in 1/3 octave steps) Setting item: EQ Presets Setting contents: FLAT (Initial setting) / POP / ROCK / NEWS / JAZZ / ELECTRONIC / HIP HOP / EASY LISTENING / COUNTRY / CLASSICAL •...
- Page 34 Setting item: Setting item: X-OVER Time Correction • When the Sound Setup of the Shortcut Setup is selected to “BASS ENGINE SQ, ” you cannot perform the set up. [Channel] • The channel being adjusted is displayed in red. [ms] [cm] [inch] Setting contents: 20 / 25 / 31.5 / 40 / 50 / 63 / 80 (Initial setting) / 100 / 125 / 160 / 200 Hz...
- Page 35 Setting item: Source Volume Setup Radio / DAB / Compressed Media* iPod Music / iPod Video or AUX* / HDMI* / Bluetooth Audio Setting contents: -14 to +14 (Initial setting: 0) Setting item: Mute while backing up *1 Compressed Media is the music data in a USB flash drive (MP3/ Setting contents: WMA/AAC/FLAC).
-
Page 36: About The Crossover
Adjusting to a frequency range outside that recommended may cause damage to the speakers. For the recommended crossover frequencies of Alpine speakers, refer to the respective Owner’s Manual. We are not responsible for damage or malfunction of speakers caused by... - Page 37 Visual Setup [Visual] [Video] (Video media)* Visual EQ / Brightness / Colour / Tint / Contrast / Sharpness [Camera]* Brightness / Colour / Contrast [Navigation]: Brightness / Contrast *1 “Video” can be selected while a video is playing. *2 The camera names are not displayed when “Off ” is set (page 45). Setting item: Visual EQ Setting contents:...
- Page 38 Screen Setup Setting item: [Screen] Brightness Setting content: -15 to +15 (Initial setting: 0) Setting item: Colour Setting content: -15 to +15 (Initial setting: 0) [Screen/Lighting] Setting item: Tint Setting item: Setting content: Dimmer / Key Illumination Level / Screen Dimmer Level R15 to G15 (Initial setting: 0) Setting item: Setting item:...
-
Page 39: General Setup
General Setup [General] Setting item: Screen Dimmer Level Setting content: -15 to +15 (Initial setting: 0) • This setting is only available when “Dimmer” is set to “On. ” Setting item: Screen Colour Setting contents: Blue (Initial setting) / Light blue / Aqua blue / Red / Green / Amber / Yellow / White Setting item: Language... - Page 40 Setting item: Clear All Settings [Reset] Setting item: Security Code [OK] Setting contents: Off (Initial setting) / On [OK] • Do not turn on/off the power, change the ignition key position or remove the screen panel until system restart is completed. [OK] [OK] •...
- Page 41 Car Setup [Audio] [Car] Setting item: Vehicle type Setting contents: Saloon (Initial setting) / Hatchback / Pickup • You can make this setting only when the optional CAN Interface box is connected. Setting item: Installation Status * This setting is only available when “AUX” is set to “On” ( [ ] [ ] [ ] [ ] •...
- Page 42 Radio Setup [Radio] Setting item: PTY31 Setting contents: On (Initial setting) / Off • The unit automatically gives priority to an emergency broadcast whenever it begins, and interrupts the programme you are currently listening to when PTY31 is set to “On”. •...
-
Page 43: Dab Setting
DAB Setting [DAB] Setting item: Announcement Mode Transport News / Warning/Service / Area Weather News / Event Announcement / Special Event / Program Information / Sport News / Financial News Setting contents: Off (Initial setting) / On Setting item: FM Linking Setting contents: Setting item: Off / On (Initial setting) - Page 44 AUX Setup [AUX] Setting item: AUX Name Setting contents: AUX (Initial setting) / AUX DVD / GAME / External DVD / DVD Changer / DVB-T / TV / USB Player Setting item: Direct Touch Setting contents: On (Initial setting) / Off Setting item: Setting contents: Off / On (Initial setting)
-
Page 45: Camera Setup
*3 You can select this item only when Camera Select is “Rear. ” *4 You can make this setting only when the optional CAN Interface box is connected. Setting item: *5 Set this setting after closing the Alpine TuneIt App. Guide Adjustment [Guide Adjustment] [Back] [Panorama] [Corner] [Top] •... - Page 46 [Link] Setting item: Guide Adjustment [Guide Adjustment] • If the video pattern is set to “Corner, ” the camera guide will not be displayed. [Adjust] • If [Adjust] does not appear, proceed to step 3. • Note on the yellow guide line “ ”...
- Page 47 CAN-I/F Setup Rear Seat Entertainment Setup [CAN-I/F Setup] [Rear Seat Entertainment] Setting item: Rear Seat Entertainment Setting contents: Off (Initial setting) / On • When this setting is “On, ” you can use this unit to switch the Illumination of a Rear monitor with the Illumination function. Setting item: Default Vehicle Screen Setting contents:...
-
Page 48: Unit Setup
Presets/Dual HD EQ/X-OVER/Time Correction/Defeat/Phone Speaker/Default Sound Settings are set to “Off ” or “Flat” and cannot be • Set this setting after closing the Alpine TuneIt App. adjusted. • After the above setting, turn the ignition key off (ACC OFF) and on •... - Page 49 • For details on switching the display of the Radio text, see “Displaying Radio Text” (page 52).
-
Page 50: Listening To The Radio
Presetting Stations Manually Listening to the Radio (AUDIO) • You can select and change the source from the Menu screen (page 19) or the Favourite screen (page 23). • [ ] button displays the current selected band. (e.g. [FM1]) • For details on switching to the Preset mode screen, see in “MW/LW band main screen example”... - Page 51 Inputting Frequency Directly and Receiving the Radio Station Turning AF (Alternative Frequencies) On or Off ] (Direct Tune) ] (AF) • RDS mode is not be displayed for the MW or LW band. • When the AF ON mode is selected, the unit automatically tunes to a strong signal station in the AF list.
-
Page 52: Receiving Traffic Information Manually
] (TA) • Touch [ ] or [ ] to select the same programme type station as the currently selected programme type after switching the tuning mode to PTY (PTY Seek) mode. • The “TP” indicator lights up during standby mode off in a condition other than radio source to indicate that the unit is receiving the traffic Displaying Radio Text announcement. - Page 53 Preset mode screen example DAB/DAB+/DMB Preset button Swipe vertically in the list to change pages. Full Search mode button (All Service list, Current Ensemble list or PTY list is displayed) Swipe to the right when you use the Full Search mode screen. •...
- Page 54 Touch [ ] / [ ], [ ] / [ ] or [ ] / [ ] to change Service Component/PTY Search Function the Service or Ensemble up or down respectively. Touch and hold to change the Service or Ensemble continuously. You can select your favourite Service Component from the All Service •...
- Page 55 Interruption Function Inputting Channel Number Directly and Receiving the Broadcasts If Interruption Function is enabled, when the following broadcast is received, the unit switches to the DAB source screen automatically, and You can receive your desired station by inputting the channel number will receive broadcasts.
- Page 56 Displaying DAB Text Text messages from a DAB station can be displayed. Tune in a DAB station that transmits text messages. Touch [ ] (Info) in the DAB mode repeatedly to switch to the desired display. Station Info Mode Dynamic Label Mode Station Info Mode Station Info Mode...
- Page 57 USB Flash drive Playback (Optional) Press the (AUDIO) button to select USB mode. The display shows the USB mode screen. • You can select and change the source in the Menu screen (page 19) You can play back music files (MP3/WMA/AAC/FLAC) stored in a USB or Favourite screen (page 23).
- Page 58 Random Play Touch [ The Random Play mode select pop up screen is displayed. • The [ ] button displays the currently selected mode. Select your desired Random Play mode. All songs in the USB flash drive are played back in random sequence.
- Page 59 iPod/iPhone WARNING It is dangerous for the driver to watch video while driving (Optional) the vehicle. The driver may be distracted from looking ahead and an accident could occur. Install the unit correctly so that the driver cannot watch a A separately sold USB iPod/iPhone AV cable (KCU-461iV) or a video unless the car is stopped and the parking brake is separately sold Lightning to USB cable (KCU-471i) is required...
-
Page 60: Searching For A Music File
Artist title/Release Date* To pause playback, touch [ / ]. Song title/Episode title* • If a song is playing on the iPod/iPhone before it is connected to the unit, Album title/Podcast title* it will continue playing when it is connected. Total time for playing •... -
Page 61: Searching For A Desired Video File
For example: Searching by Movie Full Search Mode The following example explains how a Movie search is performed. Another search mode can be used for the same operation, although the hierarchy For example: Searching by Artist name differs. The following example explains how an Artists search is performed. Another search mode can be used for the same operation, although the Touch the [Video] icon in the Full Search mode screen. - Page 62 CINEMA mode Repeat Play Touch [ ] to repeatedly play back the currently track. The tracks (files) will be played repeatedly. Touch [ ] again to deactivate Repeat play. Track Repeat Track Repeat Random Play (Shuffle) In CINEMA mode, the monitor displays a normal picture by stretching out the picture horizontally and vertically.
-
Page 63: Removing The Disc
• Before inserting or removing the disc, always turn the ignition key to HDMI Device ACC or ON. • You cannot remove or insert the disc with the ignition key turned to OFF. (Optional) Removing the Disc Devices supporting HDMI can connect and play back through this unit Press (Eject) button. - Page 64 Setting the TV Screen Mode Returning to the Initial Setting You can return the contents you previously set to the initial factory Setting item: settings. TV Screen Aspect Setting contents: Setting item: 16:9 (Initial setting) / 4:3LB / 4:3PS Setup Initialize Setting contents: •...
- Page 65 Digital audio output CD Contents Setup Audio recording Optical digital Disc format Digital audio output Digital audio Playing MP3/WMA/AAC/WAV Data output (when a digital output (HDMI setting audio processor is output) Format Setting item: connected) CD Play Mode Bitstream — LPCM 2ch Setting contents: 16/20/...
- Page 66 CD/MP3/WMA/AAC/WAV Playback MP3/WMA/AAC main screen example Press the (AUDIO) button to select DVD (CD) mode. The display shows the DVD (CD) mode screen. Info mode • You can also select and change from the Menu screen (page 19) or Favourite screen (page 23). When a disc is inserted into the disc slot of this unit, with the label side facing up, the unit starts playback of the disc.
- Page 67 MIX (Random Play) Touch [ ] during playback. DVD Video main screen example The tracks (files) on the disc will be played back in a random sequence. The MIX mode switches every time [ ] is touched. MP3/WMA/AAC: MIX Folder* MIX Disc* MIX Folder* *1 Only files in a folder are played back in random sequence.
-
Page 68: Playing A Disc
Info mode Playing a Disc WARNING It is dangerous for the driver to watch the DVD/TV/Video while driving the vehicle. The driver may be distracted from looking ahead and an accident could occur. Install the unit correctly so that the driver cannot watch DVD/TV/Video unless the vehicle is stopped and the emergency brake is applied. -
Page 69: If A Menu Screen Appears
If a Menu Screen Appears Numeric Keypad Input Operations On DVD mode, menu screens may appear automatically. If this Touch [key] again in the menu operation mode. happens, perform the operation described below to start playback. The numeric keypad input mode screen appears Direct Menu Operations Touch a desired number. -
Page 70: Repeat Playback
Stopping Playback Forward/Reverse frame-by-frame Playback Touch [ ] during playback. “ ” indicator is displayed, and playback stops. In the pause mode, touch [ ] or [ ]. • Playback starts from the beginning when [ / ] is touched while The picture advances by one frame each time the button is playback is stopped. -
Page 71: Searching By Title Number
Searching by Title Number Switching the Audio Tracks Use this function to easily find positions on the DVD using the DVD’s DVDs with multiple audio tracks or languages allow switching the titles. Perform operations while playback is stopped. sound during playback. Touch [ ] (Audio). - Page 72 • The electronic device must possess an HDMI output interface. • Not all devices with an HDMI output interface can be recognised by this unit. • Use only the Alpine Special HDMI connection cable. Press the (AUDIO) button to select HDMI mode.
-
Page 73: Before Using Bluetooth
Bluetooth compatible device to this unit. The device mobile device or personal computer over short distances. This enables a name of this unit is “ALPINE NAVI” and the initial number of the hands-free call or data transmission between Bluetooth compatible passcode is “0000. -
Page 74: Answering A Call
Answering a Call Call Waiting Function Incoming calls are announced by the received call ring tone and a If a call comes in from another phone during a call, a notice is displayed displayed message (PHONE No., etc.). on the screen. This function can only be used if the connected mobile phone has a call waiting function service included. - Page 75 Second incoming call during a conversation in the Phone Touch the Short Cut icon. Operation screen A contact’s name, phone number, and a confirmation message of the phone number are displayed. • The display or operation may differ depending on the connected mobile phone or the caller’s mobile phone.
-
Page 76: Voice Dial Function
Entering a Phone Number to Make a Call Speak into the microphone supplied with this unit. • If no speech is detected, the unit may pause depending on version Touch [ ] (Keypad). of the connected iPhone. In that case, touch the microphone icon ] in the centre of the Voice Control mode screen. -
Page 77: Phone Book Function
Adjusting the volume Phone Book Function Adjust the speaker/microphone volume in Voice Dial mode. Perform the same procedure to adjust the speaker/microphone volume of hands- free phone. Phone Book screen example Touch [ ] or [ ]. Adjust the speaker and microphone volumes. Stopping input to the microphone If the surrounding sound (road noise, etc.) is loud, you may wish to cut input to the microphone for 3 seconds. -
Page 78: Deleting The Phone Book Entries
Deleting the Phone Book Entries Bluetooth Audio Deleting One Entry from the Phone Book If a Bluetooth compatible mobile phone, portable player, etc. is connected by wireless, you can play back a song (operation is Touch [ ] (Edit). controllable from the unit). Touch the checkbox [ ] of the contact name (or phone •... -
Page 79: Search Function
• To play back audio, a mobile phone or a portable player conforming to Random Play A2DP (Advanced Audio Distribution Profile) or AVRCP (Audio/Video Remote Control Profile) is required. Not all functions work with all devices. Available for AVRCP Ver. 1.3, 1.4 and 1.5 only. •... -
Page 80: Connecting A Bluetooth Device
Connecting a Bluetooth Device Registering a Bluetooth device in the unit enables automatic connection. If it does not connect automatically, run through the connection procedure again. Touch [ ] (Phone Setting). The Device Setting select pop up screen is displayed. Touch [Reconnect]. -
Page 81: Operating An External Dvd Player
Operating an AUX, AUX DVD, GAME or USB Auxiliary Device Player (Optional) Example for AUX, AUX DVD, GAME, USB Player mode display Operating Auxiliary Devices (Optional) To operate devices connected to the AUX terminals of the unit, follow the procedure described below. •... -
Page 82: Operating An External Dvd Changer
] (Menu) External DVD changer screen example Calls up the Menu screen. ] (Menu Control) Calls up the menu operation mode. Switches the program/playlist/folder down. Switches the program/playlist/folder up. ] (Display Mode) You can set the Display Mode. For details, see “Switching Display Modes (During Video File Play Back)”... - Page 83 • If the setting for “Setting Direct Touch Operation” (page 44) is set to “On”, the direct touch operation is possible. Directly touch operation switches displayed on the screen to operate. To display the operation screen, touch [Control]. Operating a TV Menu operation mode screen example [ ], [ Switches the Channel number / Preset channel down.
-
Page 84: Rear Camera Operation
Displaying the rear view video while the car is Camera Operation in reverse (Optional) Shift the gear lever to the reverse (R) position. The rear view image is displayed while the car remains in reverse. When an optional camera is connected, the view video of camera can be output to the monitor. -
Page 85: About The Rear Camera Guide
Distance guidance mark About the Rear Camera Guide The distance guides represent the ground level distance from the rear bumper. It is difficult to accurately estimate the distance to objects above To display the guide, set “Guide Display ON/OFF Setting” (page 84) to ground level. -
Page 86: Front Camera Operation
<Situation of the car> Front Camera Operation Actual distances Displaying the Front Camera image from the Menu screen. Press the MENU button. The menu screen is displayed. Error Error The distance guidance mark represents the distance to a flat road surface. Therefore in the case of an upward slope behind the car, the distance guides are displayed closer to the rear bumper than the actual distance. - Page 87 About Vehicle Function Screen Examples The screens that can be displayed on this unit differ, depending on the Interlock Function type of vehicle. Climate screen example Communication between your vehicle and the unit allows you to set and display various functions of your vehicle, as well as enable operation of The Climate screen turns on when you adjust the air conditioning in your vehicle.
- Page 88 Parking Sensor screen The Parking sensor screen turns on when the front or rear sensor on your vehicle detects an obstacle within a certain distance. Parking Sensor Full screen example When the front or rear sensor detects an obstacle within a certain distance, the Parking Sensor screen is displayed, and the indicator ( ) that corresponds with that area lights up.
- Page 89 About Remote Battery Replacement Battery type: CR2025 battery or equivalent. Control Operation Opening the battery case Slide out the battery cover while firmly pressing in the direction (X701D with DVE- of the arrow. 5300X only) Replacing the battery Put the battery in the case with the (+) indication upward as shown in the illustration.
- Page 90 DVD/Video CD mode: Operating the DVD Player • Move to the desired position on the disc. • During playback, press and hold for more than 1 second to reverse the disc at double speed. Hold for more than 5 seconds to reverse the disc at 8 times the normal speed. Hold for more than 10 seconds to reverse the disc at 32 times the normal speed.
-
Page 91: Product Software Update
The software installed in the product contains open-source software. of the disc with a ballpoint pen or other such instrument, then See the following Alpine website for details on the open source software. insert the disc again. http://www.alpine.com/e/oss/download... - Page 92 We recommend on the disc to find the scene you want to watch and view various not using these accessories on discs played in Alpine DVD players. types of information in dialog style. Using compact discs (CD/CD-R/CD-RW) If you use unspecified compact discs, correct performance cannot be guaranteed.
- Page 93 What is MP3? On handling compact discs (CD/CD-R/CD-RW) MP3, whose official name is “MPEG Audio Layer 3,” is a compression standard prescribed by the ISO, the International Standardisation • Do not touch the surface. Organisation and MPEG which is a joint activity institution of the IEC. •...
- Page 94 ID3 tags/WMA tags Terminology This device supports ID3 tag v1.0, v1.1, v2.2, v2.3, v2.4, and WMA tag Bit rate Ver.1.x. If tag data is in an MP3/WMA/AAC file, this device can display This is the “sound” compression rate specified for encoding. The higher the title (track title), artist name, and album name ID3 tag/WMA tag the bit rate, the higher the sound quality, but also the larger the files.
- Page 95 About DVDs Music CDs and DVDs have grooves (tracks) in which the digital data is recorded. The data is represented as microscopic pits recorded into the track – these pits are read by a laser beam to play the disc. On DVDs, the density of the tracks and pits is twice that of CDs, so DVDs can contain more data in less space.
- Page 96 List of Language Codes (For details, see page 64.)
-
Page 97: In Case Of Difficulty
• If the area you are in is a primary signal area, the antenna may properly connected, or then consult your authorized not be grounded and connected properly. Alpine dealer. - Check your antenna connections; make sure the antenna is properly grounded at its mounting location. -
Page 98: If This Message Appears
If the above-mentioned solution does not solve the • A USB flash drive with a hub is connected. problem, consult your nearest Alpine dealer. - You cannot play back from a USB flash drive with a hub. USB MP3/WMA/AAC is not played back. - Page 99 Bluetooth and eject the disc. Please connect Bluetooth audio device. If the disc still does not eject, consult your Alpine dealer. • The Bluetooth audio device was not connected correctly. 2) When the error indication remains after ejecting, press - Check the settings for the unit and the Bluetooth audio device again.
-
Page 100: Specifications
- Clean the dirty disc, and insert it again. Damaged discs should MONITOR SECTION be replaced. Screen Size 8” (X801D-U) 7” (X701D/INE-W997D) Navigation LCD Type Transparent type TN LCD The vehicle’s position is erroneous. Operation System TFT active matrix •... - Page 101 Bluetooth SECTION X701D with DVE-5300X Bluetooth Specification Bluetooth V2.1+EDR CD/DVD SECTION Output Power +4 dBm Max. (Power class 2) Profile HFP (Hands-Free Profile) Frequency Response CD: 5 – 20,000 Hz (± 1 dB) OPP (Object Push Profile) Wow & Flutter (% WRMS) Below measurable limits PBAP (Phone Book Access Profile) Total Harmonic Distortion...
- Page 102 LIMITED WARRANTY END USER LICENSE AGREEMENT (HERE) HERE warrants that, subject to the warnings set out below, for a period of 12 months after acquisition of your copy of the Database, it PLEASE READ THIS END USER LICENSE AGREEMENT CAREFUL BEFORE will perform substantially in accordance with HERE’s Criteria for USING THE HERE DATABASE Accuracy and Completeness existing on the date you acquired the...
- Page 103 GOVERNING LAW This Agreement shall be governed by the laws of the jurisdiction, in which you reside at the date of acquisition of the Database. Should you at that moment reside outside the European Union or Switzerland, the law of the jurisdiction within the European Union or Switzerland where you acquired the Database shall apply.
- Page 104 User Manual Navigation software for the Alpine Navigation System UK English March 2015, ver. 1.0...
-
Page 105: Table Of Contents
Table of contents 1 Warnings and safety information ................5 2 Getting started ......................6 2.1 Initial set-up ........................6 2.2 Screen controls ........................8 2.2.1 Using the buttons and other controls..................8 2.2.2 Using the cursor ........................9 2.2.3 Using the keyboard ......................... 9 2.2.4 Using touch gestures ...................... - Page 106 3.1.7 Selecting a location on the map .................... 37 3.1.8 Planning a Multipoint Route ....................38 3.2 Checking Route Information and Alternatives ..............39 3.3 Checking Traffic Events ....................40 3.4 Editing the route ......................42 3.4.1 Setting a new starting point....................42 3.4.2 Adding an additional destination ..................
- Page 107 4.3.1.1 Vehicle profile ..........................65 4.3.1.2 Route Planning Method types ....................... 67 4.3.1.3 Navigation Mode ........................... 67 4.3.1.4 Road types ............................. 67 4.3.2 Sound ............................ 68 4.3.3 Warnings ..........................70 4.3.4 Navigation View ........................71 4.3.5 Regional ..........................73 4.3.6 Display ..........................73 4.3.7 Traffic ...........................
-
Page 108: Warnings And Safety Information
Plan the route before your departure and stop if you need to change the route. You must follow the traffic rules. If you deviate from the planned route, Alpine Navigation System changes the instructions accordingly. -
Page 109: Getting Started
2 Getting started Alpine Navigation System is optimised for in-car use. You can use it easily by tapping the screen buttons and the map with your fingertips. Easy map updates Update your maps regularly as road networks are continuously evolving all over the world. - Page 110 Read the end-user licence agreement, and tap if you agree with the terms of use. The Configuration Wizard starts. Tap to continue. Select the language and speaker used for voice guidance messages. Later you can change it in Regional settings (page 68). Tap to continue.
-
Page 111: Screen Controls
The initial set-up is now complete, tap A warning appears to draw your attention to the hazards of operating, entering data into or obtaining data from the Alpine Navigation System during driving or transportation. After reading it carefully, tap to enter the navigation view. -
Page 112: Using The Cursor
2.2.2 Using the cursor You can select a map location by tapping the map during navigation. When a map location is selected, the cursor ( ) appears at the selected point on the map. The location of the cursor can be used as the destination of the route or a new Alert Point. You can also search for Places around it or add this location to your saved locations. -
Page 113: Using Touch Gestures
2.2.4 Using touch gestures You usually need to tap the screen only once. However, some useful features can be accessed with other gestures. See the table below. Action Function Tapping and Tap and keep pressing the following buttons to reach extra functions: holding the ... - Page 114 Zooming in and Change how much of the map is displayed on the screen. Alpine Navigation System uses maps that let you examine the locations at various zoom levels, always with optimised content. It always displays street names and other text with the same font size, never upside- down, and you only see the streets and objects that you need.
-
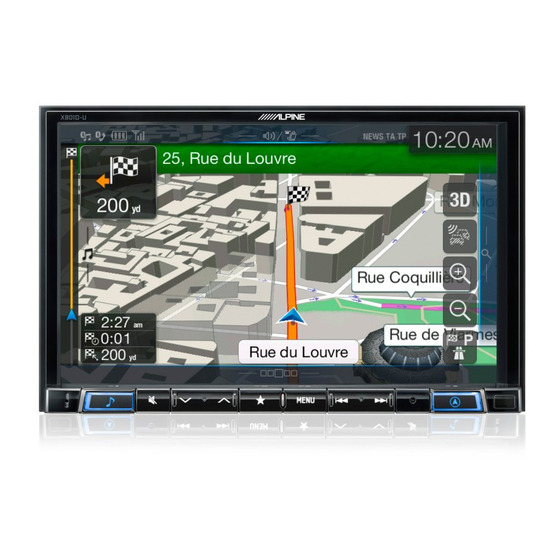
Page 115: Navigation View
The navigation view is the main screen of Alpine Navigation System that shows the planned route on a map. Alpine Navigation System works with digital maps which are not simply the computerised versions of traditional paper maps. Similarly to paper road maps, the 2D mode of digital maps shows you streets and roads. - Page 116 Traffic It shows traffic-related information. See page 40. Zoom You can change how much of the map is displayed on the screen. Alpine Navigation System uses maps that let you zoom in and out on the map. See Page Lane...
-
Page 117: Streets And Roads
When entering a tunnel, the map is replaced with a generic tunnel image. See page 18. 2.3.1 Streets and roads Alpine Navigation System shows the streets similarly to paper road maps. Their width and colours correspond to their importance; you can easily tell a motorway from a small street. -
Page 118: The Planned Route
2.3.3 The planned route The planned route is the currently navigated route. Whenever the destination is set, the route is active until you delete it, reach your destination or suspend navigation. Alpine Navigation System displays the route in the following ways:... -
Page 119: Manoeuvre Icons
A smaller icon shows the type of the second next manoeuvre if it is near the first one. Otherwise, only the next manoeuvre is displayed. 2.3.5 Manoeuvre icons During navigation the next manoeuvre is displayed in the top left corner. Most of the manoeuvre icons are intuitive. -
Page 120: Lane Information And Signposts
When navigating on multi-lane roads, it is important to take the appropriate lane in order to follow the planned route. If lane information is available in the map data, Alpine Navigation System displays the lanes and their directions using small arrows at the bottom of the map. -
Page 121: Tunnel View
2.3.8 Tunnel view When entering a tunnel, the map is replaced with a generic tunnel image so that surface roads and buildings cannot distract you. The top-down overview of the tunnel displayed in a separate window helps you orientate yourself. The remaining distance in the tunnel is also displayed. After leaving the tunnel, the original map view returns. -
Page 122: Object Types
Alpine Navigation System supports the following 3D object types: Type Description 3D terrain Alpine Navigation System displays 3D hills and mountains in the Navigation view, and illustrates them by colouring and shading on the 2D map. Elevated roads Elevated roads are complex intersections and vertically isolated roads (such as overpasses or bridges) displayed in 3D. -
Page 123: Navigation Menu
2.4 Navigation menu Press the navigation hardkey button to open the Navigation menu. You can see the following menu options when you are navigating without a planned route: Button Function Select your destination by entering an address or its coordinate, or by selecting a Place, a Saved Location, or a Saved Route. - Page 124 Delete the next waypoint or the whole route. The following options are also available on many of the menu screens: Button Function Tap the Menu button to return to the main menu. Check those notifications that contain important information but do not require immediate action from the users.
-
Page 125: Using The Navigation
3 Using the navigation By default, Alpine Navigation System calculates routes using the road network of the maps provided with the product. You can select the destination and start navigating to it right away (normal navigation) if you need a route for immediate navigation. - Page 126 . You can see the input field at the top of the screen. Right next to it you can see the search area, the town around which the search is carried out. The default search area is the area where you are located. For a local search, skip the next step.
- Page 127 If necessary, tap on the right side of the list and then tap the related button to narrow the list of search results by type (the number on the related icon shows the number of the matching results): to see the list of recent destinations with a matching name or address.
-
Page 128: Selecting An Address
Press the navigation hardkey button to access the Navigation menu. Select the country by performing the following steps: By default, the Alpine Navigation System proposes the country where you are or in case there is no valid GPS position, the country of the last known position. If needed, tap Start entering the first few letters of the country. -
Page 129: Selecting A Town Centre
Start entering the street name on the keyboard. The names that match the string appear in a list. to open the list of results. Select the street from the list. c. Enter the house number or crossing street on the keyboard. (To enter letters, Tap the selected address to finish the address search. -
Page 130: Selecting The Midpoint Of A Street
To open the list, tap , and select the town or postcode. 3.1.2.3 Selecting the midpoint of a street To navigate to the midpoint of a street without entering the house number, perform the following steps: Press the navigation hardkey button to access the Navigation menu. Go to , and select the street name field. -
Page 131: Using The Postcode To Select A Destination
Start entering the name of the crossing street (tap to enter letters), or tap to open the list of results. Select the crossing street from the list. 3.1.2.5 Using the postcode to select a destination You can also select any kind of destination by entering the postcode instead of the city name. To select the postcode, perform the following steps: Go to and modify the country as described earlier (page 25), if necessary. -
Page 132: Selecting A Place Of Interest
3.1.3 Selecting a Place of Interest You can search for Places of Interest (Places) in the menu. Using the same screen, you can find a Place by selecting one of the following options: Finding frequently searched types of Places with the Quick search categories, see page 29 ... -
Page 133: Searching By Category
Tap any of the quick search buttons to get an instant list of Places. The Places in the list can be ordered by their distance from the current or last known position, from the destination, or by the length of the necessary detour. If you need to reorder the list, tap . - Page 134 minimal detour only, such as searching for upcoming petrol stations or restaurants. (The result list is ordered by the length of the necessary detour.) to search for a place around the destination of the planned route. (The result list is ordered by the distance from the destination.) ...
-
Page 135: Searching By Name
The length of the necessary detour. to reorder the list. To filter the list of results by providers, tap and then the provider logo on the right side of the screen. Browse the list and tap one of the list items. A full screen map appears with the selected point in the middle. - Page 136 (optional) If you have selected , select the town to search in. You can search for the name of a Place in all categories by performing the following steps: . Using the keyboard, start entering the name of the Place or browse in the categories.
-
Page 137: Finding Help Nearby
3.1.3.4 Finding help nearby To quickly search for nearby assistance, perform the following steps: Press the navigation hardkey button to access the Navigation menu. Places in the following pre-set search categories can be searched for around the current position (or around the last known position if the current position is not available): ... -
Page 138: Selecting A Saved Location
3.1.4 Selecting a Saved Location To select a location that you have already saved (page 48), perform the following steps: Press the navigation hardkey button to access the Navigation menu. The list of Saved Locations is displayed. It contains two pre-set categories: Home and Work. -
Page 139: Entering Coordinates
Select a destination from the list. The route is calculated and the map appears showing the entire route, where you can check route information and route alternatives. Tap to modify the route parameters, or tap to start your journey. Three of the Smart History Items are displayed in the History screen for easy access. You can select one of them as your destination. -
Page 140: Selecting A Location On The Map
(optional) If necessary, tap then and enter the coordinate in UTM format. Tip! The route is calculated and the map appears showing the entire route, where you can check route information and route alternatives. Tap to modify the route parameters, or tap to start your journey. -
Page 141: Planning A Multipoint Route
If you already have a planned route, tap Tip! to add the selected location to your route. to select the cursor as the destination. The route is calculated and the map appears showing the entire route, where you can check route information and route alternatives. Tap to modify the route parameters, or tap to start your journey. -
Page 142: Checking Route Information And Alternatives
The New Route to... screen appears, where you can select the destination of the route the same way as described in the previous sections. If needed, you can add further intermediate destinations. To add more route points, tap or tap change the final destination. -
Page 143: Checking Traffic Events
The total time of route. You have the following options on this screen: to receive detailed information about the route. If you tap on the right side of the screen, you can narrow the route information, for example to show only motorway sections or toll roads. ... - Page 144 To check the traffic summary, perform the following steps: On the Navigation view, tap the traffic icon in the corner (for example, ) to open the Traffic Summary screen. If there is at least one significant event on the planned route, a description is displayed about the next event.
-
Page 145: Editing The Route
to display historical traffic information. A 2D map is displayed with road segments coloured by the likely density of the traffic in the given period. The information relevant for the current period is shown when you open the screen. If necessary, you can browse the map for a better view of certain road segments. -
Page 146: Adding An Additional Destination
The first line from the bottom is the start of the route, normally the current GPS position. Tap , select , and confirm your action at the warning message. The Change Start to... screen appears. Select the starting point of the route the same way you select a destination. -
Page 147: Modifying The List Of Destinations
Press the navigation hardkey button and tap . Add a destination to your route as described on page 38. 3.4.3 Modifying the list of destinations To edit your route, perform the following steps: Press the navigation hardkey button to access the Navigation menu. In the Navigation menu, tap You have the following options on this screen: ... -
Page 148: Saving The Planned Route
Type in a name and tap The route is saved and it is available in in the Navigation menu. By selecting a previously saved route, Alpine Navigation System recalculates the route using the saved destination and/or the waypoints. 3.4.5 Deleting the planned route You have the following two options to delete the navigated route: ... -
Page 149: Selecting A Route Alternative When Planning The Route
Select one of the route alternatives and tap to return to the previous screen. Alpine Navigation System recalculates the route. Tap to start your journey. The orange line now shows the new planned route. -
Page 150: Selecting A Route Alternative For An Existing Route
Select one of the route alternatives and tap to return to the previous screen. Alpine Navigation System replaces the original route. Tap to start your journey. The orange line now shows the new planned route. -
Page 151: Saving A Location
3.5 Saving a location To add any location to the saved locations (the list of frequently used destinations), perform the following steps: Select a destination as described before. It can be an address, a Place, any location on the map, a previously used destination from History, and so on. When the map appears with the route, tap (optional) Using the keyboard, you can change the name offered for the Saved Location. -
Page 152: Editing A Saved Location
3.5.1 Editing a Saved Location To edit a location that you have already added as a Saved Location, perform the following steps: Press the navigation hardkey button, and tap The list of Saved Locations is displayed. Tap the location you want to edit, tap and enter the name of the location on the keyboard, then tap In Saved Locations, Home and Work cannot be renamed. -
Page 153: Running A Simulation
Return to the Navigation view, and select the Alert Point. The red cursor ( appears there. Scroll down the list and tap Select the type of the Alert Point, the direction from which you expect the alert, and (if applicable) the speed limit for this Alert Point. to save the location as a new Alert Point. -
Page 154: Off-Road Navigation
3.8 Off-road navigation When first started, Alpine Navigation System calculates routes using the road network of the maps provided with the product. If you want to disregard roads during navigation, you can switch to off-road mode, for example when driving in a desert. -
Page 155: Switching To Off-Road Navigation
3.8.1 Switching to off-road navigation To switch to off-road navigation, perform the following steps: Press the navigation hardkey button, and tap , and and select Most of the procedures described for on-road navigation also apply to off-road navigation. However, there are some that are not available in this navigation mode. For example: ... -
Page 156: Updating The Navigation Software And The Maps
To update your navigation software and its maps, perform the following steps: Download and install the Toolbox PC tool on your PC. Go to the alpine.naviextras.com website. If you do not have a user account yet, create one. Click Download PC tool on the right side of the page to access the download page. - Page 157 Perform the update on your navigation system. Do not switch off your navigation system during the following process. Caution! Do not remove the USB storage device until the preparation process is completed. Start the navigation system while your vehicle is parked, and go to any navigation-related screen.
-
Page 158: Reference Guide
4 Reference guide The following sections describe the different concepts and menu screens of Alpine Navigation System. 4.1 Concepts The following sections describe and explain navigation-related concepts. 4.1.1 2D/3D GPS reception The GPS receiver uses satellite signals to calculate its (your) position and needs at least four signals to give a three-dimensional position, including elevation. -
Page 159: Route Calculation And Recalculation
See page 42. Once the destination has been selected, Alpine Navigation System calculates the route based on your preferences. These preferences are the route planning method, the vehicle type, and the road types used or avoided when calculating the route. -
Page 160: Smart Zoom
The maximum speed set in the vehicle profile (page 65) is also used for this warning. Alpine Navigation System alerts you if you exceed the pre-set value even if the legal speed limit is higher. -
Page 161: Real-Time Traffic
The following sections describe these features. 4.1.9.1 Congestion detour on highways Alpine Navigation System may offer a detour when you slow down on a highway due to a traffic jam. The Potential congestion detour window appears and shows the length and... -
Page 162: Real-Time Alternative Routes
You can accept the recommended detour by tapping 4.1.9.2 Real-time alternative routes Alpine Navigation System may offer an alternative route on normal roads in case of a traffic jam. The possible alternative route window appears and shows the length and duration of the detour. -
Page 163: Parking Around Destination
4.1.9.3 Parking around destination If you leave the planned route by exiting a motorway, Alpine Navigation System tries to guess the reason for making a detour. By tapping , you can open a top-down map with the recommended parking Places around the destination. By tapping the arrows on the sides, you can switch between the recommended parking facilities. -
Page 164: Information Menu
Shows the GPS Information screen with satellite position and signal strength information. Shows the version of Alpine Navigation System, licenses, content, demo routes, credits, statistics, and the SWID. -
Page 165: Where Am I
4.2.1 Where Am I This screen contains information about the current position (or about the last known position if GPS reception is not available). You can access it the following two ways: By going to the Navigation menu and tapping ... -
Page 166: Trip Monitor
4.2.2 Trip Monitor Trip Monitor logs information about your route. You can record a new trip by tapping and stop it by tapping By tapping on the Trip Monitor screen, you can select the following options: Button Function By selecting a recorded trip, you can delete, rename, or change the colour of the recorded route. -
Page 167: Setup Menu
4.3 Setup menu You can configure the navigation settings, and modify the behaviour of Alpine Navigation System, by pressing the navigation hardkey button, and tapping Tap the arrows to view the content of other pages. The Setup menu provides the following options:... -
Page 168: Route Preferences
Modify the basic software parameters set during the initial set-up process. See page Create or use your own user profile for navigating, to be able to use your own settings. Delete all saved data and reset all settings to their factory defaults. 4.3.1 Route preferences The following settings determine how routes are calculated: Button... - Page 169 Manoeuvre restrictions and one-way streets are taken into account when planning a route. Roads are used only if access for buses is allowed. Private roads, resident-only roads and walkways are excluded from routes. Manoeuvre restrictions and one-way streets are taken into account when planning a route.
-
Page 170: Route Planning Method Types
Usually, the best selection for fast and normal cars. Results in a route with fewer turns and no difficult manoeuvres. With this option, you can make Alpine Navigation System take, for example, the motorway instead of a series of smaller roads or streets. -
Page 171: Sound
Per-use toll roads are pay roads where there is a per-use charge in the routes by default. If you disable toll roads, Alpine Navigation System plans the best toll-free route. Alpine Navigation System includes ferries in a planned route by default. - Page 172 Button Function Volume slider Adjust the volume of the related sound. Mute the related sound. The slider becomes inactive. Tap again to re- enable it. Button Function Disable verbal instructions. This function is enabled by default. Choose from the following options: ...
-
Page 173: Warnings
You can enable and modify the following settings: Button Description Alpine Navigation System is able to warn you if you exceed the current speed limit. This information may not be available in your region, or may not be fully correct for all roads on the map. -
Page 174: Navigation View
Maps may contain driver alert information that can be shown on the Navigation view in a similar way as real-life road signs. Tap it to enable or disable the warning for these road segments (for example, dangers and sharp curves). For each category of warning signs, set the warning type (visual or audio and visual) and the distance from the hazard to receive the warning at. - Page 175 A top-down overview of the tunnel and the remaining distance are also displayed. In certain situations, Alpine Navigation System offers a detour when there is a traffic jam on a highway. See page 58. In certain situations, Alpine Navigation System offers an alternative route when there is a traffic jam on the road.
-
Page 176: Regional
You can set the measurement units and time/date format to be used. Alpine Navigation System may not support all the listed units in some voice guidance languages. By default, the time zone is taken from the map information and adjusted by your current location. -
Page 177: Traffic
30-minute delay. The blue route is a detour that is 15 minutes longer than the original route (not counting the traffic jam). If you set the Offer detour feature to 10 minutes, Alpine Navigation System recalculates the route because it saves 15 minutes, which is more than the 10 minutes you set. -
Page 178: Trip Monitor
4.3.9 User Profiles If more drivers use Alpine Navigation Systemfor navigating, their settings can be remembered by using one of the user profiles. You can create a new profile by tapping enter a name, and select a car model. -
Page 179: End-User Licence Agreement
5 End-user licence agreement 0. Definitions The following terms shall have the meaning defined hereunder in this agreement when used with capital letters. The text of this agreement may also contain further defined terms. “Agreement” means this End User Licence Agreement (EULA) containing the terms and conditions of use of the Software, Databases and Services by You as the end user. - Page 180 Product is a commercial item as that term is defined at 48 C.F.R (“FAR”) 2.101 and that all use of the Navigation Product is subject to this Agreement. 3 Applicable law and venue 3.1 This Agreement will be governed by the laws of the country where the Licensor has its statutory seat or in the absence of such incorporation where it has its central administration (“country of residence”) without regard to such country’s choice of law provisions.
- Page 181 5.2 Intellectual property rights of Licensor, the Software Owner or other rightholders extend to the whole Navigation Product and to its parts separately as well. 5.3 The owner(s) of the copyrights of the Database(s) is (are) the Licensor, or natural person(s) or corporate business entity(ies) (referred to as: “Database Owner”) who supply them.
- Page 182 disclose them in full or in part to the public in any format or to download them from the Navigation Product. 8. No warranty, limitation of liability 8.1 The Licensor hereby informs the User that although the greatest care was taken in producing the Navigation Product, given the nature of the Navigation Product and its technical limitations, the Licensor and its suppliers do not provide a warranty for the Navigation Product being completely error-free, and they are not bound by any obligation whereby the Navigation...
- Page 183 Safety (e.g. speed) cameras are provided for informational purposes only and may not be used to encourage, facilitate or support the violation of any laws. Furthermore some countries prohibit the display or use of such features. Compliance with country specific laws and any usage or reliance on the information by user shall be at the User's own risk and sole responsibility.
- Page 184 10.3 Collected data is transmitted, stored and handled anonymously and no connection of the data with the User shall be established by Licensor or any third party. 10.4 Licensor hereby informs the User, that if it accesses the Internet through mobile data service while abroad or otherwise roaming another mobile network the transmission of such data may result in special roaming charges.
- Page 185 11.6 Connected Services may provide data, information or materials supplied and/or licensed by third parties to Licensor. For such materials different terms and conditions imposed by such third parties may apply. Applicable third party terms shall be listed in the “About” section of the Navigation Product, in the Device documentation, at a website address indicated in the “About”...
- Page 186 Traffic data may not be archived and may only be delivered for Users’ near term personal use not to exceed one twenty-four hour period. 13. Third party attribution Attribution of third parties (e.g. copyright notices) supplying software modules, Databases, Services or other material to the Navigation Product are listed in the “About” section of the Navigation Product or at a website address indicated in the “About”...
- Page 187 Alpine Electronics, Inc. © 2015 – Alpine Electronics, Inc. All rights reserved. © 2015 – NNG Kft. All rights reserved. Map data: © 1987 - 2015 HERE. All rights reserved. See...
Need help?
Do you have a question about the X701D/INE-W997D and is the answer not in the manual?
Questions and answers