Table of Contents
Advertisement
Quick Links
Live-View Remote
Read This First
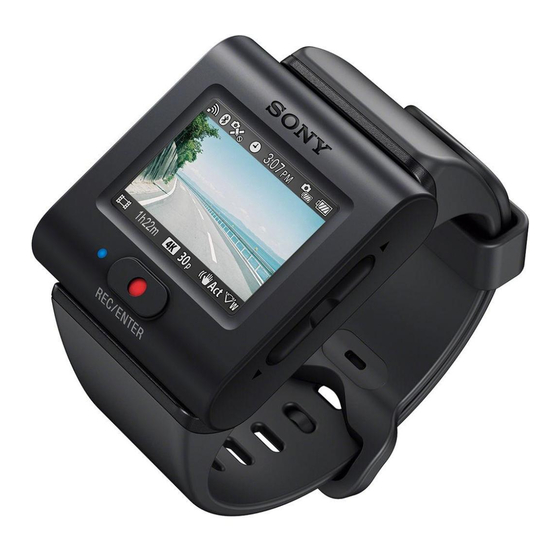
Identifying the parts [1]
Screen display during single connection [2]
Screen display during multi connection [3]
Getting Started
Charging the remote control [4]
Attaching the remote control to the belt [5]
Attaching the remote control to the Mount Adaptor [6]
Turning on/off the power of the remote control [7]
Setting the date and time [8]
Connecting the remote control to a camera via Wi-Fi (Single connection)
Checking the connection mode [9]
Connecting the remote control to a single camera via Wi-Fi [10]
Connecting the remote control to multiple cameras via Wi-Fi (Multi connection)
Connecting the remote control to multiple cameras via Wi-Fi [11]
Resetting the connection information of the registered camera [12]
RM-LVR3
Advertisement
Table of Contents

Related Manuals for Sony RM-LVR3


Summary of Contents for Sony RM-LVR3
- Page 1 RM-LVR3 Live-View Remote Read This First Identifying the parts [1] Screen display during single connection [2] Screen display during multi connection [3] Getting Started Charging the remote control [4] Attaching the remote control to the belt [5] Attaching the remote control to the Mount Adaptor [6]...
-
Page 2: Table Of Contents
Shooting Shooting movies and still images Switching shooting modes [13] Shooting [14] Using the zoom [15] Operating with the multi camera control [16] Button hold function [17] Changing the Settings List of setting items List of setting items [18] How to set the setting items [19] Shooting settings Image quality setting [20] Movie format [21]... - Page 3 AE shift [34] Time-lapse AE mode [35] Scene [36] White balance [37] Color mode [38] Audio recording setting [39] Wind noise reduction [40] Camera settings Bluetooth remote controller power setting [41] Format [42] Time code/user bit [43] IR remote [44] Beep [45] Beep volume [46] Lamp setting [47]...
- Page 4 Resetting the settings [65] Viewing Playing back images [66] Deleting images [67] Information Precautions Handling [68] On moisture condensation [69] On carrying [70] On operating temperatures [71] Handling the LCD screen [72] Waterproof performance [73] The list of time differences for world capitals [74] Specifications [75] Trademarks [76] Note on the License [77]...
-
Page 5: White
Battery pack Battery pack [81] To reduce the battery consumption of the remote control [82] Disposal of the remote control [83] Troubleshooting Cannot connect the remote control and the camera via Wi-Fi. [84] Cannot turn on the remote control. [85] The power of the remote control turns off suddenly. -
Page 6: Screen Display During Single
Terminal section (on/standby) button CHG (Charge) lamp LCD screen UP button/DOWN button REC/ENTER button REC/Wi-Fi lamp MENU button [2] Read This First Screen display during single connection The indicators described below are displayed on the LCD screen during single connection. The indicators differ depending on the connected camera. -
Page 7: Mirror
When the remaining battery charge decreases, the battery level indicator will change in the direction of an arrow. Button hold icon UP button/DOWN button operation guide Zoom ratio Angle setting SteadyShot setting Shooting setting movie format , frame rate , still image mode , self-timer , time-lapse shooting interval... -
Page 8: Charging The Remote
When the remaining battery charge decreases, the battery level indicator will change in the direction of an arrow. UP button/DOWN button operation guide Switches the connected camera. Shooting mode indicator/REC icon The shooting mode and recording status of the connected camera are displayed. The position of the orange cursor indicates which camera is currently displaying Live-View. -
Page 9: Using The
Connect the remote control to an activated computer with the micro USB cable (supplied). The CHG (Charge) lamp lights up in amber and charging begins. The CHG (Charge) lamp turns off when charging is completed. Battery charging time as follows. Via a computer: Approx. -
Page 10: Attaching The Remote Control To The
Attaching the remote control to the belt Attach the remote control to the belt. Align the protruding portion of the remote control with the concave portion of the belt, while pulling the release lever on the rear of the belt toward the opposite side with your finger. -
Page 11: Attaching The Remote Control To The Mount
[6] Getting Started Attaching the remote control to the Mount Adaptor The remote control set into the Mount Adaptor (supplied) can be used with a tripod. Align the protruding portion of the remote control with the concave portion of the Mount Adaptor, while pulling the release lever of the Mount Adaptor toward the opposite side with your finger. -
Page 12: The List Of Time Differences For World
To turn off the remote control, press the (on/standby) button again. Hint When the remote control is turned on/off, the compatible camera (Bluetooth remote controller power compatible) can also be turned on/off (only when the Bluetooth setting is set to ON on the remote control and camera, and the Bluetooth remote controller power setting is set to on the camera). -
Page 13: Checking The Connection
[9] Getting Started Connecting the remote control to a camera via Wi-Fi (Single connection) Checking the connection mode Check that the connection mode of the remote control is set to the single connection before connecting the remote control and the camera via Wi-Fi. Refer to the Help Guide of the camera on the website for how to confirm the connection mode of the camera. - Page 14 The Wi-Fi standby screen is displayed when the remote control is activated. Turn on the camera. FDR-X3000/HDR-AS300/HDR-AS50 Press the (on/standby) button. The camera excluding FDR-X3000/HDR-AS300/HDR-AS50/HDR-AZ1 Press the NEXT or PREV button. HDR-AZ1/Lens-style Camera (QX series) Press the ON/OFF (Power) button. Check the camera settings.
- Page 15 HDR-AZ1/Lens-style Camera (QX series) Check that a Wi-Fi mark is displayed on the display panel of the camera. For DSC-QX100/QX10, the Wi-Fi mark is not displayed on the camera display. If the connection mode of the camera is set to multi connection, switch to single connection. For HDR-AS15/AS30V, insert a memory card to the camera.
-
Page 16: Beep
If the model name is not displayed, check that the camera is in single connection mode. Refer to the Help Guide of the camera on the website for how to check the connection mode of the camera. Register the remote control to the camera. FDR-X3000/HDR-AS300/HDR-AS50 When is displayed on the display panel of the camera, select... - Page 17 Note Once all procedures until step are completed, the remote control and the camera will automatically be connected when you turn on the power. The shortened character string of the camera is displayed on the remote control with “DIRECT-” removed from the SSID. You cannot copy images recorded in the camera to the remote control.
- Page 18 Turn on the remote control. Press the MENU button. Press the UP button or DOWN button to select (Remote control settings) - (connection mode) - (multi connection), then press the REC/ENTER button. Press MENU button. Press the UP button or DOWN button to select (device registration), then press the REC/ENTER button.
-
Page 19: Resetting The Connection Information Of The Registered
Note Register cameras before connection standby mode of the remote control is canceled. The multi camera control function is only available with the compatible cameras. When operating a camera that does not support the multi camera control function, set the connection mode (single connection). - Page 20 Some shooting modes cannot be set depending on the connected camera. Refer to the instruction manual of the connected camera. The shooting mode icon is displayed on the bottom left area of the display. The switchable shooting modes are as follows. Movie mode: Shoots movies.
-
Page 21: Operating With The Multi Camera
To stop shooting, press the REC/ENTER button again. The REC/Wi-Fi lamp turns from red to blue. Note You can shoot a still image by pressing the REC/ENTER button in photo mode. The REC/Wi-Fi lamp does not turn to red. [15] Shooting Shooting movies and still images Using the zoom When the zoom setting of the camera is ON in the single connection mode, you can change the zoom... -
Page 22: Image Quality
Operate multiple cameras on the remote control with multi connection. You can connect up to five cameras at the same time with multi connection. Some setting items cannot be set depending on the connected cameras. Refer to the instruction manual of the camera. Press the UP button or DOWN button of the remote control to move the cursor and switch the Live-View display on the LCD screen of the remote control to the display of any of the connected cameras. -
Page 23: List Of Setting
In button hold mode, appears on the LCD screen of the remote control. The REC/ENTER button, MENU button, UP button and DOWN button of the remote control are disabled. To cancel the button hold mode, press the MENU button for 2 seconds or more, or press the (on/standby) button to turn off the power of the remote control. -
Page 24: Time-Lapse Shooting
– – – Loop recording time – – – Still image mode switching – – – Still image shooting interval – – – Self-timer – – – Time-lapse shooting interval – – – Time-lapse shot number – – SteadyShot (Movie) (FDR-X3000/HDR-AS300) –... -
Page 25: Time Code/User
White balance – – Color mode – – Audio recording setting – – Wind noise reduction Play mode Plays and deletes movies/images using the remote control. Camera Settings : Bluetooth remote controller power setting : Format : Time code/user bit : IR remote : Beep : Beep volume... -
Page 26: How To Set The Setting
Disconnect Disconnects the Wi-Fi connection and returns to the Wi-Fi device selection screen. Device registration Registers a camera to connect to the remote control for multi connection. Displayed only in the single connection. The icon varies depending on the connected camera. Displayed only when a memory card is inserted into the camera. -
Page 27: Loop Recording
Press the (on/standby) button to turn on the power. Press the MENU button. Press the UP button or DOWN button to select the icon of the item, then press the REC/ENTER button. To retry, select (cancel), then press the REC/ENTER button. [20] Changing the Settings Shooting settings Image quality setting... - Page 28 Highest resolution (smooth image recorded at 2× frame rate) Highest resolution High resolution High speed recording (smooth image recorded at 4× frame rate) High speed recording (smooth image recorded at 8× frame rate) Slow recording (slow motion image recorded at 2× frame rate) Super slow recording (slow motion image recorded at 4×...
- Page 29 Note After selecting the Format, set “Image quality setting.” [22] Changing the Settings Shooting settings Time-lapse capture image size You can set the image size of still images shot during time-lapse capture. Press the MENU button. Press the UP button or DOWN button to select (Time-lapse capture mode setting) - (Time-lapse capture image size) - setting value, then press the...
- Page 30 of created movie is 15 minutes per file.) [24] Changing the Settings Shooting settings Still image mode switching You can select either single shooting or continuous shooting when shooting still images. Single shooting and continuous shooting can only be set when shooting still images. Press the MENU button.
- Page 31 You can select the continuous shooting setting for using burst shooting or Motion Shot LE. Press the MENU button. Press the UP button or DOWN button to select (Photo mode setting) - (Still image shooting interval) - setting value, then press the REC/ENTER button.
- Page 32 Press the UP button or DOWN button to select (Photo mode setting) - (Self-timer) - setting value, then press the REC/ENTER button. (Does not use self-timer) (Sets the self-timer to 2-second) (Sets the self-timer to 10-second) Note You cannot use self-timer when recording movies. The self-timer function is enabled until it is cancelled.
- Page 33 [28] Changing the Settings Shooting settings Time-lapse shot number You can set the number of still images shot during time-lapse capture. Press the MENU button. Press the UP button or DOWN button to select (Time-lapse capture mode setting) - (Time-lapse shot number) - setting value, then press the REC/ENTER button.
- Page 34 [30] Changing the Settings Shooting settings SteadyShot (Still) (FDR-X3000/HDR-AS300) You can activate the camera-shake reduction when shooting still images. Press the MENU button. Press the UP button or DOWN button to select (Photo mode setting) - (SteadyShot (Still)) – setting value, then press the REC/ENTER button. (Uses the SteadyShot function when shooting still images) (Does not uses the SteadyShot function when shooting still images) Note...
- Page 35 [32] Changing the Settings Shooting settings Zoom setting You can set whether to use the digital zoom. Press the MENU button. Press the UP button or DOWN button to select (Shooting settings) - (Zoom setting) - setting value, then press the REC/ENTER button. (Uses the digital zoom function) (Does not use the digital zoom function) [33] Changing the Settings...
- Page 36 You can adjust the exposure according to your preference. Press the MENU button. Press the UP button or DOWN button to select (Shooting settings) - (AE shift) - setting value, then press the REC/ENTER button. (Does not use the AE shift) (Uses the AE shift (Set +0.3EV for example)) [35] Changing the Settings Shooting settings...
- Page 37 settings) - (Scene) - setting value, then press the REC/ENTER button. (Shoots images in the standard quality) (Shoots images in an image quality suitable for underwater shooting) [37] Changing the Settings Shooting settings White balance You can adjust the color balance to the recording environment. Press the MENU button.
- Page 38 [39] Changing the Settings Shooting settings Audio recording setting Set whether to record audio while shooting movies. Press the MENU button. Press the UP button or DOWN button to select (Shooting settings) - (Audio recording setting) - setting value, then press the REC/ENTER button. (Records sound when shooting a movie) (Does not record sound when shooting a movie) [40] Changing the Settings...
- Page 39 The remote control is able to turn on/off cameras that have already been paired with the remote control by communicating via Bluetooth. Press the MENU button. Press the UP button or DOWN button to select (Camera Settings) - (Bluetooth remote controller power setting) - setting value, then press the REC/ENTER button.
- Page 40 Formatting starts when you select (execute), then press the REC/ENTER button. Formatting cancels when you select (cancel), then press the REC/ENTER button. The formatting completes when a screen with check mark is displayed. Press the REC/ENTER button to return to the previous MENU. Note Save important images to devices such as a computer before formatting.
- Page 41 (Selects the time code recording method) : Records the time code in drop frame. : Records the time code in non-drop frame. In the following situations, the time code is fixed to When the image quality is set to 24p When the NTSC/PAL switching is set to (Sets the time code count up format) : The time code advances only while recording XAVC S movies.
- Page 42 The remote commander & IR receiver kit RMT-VP1K and infrared remote control RMT-845 (sold separately) are required to use this function. Purchase RMT-845 at a Sony service center. You can operate only the following settings using the RMT-845 (sold separately). Other settings are inoperable.
- Page 43 [45] Changing the Settings Camera settings Beep You can set the audible notification for camera operation. Press the MENU button. Press the UP button or DOWN button to select (Camera Settings) - (Beep) - setting value, then press the REC/ENTER button. (All operation sounds are enabled) (Operation sounds are emitted for the following operations only) Power turned on...
- Page 44 (soft beep volume) Note When the Beep is set to OFF, this function cannot be set. [47] Changing the Settings Camera settings Lamp setting To prevent the lamp light from reflecting off of the subject, you can limit the number of REC lamps that turn on when recording.
-
Page 45: Auto Power Off
Press the MENU button. Press the UP button or DOWN button to select (Camera Settings) - (One touch recording) - setting value, then press the REC/ENTER button. (One touch recording enabled) (One touch recording disabled) Note With One touch recording, the recording will start in the shooting mode that was set immediately before the power was turned off. - Page 46 [50] Changing the Settings Camera settings Switching NTSC/PAL You can select the NTSC/PAL setting, depending on the TV system of the country or region where you use the camera. Press the MENU button. Press the UP button or DOWN button to select (Camera Settings) - (Switching NTSC/PAL), then press the REC/ENTER button.
- Page 47 Note This function is available only in the single connection mode. [52] Changing the Settings Remote control settings Airplane mode You can set the remote control to disable all the Wi-Fi/Bluetooth functions. When you are in an airplane or other restricted areas, set the Airplane mode of the remote control and camera to ON.
-
Page 48: Bluetooth Setting
Note The connection mode cannot be set while the remote control is connected to the camera via Wi-Fi. Press the MENU button. Press the UP button or DOWN button to select (Remote control settings) - (connection mode) - setting value, then press the REC/ENTER button. (default) (single connection) (multi connection) [54] Changing the Settings... -
Page 49: Network Reset
The remote control can be paired with up to 15 Bluetooth devices. If a 16th device is paired with the remote control, the pairing information of the first registered device is deleted. When the remote control is communicating via Bluetooth, another device cannot be paired. When the remote control is initialized, the pairing information is also reset. - Page 50 If the remote control has not been operated for more than 10 seconds while shooting movies, time- lapse capturing, or loop recording, the LCD screen display of the remote control is turned off automatically to reduce battery consumption. Operate the remote control to turn on the LCD screen display again.
- Page 51 Press the UP button or DOWN button to select (Remote control settings) - (Mirror Mode) - setting value, then press the REC/ENTER button. (Images are displayed as mirror-reversed) (default) (Images are not displayed as mirror-reversed) [58] Changing the Settings Remote control settings Display rotate You can rotate the LCD screen display and change the orientation of the UP button/DOWN button on the remote control.
- Page 52 Note You cannot set the monitor brightness when supplying power from a Micro USB terminal. The setting is fixed to “Bright.” [60] Changing the Settings Remote control settings Date & time setting Set the date and time. Press the MENU button. Press the UP button or DOWN button to select (Remote control settings) - (Date &...
- Page 53 [61] Changing the Settings Remote control settings Area setting You can adjust the clock on the remote control to match the time in your area without stopping the clock. The area is determined by the time difference from Greenwich Mean Time (GMT). See “The list of time differences for world capitals”...
-
Page 54: Resetting The
[63] Changing the Settings Remote control settings Date format Set the display order of the date displayed on the remote control. Press the MENU button. Press the UP button or DOWN button to select (Remote control settings) - (date format) - setting value, then press the REC/ENTER button. -
Page 55: Playing Back
Press the MENU button. Press the UP button or DOWN button to select (Remote control settings) - (Resetting the settings), then press the REC/ENTER button. Press the UP button or DOWN button to select the setting, then press the REC/ENTER button. Select (cancel) to return to the remote control settings menu screen. -
Page 56: Deleting
The frame rate displayed on the LCD screen while playing back varies with the Wi-Fi communication status between the remote control and the camera. It is different from the one displayed while shooting. Hint You can use the following operations while playing back the movie. Fast-rewind: Press the UP button. -
Page 57: On Moisture
[68] Information Precautions Handling Do not use/store the remote control in the following places In an extremely hot, cold or humid place In places such as in a car parked in the sun, the remote control body may become deformed and this may cause a malfunction. -
Page 58: Waterproof
[70] Information Precautions On carrying Do not sit down in a chair or other place with the remote control in the back pocket of your trousers or skirt, as this may cause malfunction or damage the remote control. [71] Information Precautions On operating temperatures The remote control is designed for use in temperatures between –10°C and +40°C (14°F and... -
Page 59: Maintenance Of The Remote Control In Water Or At A
Notes on the waterproof performance The remote control is designed to be waterproof. Damage caused by misuse, abuse, or improper maintenance is not covered by the limited warranty. Do not subject the remote control to pressurized water, such as from a tap. Do not use in hot springs. - Page 60 Tehran +03:30 Abu Dhabi +04:00 Baku Kabul +04:30 Karachi +05:00 Islamabad Kolkata +05:30 New Delhi Almaty +06:00 Dhaka Yangon +06:30 Bangkok +07:00 Jakarta Hong Kong Singapore +08:00 Beijing Tokyo +09:00 Seoul Adelaide +09:30 Darwin Melbourne +10:00 Sydney New Caledonia +11:00 Fiji +12:00 Wellington...
-
Page 61: Specifications
Chicago -06:00 Mexico City New York -05:00 Bogota Santiago -04:00 St.John’s -03:30 Brasilia -03:00 Montevideo Fernando de Noronha -02:00 Azores -01:00 Cape Verde Is. [75] Information Specifications [Input terminal] Micro USB Terminal: micro-B/USB (For charging) [Power] Power requirements: Rechargeable battery pack: 3.7 V (Internal battery) Micro USB Terminal: 5.0 V Charging method: USB charging: DC 5.0 V, 500 mA... - Page 62 Adobe Systems Incorporated in the United States and/or other countries. The Bluetooth® word mark and logos are registered trademarks owned by Bluetooth SIG, Inc. and any use of such marks by Sony Corporation is under license. Other trademarks and trade names are those of their respective owners.
-
Page 63: Maintenance Of The Lcd
GPL/LGPL. Source code is provided on the web. Use the following URL to download it. http://www.sony.net/Products/Linux/ We would prefer you do not contact us about the contents of source code. -
Page 64: Battery Pack
On battery pack life The battery pack has a limited life. Battery capacity decreases over time and through repeated use. If decreased usage time between charges becomes significant, the battery pack life has been shortened. In this case, contact your Sony dealer. - Page 65 The battery pack life varies according to how the battery pack is stored or used. [82] Information Battery pack To reduce the battery consumption of the remote control The following settings enable the battery consumption to be reduced when in use. Auto monitor off while shooting: Monitor brightness: (Example)
- Page 66 Detach the cover. Remove the battery pack. Note When removing the built-in battery pack of the remote control, be careful of the followings. Remove the screws, etc. away from small children to prevent accidental swallowing. Be careful not to injure your nails or fingers. [84] Troubleshooting Cannot connect the remote control and the camera via Wi-Fi.
- Page 67 A discrepancy arises between the remaining charge indicator and the actual remaining battery charge. Fully discharge the battery pack once, then charge it to correct the indication. Fully charge the battery pack again. If the problem persists, the battery pack is worn out. Consult your nearest Sony dealer.
- Page 68 [89] Warning indicators and error messages Error display on the Live-View Remote If the following messages appear, follow the instructions. 01-01/02-02 Failed to connect the camera to the remote control. Signal traffic may be heavy or the remote control may be too far from the access point. 01-02 Failed to connect the camera to the remote control.
- Page 69 Failed to connect the camera to the remote control. The camera is not recognized. You need to do some operation on the camera you want to connect. Signal traffic may be heavy or the remote control may be too far from the access point. 03-05 Cannot connect to the camera.
- Page 70 Press the MENU button, REC/ENTER button, and DOWN button of the remote control simultaneously to reset it. If the problem persists, some repairs may be necessary. Please consult your nearest Sony dealer and inform them of all codes starting with an E or a C.
Need help?
Do you have a question about the RM-LVR3 and is the answer not in the manual?
Questions and answers