
Subscribe to Our Youtube Channel
Related Manuals for Rice Lake 340-10 Series


Summary of Contents for Rice Lake 340-10 Series
- Page 1 Rice Lake Digital Wheelchair Scale 340-10 Series Software Revision 11387 Technical and Operating Instructions To be the best by every measure 118580...
-
Page 3: Table Of Contents
Course descriptions and dates can be viewed at www.ricelake.com or obtained by calling 715-234-9171 and asking for the training department © 2012 Rice Lake Weighing Systems. All rights reserved. Specifications subject to change without notice. Series 340-10, Software revision 11387... - Page 4 Rice Lake continually offers web-based video training on a growing selection of product-related topics at no cost. Visit www.ricelake.com/webinars. Wheelchair Scale Technical and Operating Instructions...
-
Page 5: Introduction
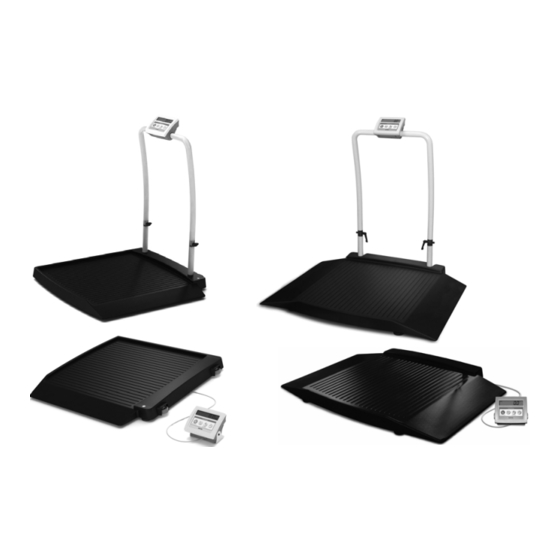
Introduction The Rice Lake Digital Wheelchair Scale from Rice Lake is a user-friendly, quality scale, designed for safe weighing of the handicapped and mobility challenged individuals. Movement compensation technology ensures sound, accurate weighments. The scale has roll on ramp access and comes in four different configurations: •... -
Page 6: Scale Assembly
Scale Assembly Unpacking Your Scale Place the unopened box in an open area that has ample room for unpacking the scale. Recommended tools needed to set up your scale include: • Scissors or a box cutter Using scissors or a box cutter, cut the strapping bands that secure the box together. Immediately after opening the box, visually inspect your scale to ensure all parts are included and undamaged. -
Page 7: Setting Up Your Scale
Setting Up Your Scale Use the following steps to set up the Digital Wheelchair Scale. 1. Locate the users manual from inside the box and set aside as it will provide instructions on the proper scale removal and set up. 2. -
Page 8: Attaching The Feet To The Scale
Attaching the Feet to the Scale The Digital Wheelchair Scale comes with four feet that must be attached to the scale base for proper operation. The four feet are located in the parts box in the original shipping box. Use the following steps to attach the feet to the scale. - Page 9 5. Loosen the handles (shown in Figure 2-6) and set upright as shown in Figure 2-7. Figure 2-6. Loosen the Durable Hinges to Set Handles Upright Figure 2-7. Set Scale Handles Upright 6. Tighten the two hinges on the Digital Wheelchair Scale by rotating the two handles. This will secure the handrail mounted indicator.
-
Page 10: Hooking Up The Ac Power Connections
Hooking up the AC Power Connections The Digital Wheelchair Scale has a 120 VAC adaptor or 230 VAC adaptor to use when power is readily available. The AC power adaptor plugs into the back of the indicator as shown in Figure 2-8. Connect the AC power source here RS-232 port... -
Page 11: Getting Ready To Weigh A Patient
Getting Ready to Weigh a Patient Once the scale is properly unpacked and set up, and prior to weighing a patient, step on the scale to check the scale that all functions are working correctly. The scale is calibrated from the factory so simply turn on the scale and step on the scale to get a weight reading. -
Page 12: Scale Operation
Scale Operation The display has various front panel keys. They are shown below and their function is described in 3-1. Figure 3-1. Front Panel Display Keys Name Function ON-OFF/ZERO ON-OFF - Switches the scale on or off. ZERO - Clears weight off the scale and returns it back to zero. BMI/TARE BMI - Enables the user to access the BMI (Body Max Index) function. -
Page 13: Using The Body Mass Index (Bmi) Function
Using the Body Mass Index (BMI) Function Body mass index (BMI) is the relationship between weight and height associated with body fat and health risk. It is a reliable indicator of body fatness for people and even though BMI does not measure body fat directly, research has shown the BMI correlates to direct measures of body fat. -
Page 14: Using The Tare Function
Using the Tare Function You can use the tare function for deducting an extra weight (such as a wheelchair, or medical equipment attached to the patient) in a weighing operation. To get the most accurate reading, always use the same equipment for pre-weighing (getting the tare Note weight) which includes things like the wheelchair footrests, blankets, etc. -
Page 15: Scale Configuration
Scale Configuration Options and parameter setup are done through the scale configuration section and is used for setting values and various parameters and options that are essential for the functioning of the system. Entry into this mode is possible only when the scale is turned off. Enabling Configuration or Calibration Modes Before the scale will enter either the Configuration or Calibration mode, the configuration enable jumper must be removed. -
Page 16: Numeric Data Entry
Various parameters can be set up while in programming mode. Power Off Power On-Off Press and START Kg-Lb Key hold Press and hold the OP1=X OP2=X Software Version Kg-Lb key = DEF = Software ID to advance OP3=X SET=X to option 0.000 2 through OP4=X... - Page 17 The following table lists the various display messages and sequence when setting up the scale. Note <-> means that you can toggle between two values. Step Function Display Available Parameters Allows the scale to enter into either With the scale turned off, remove the configuration or calibration mode.
- Page 18 Step Function Display Available Parameters Message style on weight algorithm MESS <-> WEIGH This displays the message that will show on the indicator display. To change the message, press the Kg-Lb key. WEIGH, LIVE, - - - - - - To advance to the next step, press the REWEIGH key.
- Page 19 Step Function Display Available Parameters Option 6 allows you to either enable or OP6 = 1 Hold the Kg-Lb key for browsing through disable the hold function on the scale the options. Double click on the Kg-Lb key to change the options value or to advance to the next step, press the REWEIGH key.
-
Page 20: Reset To Factory Defaults
Step Function Display Available Parameters Determines the automatic shut off time t-OFF <-> 5 Press and hold the Kg-Lb key to scroll when the scale is not in use. Options through the furthest right hand digit on the are between one and 20 minutes. display (0-9). -
Page 21: Scale Calibration
Scale Calibration Before you can calibrate the scale, verify and set all scale parameters which are noted in “Scale Configuration” on page 11. Remove the configuration/calibration jumper (see page 11). Turn the scale on. While is displayed, press and StArt hold both the key and the keys until... -
Page 22: Rs-232 Communication
The scale comes with an RS-232 port which enables weight data to be transmitted to other equipment, such as a computer or printer. The RS-232 cable with DB-9 connector (PN 100719) is available from Rice Lake Weighing System. Figure 2-8 on page 6 shows where the RS-232 connection is. -
Page 23: Esc Protocol (Configuration Option #9 Set To 0)
• Unit of measurement (metric or constitutional) (UOM) = c (m or c) Table 6-1. RS-232 Communication Parameters If you’re using the Rice Lake files, please follow the instructions below. 1. Go to www.ricelake.com/health and download the Rswin.exe and Inbar.ini files located in the downloads section of the web site and download them to your computer. - Page 24 3. Double click on the Rswin.exe file and the following screen appears. C l i c k o n F I L E S and in dropdown m e n u , s e l e c t L O A D CONFIGURATION as noted in Step 4 Figure 6-1.
- Page 25 Examples of what you would see in the HEX screen are shown in Figure 6-3. Figure 6-3. HEX Screen Example Examples of what you would see in the ASCII screen are shown in Figure 6-4. Figure 6-4. ASCII Screen Example Wheelchair Scale Technical and Operating Instructions - RS-232 Communication...
-
Page 26: Sample And Explanation Of Esc Protocol
Sample and Explanation of ESC Protocol When the scale measures weight and sends this over the communications line to the PC, the string will look like this. <SCALE> --------<PC> When the user wants to diagnose any problems with the scale, the operator will have to ask the scale to send the error data (if any exists). - Page 27 If the battery is okay, the scale will reply with the following value: If the battery is critically low, it will reply with: Wheelchair Scale Technical and Operating Instructions - RS-232 Communication...
-
Page 28: Troubleshooting And Testing
Calibration or configuration settings are Pushed the wrong keys Reset to factory defaults. See page 16 messed up for instructions. Table 7-1. Troubleshooting Table for the Rice Lake Scale Line Wheelchair Scale Technical and Operating Instructions... -
Page 29: Test Mode
Test Mode The test mode menu is a special mode used for checking four very important parameters which are useful in knowing the system’s state and for troubleshooting. Entry into this mode is possible only when the scale is turned off. - Page 30 Step Function Display Available Parameters Checks for current bAt <-> XXX or nO bAt If the nO bAt is displayed, there are not battery level batteries in the unit or the unit is operating on its external AC adaptor. To advance to the next step, press the REWEIGH key.
-
Page 31: Maintenance
Maintenance The following section provides instructions for maintaining and cleaning the Rice Lake line of scales. Maintenance operations other than those described in this section should be performed by qualified service personnel. Basic Maintenance Before the first use of the scale and after periods of non-use, check the scale for proper operation and function. If the scale does not operate correctly, contact qualified service personnel. -
Page 32: Trimming Procedure
Trimming Procedure Trimming is the process of equalizing the output from multiple individual load cells. If needed, load cells can be individually trimmed with potentiometers. Whenever a substantial amount of trim (more than 5% of normal output) seems necessary to equalize output, check for other possible problems. - Page 33 3. Replace the same test load over each cell in turn measuring load cell one (1) and two (2) first and then using the corresponding potentiometer, turn each cell down to equal the referenced load cell. Potentiometer for load cells Potentiometer for load cells one (1) and two (2) three (3) and four (4)
-
Page 34: Wheelchair Scale Specifications
Wheelchair Scale Specifications Power 120 VAC-9VDC-50Hz / 230 VAC-9VDC-50Hz Battery Type Sealed lead acid battery Battery Use 75 hours Approximately 300-1200 recharge cycles available depending on battery discharge activity Automatic power-off can be configured from 0 - 20 minutes Data Communications RS-232 with RJ-45 jack Selectable baud rate, default - 9600 8 bits... -
Page 35: For More Information
US sales and product information at prodinfo@ricelake.com • International (non-US) sales and product information at intlsales@ricelake.com Mailing Address Rice Lake Weighing Systems 230 West Coleman Street Rice Lake, WI 54868 USA Wheelchair Scale Technical and Operating Instructions - Wheelchair Scale Specifications... -
Page 36: Digital Wheelchair Scale Limited Warranty
Digital Wheelchair Scale Limited Warranty Rice Lake Weighing Systems (RLWS) warrants that all RLWS equipment and systems properly installed by a Distributor or Original Equipment Manufacturer (OEM) will operate per written specifications as confirmed by the Distributor/OEM and accepted by RLWS. All systems and components are warranted against defects in materials and workmanship for two years. - Page 38 PN 118580 01/12...
Need help?
Do you have a question about the 340-10 Series and is the answer not in the manual?
Questions and answers