Rice Lake SURVIVOR CW-80 Installation Manual
Hide thumbs
Also See for SURVIVOR CW-80:
- Operating manual (3 pages) ,
- Operating manual (3 pages) ,
- Operating manual (20 pages)
Table of Contents
Advertisement
Advertisement
Table of Contents
Troubleshooting

Related Manuals for Rice Lake SURVIVOR CW-80


Summary of Contents for Rice Lake SURVIVOR CW-80
- Page 1 ® SURVIVOR CW-80 Checkweigher Installation Manual 32291...
-
Page 2: Table Of Contents
Course descriptions and dates can be viewed at www.rlws.com or obtained by calling 715-234-9171 and asking for the training department. © 2004 Rice Lake Weighing Systems. All rights reserved. Printed in the United States of America. Specifications subject to change without notice. - Page 3 OU SET Mode ......................... 5-4 PTT/SET Mode ........................ 5-4 Displaying and Setting Over and Under Tolerance Values ..........5-5 Alternate Method for Changing Over or Under Values ..........5-7 Setting Tare Values......................5-8 To Display the Current Tare Value ................5-8 Using ID Storage Registers ....................
-
Page 4: Introduction
Over/Under/Accept status as setpoints by using TTL compatible Application specialists at digital outputs. A serial port can be used to send out check-weight results to Rice Lake Weighing Systems are an external controller or data collector. available to help with unique situations not covered in this 300 Over/Under/Tare/Units register sets can be linked to ID’s for easy recall... -
Page 5: Features
• 3 TTL active low outputs Note: • 3 normally-open relays Application specialists at • 3 normally-closed relay outputs Rice Lake Weighing Systems are Software: available to help with unique • RS-485 communications, 2-wire, half-duplex format situations not covered in this manual. -
Page 6: Learning The Keypad And Led Displays
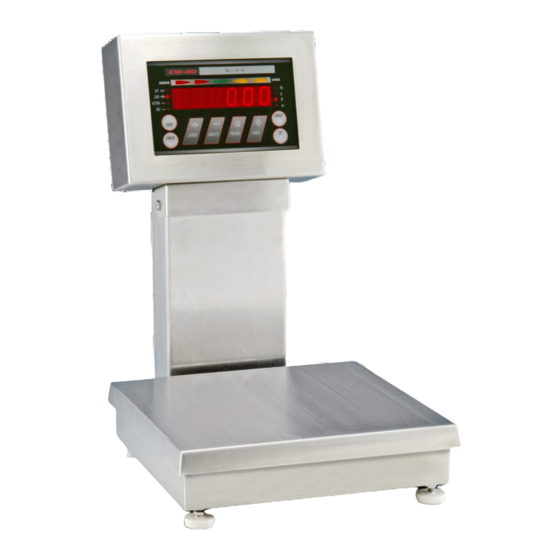
Learning the Keypad and LED Displays The front panel consists of a 6-digit LED alphanumeric display, individual status indicators, annunciator LED’s, and a membrane touch-panel (keypad) encased in a watertight stainless steel case. Take some time to familiarize yourself with the CW-80 front panel shown below and the key functions described on the following pages. -
Page 7: Keypad Functions And Related Displays
Keypad Functions and Related Displays Table 1-3 describes CW-80 front panel keys and related display functions. Table 1-3. Front Panel Keys ZERO key The ZERO key sets the current Gross weight to Zero, provided the amount of weight to be removed or added is within the specified Zero Range and scale is not in motion. - Page 8 Table 1-3. (continued) OVER key/UP ARROW key OVER key The OVER key allows the display of the current “Over tolerance” value, or allows setting the Over tolerance” value. See “Displaying/Setting Over/Under/Tare Values”. As a secondary function, the OVER key also OVER acts as an Up Arrow key while in the Configuration mode.
-
Page 9: Front Panel Annunciator Lights
Front Panel Annunciator Lights Table 1-4 describes the functions of the front panel annunciator LEDs. Table 1-4. Front Annunciator LEDs NET, ZERO, MOTION, NEG NET LED When illuminated, this LED indicates that the displayed weight is the ZERO NET Weight, or that the CW-80 is in the NET weight display mode, and that a Tare value is being applied to the current Gross weight reading. - Page 10 Table 1-4. (continued) Bar Graph LEDs: Red, Green, and Amber UNDER OVER The Bar Graph LEDs provide you with a fast way of determining if a ACCEPT container is too heavy (Over), too light (Under), or is within an accept- able weight range (ACCEPT).
-
Page 11: Installation
Installation Unpacking and Assembly In this section: 1. When opening the shipping carton, notice that the indicator head and Unpacking and Assembly support column or stand are shipped detached from the scale platform. Leveling 2. Remove all assemblies from the shipping carton. Notice that the head and Making Power Connections scale platform are joined by a load cell cable. -
Page 12: Leveling
Leveling Select a location for the CW-80 that is reasonably level and free of unneces- sary vibrations and air currents. Adjust the four corner feet on the base until the bubble level on the inside frame of the unit reads level. When level, the base should not rock and all four feet should have solid contact with the support surface. -
Page 13: Wiring Standard Serial Communications Ports
Wiring Standard Serial Communications Ports Serial communications for the CW-80 is provided through a serial communications terminal block located on the CPU board next to the Note: load cell terminal block. (See Figure 2-3). The four cord grips on the bottom This terminal block provides a port for both EDP (Electronic Data of the indicator head should be Processing) devices and printers or remote displays. -
Page 14: Using Optional Rs-485 Network Communications
The following communications parameters (Table 2-2) apply to both the RS-232 and 20mA Current Loop interfaces. Table 2-2. Serial communications parameters • Continuous or Demand outputs • 150, 300, 600, 1200, 2400, 4800, 9600, or 19200 baud rate • 7 data bits (with parity) or 8 data bits (no parity); 1 start bit and 1 stop •... - Page 15 You enable the optional RS-485 software protocol for the CW-80 by assigning an address to the EDP port in the Serial menu. The address assigned must be a 2-digit integer between 00 and 99. Since the RS-485 protocol requires that each device has a unique address, all remote commands sent to a checkweigher must be initiated as shown below: <SOH>...
-
Page 16: Wiring The Optional Digital Outputs
Wiring the Optional Digital Outputs TTL Output Options NOTE: Wire selected digital outputs for Over, Accept, and Under to connector J2 Unless one of the Output on the power supply board (Figure 2-4). There is capacity for up to 3 TTL Options (B–G) has been ordered, no terminal block (J2) outputs. -
Page 17: Optional Battery Backup Operation
Optional Battery Backup Operation Warning A DC battery backup power supply is available on special order for factory- The optional DC battery is a mounting in the checkweigher column. If AC power fails, this battery lead/acid model which gives off provides backup power until AC power resumes. -
Page 18: Board Diagrams
Board Diagrams Figure 2-6. Nomex insulative strip over AC voltage selection jumpers Power supply board (component side) Battery - Battery + Over Accept Optional Relay AC-1 Sockets Under AC-2 not used not used Figure 2-7. CPU board (component side) -SE -SI +SE +EX SHI Figure 2-7 Key 1 .. -
Page 19: Power-Up Sequence
Power-Up Sequence When the CW-80 is powered-up, the following displays appear in sequence: 1. DISPLAY TEST — All LED’s and number segments light. 2. SOFTWARE VERSION — Software revision number is displayed. 3. INITIALIZATION — “Init” is displayed. NOTE: 4. 0.0 — Scale zeros weight allowable in Auto Zero Range setting (if calibrated and After powering up the indicator, in weighing mode), allow the unit to warm up at... -
Page 20: Configuration
Configuration Before You Begin In this section: The CW-80 Checkweigher has a push-switch on its main board to switch Before You Begin between the Configuration mode and Normal Operating mode. The switch is accessible through a hole in the rear panel normally closed off by a drilled- Moving Around the Menus head fillister screw and water-tight washer (Fig. -
Page 21: Moving Around In The Menus
Navigational keys Moving Around in the Menus After setting the mode switch to the Configuration mode, you have access to UP Arrow Key: three menu choices that allow you to setup and calibrate the CW-80. The OVER Moves up to previous level. Configuration menus are: SETUP, SERIAL, and CALIB. - Page 22 Figure 3-3. Entering numeric values C W -80 Note: ACCEPT UNDER OVER Numeric Entry of Values: Some menu ZERO items require a numeric entry. In such a MOTION case, you enter numeric values using the navigational keys as shown at right. TARGET OVER UNITS...
-
Page 23: Setup Menu Chart
SETUP Menu chart The following figure provides a graphic representation of the CW-80 Checkweigher Setup menu structure. In the actual menu structure, the settings you can choose under each parameter are arranged horizontally. To save page space, menu choices are sometimes shown arranged vertically, with the factory default indicated by a check mark. Figure 3-4. - Page 24 √ √ .040 S√ 1 √ .120 S √ .240 S .480 S OFF√ .720 S 1 dd 1.000 S 2 dd 1.480 S 5 dd√ 2.000 S 10 dd 2.480 S 20 dd 3.000 S 50 dd same setting choices as Ptt.SEt number number number...
-
Page 25: Menu Descriptions
Menu Descriptions Tables 3-1 through 3-3 provide complete information about each of the main menu options. Each table describes all parameters associated with that particular menu option, the choices available for each parameter, and a general description of each parameter and related choices. The system defaults are indicated by a check mark (√). Table 3-1. - Page 26 Table 3-1. (continued) SETUP menu (continued) Menu Item… Parameter… Description… √ SEL UN Select Units. Select from the given list of units for DEFALT, ALT1, ALT2, or ALT3. lb/oz The SEL UN parameter can be set to oz, lb, g, and kg for the DEFALT unit, while the SEL UN parameter can be set to OFF, lb/oz, oz, lb, g, and kg for any of the ALT-X units.
- Page 27 Table 3-1. (continued) SETUP menu Menu Item… Parameter… Description… √ Z TRAC Zero Track. Sets the condition for the CW-80 to perform automatic adjustments of the 0.5 dd Acquired Zero. When the condition is satisfied, the adjustments are made simulta- 1.0 dd neously.
- Page 28 Table 3-1. (continued) SETUP menu Parameter… Menu Item… Description… √ DISPLAY Display. Defines whether the numeric display will be on, or merely the bar graph. The default is ON. To disable the numeric display, select OFF. SLEEP Sleep Mode. Defines when and if the CW-80 should change to a low power state to DELAY LEVEL conserve power.
- Page 29 Table 3-1. (continued) SETUP menu Menu Item… Parameter… Description… OPERAT TARGET UN 1 Target mode. Pressing the TARGET key allows the CW-80 to acquire the current weight on UN 1-2 the platter as a Target value. The Target Value is an “ideal weight” or reference value around UN 2 which the over (OV 1) and under (UN 1) tolerance values are automatically adjusted during OV 1...
- Page 30 Figure 3-5. Serial menu XXXXXXX 9600 √ CR LF √ 0 SEC √ 8 NONE √ OFF √ number Set address 19200 7 EVEN .2 SEC RS 232 number with 7 ODD .4 SEC RS 485 directional navigator If RS-485 .6 SEC keys, then option has...
- Page 31 Table 3-2. SERIAL menu Menu Item… Parameter… Description… BAUD 2400 Baud Rate. Selects the transmission speed for the serial port. 4800 √ 9600 1200 19200 √ BITS 8 NONE Bits and Parity. Selects the number of data bits and parity for the serial port. 7 EVEN 7 ODD √...
- Page 32 Table 3-2. (continued) SERIAL menu Menu Item… Parameter… Description… √ • TOD Transmit on Demand. Transmits weigh data when PRINT key is pressed. Printout PFUNCT only occurs if scale is not in motion or out of range (Overrange or Underrange CONT condition).
- Page 33 Table 3-2. (continued) SERIAL menu Menu Item… Parameter… Description… √ PR OUT Printout. Selects the type of print data format to be used when transmitting through the serial port. The four possible selections are listed below. See Section 7 for more detail on print formats.
- Page 34 Figure 3-6. Calibrate menu XXXXXXX ZERO number SPAN Clear scale After zero At capacity Place test “S CAL” and press calibration, value line, weight on will ZERO. “CAL SP” enter test scale. display for “Z CAL” weight Press 10 secs. DISPLAYS displayed, value.
-
Page 35: Calibration
Calibration Overview In this section: The CW-80 Checkweigher is calibrated from the CALIB menu and stores Overview the results in nonvolatile memory on the CPU board. Calibration is done through the CALIB setup menu shown below, which includes screen Calibration Procedure displays seen during the process. -
Page 36: Operating Modes
Operating Modes Before You Begin In this section: The CW-80 has four separate operating modes to accommodate different Before You Begin applications. The major difference between these four operating modes is the manner in which Under/Accept/Over tolerance values are established, Overview of Operating and the manner in which they can be changed once set. -
Page 37: Overview Of Operating Modes
Overview of Operating Modes The following pages use graphics to summarize how each operating mode functions. This page provides a key (using the two figures below) for reading those graphics on the following pages. Note that all graphics assume you are using a scale with 30 lb capacity, set up for 3,000 grads (20 x .01), a Count By of 1, and 2 decimal places. -
Page 38: Target Mode
TARGET Mode In TARGET mode, all tolerances (Un 1, Un 1-2, Un 2, Ov 1, Ov 1-2, Ov 2) are pre-set by the installer. The operator places a sample weight of the product on Checkweigher-Acquired Weight Value by Pressing TARGET Key the scale and presses the TARGET key. -
Page 39: Ou Set Mode
OU SET Mode In OVER UNDER SET mode, the lower (Un 1) and upper (Ov 1) limits of the ACCEPT band are entered digitally through the keyboard by the operator. The operator presses the UNDER key, Operator Numeric Entry Required then enters the Un 1 value. -
Page 40: Displaying And Setting Over And Under Tolerance Values
Displaying and Setting Over and Under Tolerance Values UNDER This section explains how to set or alter the values that define the OVER ACCEPT band. When in OU SET mode, the operator uses keypad buttons to digitally set or alter Over (Ov 1) and Under (Un 1) values around the ACCEPT band. When in TARGET or PTT/SET mode, these Ov 1 and Un 1 values defining the ACCEPT band are initially acquired from weights on the platter, but can then be altered by the operator using keypad buttons. - Page 41 STEP 2: Establish the direction (smaller or C W -80 larger) in which you want to alter the displayed value by pressing the ACCEPT UNDER OVER appropriate OVER or UNDER key. In this example, we will make the value smaller, so press UNDER. ZERO MOTION TARGET...
-
Page 42: Alternate Method For Changing Over Or Under Values
STEP 4: Allow the CW-80 to store the C W -80 new 9.75 value. The CW-80 does this automatically if no keys are ACCEPT pressed for 3 seconds. UNDER OVER Note: ZERO If any key is pressed other than MOTION those previously mentioned, the CW-80 aborts the display of the Under value and retains the... -
Page 43: Setting Tare Values
Setting Tare Values The CW-80 allows two methods for establishing tares. The most common method involves placing the actual tare weight on the scale, then pressing TARE to allow the scale to acquire that value. If this is the method of choice, the TARE menu must be set to PTT (Push To Tare) in Configura- tion mode. - Page 44 Note: Digit Adjustment Keys If you don’t prefer the Auto Pressing any of the keys (ZERO, UNITS, PRINT, TARE) beneath Rolling method of adjusting tare the display digits while the Tare value is displayed will increment or values, you may use the Digit decrement the digit above the key by 1 each time the key is pressed.
- Page 45 3-Second Timeout to Store Tare Value If no key is pressed for 3 seconds, the tare value on the display is stored into memory, and the word “STORED” appears on the display for 1/2 second. Note that this stored value overwrites any value which might currently be in memory.
- Page 46 C W -80 ACCEPT UNDER OVER STEP 3: ZERO Press the PRINT key 6 times to MOTION increment the digit above the key from 0 to 6. TARGET Note: OVER UNITS If a digit is incremented beyond 9, Z E R O U N I T S P R I N T TA R E...
-
Page 47: Using Id Storage Registers
Using ID Storage Registers When the Configuration menu item ID STR is set to either ON or R ONLY, the multiple ID storage feature is activated. Any of 299 available ID registers can be selected. Each ID number must have four distinct categories of information: •... - Page 48 To illustrate how you can select an ID register set and make its contents the current operating parameters, see the following example. Assume that the current ID number selected is 34, and you want to select ID number 50. The following key sequence allows you to select the register set assigned to ID 50, and make its contents the current operating parameters.
-
Page 49: Zeroing The Scale
Zeroing the Scale Upon power up, or upon exiting the Setup menu, the CW-80 will automati- cally zero off weight on the platter up to the amount established in the Zero Band setting. To prevent unwanted zero shifts, be certain platter is empty when powering up the indicator and when exiting the Setup mode. -
Page 50: Using The Edp Port
Using the EDP Port Overview In this section: The EDP (electronic data processing) port allows you to transfer important Overview weigh-process data to printers or computers. Simple Commands The CW-80 Checkweigher uses either bidirectional RS-232 or simplex (No Response) (output only) 20 mA current loop communications as its standard communi- cations interface. -
Page 51: Simple Commands (No Response)
Simple Commands (No Response) Note: Simple Commands instruct the CW-80 to perform various functions. When you enter this type of EDP command, the CW-80 will not respond with data, After the CW-80 receives a but rather with an acknowledgement sequence (“*[CR]”). simple command, it responds with the character sequence All available simple commands, response formats, and related syntax... - Page 52 Table 6-1. (continued) SIMPLE COMMANDS “B” (BUFFER ENABLE COMMAND) Requests that the CW-80 enable the transaction buffer. Once enabled, all data normally transmitted upon PRINT Note: Key activation or Auto Print functions will be buffered. The buffer is able to store in Data can then be made available from the buffer via serial excess of 500 transactions in command.
- Page 53 Table 6-1. (continued) SIMPLE COMMANDS “CT” (CLEAR TARE COMMAND) This sequence requests the CW-80 to clear the current Tare value. The CW-80 acknowledges when successful with the Acknowledgement Character sequence, [“*”][EOL], if enabled. Note that the contents of the Tare register of the current ID are unaffected by this command.
-
Page 54: Inquiry Commands (Requesting Status/Data)
Inquiry Commands (Requesting Status/Data) Inquiry Commands instruct the selected CW-80 to transmit weight data or the status of various current parameter values. When you enter this type of EDP command, the CW-80 will respond. All available inquiry commands, response formats, and related syntax parameters are described in Table 6-2. - Page 55 Table 6-2. (continued) INQUIRY COMMANDS (REQUESTING STATUS) [M/S] is one-character of status information: for Motion, or scale is not in standstill for in range, stable reading is one-character of overload status information: for scale overloaded. [SP] for scale in range. [O/A/U] is the one-character indication of OVER/ACCEPT/UNDER status for weight greater than or equal to the Over value:...
- Page 56 Table 6-2. (continued) INQUIRY COMMANDS (REQUESTING STATUS) [nnn] is the three-ASCII character for the ID number. Example: [nnn] would be “025” for the 25th ID register. [“:”] is ASCII literal text (3A Hex). [POL] is the polarity or sign of the Target value space (20 Hex) for positive values.
- Page 57 Table 6-2. (continued) INQUIRY COMMANDS (REQUESTING STATUS) Where: [STX] is the one ASCII character (02 Hex) for Start of Text. [“O”] is ASCII literal text (4F Hex). [nnn] is three ASCII character for the ID number. Example: [nnn] would be “025” for the 25th ID register. [“:”] is ASCII literal text (3A Hex).
- Page 58 Table 6-2. (continued) INQUIRY COMMANDS (REQUESTING STATUS) [“:”] is ASCII literal text (3A Hex). [POL] is the polarity or sign of the Under value: space (20 Hex) for positive values. “-” (2D Hex) for negative values. [DATA] is a seven-character field with (including) decimal point for Under value data.
- Page 59 Table 6-2. (continued) INQUIRY COMMANDS (REQUESTING STATUS) [EOL] is either [CR] or [CR][LF], depending on serial port setting for End of Line Termination. “X” (XMIT DATA COMMAND) Requests that the CW-80 perform a simple XMIT out the serial port in the selected Prt Out format.
- Page 60 Table 6-2. (continued) INQUIRY COMMANDS (REQUESTING STATUS) “XC” (XMIT CURRENT TOLERANCE STATUS) This sequence requests the CW-80 to transmit the current tolerance annunciator activated in the following format. Response Format: [STX][SP][O/A/U][EOL] Where: [STX] is the one-ASCII character (02 Hex) for Start of Text. [SP] is the ASCII “SPACE”...
- Page 61 Table 6-2. (continued) INQUIRY COMMANDS (REQUESTING STATUS) [“:”] is ASCII literal text (3A Hex) [POL] is the polarity or sign of the Tare value: space (20 Hex) for positive values. “-” (2D Hex) for negative values. [DATA] is a seven-character field with (including) decimal point for Tare value data.
- Page 62 Table 6-2. (continued) INQUIRY COMMANDS (REQUESTING STATUS) [“:”] is ASCII literal text (3A Hex) [POL] is the polarity or sign of the Target value: space (20 Hex) for positive values. “-” (2D Hex) for negative values. [DATA] is a seven-character field with (including) decimal point for Target value data.
- Page 63 Table 6-2. (continued) INQUIRY COMMANDS (REQUESTING STATUS) [SP] is the ASCII character for space (20 Hex). [UNITS] is the one–two character indication of the current unit of measure: for kilograms for grams for pounds for ounces lb/oz use special format. See XTG command for full details.
-
Page 64: Id Reference Commands
ID Reference Commands ID Reference Commands instruct the CW-80 to transmit various values associated with a particular ID number specified in the location field. Upon receipt of this type of EDP command, the CW-80 will respond with the requested information in a specific format. In some cases, it may respond with the sequence [“*”][EOL] when the operation is completed. - Page 65 Table 6-3. (continued) ID REFERENCE COMMANDS “RT” (RECALL TARE REGISTER COMMAND) This sequence requests the CW-80 to Recall the Over/Under/Tare/Units values associated with the ID number located in the Location character field, and make these new values the current operating Over/Under/Tare/Units values.
- Page 66 Table 6-3. (continued) ID REFERENCE COMMANDS “XTG” (XMIT TARGET COMMAND) This sequence requests the CW-80 to Transmit the Target value associated with the ID number located in the Location character field. It does not make this Target value the current Target value. It is simply used for inspection. The CW-80 responds with the following format: Response Format: Command Format Key:...
- Page 67 Table 6-3. (continued) ID REFERENCE COMMANDS Where: [STX] is the 1-ASCII character (02 Hex) for Start of Text. [“O”] is ASCII literal text (4F Hex). [nnn] is the 3-ASCII character for the ID number.ex.[nnn] would be “025” for the 25th ID register. [“:”] is ASCII literal text (3A Hex).
- Page 68 Table 6-3. (continued) ID REFERENCE COMMANDS “RT” (RECALL TARE REGISTER COMMAND) “XT” (XMIT TARE COMMAND) “XTG” (XMIT TARGET COMMAND) “XO” (XMIT OVER COMMAND) [SP] is the ASCII character for space (20 Hex). [UNITS] is the 1–2 character indication of the current unit of measure: for kilograms for grams...
-
Page 69: Commands To Read And Write To Ids
Commands to Read and Write to IDs One way the CW-80 is very different from the CW40 is in the area of ID Serial commands. The !I command is used to transmit a Tare/Tolerance set to a checkweigher, and have it store the contents in the desired ID# location. The ?I command is used to request that a checkweigher transmit the contents of a particular ID Register set from the serial port back to the host controller. - Page 70 Table 6-4. (continued) READ AND WRITE COMMANDS [UNITS] This is a single character field indicating the units of mea- sure to be associated with all OVER/UNDER/TARE/ UNITS values for the given ID number. for pounds for kilograms for grams for ounces for pounds and ounces [CR] This is a single ASCII character (1D Hex) “Carriage...
- Page 71 Table 6-4. (Continued) READ AND WRITE COMMANDS [Addr] This is a two-character ASCII sequence 00-99 for the address of the Checkweigher that reads and reacts to the next command. [“?I”] This is a two-character sequence for the command that instructs the checkweigher to store the associated Tare/ Tolerance data in the designated ID# .
- Page 72 Table 6-4. (continued) READ AND WRITE COMMANDS [ UNITS ] This is a single character field indicating the units of measure to be associated with all OVER/UNDER/TARE/ UNITS values for the given ID number. for pounds for kilograms for grams for ounces for pounds and ounces [EOL]...
-
Page 73: Advanced Features
Advanced Features Bar Graph In this section: The Bar Graph is a programmable 5-segment, 7-range LED that gives you a Bar Graph quick visual method of determining if a container is too heavy (Over), too light (Under), or in a correct range (ACCEPT). The functions of the 5 LEDs Print Formats (or segments) are described in the following paragraphs. -
Page 74: Green Segment (1)
Green Segment (1) The green segment (Figure 7-1) indicates an Accept value. When illuminated, the green segment light indicates that the container weight is within the actual acceptable band of weight limits (Figure 7-2). Amber Segments (2) The amber segment (Figure 7-1) indicates an Over weight value. When illuminated, the amber segment(s) indicate that the container weight is more than the highest acceptable weight value. -
Page 75: Print Formats
Therefore, to set the CW-80 so that Un 1, Un1-2, and Un 2 light at .01 intervals, parameters should be set to 5. Because these values are cumulative, the first red segment (Un 1) will light at .01 lb under target, both red segments (Un 1-2) at .02 lb, and the leftmost red segment (Un 2) at .03 lb. - Page 76 Table 7-1. (continued) TOL (tolerance) output format [ST] is a 1-character field for CW-80 status transmitted during continuous (PFUNCT=CONT) transmit mode only: for Motion status, scale is not at standstill. for Overload, out of range indication. <sp> ASCII (20 Hex) for Standstill, in range reading.
- Page 77 Table 7-2. SSF Sample Print Outs SSF (short standard format) output format Short Standard Format (not for lb and oz units of measure) SSF Gross Accept: Print Format: 1.690LA [POL][DATA][L/K/O/G][O/A/U]<EOL> Where: SSF Net Accept: [POL] is the 1-character polarity indicator 1.490LA ASCII 20H (space) if positive weight reading.
- Page 78 Table 7-3. CCC Sample Print Outs CCC (consolidated controls) output format Non-continuous or continuous transmission CCC Non-continuous Gross: Print Formats: 1.690 LB GR Non-continuous—[STX][POL][DATA]<SP>[LB/KG/OZ]<SP> [GR/NT]<EOL> CCC Non-continuous Net: Continuous — [STX][POL][DATA][L/K/O][G/N][ST]<EOL> 1.490 LB NT Where: CCC Continuous Gross: <STX> is the ASCII “START OF TEXT” character (02 Hex). 1.690LG [POL] is the polarity indicator, 1 single character:...
- Page 79 Table 7-4. LFT/OIML Sample Print Outs LFT (Legal For Trade) and OIML output formats Legal For Trade Format LFT or OIML PTT tare mode with tare entered: Print Formats: 4.690 LB G [STX][POL][DATA]<SP>[LB/KG/OZ/G]<SP>[G]<EOL> 1.000 LB T [STX][POL][DATA]<SP>[LB/KG/OZ/G]<SP>[T/PT]<EOL> 3.690 LB N [STX][POL][DATA]<SP>[LB/KG/OZ/G]<SP>[N]<EOL>...
-
Page 80: Maintenance And Troubleshooting
Maintenance and Troubleshooting Display Error Codes Table 8-1 Display error codes In this section: Display Condition Description Display Error Codes Weight on scale is greater than calibrated capac- OVERLOAD Troubleshooting Table ity range. Main Board/Display Displayed weight is less than calibrated capacity UNDERLOAD Replacement range. -
Page 81: Troubleshooting Table
Troubleshooting Table Table 8-2. r i a y l t e r i l l e o i t y t l i v r c i t o i t i g i l a t i n i c i t l l e l l e... -
Page 82: Main Board/Display Replacement
Main Board/Display Replacement The steps below show you how to replace the CW-80 main board/display. Warning The procedure involves removing the power board and main board/display to allow installation of the new board. Before you begin: There is no ON/OFF switch on the CW-80. -
Page 83: Installation
Figure 8-2. Main CPU board -SE -SI +SE +EX SHI If serial communications are used, disconnect those wires from the serial communications terminal (3). Using a hex-head socket wrench, remove the 4 standoffs (5). Remove the two phillips screws (4) from the remaining corners. -
Page 84: Load Cell Replacement
Load Cell Replacement For 10"x10" and 12"x12" Scales (Capacities 6 - 60 lb.): Unplug AC power from indicator, remove rear cover from indicator head (10 screws), and disconnect load cell cable from indicator’s terminal connection strip. Lift off scale top cover. Locate two upper load cell screws. Use 7/16" wrench to unscrew and remove those two load cell screws. - Page 85 12. Recalibrate scale according to Calibration section of this manual. 13. Adjust Overload Protection Screw on bottom of scale by loading scale to 125% capacity. Place this weight on top cover, centered on platform. With appropriate size hex wrench, screw in Overload Protection Screw until it touches load cell, then back it off 1/6 turn.
- Page 86 Thread cable of replacement load cell through rubber grommet. Position bottom shim directly beneath load cell and screw in lower load cell screws. Torque to 120 in. lbs for 18" x 18" and 24" x 24" scales. Turn scale right side up. Position spacer plate on load cell, then place the top spider into position.
-
Page 87: Appendix
Appendix Specifications In this section: Analog Specifications Specifications Measurement Rate 25 updates/second Assembly Drawings System Linearity 0.01% of F.S. Replacement Parts List Zero Stability 100 nV/°C maximum ASCII Character Set Span Stability 3 ppm/°C maximum Software Revision AZM (Zero Track) Off, ±... - Page 88 Power Line Voltages Available in 115 VAC, 230 VAC Optional 6 VDC battery backup Frequency 50 or 60 Hz Fusing 115 VAC: 2 x 250 mA TR5 subminiature fuses Wickmann Time-Lag 19374 series Caution UL listed, CSA certified 230 VAC: 2 x 125 mA TR5 subminiature fuses For protection against risk of fire, Wickmann Time-Lag 19372 series replace fuses only with same type...
- Page 89 Mechanical (continued) Indicator Dimensions 9.5" W x 8.5" H x 3.25" D (241 mm x 216 mm x 83 mm) Platform/Column Dimensions (6, 10, 15, 30) lb Platform: 10" L x 10" W x 3" H (254.0 mm x 254.0 mm x 76.2 mm ) Column: 12"...
-
Page 90: Assembly Drawings
Assembly Drawings Figures 9-1 through 9-6 are assembly drawings for the CW-80 head, column and base. Also included is the battery box and charger. Figure 9-6 shows dimensions for all available sizes. Figure 9-1. Head (rear and side view) Figure 9-2. Column (rear and side view) Figure 9-3. - Page 91 Figure 9-4. Battery and box Figure 9-5. Battery charger SPARE SPARE Figure 9-6. CW-80 dimensions Package clearance: Overall height: 12" column: approx. 9.5" 12" column: 19" max. 18" column: approx. 15.5" 18" column: 25" max. 24" column: approx. 21.5" 24" column: 31" max. 30"...
-
Page 92: Replacement Parts List
Replacement Parts List Indicator and Column Assemblies Ref .... Part Description 1 ....30203 Backplate 2 ....65888 Gasket, rear panel 3 ....30341 Gasket, front panel 4 ....30295 Indicator box 5 ....22086 Screw, 6-32NC x 1/4 Phillips pan head, SS 6 .... - Page 93 Additional Replacement Parts 47966 Shield, high-voltage 30907 Indicator stand/wall-mount bracket 32388 Battery back-up unit 13 14 15 32387 Cable assembly, battery backup box 15671 Cable grip, 1/4 NPT, battery backup box 31223 Relief valve, battery backup box 30330 Enclosure, battery backup box 30204 Standoff 1/4-20 x 1"...
-
Page 94: 10" X 10" Base Assembly
10" x 10" Base Assembly 12" x 12" Base Assembly Part # ..Description Part # Description 14920 ..Screw, overload protection, 8-32NC x 1/4 14951 ..Screw, cap, 1/4-28NF x 3/8 (100 lb only) 35128 ..Foot, 1/4-20NC 14920 ..Screw, overload protection, 8-32NC x 1/4 14645 .. - Page 95 10" x 10" and 12" x 12" Base Assemblies TOP VIEW OF SCALE WITH COVER REMOVED 26 27 10 11 100 lb, 12” x 12” only Appendix...
-
Page 96: 18" X 18", 18" X 24", 24" X 24" Base Assemblies
18" x 18", 18" x 24", 24" x 24" Base Assemblies Part # Description 19141 ..Foot, 3/8-16 x .78 14653 ..Jam nut, foot SS 49768 ..Frame, bottom, 18" x 18" 49772 ..Frame, bottom, 18" x 24" 49776 .. - Page 97 18" x 18", 18" x 24", and 24" x 24" Base Assemblies TOP VIEW OF SCALE WITH COVER REMOVED 27/4X 26/4X 25/4X 22/2X 9/8X 10/4X 9/8X 8/16X 20/4X 6/4X 5/2X 2/4X SECTION A-A 1/4X Appendix 9-11...
-
Page 98: Ascii Character Chart
ASCII Character Chart Table 9-1. ASCII characters with decimal and HEX equivalents ASCII DEC ASCII DECIMAL HEX ASCII DECIMAL HEX ASCII DECIMAL HEX Ctrl @ Ç Ctrl A ü Ctrl B é Ctrl C â Ctrl D ä Ctrl E «a Ctrl F å... -
Page 99: Software Revision History
Software Revision History Version 1.0 4/95 Original release. Version 1.1 7/95 1. Numeric Display Blanking added. 2. <CR> as well as <CR<>LF> allowed bidirectionally as commands. Version 1.2 1. Keypad tactile sensitivity decreased Version 1.3 8/96 1. Legal-For-Trade (LFT) print format added Appendix 9-13... -
Page 100: Cw-80 Limited Warranty
CW-80 Limited Warranty Rice Lake Weighing Systems (RLWS) warrants that all RLWS equipment and systems properly installed by a Distributor or Original Equipment Manufacturer (OEM) will operate per written specifications as confirmed by the Distributor/OEM and accepted by RLWS. All systems and components are warranted against defects in materials and workmanship for two (2) years.
Need help?
Do you have a question about the SURVIVOR CW-80 and is the answer not in the manual?
Questions and answers