Advertisement
Quick Links
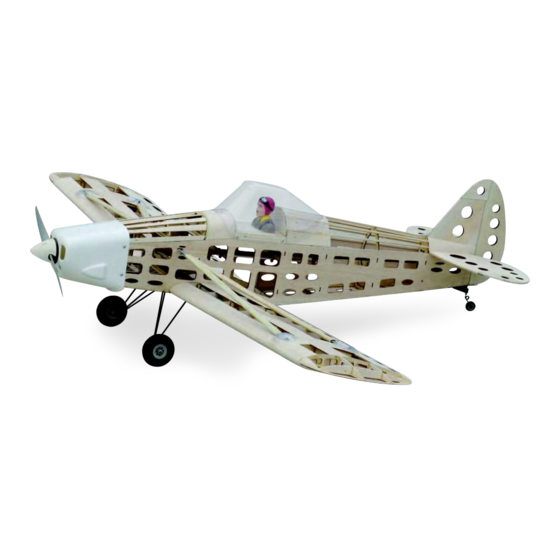
1/6 PA-25 PAWNEE
1/6 PA-25 PAWNEE
Wing Span
Wing Area
Flying Weight
Fuselage Length
Requires
Warning! This model is not a toy.
It is designed for maximum performance. Please seek advice if one is not familiar with this kind
of engine powered precision model. Operating this model without prior preparation may cause
injuries. Remember, safety is the most important thing. Always keep this instruction manual at
hand for quick reference.
T he World M ode ls
M a nufa c t uring Co., Lt d.
www.theworldmodels.com
:
72 in / 1830 mm
:
736 sq in / 47.5 sq dm
:
6.6 lbs / 3000 g
:
48 in / 1220 mm
:
"Glow Power" requires: 6-channel radio w/4 mini servos,
3 standard servos, 2-stroke 0.40-0.46 engine.
"Electric Power" requires: 6-channel radio w/6 mini
servos, Outrunner Motor KM37490750 w/Radial Mount
Adaptor HW2340300, 40A Brushless ESC, 4 cells 14.8V
3200mAh Lipo battery and charger.
*Specifications are subject to change without notice.*
INSTRUCTION MANUAL
[ A335 Kit ]
[ A335 Kit ]
PRECISION LASER CUT
EASY BUILT KIT SERIES
MADE IN CHINA
Advertisement

Related Manuals for THE WORLD MODELS 1/6 PA-25 PAWNEE


Summary of Contents for THE WORLD MODELS 1/6 PA-25 PAWNEE
- Page 1 INSTRUCTION MANUAL 1/6 PA-25 PAWNEE 1/6 PA-25 PAWNEE [ A335 Kit ] [ A335 Kit ] Wing Span 72 in / 1830 mm Wing Area 736 sq in / 47.5 sq dm Flying Weight 6.6 lbs / 3000 g Fuselage Length...
-
Page 2: Fuselage Assembly
T he World M ode ls T he World M ode ls FUSELAGE ASSEMBLY Flip the fuselage over with bottom up, take F29 and latch it between the two side panels. Note that the side with small Lay out the fuselage parts on a flat table top. plywood sheet should be facing inside of the fuselage. - Page 3 T he World M ode ls T he World M ode ls F10 in position. 1.12 Take F5 and latch between the panels. Make sure the side with glued plywood block is facing the rear. Apply a few drop of CA to temporary fix its position perpendicular to the left side panel.
- Page 4 T he World M ode ls T he World M ode ls 1.16 Press and fit right side fuselage to F4, F5, F5B, F16, F17, F20, F27 and landing gear housing, use tape to hold them in position. 1.17 Latch in F6, F7, F8 and F9 between the fuselage panels. Pay attention to the tenons and cut outs, they may not be symmetrical and if they don't seem to fit, flip it left to right will do.
- Page 5 T he World M ode ls T he World M ode ls 1.20 Basic fabrication of fuselage is complete. Check any loo- se joints and distortion of the frame work. Prepare to ap- ply glue in the next step. If epoxy was not used in Step 1.19, apply adequate CA to the F1 joints.
- Page 6 T he World M ode ls T he World M ode ls F28C F28A Latch in F28, apply glue to inside and outside of the fuse- lage. F23A F23A Insert F28C into tail section of fuselage, note that it should With fuselage bottom up, glue in two F23A and then F26A.
- Page 7 T he World M ode ls T he World M ode ls F14A F16B F16B F27A F27B F20A Flip over fuselage and glue in reinforcement bars F16B, F20A, F24, F25, F27A and F27B. F14B Glue in F14A to F14, then glue in bottom of fuselage. Flip over fuselage, glue in F45 and F46, then F14B.
- Page 8 T he World M ode ls T he World M ode ls F18A F18A F18B 3.10 3.9 Glue in F35 and F36, when cured, glue in F38, F39 and Glue in F18, F18A and F18B. Note that F18A should be flushed with F18, so F18B could be flushed with the fuse- F40.
- Page 9 T he World M ode ls T he World M ode ls 3.11 3.12 Sand down uneven surface of F10, glue in F32. Use S1 Glue in F41 and F42, don't force F5B and F6 to accom- as template to align F32. Since you have to remove S1 modate the length of F41 and F42, grind them down with after gluing, apply tape to S1 to protect it from sticking to sand paper after gluing in F43.
-
Page 10: Battery Cover Assembly
T he World M ode ls T he World M ode ls BATTERY COVER ASSEMBLY Lay out parts for the battery cover. 3.13 Cut and trim plastic sleeves to flush with fuselage. Apply thin plastic sheet to protect battery cover opening. F48A Insert F59 into F48, then F48A, align the edges and the 3.14 Use sand paper to remove rough edges. - Page 11 T he World M ode ls T he World M ode ls F50A When cured, remove from fuselage and glue in F55, F56 Glue in F47, then F50, F50A and F49. and F57, apply glue on both sides. Glue in F51, F52 and F53. Make sure CA glue do not get When cured, use sand paper to remove rough edges and inside F53 latch.
-
Page 12: Main Wing Assembly
T he World M ode ls T he World M ode ls MAIN WING ASSEMBLY Lay out parts for the wings. Glue in W12A/W13 assembly perpendicularly to W9, note that W9 is the wing tip end and should be perpendicular to W12A/W13. - Page 13 T he World M ode ls T he World M ode ls Insert fiber glass sleeves for wing tubes into W1R, W2, and W3R. Glue them in place and when cure, use sand paper to remove edges to make it flush with W1R. Glue in W11 and W14, make sure the ends are flushed with the ribs W2 ..W8.
- Page 14 T he World M ode ls T he World M ode ls W37A W40A W27A W27A W38A W39A Glue in W24, W25, W26, W27 and W27A. 5.11 Glue in W37 and W40, then flip over to the flat side and glue in W37A and W40A, then W38A and W39A.
- Page 15 T he World M ode ls T he World M ode ls VERTICAL STABILIZER AND RUDDER ASSEMBLY Lay out parts for the vertical fin and rudder 5.13 Use sand paper to remove rough edges of the wing assembly. W15R Place V2 and V3 on flat surface and apply glue to glue them together.
- Page 16 T he World M ode ls T he World M ode ls HORIZONTAL STABILIZER STABILIZER, RUDDER, MAIN AND ELEVATOR ASSEMBLY WING AND FUSELAGE SETTING Lay out parts for horizontal stabilizer and elevator Dry fit all the main components of the plane. Remove left elevator from horizontal stabilizer and pass through the tail slot, align the middle slot of the horizontal stabilizer and install back the left elevator.
- Page 17 T he World M ode ls T he World M ode ls COVERING The following ironing procedure is for the World Models Tough- Lon covering. Please follow the instructions included with the covering material. Please completely remove dust from the surface before covering, or the covering will not stick to the sur- face.
- Page 18 T he World M ode ls T he World M ode ls Paint the cockpit black. Iron on covering for the side panels. Always use lower heat to stick on the covering. Use high heat carefully only for shrinking covering around corners. 9.10 Cover the battery hatch.
- Page 19 T he World M ode ls T he World M ode ls 11. 1 Cover the horizontal stabilizer and elevator. 14. 2 Prepare openings for aileron and flap servo trays. 12. 1 Cover the wing struts. 13. 1 Cover the aileron servo tray. Lay out the Wings coverings.
- Page 20 T he World M ode ls M a nufa c t uring Co., Lt d. www.theworldmodels.com http://www.theworldmodels.com/para/instruction/instructionManuals.php www.theworldmodels.com www.twmrc.com www.radarrc.com www.radarrc.cn...
Need help?
Do you have a question about the 1/6 PA-25 PAWNEE and is the answer not in the manual?
Questions and answers