Table of Contents
Advertisement
Quick Links
Advertisement
Table of Contents

Related Manuals for CAME BX-246


Summary of Contents for CAME BX-246
- Page 1 AUTOMATION SYSTEMS FOR SLIDING GATES INSTALLATION MANUAL BX-246 English...
-
Page 2: Legend Of Symbols
For intensive or condominium use: max gate weight 600kg with max gate length 18 m. 3 Reference standards The company CAME cancelli automatici is ISO 9001:2000 quality certified; it has also obtained the ISO 14001 environmental safe- guarding certification. CAME engineers and manufactures all of its products in Italy. -
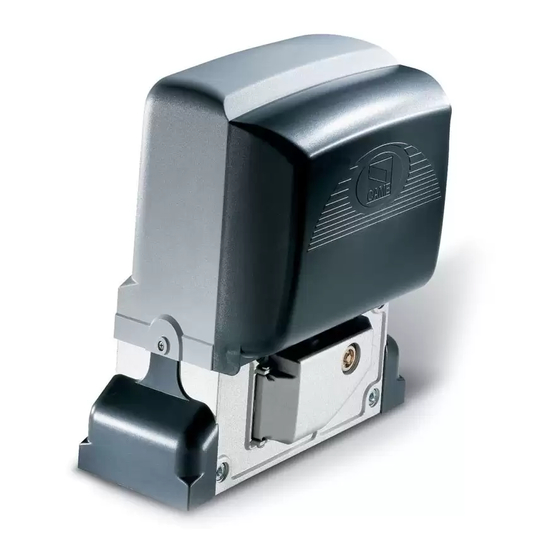
Page 3: Description Of Parts
4.3 Description of parts 1 - Top cover 2 - Settings casing 3 - Control board support 4 - Endstop fins 5 - ZD2 electronic card 6 - Front cover to control panel 7 - Gearmotor release door 8 - Securing plate 9- Securing bolt 10- Securing screw plate 11- Nut... -
Page 4: Tools And Materials
5.2 Tools and materials Make sure you have all the tools and materials you will need for the installation at hand to work in total safety and compliance with the current standards and regulations. The following figure illustrates the minimum equipment needed by the installer. 5.3 Cable list and minimum thickness Connection Type of cable Length of cable 1 <... - Page 5 5.5 Securing the plate and installing the assembly The following applications are only examples, as the space for installing the ratiomotor and accessories varies according to obstructions. It is thus up to the system installer to select the most suitable solution. - Dig a pit to the side of the gate (see measurements from diagram).
- Page 6 - To position the plate in relation to the rack please see the measurements on the diagram. Fill the form box with cement and wait for at least 24 hours for it to solidify. - Remove the form box, fi ll the pit around the cement block with soil. - Unbolt the nuts and washers from the bolts.
- Page 7 - Remove the cover from the gearmotor by loosening the side bolts, perforate the cable shafts using a screwdriver or a pair of scissors and position the gearmotor atop the plate. Careful! The electric cables must pass through the cable shafts. - Lift the gearmotor from the securing plate by about 5 to 10mm by using the threaded steel-levelling feet to allow any later adjustments between the pinion and the rack.
- Page 8 - Open and close the gate manually and register the pinion-to-rack distance using the threaded steel-levelling feet (for vertical adjusting) and the slotted holes (horizontal adjusting). This prevents the weight of the gate from bearing on the operator. Rack Rack Pinion Pinion Levelling feet...
-
Page 9: Manually Releasing The Gearmotor
5.6 Mounting the endstop fins Place the endstop fi ns onto the rack and secure them using a 3 mm Allen wrench. Their positioning limits the gate run. Note: the gate schould not slam against the mechanical stop, when opening or closing. Mechanical stop 5.7 Manually releasing the gearmotor - Insert the trilobed key into the lock, push it in and turn it clockwise .. -
Page 10: Control Board
6 Control board 6.1 General description Use 230V A.C. to power the electronic card using the L-N Apposite trimmers regulate: terminals, at a max 50/60Hz frequency. - The automatic closing’s running time; - The partial opening; Use 24V to power the command devices and accessories. Careful! The accessories cannot exceed 37W of overall power. -
Page 11: Electrical Connections
6.3 Electrical connections Gearmotor, endstop and encoder Description of the standard electrical connections for left-hand installations Orange Black White Orange Brown Opening microswitch Blue Closing microswitch 24V (d.c.) motor with encoder Modifications to the electrical connections for right-hand installations Orange Brown White Blue... - Page 12 Power supply for accessories Cable lug with bolt and washer for connecting to earth. Terminals for powering the following accessories: - 24V A.C. normally; - 24V D.C. when the emergency batteries are working; Maximum allowed power: 35W 230V (a.c.) Power, 50/60Hz frequency Warning devices Movement fl...
Need help?
Do you have a question about the BX-246 and is the answer not in the manual?
Questions and answers