Gigaset SL910 Manual
Hide thumbs
Also See for SL910:
- User manual (112 pages) ,
- Manual (101 pages) ,
- Quick start manual (2 pages)

Related Manuals for Gigaset SL910


Summary of Contents for Gigaset SL910
- Page 1 Congratulations By purchasing a Gigaset, you have chosen a brand that is fully committed to sustainability. This product’s packaging is eco-friendly! To learn more, visit www.gigaset.com.
-
Page 3: Gigaset Sl910/Sl910A - With The Special "Touch
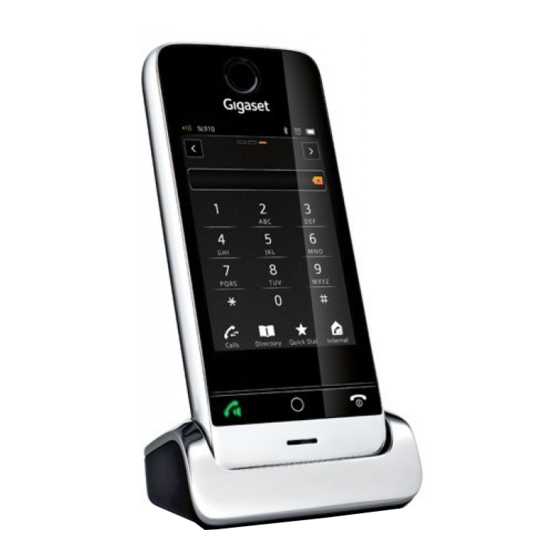
Congratulations on your purchase of the first Gigaset with touchscreen. This phone sets new standards with its high-quality genuine metal frame, 3.2" TFT colour touchscreen and excel- lent sound quality and, last but by no means least, its impressive interior qualities. Your Gigaset can do a lot more than just make calls:... -
Page 4: Table Of Contents
Contents Gigaset SL910/SL910A – with the special "touch" ....1 Overview of handset ..........6 The base at a glance . - Page 5 Text Messages Inbox ............39 Answering machine list (Gigaset SL910A only) ....... . 39 Call lists .
- Page 6 Contents Setting an appointment (calendar) ....... 63 Displaying missed appointments, anniversaries ....... 64 Setting a reminder call .
- Page 7 Contents Customer Service & Assistance ........81 Manufacturer warranty (Middle East) .
-
Page 8: Overview Of Handset
¢ Press briefly: open main menus ( page 24) ¢ Press and hold: key and display lock on/off page 28) Underside of the handset: Mini USB connection socket Connect wire-bound headset or handset to your PC (Gigaset QuickSync) Charging contacts... -
Page 9: The Base At A Glance
The base at a glance The base at a glance Paging key Press briefly: Start paging Press and hold (approx. 3 seconds): Set base to registration mode Lights up: LAN connection active (for firmware update only) Display icons Icons on the status bar The following icons are displayed in the status bar depending on the settings and the operating status of your telephone: Icon... - Page 10 Display icons Option slider icons The functions on the option slider change depending on the operating situation. Icon Action Icon Action † Activate handsfree mode Determine free memory in the † resource directory þ (Handsfree mode is activated) (orange) Search Deactivate handsfree mode Ž...
- Page 11 Display icons Signalling icons Connection cannot be Establishing a connection established or connection (outgoing call) Connection established interrupted š Internal/external call Alarm call Ø w Ú Ø Ù Ú Reminder call for appoint- Answering machine ment / anniversary is recording Ø...
-
Page 12: Safety Precautions
Otherwise you risk serious and permanent damage to your hear- ing. Your Gigaset is compatible with the majority of digital hearing aids on the market. However, perfect function with all hearing aids cannot be guaranteed. The handset may cause interference in analogue hearing aids (humming or whis- tling) or cause them to overload. -
Page 13: First Steps
Please note: Never expose the telephone to the effects of heat sources, direct sunlight or other electrical devices. Protect your Gigaset from moisture, dust, corrosive liquids and fumes. -
Page 14: Connecting The Base With The Phone Network And The Mains Power Supply
First steps Connecting the base with the phone network and the mains power supply ¤ Insert the phone cable (cable slightly flattened) into the lower connection socket at the rear of the base. ¤ Insert the power cable for the power adapter into the upper connection socket at the rear... -
Page 15: Wall Mounting Of The Base (Optional)
First steps Wall mounting of the base (optional) Connecting the handset charger ¤ Connect the flat plug on the power adapter ¤ Plug the power adapter into the plug socket If you have to remove the plug from the charger again: ¤... -
Page 16: Setting Up The Handset For Use
Warning ¢ Use only rechargeable batteries ( page 95) recommended by Gigaset Com- munications GmbH, as this could result in significant health risks and personal injury. For example, the outer casing of the battery could be destroyed or the battery could explode. The phone could also malfunction or be damaged as a result of using batteries that are not of the recommended type. -
Page 17: Charging The Battery
First steps ¤ To remove the battery, insert your fingernail into the cavity on the casing and pull the bat- tery upwards. Charging the battery The battery is supplied with a partial charge. Please charge it completely before use. ¤ Charge the handset in the charger for 5 hours. -
Page 18: Setting Up The Base And Handset - Installation Wizard
First steps Setting up the base and handset – installation wizard Once the battery has been inserted, the time and date symbols flash. The installa- tion wizard starts automatically as soon as you touch one of the flashing symbols. It helps you to configure the following key settings on the handset and base, which are required for operation: Time and date Display language... - Page 19 First steps Comment: If you set the 12 hrs mode, am/pm is shown next to the number wheels. Date ¤ Touch the ’ icon next to Date to set 01.04.2010 the date. Display Language English Country ¤ Use the three number wheels to set the Date current date.
- Page 20 First steps This brings up a list containing all the Display Language available languages. The current language is marked with Ø. ± English ¤ ± Touch the required language. Français If your language is not displayed, the list ± Castellano may be "longer"...
- Page 21 First steps Finally, you have to enter your area code: ¤ Touch the corresponding ’ icon. Welcome Time Area (Dial Code) (Not configured) The Local Prefix refers to the country-spe- Area (Dial Code) cific prefix that is put in front of the area code when you do not dial the country Local Prefix code.
-
Page 22: Handset In Idle Status
First steps Handset in idle status Once you have configured all the necessary settings, your handset switches to idle ¢ status. There are three idle display pages ( page 22). When you first set up the phone, the configurable page that you can customise is displayed. Here, you can ¢... -
Page 23: Using The Phone
Press and hold the end call key a again to reactivate the handset. Operating the touchscreen The Gigaset SL910H handset is primarily operated using the display and only to a small extent using the three buttons on the handset. Icons, list entries, buttons and sliders shown on the display are sensitive areas. You... -
Page 24: Handset Idle Display
Using the phone Handset idle display The idle display consists of three pages that are shown separately on the display. ¢ The configurable page (example page 20) You can customise this page yourself. More detailed information on configuring this page is available on page 70. By default, the date and time are displayed and quick access can be set for call ¢... -
Page 25: Using The Menus
Using the phone Status bar and status page On each of the three pages, a status bar appears in the header. Ð Ã òô ó ¼ 06:00 For the corresponding icons and their meaning, see page 7. Touch the status bar to display the status page. This page gives you direct (quick) access to the settings for Eco Mode, Eco Mode+, the answering machine for the SL910A, the Bluetooth interface, the Do not disturb setting and the alarm. - Page 26 Answer Network Machine Mailbox Gigaset SL910A only Switch to a different main menu page Changing between the menu pages You can switch between the menu pages in the same way as you switch between the pages in idle mode, using ê, ë or dragging horizontally over the display ¢...
-
Page 27: Scrolling Through Lists (Vertical Scrolling)
Using the phone Room Monitor Button Sensitivity Setting options High Forward Internal External Current number Number Opens another 1234567890 submenu Change your settings Edit Scrolling through lists (vertical scrolling) If lists (not submenus) are longer than the display, i.e., if it is not possible for all the list entries to be displayed at once, then a drop shadow on the lower and/or upper edge of the display indicates the direction you have to scroll in to view more of the list. -
Page 28: Entering Numbers And Text, Incorrect Entries
Using the phone If all of the options cannot be displayed at the same time in one row, a moveable option slider is generally used. You can scroll horizontally using the option slider. Moving the option slider (horizontal scrolling) A moveable option slider is identified by an arrow to the right and/or left next to the options (see the picture above). - Page 29 Using the phone ¤ §123§ Touch if you want to enter a digit or a special character. Touch More... to §abc§ view other special characters. Touch to return to the normal keypad (lower case). ¤ You enter special characters (marked/diacritical characters, e.g., umlauts) by pressing and holding the corresponding initial letter and selecting the required character from the list displayed.
-
Page 30: Returning To Idle Status
Using the phone Returning to idle status ¤ Briefly press end call key a. ¤ If you do not press any key and do not touch the display, the display automati- cally reverts to idle status after approximately three minutes. Returning to the previous display page Just like the idle display pages, the ‘... -
Page 31: Menu Tree
Menu tree Menu tree ¤ Briefly press the v key when the handset is in idle status to open the main menu. The main menu consists of the Applications and Settings pages. ¤ Drag your finger horizontally across the display to switch between the pages. Applications menu Main menu Page... -
Page 32: Settings Menu
Menu tree Settings menu Main menu Submenu Additional setting Page Settings Current setting options â Date + Time page 16 Time Date ì Audio Ringtones Volume page 75 Settings Crescendo Int. Calls Ext. Calls Time Ctrl (Ringer Off) Anon. Call Silenc. Silent Alert Reminder Signal Volume... - Page 33 Menu tree Main menu Submenu Additional setting Page Settings Current setting options Display + Screensaver page 73 Keypad Activation Selection Slideshow Calendar Digital Clock Analogue Clock Backlight page 73 In Charger Out of Charger Backlight Timeout Number Info in Dial Lists Number Type Only page 39 Type and Number...
- Page 34 Menu tree Main menu Submenu Additional setting Page Settings Current setting options Ê System Eco Mode page 60 Eco Mode Eco Mode+ Repeater Mode page 77 Security Check page 77 System PIN Local Network IP Address Type page 90 IP Address Subnet Mask Default Gateway Preferred DNS server...
- Page 35 Menu tree Main menu Submenu Additional setting Page Settings Current setting options « Telephony Auto Answer page 74 Listening In page 69 Access Code page 78 Calls from Call Lists All Calls Never Dialling Mode Tone page 78 Pulse page 78 Recall 80 ms/ ...
- Page 36 Menu tree Main menu Submenu Additional setting Page Settings Current setting options ¶ Answer Activation page 52 Machine Mode Announcement Current Announcement page 52 Standard User recorded Advisory Message Current Message page 52 Standard User recorded Recording Length 1 min. / 2 min. / 3 min. page 55 Maximum Recording Quality...
-
Page 37: Making Calls
¢ Take the handset out of the charger, if Auto Answer is activated ( page 74). ¤ Gigaset SL910A: Touch [ Divert] to divert the call to the answering ¢ machine ( page 54). Accepting a call on a Bluetooth headset Prerequisite: Bluetooth is activated;... -
Page 38: Call Display
ó à Divert Silence Divert] on Gigaset SL910A only No calling line identification Instead of name and number, the following is displayed: External: No number is transferred. Withheld: Caller has withheld calling line identification. Unavailable: Caller has not requested calling line identification. -
Page 39: Handsfree Mode
To do this, search for terms such as CLIP, calling line identification, phone number identification, caller ID, etc. in the system's user guide or ask the system manufac- turer. Further information on this topic can be found at: www.gigaset.com/service Handsfree mode ¢... -
Page 40: Making Calls Via Network Services
Making calls via network services Making calls via network services Network services are functions that your network provider makes available to you. You have to request these services from your network provider (there may be addi- tional charges). ¤ It is not possible to reprogram the network services. ¤... -
Page 41: Using Lists
Accepted calls ( ) and calls recorded by the answering machine (Ã, Gigaset SL910 A only) in the Accepted Calls list You can view each type of call separately or get an overview of all calls (Call List). Each call record contains the last 20 numbers in its category. -
Page 42: Missed Appointments List
Using lists Opening lists from the menu ¤ ¢ page 24), touch [ — Call List]. In the Applications menu ( The last call list displayed is opened. All, Missed, Accepted and Outgoing appear in the lower part of the display. ¤... -
Page 43: Opening Lists Via The Message Page In The Idle Display
Missed appointments list ( page 40) The list of missed calls and the answering machine list (Gigaset SL910A) are always displayed. The icon for the network mailbox is always displayed, provided the number is stored in the telephone. The other lists are only displayed if they contain messages. -
Page 44: Using Contacts
In idle status, the following message appears: Icon New message... Ã ... in the answering machine list You received (Gigaset SL910A only) or on the network mailbox ™ Ã ™ · ... in the Missed Calls list ·... -
Page 45: Creating A New Entry In Contacts
Using Contacts Creating a new entry in Contacts ¤ ¤ Open Contacts. Touch [d New New Entry Entry]. ¤ Touch the individual fields to enter the corresponding component of the entry. Name You can touch Add Number up to eight times to assign up to eight numbers to Add Number this entry. -
Page 46: Dialling With Contacts
Using Contacts Dialling with Contacts ¤ ¢ Open Contacts ( page 42). You have the following options: ¤ Press c. The default number of the entry marked with the green dot is dialled. ¤ Touch the name in the entry. The default number of the entry is dialled. Excep- tion: If you have opened Contacts via the dial page, the phone number is trans- ferred into the number field and can be expanded if required. -
Page 47: Transferring An Entry/Contacts To Another Handset
Using Contacts Transferring an entry/Contacts to another handset Prerequisites: The sending and receiving handsets must both be registered to the same base. The other handset and the base can send and receive Contacts entries. You can transfer the entire Contacts list, an individual entry or several individual entries. -
Page 48: Receiving A Vcard With Bluetooth
Using Contacts Receiving a vCard with Bluetooth Prerequisite: The handset is in idle status. Bluetooth is activated. ¤ ¢ If the sender is in the Known Devices ( page 59) list, receipt occurs automat- ically. ¤ If the sender is not in the Known Devices list, enter the sender's device PIN and touch è. -
Page 49: Sending And Receiving Sms Messages (Text Messages)
Sending and receiving SMS messages (text messages) Sending and receiving SMS messages (text messages) Your device is supplied ready for you to send text messages immediately. Prerequisites: Calling Line Identification is enabled. Your network provider supports SMS within the fixed line network. To receive SMS messages, you must be registered with your network provider. -
Page 50: Receiving Sms
Sending and receiving SMS messages (text messages) Receiving SMS Incoming SMS messages are saved in the inbox, linked SMS messages are, in gen- eral, displayed as one SMS. Activating/deactivating first ringtone muting ¤ Open the Settings menu and enter the number code for the service functions ¢... - Page 51 Sending and receiving SMS messages (text messages) Entry in the Text Messages Inbox An entry in the inbox is displayed with the sender and date of receipt (example): 1. Number or name and number type Text Messages Inbox (if number is in Contacts). Unknown, if no number is available.
-
Page 52: Setting Up The Sms Centre
Sending and receiving SMS messages (text messages) Setting up the SMS centre Phone numbers of at least one SMS centre must be saved in the device, otherwise · you cannot open the [ Write Text Message] submenu in the Applications menu. -
Page 53: Activating/Deactivating The Sms Function
Sending and receiving SMS messages (text messages) Activating/deactivating the SMS function If you deactivate the SMS function, you cannot send or receive any further SMS messages with your phone. All the settings and the entries in the inbox and draft message list remain saved even after switching off. -
Page 54: Operating The Gigaset Sl910A Base Answering Machine
Operating the Gigaset SL910A base answering machine Operating the Gigaset SL910A base answering machine Operating via the handset ¢ Set the answering machine using the status page ( page 23) or the Answer Machine submenu: ¤ ¢ [ ¶ Answer Machine] ¤... - Page 55 Operating the Gigaset SL910A base answering machine To cancel the recording: Press a briefly or touch ‘. Please note Recording ends if there is a pause lasting longer than 3 seconds. If you cancel the recording, the default announcement is used.
-
Page 56: Activating/Deactivating Call Screening On A Handset
Operating the Gigaset SL910A base answering machine Playing individual messages ¤ Touch an entry in the answering machine list. While listening, the Call Info is displayed. You have the following options: [ R Volume] ¤ Adjust the playback volume. ö... -
Page 57: Activating/Deactivating Playback Of The Recording Time
Operating the Gigaset SL910A base answering machine Activating/deactivating playback of the recording time ¤ ¢ In the Answer Machine submenu ( page 52), scroll to Play Time Stamp. ¤ Activate/deactivate the function with the corresponding button. Setting the recording parameters The answering machine has default settings. -
Page 58: Operating When On The Move (Remote Operation)
Operating the Gigaset SL910A base answering machine Operating when on the move (remote operation) Check or activate the answering machine from another telephone (e.g., hotel, mobile phone). Prerequisites: The current system PIN is set to something other than 0000 ¢... -
Page 59: Using The Network Mailbox
Using the network mailbox Using the network mailbox You cannot use the network mailbox unless you have requested it from your provider and saved the network mailbox number in your phone. ¤ ¢ Touch [ ¶ Network Mailbox]. ¤ Open the Settings menu ( page 24). -
Page 60: Using Bluetooth Devices
You can exchange Contacts entries using the data devices and load ringtones and ¢ pictures to the handset using the Gigaset QuickSync software ( page 92). Please note A headset must have the headset or handsfree profile. The handsfree pro- file is preferred. - Page 61 Using Bluetooth devices Starting the search The search is started when you open the Bluetooth submenu under Settings and Bluetooth is activated. ¤ Open the Devices found list: Touch ’ to the right of the list (see picture above). ¤ Trusting the device adding the device to the known devices list ¤...
-
Page 62: Eco Dect: Reducing Energy Consumption And Radiation
ECO DECT: reducing energy consumption and radiation ECO DECT: reducing energy consumption and radiation You are helping to protect the environment with your Gigaset SL910/SL910A. Reducing energy consumption Your telephone has a power-saving adapter plug and uses less power. Reducing radiation The radiation from your telephone is reduced automatically: The closer the handset is to the base, the lower the radiation. -
Page 63: Using A Handset As A Room Monitor
Using a handset as a room monitor Please note Check that the base can be reached when Eco Mode / Eco Mode+ is acti- vated: Press and hold c. You hear the dialling tone if the base can be reached. When Eco Mode+ is activated, call setup is delayed by approx. -
Page 64: Room Monitor
Using a handset as a room monitor Changing the settings ¤ Room Monitor In the Applications menu, touch [ Ç Room Monitor]. ¤ Touch [ N Edit]. ¤ Select the sensitivity Sensitivity (High or Low) and destination for the room monitor call (Internal or External). -
Page 65: Setting An Appointment (Calendar)
Setting an appointment (calendar) Setting an appointment (calendar) You can remind yourself of up to 100 appointments. Birthdays in Contacts are transferred into the calendar. Saving an appointment ¢ Prerequisite: The date and time have already been set ( page 16). ¤... -
Page 66: Displaying Missed Appointments, Anniversaries
Setting an appointment (calendar) Displaying missed appointments, anniversaries ¢ Appointments/anniversaries ( page 46) are displayed in the Reminders / Events list if: You do not accept an appointment/anniversary. The appointment/anniversary was signalled during a phone call. The handset was deactivated at the time of the appointment/anniversary. You can open the Reminders / Events list via the message page in the idle display. -
Page 67: Setting The Alarm
Setting the alarm Setting the alarm ¢ Prerequisite: The date and time have already been set ( page 16). ¢ You can activate/deactivate and set the alarm using the status page ( page 23) or as follows: ¤ ¢ page 24), touch [ Ü Alarm]. In the Applications menu ( ¤... -
Page 68: Using Multiple Handsets
Using multiple handsets Registering handsets You can register up to six handsets and Gigaset repeaters to your base. Your hand- set can be registered on up to four bases. Each registered device is assigned an internal number (1–6) and an internal name (default names are INT 1–INT 6). -
Page 69: De-Registering Handsets
Using multiple handsets Registering other handsets to the Gigaset SL910/SL910A base You can register other Gigaset handsets and handsets for other devices with GAP functionality as follows. 1) On the base ¤ ¢ Press and hold the registration/paging key ( page 7) on the base (approx. -
Page 70: Changing The Base
If more than two handsets are registered to the base, select one handset or All. Please note If there are already two internal connections between the handsets/to the answering machine (Gigaset SL910A), then an internal consultation call is not possible. Transferring (connecting) an external call to the other handset You can transfer the external call either before the internal participant answers or afterwards. -
Page 71: Listening In To An External Call
Using multiple handsets Accepting/rejecting call waiting External call during an internal call ¤ Accept the call: Touch Accept. The internal call is placed on hold. ¤ Reject the call: Touch Reject. Internal call during an external call You will hear a single beep tone and receive a corresponding message. ¤... -
Page 72: Setting Up The Handset
Setting up the handset Setting up the handset Your handset comes with default settings, but you can change the settings to suit your individual requirements. Quick access to functions, QuickDial – customising your own idle display page ¢ ¢ On the configurable page of the idle display ( page 22, example page 20) you can customise applications, functions and phone numbers for quick access. - Page 73 Setting up the handset Removing application/function In configuration mode: ¤ Drag the corresponding icon back into the selection list. A QuickDial is deleted. The related entry in Contacts remains unchanged. The settings for all other functions (e.g., wake-up time) remain unchanged. Selectable applications and functions Icon Description...
-
Page 74: Changing The Display Language
Setting up the handset Icon Description ˜ Call list ¤ ¢ Touch the icon to open the call list ( page 39). Call List  Contacts ¤ Touch the icon to open the handset's local Contacts list ¢ page 42). Contacts ¾... -
Page 75: Configuring The Keyboard/Keypad
Setting up the handset Configuring the keyboard/keypad You can change the appearance and behaviour of the selection fields shown in the c v a display. The settings do not correspond to the handset keys ( ¤ ¢ In the Settings menu ( page 24), touch [ g Display and Keypad]. -
Page 76: Activating/Deactivating Auto Answer
Setting up the handset Please note The handset's standby time can be significantly reduced if the display backlight is activated. Activating/deactivating auto answer In the case of auto answer, the handset accepts an incoming call, as soon as you take it from the charger. In the same way, the connection ends when you place it in the charger. -
Page 77: Setting Ringtones
Ó Ô to adjust the volume. ¤ Crescendo Activate/deactivate the crescendo call Int. Calls with the button next to Crescendo. Gigaset Setting the ringtone ¤ Touch the ’ next to Int. Calls or Ext. Ext. Calls ¤ Gigaset Calls. Select the ringtone. -
Page 78: Activating/Deactivating Ringtone
Setting up the handset Activating/deactivating ringtone You can activate/deactivate the ringtone permanently via the status page ¢ page 23). ¤ ¢ ¤ Open the status page ( page 23). Activate/deactivate the ringtone with the button to the right of Do not disturb. Deactivating the ringtone for the current call ¤... -
Page 79: Setting Up The Base
Setting up the base Setting up the base Activating/deactivating music on hold ¤ ¢ page 24), touch [ ì Audio Settings]. In the Settings menu ( ¤ ¤ If necessary, scroll to Music on Hold. Activate/deactivate music on hold with the corresponding button. -
Page 80: Resetting The Base To The Default Settings
Connecting the base to the PABX Resetting the base to the default settings When the settings are restored: Date and time are retained The redial list is not deleted Handsets are still registered The system PIN is not reset. ¤ ¢... -
Page 81: Setting Pauses
Connecting the base to the PABX Setting pauses ¤ Open the Settings menu and enter the number code for the service functions ¢ page 80). ¤ Enter the pause after line seizure: A F A for 1 second, A F B for 3 seconds or A F 3 for 7 seconds. ¤... -
Page 82: Switching Temporarily To Tone Dialling (Tone)
Connecting the base to the PABX Switching temporarily to tone dialling (Tone) After dialling the external number or after establishing the connection (# is dis- played): ¤ Keypad] and then briefly touch :. Touch [ Configuring service functions It is not possible to access functions that are only required in special cases directly from the menu. -
Page 83: Customer Service & Assistance
Customer Service & Assistance Customer Service & Assistance Do you have any questions? As a Gigaset customer, you can find help quickly in this User Manual and in the service section of our Gigaset online portal www.gigaset.com/service. In our constantly updated online service you can find:... - Page 84 Mexico Bulgaria ....+359 2 9710666 . . . 01800 999 4442738 (01800 999 GIGASET) (0.50 евро на минута от всички държави за Netherlands ....0900-3333102 стационарни...
-
Page 85: Manufacturer Warranty (Middle East)
Manufacturer warranty (Middle East) Manufacturer warranty (Middle East) On the purchase of your new Gigaset product, we guarantee that this equipment is a genuie manufacturer’s product and extend the following warranty: We guarantee this product against manufacturing defects for two full years from the date of purchase, unless specified otherwise. - Page 86 Manufacturer warranty (Middle East)
-
Page 87: Service Centres (Midde East)
Service Centres (Midde East) Service Centres (Midde East) Customer Service Hotline UAE TEL: 00971-4-4458255 / 00971-4-4458254 Service Collection Point www.technocare-prodigy.com KARAMA Sea Shell Electronics Opp. Karama Centre Dubai, UAE Tel: 00971-4-3979228 Fax: 00971-4-3966205 Deira Souvenier Mobiles, Omar Bin Katab Road, Oppst. - Page 88 Service Centres (Midde East) Qatar Modern Home, 51-East - Salwa Road, Al-Maha Complex, Doha Tel: 00974-4257844 / 00974-4257777 Fax: 00974-4314700 Bahrain Authorized Service Center, Bldg: 211, Rd: 339, Block: 321, Old Place Road, Manama, Tel: 00973-17311173 E-mail: servicemanager@ashrafs.com.bh Saudi Arabian Service Centers: Ahmed Abdulwahed Trading Co.
-
Page 89: Questions And Answers
Tel: 00961-1240259 / 00961-1236110 Questions and answers If you have any questions about the use of your phone, you can contact us 24/7 at www.gigaset.com/service The table below also lists steps for troubleshooting. Registration or connection problems with a Bluetooth headset. - Page 90 Service Centres (Midde East) " " Base connection lost - Searching for base ... flashes on the display. ¥ 1. The handset is outside the range of the base. Move the handset closer to the base. ¥ ¢ 2. The base is not activated. Check the base power adapter ( page 12).
-
Page 91: Exclusion Of Liability
Delete old messages. Play back new messages and delete. Exclusion of liability The display on Gigaset SL910H has a resolution of 480x320 pixels, which is achieved with the aid of 460,800 control elements. Each pixel consists of three sub-pixels (red, green, blue). -
Page 92: Updating The Base Firmware
LAN socket on the router Please note This user guide describes the functions for the SL910/SL910A as supplied (other functions may be added later through firmware updates). If the firmware update results in operational changes, a new version of this user manual or the necessary amendments will be published on the Internet at: www.gigaset.com./gigasetsl910... -
Page 93: Starting A Firmware Update
Updating the base firmware Starting a firmware update Prerequisite: The base is connected to the Internet and is in idle status. Starting the firmware update manually ¤ ¢ Ê In the Settings menu ( page 24), touch [ System]. ¤ Touch the corresponding ’. -
Page 94: Accessing Additional Functions Via The Pc Interface
Using a USB connection with a power supply of 500 mA. the handset's bat- tery is charged. On USB connections with lower charging currents, the handset's battery is discharged! A detailed description can be found in the help file to Gigaset QuickSync. -
Page 95: Checking Base/Handset Service Information
Country-specific requirements have been taken into consideration. We, Gigaset Communications GmbH, declare that this device meets the essential requirements and other relevant regulations laid down in Directive 1999/5/CE. A copy of the 1999/5/EC Declaration of Conformity is available at this Internet address: www.gigaset.com/docs... -
Page 96: Environment
Environment Our environmental mission statement We, Gigaset Communications GmbH, bear social responsibility and are actively committed to a better world. Our ideas, technologies and actions serve people, society and the environment. The aim of our global activity is to secure sustainable life resources for humanity. -
Page 97: Appendix
The handset is supplied with the recommended battery. Only an original battery may be used. Due to the constant progression in battery development, the list of recommended batteries in the FAQ section of the Gigaset Customer Care pages is updated regu- larly: www.gigaset.com/service... -
Page 98: General Specifications
Appendix Handset operating times/charging times The operating time of your Gigaset depends on the capacity and age of the battery and the way it is used. (All times are maximum possible times). Standby time (hours) * Standby time in Eco Mode+ (hours) * Talktime (hours) Operating time for 1.5 hours of calls per day (hours) *... - Page 99 Appendix Bluetooth Radio frequency range 2402–2480 MHz Transmission power 4 mW pulse power Pin connections on the telephone jack 1 unused 2 unused 5 unused 6 unused...
-
Page 100: Using Open Source Software Contained In The Product
The corresponding source code can be requested from dom, not price. Our General Public Licenses are designed Gigaset Communications GmbH, but this will incur a EUR to make sure that you have the freedom to distribute copies of free software (and charge for this service if you 10 processing charge for the provision. - Page 101 Using Open Source software contained in the product GNU GENERAL PUBLIC LICENSE missions for other licensees extend to the entire whole, and thus to each and every part regardless of who wrote it. Thus, it is not the intent of this section to claim rights or contest your rights to work written entirely by you;...
- Page 102 Using Open Source software contained in the product 6. Each time you redistribute the Program (or any work derivatives of our free software and of promoting the sha- based on the Program), the recipient automatically recei- ring and reuse of software generally. ves a license from the original licensor to copy, distribute or modify the Program subject to these terms and condi- NO WARRANTY...
-
Page 103: Gnu Lesser General Public License (Lgpl)
Using Open Source software contained in the product certain responsibilities for you if you distribute copies of Gnomovision version 69, Copyright (C) <year> <name the library or if you modify it. of author> For example, if you distribute copies of the library, whe- Gnomovision comes with ABSOLUTELY NO WAR- ther gratis or for a fee, you must give the recipients all the RANTY;... - Page 104 Using Open Source software contained in the product The precise terms and conditions for copying, distribu- d) If a facility in the modified Library refers to a func- tion and modification follow. Pay close attention to the tion or a table of data to be supplied by an applica- difference between a "work based on the library"...
- Page 105 Using Open Source software contained in the product However, linking a "work that uses the Library" with the e) Verify that the user has already received a copy of Library creates an executable that is a derivative of the these materials or that you have already sent this user Library (because it contains portions of the Library), a copy.
- Page 106 Using Open Source software contained in the product those who receive copies directly or indirectly through REDISTRIBUTE THE LIBRARY AS PERMITTED ABOVE, BE you, then the only way you could satisfy both it and this LIABLE TO YOU FOR DAMAGES, INCLUDING ANY GENE- License would be to refrain entirely from distribution of RAL, SPECIAL, INCIDENTAL OR CONSEQUENTIAL DAMA- the Library.
-
Page 107: Index
Index Index changing ........... . connecting . - Page 108 ..Destination number (room monitor) ... . . (Gigaset QuickSync) ....Diacritical characters...
- Page 109 ......status bar ....Gigaset QuickSync Idle display ... .
- Page 110 Index Lock activating/deactivating display lock ....Opening the submenu ..activating/deactivating key lock ....Operating remotely .
- Page 111 Index reading ............receiving .
Need help?
Do you have a question about the SL910 and is the answer not in the manual?
Questions and answers