Table of Contents
Advertisement
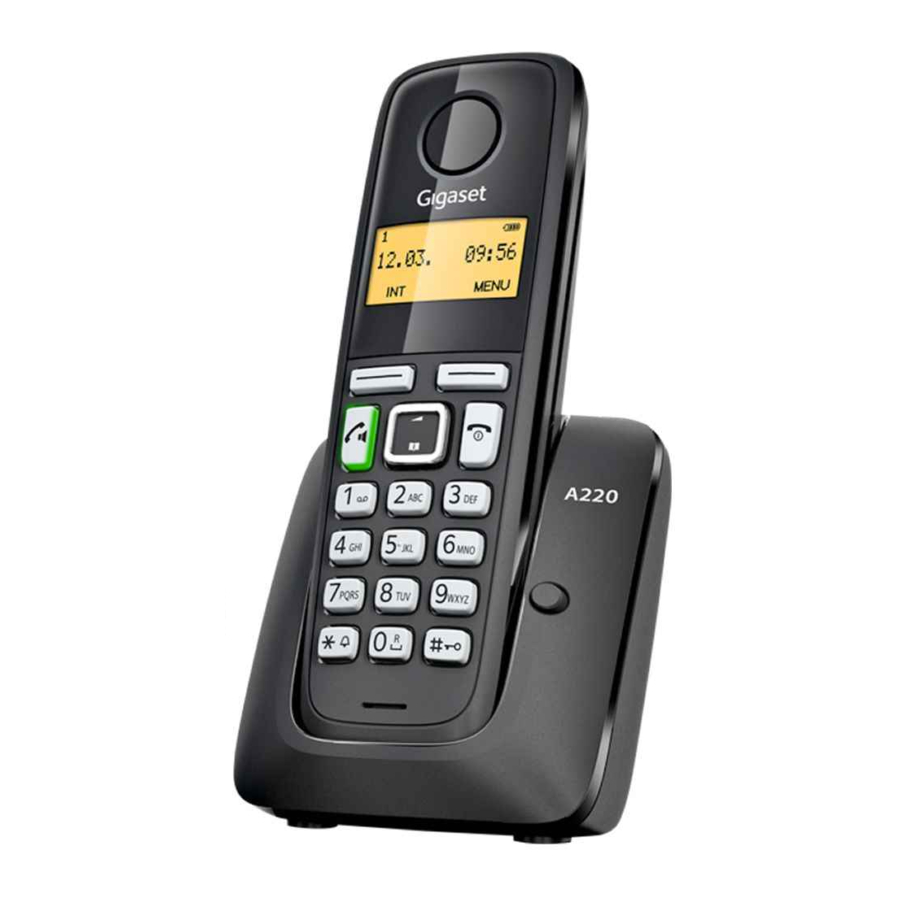
Gigaset A220/A220A
The handset at a glance
1 Charge status of the batteries:
= e V U
(flat to full)
=
flashes: batteries almost flat
e V U
flashes: charging
2 Answering machine icon (A220A only)
3 Display keys
4 End call key and On/Off key
5 Talk key/Handsfree key
u
6 Control key (
)
7 Directory key (press down on the con-
trol key)
8 Key 1
Open the answering machine (A220A
only)/network mailbox
9 Star key
Ringers on/off (press and hold)
10 Key 0/recall key
Consultation call (flash): press and hold
11 Hash key
Keypad lock on/off (press and hold);
toggles between upper/lower case
and digits; inserts a dialling pause
(press and hold)
12 Microphone
1
±
V
1
2
11.12.
11:56
INT
MENU
3
4
5
6
7
8
9
10
11
12
1
Please note
New messages in the calls list/answering machine list/network mailbox list (
are indicated in the display by the message New messages.
Display keys:
Pressing a key launches the function that appears above
that key in the display.
Display Function when pressed
INT
Call other registered handsets
MENU
Open main/submenu (see menu overview
¢
page 16).
"
Go back one menu level.
U
Scroll up/down or adjust volume with
T
Move cursor to left/right with
˜
Backspace deletes one character at a time.
OK
Confirm menu function or save entry.
ECO DECT
During a call, the level of the handset's radio signal adjusts automatically according to
the distance between the handset and base station: the shorter the distance, the lower
the signal strength (radiation).
The handset's radio signal is switched off when it is in standby mode. The base station,
however, maintains contact with the handset with fewer radio signals.
In addition, the base station radio signals are switched off when the No Radiation set-
ting is enabled.
¤ u
¤ u
¤
MENU
Settings
OK
‰
¤
¤
No Radiation
OK (
= radiation switched off, icon
display)
Please note
◆
All registered handsets must support this feature.
◆
For quick connection of incoming calls the handset repeatedly switches to recep-
tion mode for short periods. This increases energy consumption and therefore
reduces the standby and talk times.
The base station at a
glance
¢
page 11.
u
.
Registration/paging key:
u
.
Search for handsets (press
briefly, "Paging"
Register handsets (press and
¢
hold
page 10).
¤ u
¤
¤
Base
OK
ECO DECT
OK
½
in the left-hand corner of the
¢
page 7)
¢
page 10)
Advertisement
Table of Contents

Related Manuals for Gigaset A220


Summary of Contents for Gigaset A220
- Page 1 Gigaset A220/A220A Please note ¢ New messages in the calls list/answering machine list/network mailbox list ( page 7) are indicated in the display by the message New messages. The handset at a glance 1 Charge status of the batteries: = e V U Display keys:...
- Page 2 Do not use your phone/phone system in environments with a potential explosion hazard (e.g., paint shops). If you give your Gigaset to a third party, make sure you also give them the user guide. Remove faulty devices from use or have them repaired by our Service team, as these could interfere with other wireless services.
- Page 3 Inserting the batteries and closing the battery cover ¤ Then connect the telephone Warning jack and insert the cables Use only the rechargeable batteries recommended by Gigaset Communications into the cable ducts. ¢ GmbH ( page 13), i.e. never use conventional (non-rechargeable) batteries as Please note: this could result in significant health risks and personal injury.
- Page 4 ¤ Press the display key OK. ◆ If you have purchased multiple devices, you can upgrade your Gigaset to a cordless PABX by registering all A220 handsets at the same base ¢ page 10). ◆ After the first battery charge and discharge, you may place your handset in the charger after every call.
- Page 5 During a call and when listening to the approx. 30 seconds. answering machine (Gigaset A220A only) you activate or deactivate handsfree mode If you remove the handset from the base station/charging cradle, the display turns off by pressing the handsfree key briefly.
- Page 6 Optus: Internal consultation call/connecting a call You are on the phone and hear the beeps. You are in conversation with an external participant. Press the left display key and call To put the first caller on hold and talk to the new caller (the caller on hold will hear one or all handsets.
- Page 7 Using the directory and lists Last number redial list This list contains the ten last dialled numbers. Directory Dialling from the last number redial list ¤ c ¤ To open the directory: press control key (press briefly) (select entry) You can save up to 80 phone numbers (max. 22 digits) with corresponding names Managing entries in the last number redial list (max.
- Page 8 Answering machine list (A220A only)/network mailbox list Playing back/deleting messages You can use these lists to listen to messages on the answering machine (see "Playing There are three ways to start playing back messages on the answering machine. ¢ ¢ back/deleting messages"...
- Page 9 Stopping and controlling playback Accepting a call from the answering machine Controlling playback depends on the point in time at which the corresponding key is You can accept a call while the answering machine is recording the caller's message: pressed. ¤...
- Page 10 ¤ De-registering handsets MENU Answer Machine Netw. Mailbox/Net Mailbox (enter ¤ number) You can de-register all other registered handsets from each of the registered Gigaset Locating a handset ("Paging") handsets. ¤ u ¤ u ¤ u ¤ u ¤ ¤...
- Page 11 Using multiple handsets Setting the alarm clock Making internal calls Activating/deactivating the alarm clock ‰ ¤ u ¤ ¤ ¤ MENU Alarm Clock Activation OK ( = on) Internal calls are free calls to other handsets that are registered to the same base sta- ¤...
- Page 12 Phone settings Restoring the base station When restoring factory settings the No Radiation mode is deactivated, individual set- ¢ For details on how to make audio settings, see menu overview page 16. tings are reset and all lists are deleted. For details on how to set the system PIN on the base station, see the menu overview The date and time are retained.
- Page 13 Operating the base station on the PABX/router Appendix Operating on the router Entering letters/characters When operating the Gigaset on an analogue port of a router you can reduce problems ¢ Standard 1x 2x 3x 4x 5x 6x 7x 8x 9x 10x 11x 12x 13x 14x 15x with echoes by activating the Echo mode ( page 16).
- Page 14 Questions and answers Australia and New Zealand If you have any queries about the use of your telephone, visit our website at www.gigaset.com/service for 24-hour support. The table below contains a list of com- mon problems and possible solutions. IMPORTANT Please retain your sales receipt as proof of the date of purchase.
- Page 15 Our environmental mission statement port line listed in this document whereby the customer service representative will We, Gigaset Communications GmbH, bear social responsibility and are actively com- inform you of the product return process. Except as explicitly stated in this document, mitted to a better world.
- Page 16 ¢ Menu overview Netw. Mailbox * page 10 ¢ Net Mailbox *** page 10 with network mailbox. Your phone has an extensive range of features. These are offered in the form of menus. Set Key 1 * Net Mailbox Assign key (In idle status, press and hold key to dial.)
Need help?
Do you have a question about the A220 and is the answer not in the manual?
Questions and answers