kozy heat PRINCETON PRC-36 Installation And Operating Manual
Direct vent gas fireplace
Hide thumbs
Also See for PRINCETON PRC-36:
- Installation and operation manual (80 pages) ,
- Installation and operating manual (40 pages) ,
- Installation manual (76 pages)
Table of Contents
Advertisement
MODELS:
#PRC-36 / #PRC-36-RF
'PRINCETON'
Direct Vent Gas Fireplace
INSTALLATION AND
OPERATING MANUAL
US Patent #6004493
INSTALL THIS FIREPLACE CORRECTLY CAN CAUSE SERIOUS STRUCTURAL
Report No. 216-F-10-5
READ INSTRUCTIONS CAREFULLY BEFORE INSTALLATION. FAILURE TO
AND FIRE HAZARDS AND MAY VOID YOUR WARRANTY
www.kozyheat.com
WARNING: If the information in these instructions
is not followed exactly, a fire or explosion may
result, causing property damage, personal injury
or loss of life.
‚ Do not store or use gasoline or other flammable
vapors and liquids in the vicinity of this or any other
appliance.
WHAT TO DO IF YOU SMELL GAS
‚ Do not try to light any appliance.
‚ Do not touch electrical switches; do not use the
phone in your building.
‚ Immediately call your gas supplier from a
neighbor's phone. Follow your gas supplier's
instructions.
‚ If you cannot reach your gas supplier, call the fire
department.
Installation & service must be performed by a qualified
installer, service agency, or the gas supplier.
This appliance is only for use with the type(s) of gas
indicated on the rating plate and may be installed in an
aftermarket permanently located, manufactured (mobile)
home, where not prohibited by local codes. See owner's
manual for details. This appliance is supplied with a
conversion kit.
IMPORTANT:
:
.
March 2006 (2)
Advertisement
Table of Contents

Related Manuals for kozy heat PRINCETON PRC-36


Summary of Contents for kozy heat PRINCETON PRC-36
- Page 1 WARNING: If the information in these instructions is not followed exactly, a fire or explosion may result, causing property damage, personal injury or loss of life. ‚ Do not store or use gasoline or other flammable MODELS: vapors and liquids in the vicinity of this or any other #PRC-36 / #PRC-36-RF appliance.
-
Page 2: Table Of Contents
DIRECT VENT CHIMNEY INSTALLATION ..................14-15 KOZY HEAT #800 SERIES FLEXIBLE TERMINATION KIT INSTALALTION ......14-15 FAN INSTALLATION . -
Page 3: Safety Requirements / Specifications
IMPORTANT: READ THIS MANUAL BEFORE INSTALLING AND USING THIS FIREPLACE MODEL #PRC-36 PRINCETON’ DIRECT VENT GAS FIREPLACE This fireplace has been tested to and complies with ANSI Z21.88B-2003 CSA 2.33B-2003 “VENTED GAS FIREPLACE HEATERS” by OMNI-Test Laboratories, Beaverton, OR. Installation must conform with local building codes or in the absence of local building codes, with the National Fuel Gas Code, ANSI Z223.1/ NFPA 54 - Current Edition, or the Natural or Propane Installation Code, CSA B149.1. -
Page 4: Specifications
SPECIFICATIONS Height ........32" Height to top of stand-off ..... 42" Front width . -
Page 5: Minimum Clearances
INSTALLATION REQUIREMENTS: Minimum clearances from the fireplace to combustible materials: From unit face top: 10 " From unit left & right sides & back: 1/2" From face sides: 1/4" Unit bottom to flooring: 0" Unit top to ceiling: 31" Unit side to adjacent sidewall: 10"... -
Page 6: Typical Installation Options
THIS FIREPLACE IS APPROVED FOR USE WITH THE FOLLOWING 5" X 8" DIRECT VENT SYSTEMS: SIMPSON DURA-VENT DV-GS, AMERI-VENT, AND SELKIRK METALBESTOS. THIS FIREPLACE IS ALSO APPROVED FOR USE WITH THE KOZY HEAT #800 SERIES FLEXIBLE VENT SYSTEM FOR HORIZONTAL VENTING APPLICATIONS. -
Page 7: Minimum / Maximum Venting Requirements
VENTING SPECIFICATIONS: IMPORTANT: Flame height and appearance will vary depending upon venting configuration and type of fuel used. HORIZONTAL TERMINATIONS: IMPORTANT: The horizontal heat shield included with this fireplace must be installed when using a 45-degree elbow to horizontally position the vent system. Minimum: 45-degree elbow at start followed by 6"... -
Page 8: Horizontal Venting
MINIMUM HORIZONTAL VENTING IMP0RTANT: THE KOZY HEAT WALL THIMBLE PASS-THRU MUST BE USED ON ALL HORIZONTAL VENT RUNS. THE MINIMUM WALL THICKNESS FOR THIS PASS-THRU IS 4 ½" AND THE MAXIMUM WALL THICKNESS IS 8". Minimum horizontal venting NOTE: Horizontal Vent Heat shield must be installed when using a 45-degree elbow to horizontally position the vent system. -
Page 9: Termination Cap Location
TERMINATION VENT CAP LOCATION: This gas appliance must not be connected to a chimney flue serving another type of appliance. GENERAL: Terminations against vinyl siding must use a vinyl siding protector. Follow instructions included. DO NOT RECESS TERMINATION KIT INTO OUTSIDE BUILDING MATERIALS - i.e.: brick, stone, siding, etc.. If necessary, extend framing so that termination kit will be exposed once building materials are installed. -
Page 10: Vertical Venting
WHEN VERTICALLY TERMINATING, THE MINIMUM CHIMNEY HEIGHT ABOVE THE ROOF LINE IS DETERMINED BY THE FOLLOWING CHART: Roof Pitch Minimum Chimney Height Roof Pitch Minimum Chimney Height Flat to 6/12 1 ft. 13/12 to 16/12 6 ft. 6/12 to 9/12 2 ft. -
Page 11: Determine Location
IMPORTANT: The horizontal vent heat shield must be installed when using a 45-degree elbow to horizontally position the vent system or when using the #800 series Kozy Heat flexible vent system for horizontal terminations. Refer to page #12 of this manual for instruction on attaching the horizontal vent heat shield. -
Page 12: Rough-In Dimensions
VERTICAL TERMINATIONS: Follow vent pipe manufacturer’s installation instructions for vertical terminations. A minimum 1" clearance on all sides of vertical vent pipe sections must be maintained. The horizontal vent heat shield is not used for vertical venting configurations. CAUTION: COLD AIR TRANSFER AREA. THE SURROUNDING CHASE OF THE FIREPLACE MUST COMPLY WITH ALL CLEARANCES AS OUTLINED IN THIS MANUAL AND BE CONSTRUCTED IN COMPLIANCE WITH LOCAL BUILDING CODES. -
Page 13: Prepare The Fireplace
PREPARE THE FIREPLACE STAND-OFF ASSEMBLY & INSTALLATION The top stand-off brackets must be formed and correctly positioned prior to positioning the fireplace into the framed opening. Figure 8A. The top stand-off brackets are attached to the top of the fireplace in a flat state when the fireplace is shipped. Remove the screws securing each stand-off bracket and remove from the fireplace. -
Page 14: Position The Fireplace
VERTICAL VENT APPLICATIONS This fireplace is approved for use with the Simpson Dura-Vent, Ameri-Vent and the Selkirk Metalbestos 5" x 8" direct vent systems for vertical vent applications. There is no additional adaptor necessary to begin installing the chimney components. POSITION THE FIREPLACE Place the fireplace into position. -
Page 15: Direct Vent Chimney Installation
All clearances and venting requirements as specified in this manual must be followed. HORIZONTAL TERMINATIONS: IMPORTANT: The Kozy Heat wall pass-thru, part #MTK-WPT, must be used on all horizontal vent applications regardless of which vent system you are using. INSTALLATION OF #800 SERIES DIRECT VENT TERMINATION KIT(S) IMPORTANT: The flex pipe is permanently attached to the exterior plate. - Page 16 Minimum venting requirements: A minimum of 37 7/8" to the top of the vent pipe and 40 7/8" to the top of the framed opening from the floor or hearth the fireplace is setting on is required. Refer to pages #5 - #10 for complete venting requirements &...
-
Page 17: Fan Installation
MODEL #PRC-36 ONLY: OPTIONAL FAN INSTALLATION INSTRUCTIONS NSTALLATION OF THIS FAN SHOULD BE DONE ONLY BY A QUALIFIED INSTALLER IMPORTANT: If a fan is going to be installed, it is easier to complete before the millivolt board is connected to the gas line. The wiring must be done prior to enclosing the sides of the unit. -
Page 18: Installation Instructions
INSTALLATION INSTRUCTIONS THE FOLLOWING COMPONENTS MUST BE REMOVED FROM THE FIREPLACE PRIOR TO INSTALLATION OF THIS FAN. REFER TO THE CORRESPONDING INSTALLATION MANUAL PAGES FOR ASSISTANCE IF NECESSARY. Upper hood, upper louver & lower grill, if installed. Refer to Slide to the left. Slide to the right. -
Page 19: Model #Prc-36-Rf
MODEL #PRC-36-RF ONLY: FAN INSTRUCTIONS NSTALLATION OF THIS FAN WIRING SHOULD BE DONE ONLY BY A QUALIFIED INSTALLER IMPORTANT: A fan assembly is pre-installed and wired to the RF gas valve in the PRC-36-RF models. The wiring must be done prior to enclosing the sides of the unit. An electrical box & romex connector are pre-installed on a removable panel on the right side of the fireplace. -
Page 20: Gas Line Specifications
RUN THE GAS LINE. CAUTION: Installation of the gas line must only be done by a qualified person in accordance with local building codes. GAS CONVERSIONS - If a gas conversion to LP GAS is necessary, the appropriate gas conversion kit, #H5271-L for Model #PRC-36 and #H5271L-RF for Model #PRC-36-RF, is included in the fireplace components packet. -
Page 21: Secure The Millivolt Board
3. Connect the gas line to the manual shut-off valve. 4. Connect the flexible gas line (installed on the millivolt board valve) to the manual shut off valve. IMPORTANT: ALL CONNECTIONS WHETHER FIELD OR FACTORY MADE MUST BE CHECKED FOR LEAKS! NOTE: The appliance and its individual shutoff valve must be disconnected from the gas supply piping system during any pressure testing of that system at test pressures in excess of ½... -
Page 22: Log Installation
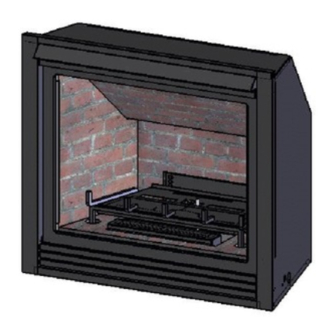
LOG INSTALLATION The PRC-500 log set includes 11 logs, 1 bag klinkers and 1 pkg. rock wool burning embers. The logs are numbered on the bottom side - refer to the instructions below for proper placement. Figure 17A Position base log P1 over the pilot shield on the burner, setting the backside of the log against the flange at the back. Pull the log forward until it reaches the backside of the burner port holes. -
Page 23: Thermostat - Wall Switch - Remote Control Installation (Model #Rpc-36 Only)
MODEL PRC-36 ONLY: THERMOSTAT - WALL SWITCH - REMOTE INSTALLATION CAUTION: DO NOT CONNECT HIGH VOLTAGE (115V) WIRE TO THE GAS VALVE! If desired, a thermostat (wireless style available), wall switch, or remote control assembly may be used to turn the fireplace ‘OFF’ Thermostat Wiring Diagram and ‘ON’. -
Page 24: Complete The Installation
COMPLETE THE INSTALLATION 1. A) If not previously done, plumb & level the fireplace and secure to the framing using the stud tabs located on the sides of the fireplace. The stud-tabs are adjustable to accommodate the thickness of finish material you are using. To adjust, loosen the screws securing it to the sides of the fireplace and slide to desired position. - Page 25 4. Replace the glass. A) Place the glass assembly onto the front of the fireplace and secure with the spring-loaded handles FIRST AT THE TOP, THEN AT THE BOTTOM of the firebox. CAUTION: TO PREVENT THE GLASS ASSEMBLY FROM FALLING OFF WHEN INSTALLING ON THE FIREPLACE, SECURE THE TOP GLASS LATCH BRACKETS FIRST, THEN THE BOTTOM.
-
Page 26: Model #Prc-36
MODEL #PRC-36 ONLY: LIGHTING AND SHUTDOWN PROCEDURES NOTE: Prior to lighting, check all fittings for leakage. This is accomplished by applying soapy water on all connections made. If there is any leakage, bubbles will appear at the point of connection. If bubbles occur, tighten the fittings until the bubbles no longer appear. IMPORTANT: TEST ALL CONNECTIONS WHETHER FIELD OR FACTORY MADE. - Page 27 The pilot will generally light with two or three pushes on the igniter. Hold the knob in for about one (1) minute after the pilot is lit. Release knob and it will pop back out. Pilot should remain lit. If it goes out, repeat steps 4 through 8. *If knob does not pop out when released, stop and immediately call your service technician or gas supplier.
-
Page 28: Manifold & Incoming Pressure Check Procedures
MODEL #PRC-36 ONLY: PRESSURE TEST - MANIFOLD & INLET PRESSURE IMPORTANT NOTICE: A pressure check tap for both the manifold (outgoing) and inlet (incoming) pressure has been incorporated into the valve by HONEYWELL Controls. The left pressure tap is the manifold pressure and the right pressure tap measures the incoming pressure. -
Page 29: Model #Prc-36-Rf Lighting & Shutdown
MODEL #PRC-36-RF ONLY: LIGHTING AND SHUTDOWN PROCEDURES NOTE: Prior to lighting, check all fittings for leakage. This is accomplished by applying soapy water on all connections made. If there is any leakage, bubbles will appear at the point of connection. If bubbles occur, tighten the fittings until the bubbles no longer appear. IMPORTANT: TEST ALL CONNECTIONS WHETHER FIELD OR FACTORY MADE. - Page 30 *If the pilot will not stay lit after several tries, turn the gas control knob to "OFF" and call your service technician or gas supplier. Push the control knob on the gas valve in slightly and turn counterclockwise to the "ON" position. If the manual switch is in the LOCAL position, the main burner will turn on immediately.
-
Page 31: Manifold & Incoming Pressure Check Procedures
MODEL #PRC-36RF ONLY: PRESSURE TEST - MANIFOLD & INLET PRESSURE IMPORTANT NOTICE: A pressure check tap for both the manifold (outgoing) and inlet (incoming) pressure has been incorporated into the valve by HONEYWELL Controls. The left pressure tap is the manifold pressure and the right pressure tap measures the incoming pressure. -
Page 32: Cleaning & Maintenance Requirements
MAINTENANCE REQUIREMENTS MILLIVOLT BOARD SYSTEM 1. The appliance should be inspected at least once a year by a professional service person. 1. Annual cleaning of the burner is required. The burner & cover assembly may be removed for NOTE: INSTALLATION AND REPAIR SHOULD BE DONE easier access. -
Page 33: Millivolt Board Removal / Installation
MILLIVOLT BOARD REMOVAL / INSTALLATION NOTE: This fireplace is equipped with the millivolt board, burner & burner cover already installed. Follow instructions ‘INSTALLING THE BOARD’ on pages #33-#34 to properly secure the millivolt board in place. Follow these procedures should the millivolt board need replacing or is removed for servicing. - Page 34 14. Loosen and remove the (8) screws securing the board. Figure 25C. 15. Carefully lift the board up and remove from the firebox. Figure 25C MILLIVOLT BOARD INSTALLATION: NOTE: The millivolt board is fitted with a gasket to seal the millivolt board. Make certain this gasket is properly placed around the opening before installing the millivolt board.
- Page 35 RE-ADJUST THE BACK BURNER VENTURI POSITION: A. Move the handle until the venturi wheel is at the #1 position for LP Gas and the #9 position for Natural Gas. These are the factory standard settings. NOTE: The venturi opening may need further adjusting, depending on your specific venting configuration.
-
Page 36: Trouble Shooting Guide
TROUBLE SHOOTING GUIDE NOTE: The millivolt board includes the following items: Valve, pilot assembly, piezo, electrode, on/off rocker switch, burner, burner venturi tubes, & burner orifices. If any of these items are defective, contact your dealer for the appropriate repair / replacement procedures to follow. WARNING: DO NOT ATTEMPT TO SERVICE THIS UNIT IF YOU ARE NOT A QUALIFIED INSTALLER OR REPAIRMAN. - Page 37 PROBLEM CAUSE SOLUTION Burner won't light Pilot not lit Relight pilot Regulator valve not turned “ON”. Turn valve to "ON" Rocker switch not turned “ON”. (Model PRC-36) Depress switch. Rocker switch wires not connected. (Model PRC-36) Check wiring diagram Figure 26 to ensure that all wires are secure.
-
Page 38: Replacement Parts Lists
REPLACEMENT PARTS Replacement parts are available through your local dealer. Contact them for availability and pricing. MILIIVOLT BOARD AND PARTS - PRC-36 PRC-800 Princeton Millivolt Board - Natural Gas 700-224 3/8" Flexible Gas Line - Valve to Burner connection 700-023 On/Off Rocker Switch 700-237 Natural Gas orifice #37 (back burner) 700-057...
Need help?
Do you have a question about the PRINCETON PRC-36 and is the answer not in the manual?
Questions and answers