
Related Manuals for Body Champ BRB 3800


Summary of Contents for Body Champ BRB 3800
- Page 1 BRB 3800 M A G N E T I C RECUMBENT BIKE * This item is for consumer use only and it is not meant for commercial use. OWNE R’ S M ANUAL...
- Page 2 This page intentionally left blank...
-
Page 3: General Information
You should avoid storage in Fax: (909) 598 - 6707 excessively cold or damp places as this may Email: info@bodyflexsports.com lead to corrosion and other related problems. Weight Limit Your product is suitable for users weighing: 250 pounds or less. BRB 3800 Page 1... - Page 4 [8 Pieces] [10 Pieces] Pre-assemble [2 Pieces] Pre-assemble [2 Pieces] Pre-assemble [4 Pieces] #25. Nylon Nut (M10) #26. Nut (M8) [9 Pieces] [4 Pieces] Tool #53. Tool 1 #54. Tool 2 (5 mm) [2 Pieces] [1 Pieces] Page 2 BRB 3800...
-
Page 5: Parts Listing
Sensor Wire 7 Spring Washer (M8) Tension Control Arc Washer (M8) Tension Control Cable Washer (M10) Monitor Washer (M8) Seat Cushion Nylon Nut (M10) Backrest Cushion Nut (M8) Tool 1 Spring Loaded Knob (M16x30 mm) Tool 2 Page 3 BRB 3800... -
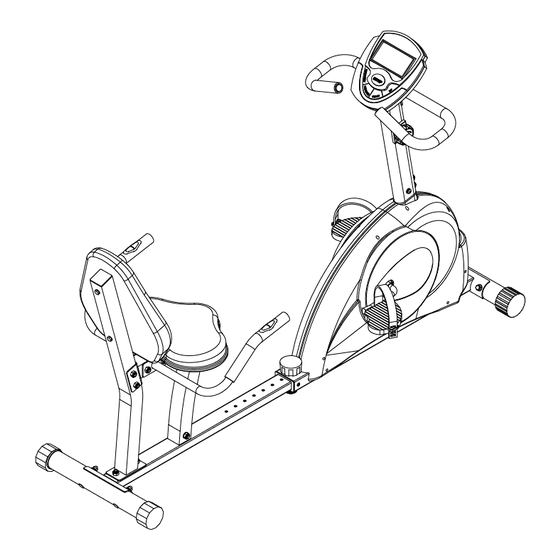
Page 6: Exploded Diagram
Please continue to the next page to begin the assembly process and use this page only as a reference guide for parts and hardware. Page 4 BRB 3800... - Page 7 Once you select the desired setting, screw the Spring #26. Nut (M8) Loaded Knob (#27) into the Main Frame (#01) and through the [4 Pieces] Bottom Frame (#02) to secure it in place. Tighten them using two Screws (#20). BRB 3800 Page 5...
- Page 8 SENSOR WIRE ASSEMBLY TENSION WIRE ASSEMBLY Insert the tip of the Tension Control (#48) wire into the Tension Control Cable (#49) head at an angle. Tilt the Tension Control (#48) wire into the crevice and then pull upward. Page 6 BRB 3800...
- Page 9 3. Insert two Hex Bolts (#13) through the Seat Cuhion Support Frame (#05) and the Seat Cushion Frame (#04), then secure #25. Nylon Nut (M10) #23. Washer (M10) them together using two Nylon Nuts (#25). [7 Pieces] [4 Pieces] Page 7 BRB 3800...
- Page 10 [2 Pieces] [2 Pieces] Rear Handle Bar (#07) followed by the Seat Cushion Frame (#04) and the Right Rear Handle Bar (#06). Secure them together using two Nylon Nuts (#25). #25. Nylon Nut (M10) [2 Pieces] Page 8 BRB 3800...
- Page 11 Screw Right Pedal (#37) into the right crankshaft by turning the Right Pedal (#37) clockwise. Washer Screw Left Pedal (#38) into the left crankshaft by turning the Left Pedal (#38) counterclockwise. #24. Washer (M8) [6 Pieces] BRB 3800 Page 9...
- Page 12 Monitor (#50) and Front Post (#09). Secure them together using four Screws (#18) that were previously removed. The assembly process is complete. Please ensure all nuts, bolts and knobs are securely tightened before using the cycle. Page 10 BRB 3800...
-
Page 13: Computer Operation
Body fat ration, Body type & BMI. (The monitor has to be in stop condition.) RECOVERY: Press this button to measure your pulse recovery condition during stop condition. Functions 1. Calendar: Display the month, date and week. 2. Temperature: Display current room temperature from 10℃ to 60℃. BRB 3800 Page 11... - Page 14 Users can set the target value from 1:00 to 99:00 then the monitor will count down form the setting value. Once reach the setting value, the monitor will alarm then the value will count up from 00:00. BRB 3800 Page 12...
- Page 15 LCD from F1.0 to F6.0, the increment is 0.1. F1.0 means the best, and F6.0 means the worst. Press any key except RECOVERY key to return to the main display. BRB 3800 Page 13...
-
Page 16: Proof Of Purchase
Proof of purchase Model Number BRB 3800 version: 04-19-2010 BRB 3800...
Need help?
Do you have a question about the BRB 3800 and is the answer not in the manual?
Questions and answers