GAUI Hurricane 255 Assembly Instructions Manual
Hide thumbs
Also See for Hurricane 255:
- Assembly instruction manual (24 pages) ,
- Operating instructions manual (108 pages)
Table of Contents
Advertisement
Quick Links
GAUI
Hobby
規格資料
Specification
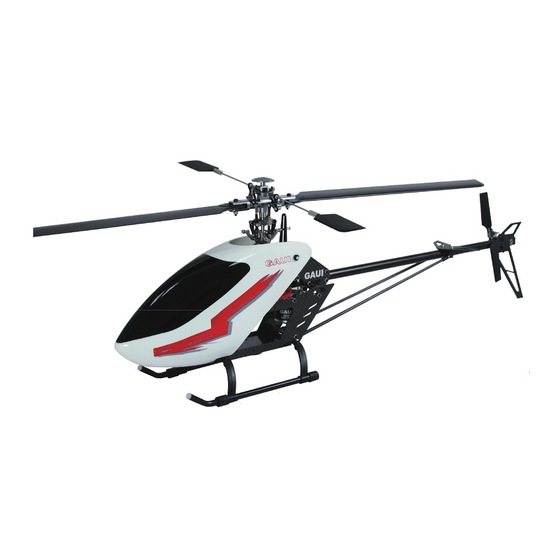
Overall length : 488 mm (including cabin & canopy)
全
長 : 488 mm (含艙罩)
Main rotor diameter : 550 mm
主旋翼面直徑 : 550 mm
Tail rotor diameter : 110 mm
尾旋翼面直徑 : 110 mm
Motor : KV3400 brushless motor (included)
馬
達 : 3400 KV (內含)
ESC : 18A Micro ESC (included)
電子變速器
: 18A迷你ESC (內含)
ASSEMBLY INSTRUCTION
Main rotor blades : 250mm CF Blades (included)
主
旋
翼 : 碳纖槳 250 mm (內含)
Battery : Li-Po 11.1V 900mah ( NO : 926081 )
電
池 : Li-Po 11.1V 900mah (料號:926081)
Gyro : GU210 Heading Hold Gyro ( NO : 924210 )
陀
螺
儀 : GU-210機頭鎖定陀螺儀 (料號:924210)
+ -
Flying Weight : 360g
5 % ( Depending on Equipment Used )
飛 行 重 量 : 360g
5% (依電裝配置不同而定)
Flying duration : 5~6 minutes with 11.1v/900mah Li-Po battery
飛 行 時 間 : 5 ~ 6 分鐘
TAI SHIH HOBBY CORPORATION
泰世科技模型有限公司
Advertisement
Table of Contents

Related Manuals for GAUI Hurricane 255


Summary of Contents for GAUI Hurricane 255
- Page 1 GAUI Hobby ASSEMBLY INSTRUCTION 規格資料 Specification Overall length : 488 mm (including cabin & canopy) Main rotor blades : 250mm CF Blades (included) 全 長 : 488 mm (含艙罩) 主 旋 翼 : 碳纖槳 250 mm (內含) Main rotor diameter : 550 mm Battery : Li-Po 11.1V 900mah ( NO : 926081 )
- Page 2 Index 目錄 Forward / Safety Precautions / Check List Before First Flight / Notes for Assembly P.1 ~ P.2 前言、安全注意事項、飛行前注意事項、組裝注意事項 Figures instruction / Specification of Screws 組裝代號說明、螺絲規格表 Main Rotor Head Assembly P.4 ~ P.5 旋翼頭總成組裝 Main Frame Assembly P.6 ~ P.7 側板總成組裝...
-
Page 3: Safety Precautions 安全注意事項
前言 Forward Th an k y o u f o r p u r c h a s i n g G A U I “ H u r r ic a n e 2 5 5 ” p r o d u c t. A s th e i n d u s t r y l e a d e r a n d c r e a to r o f th e 2 5 5- cl a s s R C h e l i c o p t e rs , w e w o u l d l ik e t o p r o u d ly in t r o d u c e t h i s u l ti m a te m a c h i n e to th o s e w h o l o ve hi gh p e rf o rm a n c e a n d 3 D c a p a b l e u lt r a - mi c ro R C h e li c o p te r , P l e a s e r e a d a l l i n s tr u c ti o n s th o r o u g h l y b e fo r e o p er a t i o n t o g e t t h e b e st f l ig h t p e rf o rm a n ce . - Page 4 飛行前注意事項 Check List before First Flight 1 . B e g i n n e r ’ s o p e ra t i n g u n d e r t h e s u p e r vi si o n o f th e e x p e r i e n c e d p i l o ts i s n e c e s s a r y . It i s h i g h l y re com m e n d e d t h a t i ns p e c t t h e me c h a n is m a n d c h e c k th e s e tti n g o f tr a n s m i tte r b y e x p e r i e n c e d pi l o t s f o r f i r s t f l i g h t .
- Page 5 組裝代號說明 Figures instruction Please note the following caution symbols during assembly 組裝維修時請注意以下 警示圖案 。 請注意 IMPORTANT Use the thread-lock adhesive if the screws are tightened to the metal parts. 組裝時如遇螺絲鎖於金屬件,請適量 使用 螺絲止鬆劑 以確保飛行安全! Use the thread-lock adhesive on the tip of screw for 1mm width. 螺絲止鬆劑上膠位置約為螺紋前端...
-
Page 6: Main Rotor Head Assembly
旋翼頭總成組裝 Main Rotor Head Assembly 請注意 IMPORTANT Use the thread-lock adhesive if the screws are tightened to the metal parts. 組裝時如遇螺絲鎖於金屬件,請適量 使用 螺絲止鬆劑 以確保飛行安全! Use the thread-lock adhesive on the tip of screw for 1mm width. 螺絲止鬆劑上膠位置約為螺紋前端 1mm寬度。 CNC See-Saw Spindle #203647 CNC平衡桿軸... -
Page 7: Rotor Head Assembly
旋翼頭總成組裝 Rotor Head Assembly 請注意 IMPORTANT Use the thread-lock adhesive if the screws are tightened to the metal parts. 組裝時如遇螺絲鎖於金屬件,請適量 使用 螺絲止鬆劑 以確保飛行安全! Use the thread-lock adhesive on the tip of screw for 1mm width. CNC Scissors Arm 螺絲止鬆劑上膠位置約為螺紋前端 CNC剪形臂 1mm寬度。... -
Page 8: Main Frame Assembly
側板總成組裝 Main Frame Assembly Make sure to assemble the Upper / Lower Mount at the correct position 請注意 IMPORTANT as shown in Figure. 組裝伺服機座鋁柱時請注意方向性 Use the thread-lock adhesive if the Upper Mount screws are tightened to the metal parts. 上 組裝時如遇螺絲鎖於金屬件,請適量... - Page 9 側板總成組裝 Main Frame Assembly The servo #922093 is recommended to 9.5mm be used for CCPM. Ball With Stand The servo #922095 is recommended to 長頸球頭 be used for Tail. M2X3.2 CCPM伺服機建議使用#922093, 尾伺服機建議使用#922095。 螺 距 伺 服 機 副 翼 伺 服 機 Make sure to use the Ball With Stand for 升降舵伺服機...
-
Page 10: Tail Gear Case Assembly
尾殼總成組裝 Tail Gear Case Assembly 請注意 IMPORTANT Use the thread-lock adhesive if the screws are tightened to the metal parts. 組裝時如遇螺絲鎖於金屬件,請適量 使用 螺絲止鬆劑 以確保飛行安全! Use the thread-lock adhesive on the tip of screw for 1mm width. 螺絲止鬆劑上膠位置約為螺紋前端 1mm寬度。 Tail Rotor Belt #861001 尾傳動皮帶... - Page 11 雙推系統總成組裝 Double link Tail Control Ass’y 請注意 IMPORTANT Use the thread-lock adhesive if the screws are tightened to the metal parts. 組裝時如遇螺絲鎖於金屬件,請適量 使用 螺絲止鬆劑 以確保飛行安全! Use the thread-lock adhesive on the tip of screw for 1mm width. Arc Tail Lever Set 螺絲止鬆劑上膠位置約為螺紋前端...
-
Page 12: Main Gear Assembly
主齒盤嶼馬達組裝 Main Gear Assembly Auto-rotation Main #203542 Gear Set 高性能同步自旋主齒盤 Main Pulley Collars #203232 主皮帶輪固定環 Belt Driven Gear 15T Pinion Gear 皮帶傳動盤 #901503 15T馬達齒 Socket set screws M3X3 止付螺絲 Bearing B3X7X2 Distance B = 軸承 4.5mm One Way Bearing B3X6.5X6 單向軸承... - Page 13 Belt Assembly / Gear Mesh Adjusting 皮帶總成及馬達齒隙調整 IMPORTANT 請注意 Make sure both sides of the belt are parallel in the tail boom, turn the front end of the belt 90 degrees counter - clockwise (front view). 請先檢視皮帶是否垂直(不可捲繞) 並逆時針旋轉90度。 (front view) (前視圖) 請注意...
- Page 14 電裝配置與說明 Electronics installing Example of Installing (It may vary according to the equipment used) 電裝配置範例 (個人電裝不同請依需求調整) 請注意 IMPORTANT Servo(PIT) 螺距伺服機(PIT) When install the ball onto the servo horn, make Servo(ELE) Tail Servo 升降舵伺服機(ELE) sure to use the correct type of balls (Ball with 尾伺服機(RUD) Servo (AIL) 副翼伺服機(AIL)
- Page 15 Negative Black Black Black Brown Black 負極線顏色(-) 黑 黑 黑 棕 黑 建議使用原廠配備 GAUI equipment are recommanded CH 1 CH 2 CH 3 CH 4 CH 5 CH 6 陀螺儀插孔 GYRO Gyro Gain Plug(S) GAUI Hobby 3-6 LiPo Cells CH 5...
- Page 16 Negative Brown Black Brown Brown Black 負極線顏色(-) 棕 黑 棕 棕 黑 建議使用原廠配備 GAUI equipment are recommanded CH 4 CH 6 CH 5 CH 2 CH 1 CH 3 陀螺儀插孔 GYRO Gyro Gain Plug(S) GAUI Hobby 3-6 LiPo Cells CH 5...
- Page 17 尾伺服機與陀螺儀設定 Tail servo and the heading hold gyro setup 1. Install the Gyro and the tail servo. 安裝陀螺儀與尾伺服機。 2. Connect the tail pushrod to the servo. Make sure the servo arm is 90 degrees to the tail pushrod. The ball link is recommended to install at the position as shown in figure.
- Page 18 伺服器與連桿調整安裝 Servo and Linkage Installation 請注意 IMPORTANT Rotate each blade clockwise until the blades are parellel to the flybar. (Top View) 將左右主旋翼各依順時針方向旋轉90度, 使之與平衡桿在上視方向平行。 請注意 IMPORTANT Slide the swashplate up or down until 0 the blades are parallel to the flybar (Left View).
- Page 19 螺距設定 Pitch Setting 設定螺距時請參考左列說明。 請注意 IMPORTANT Head speed and pitch settings 主旋翼轉速與螺距設定 1. Total collective pitch range for 3D should Pitch : 0 be approx 30 degrees ( -15 ~ +15 ). Normal flight should be about +15 to -3 degrees.
- Page 20 Head speed and Curve settings 主旋翼轉速與曲線設定 Suggested Flight Time with 11.1v / 900 mah battery : 4 ~ 5 Min. Normal Mode Normal 設定 建議飛行時間(電池使用11.1v / 900 mah): 4 ~ 5 分鐘 Stick position Throttle Pitch Current Head speed Low to High 油門...
-
Page 21: Esc Instruction
電子變速器設定說明 ESC instruction Instruction Flying Mode Battery Protection There is a built-in Battery Management function in the The flying mode function offers you four options for different The battery management allows you to protect your speed controller. The power cut off timing is based aircrafts. - Page 22 電子變速器設定說明 ESC instruction 產品特色介紹 啟動飛行模式 放電電壓保護 標準鋰離子電池模式: 1.將無刷速控器連接到無刷馬達與 四種飛行模式: 單Cell 2.9V 啟動第一階段斷續 主電池電源。 1.飛機模式。 收油保護程序(Soft cut) 2.聽到嗶-嗶-嗶(♪-♪-♪)三個上昇聲響, 2.滑翔機模式。 單Cell 2.6V 啟動第二階段直接 油門控制桿撥至全收油位置或最低點 3.直昇機模式,有定速。(with governor) 斷電保護程序(Hard cut) 後速控器會發出嗶-嗶-嗶-嗶(♪-♪-♪-♪) 4.直昇機模式,無定速。 直昇機模式無此選項 4聲單音之應答聲,代表完成油門校正 (without governor) 鎳氫電池模式: 動作。 5.0V直接斷油保護程序...
- Page 23 飛行前調整與說明 Preflight Setup 請事先熟練模擬飛行 Simulator For beginners, it is highly recommended to use the simulator at beginning. 初學者請事先熟悉遙控器操作並能熟練的反應各動作,再實機飛行。 建議透過市售販賣模擬軟體進行模擬器練習如此提高飛行安全、降低損耗,以增加實機飛行的樂趣。 Training gear 初學者建議加裝練習腳架 For beginners, it is highly recommended to use the training gear. 初學者實機飛行前建議加裝練習腳架,可避免初次上機因緊張、壓力等因素造成不等的損害, 初次飛行時請勿離地過高,一驚覺有危險請將油門推至低點,練習腳架可預防重心不穩、 輕降落等問題降低對機身的損害。 並持續練習油門手感到操縱自如後再練習副翼跟方向舵。 示意圖 實機飛行 Real flight Make sure to check that your frequency is not interfer with others in the same field.
-
Page 24: Preflight Setup
Preflight Setup 飛行前調整與說明 Mode 1 Throttle Control 油門控制練習 Keep 5 meters away behind the heli when hovering, keep the head toward to the front outside. 熟悉停旋練習,是提高安全的基本功,練習時請先保持直升機尾部 朝向自己及確認距離於直升機後方約5公尺並保持之。 Mode 2 Increase the throttle little by little until the heli lifts slowly and decrease the throttle slowly to land it smoothly, practice it in both steps for a better control skill. - Page 25 Preflight Setup 飛行前調整與說明 Trim - Rudder 飛行動作微調-方向舵 Use the trim function on transmitter to adjust the drift when hovering. 各操控桿皆有微調撥鈕,如遇直昇剛離地便開始偏移時請微調以修正直升機動作 Mode 2 Mode 1 Use the Rudder trim to adjust the yawing when the tail drifts to right or left in hovering. 直昇機正起飛離地時,機頭朝左或右偏移時...
- Page 26 維修檢查事項 Maintenance The Hurricane 255 heli product is not a toy, for the consideration of safety and performance, it is necessary to check and maintain after each flight. 請維持良好習慣: 颶風255電動遙控直升機為高科技精密零組件構成之休閒用品,玩家請時常注意確保機體的保養及維持 機構組件之性能,於飛行時展現其優異的性能,不當的保養維護,會導致飛行時的安全度降低。 When spinning, if the blades are unbalanced or the tracking of both blades is not even with each other, Check or replace the Blades / Mast / spindle shaft to fix the problem.
- Page 27 (GUEC GM-202)Brushless Motor with connector(200W-kv3400) 852202 無刷馬達附接頭及螺絲(200W-kv3400) Please refer to the website or contact us for the latest news of GAUI products, the contents or equipments of the real products might be changed and different with the manual. 本說書內的材質、規格,零件包裝之內容物僅供參考組裝用。 泰世科技將不對此印刷物之任何異動更新負責,...
Need help?
Do you have a question about the Hurricane 255 and is the answer not in the manual?
Questions and answers