Table of Contents
Advertisement
Advertisement
Table of Contents

Subscribe to Our Youtube Channel
Related Manuals for Technika TEE54SS


Summary of Contents for Technika TEE54SS
- Page 1 Instructions for Use and Installation Freestanding Electric Cookers: - TEE54SS...
-
Page 2: Table Of Contents
Contents For your safety Safety of children and the infirm ......3 Cleaning and maintenance ......3 During use . -
Page 3: For Your Safety
To maintain the efficiency and safety of this appliance, we recommend that you do the following: · Always call the Technika service department if there are any faults with your appliance. · Always use original spare parts available from Technika. -
Page 4: During Use
For Your Safety During use · The appliance becomes hot. Take care not to touch the surface of the hob. Care should be taken to avoid touching heating elements inside the oven. To avoid burns and scalds, children should be kept away. ·... - Page 5 For Your Safety During use (con’t) · Do not allow pots to boil dry, as damage to the hotplate may result. · Do not operate hotplates without a pot, fry pan etc. · Do not allow cookware to overhang hob onto adjacent bench tops, this will cause scorching to the bench top surface.
-
Page 6: Installation
Refer to the instructions for installation. · Technika will not accept any liability as a result of any damage due to incorrect installation or improper use. - Page 7 Only use the temperature sensing probe recommended for this oven. Technika Service Department must be contacted... · If in doubt about the operation of the appliance. · If in doubt about the soundness of the appliance after removing it from its packaging.
-
Page 8: Service And Spare Parts
For Your Safety Service and spare parts If the appliance fails to operate correctly, never attempt to repair the appliance yourself. Repairs by unskilled persons may cause damage and accidents. First refer to the contents of this manual. If you do not find the necessary information, contact your nearest Service Center. -
Page 9: Use And Care
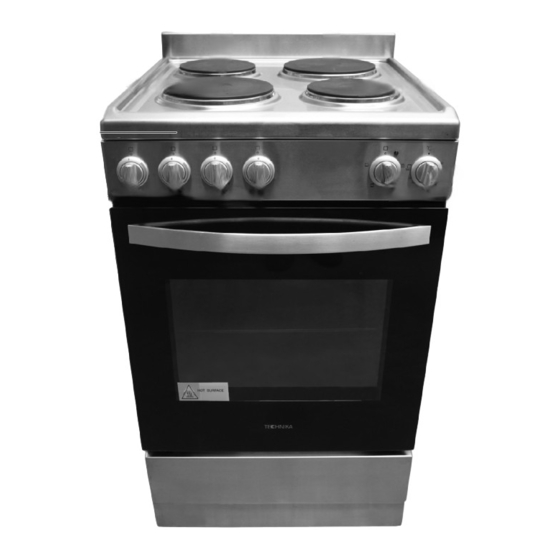
Use and Care Description of the appliance 1. Maintop 2. Electric Heating Plates (Ø180) 3. Electric Heating Plates (Ø145) 4. Control knob (cooktop burners) 5. Cooking mode selection knob 6. Cooking temperature selection knob Note: Photo may not be identical to the appliance you purchased. -
Page 10: Oven & Accessories
Use and Care Oven & accessories The oven has enamel pressed oven side panels and a range of shelf options as shown below. There are five shelf positions on the oven. Shelf Supports Oven Shelf Grill Tray with removable insert... -
Page 11: Controls
Use and Care Controls Control Knob (Cooktop Burners) Cooking Mode Cooking Temperature Selection Knob Selection Knob... -
Page 12: How To Use Your Hob
Use and Care How to use your hob Before first Use The top surface of the hotplates are sealed with a heat resistant coating. Before using for the first time, the hotplates should be heated for a short period without a pan to harden the protective coating. - Page 13 Use and Care How to use your hob Practical cooking advice For best results and energy saving, only use pans suitable for electric cooking: · The bottom of the pan must be very thick and perfectly flat; before placing on the hotplate, make sure that the pan, as well as the hotplate itself, is perfectly clean and dry.
-
Page 14: How To Use Your Oven
Use and Care How to use your oven This multi-function oven combines the advantages of traditional convection ovens with modern fan assisted ovens in a single appliance. It is an extremely versatile appliance that allows you to choose easily and safely between different cooking modes. The various cooking modes are selected by means of a cooking mode selection knob, located on the control panel. -
Page 15: Positioning The Oven Trays & Shelves
Use and Care Positioning the oven trays & shelves The Grill Tray or Oven Shelf can be located in any of the five height positions in the oven. Refer to the ‘Cooking Guide Table’ for the recommended shelf position. When fitting the trays or shelves, ensure they are fitted between the allocated slots. -
Page 16: Cooking Modes
Use and Care Cooking modes Convection mode When set to Convection mode, the top and bottom heating elements operate together like a ‘normal’ conventional oven that you have probably used before. Convection mode is best suited for traditional baking and roasting and you should only use one shelf at a time, otherwise the heat distribution will be uneven. - Page 17 Use and Care The oven light Set cooking mode selection knob to symbol to switch on the oven light/s. The oven light/s stay on when the oven is operating. Cooling ventilation In order to cool down the exterior of the appliance, this model is equipped with a cooling fan, which switches on automatically.
-
Page 18: Practical Cooking Advice
Use and Care Practical cooking advise The oven offers a wide range of settings which allow you to cook any type of food in the best possible way. With time you will learn to make the best use of this versatile cooking appliance and the following directions are only a guideline which may be varied according to your own personal experience. - Page 19 Use and Care Baking cakes When baking cakes ,always place them in a preheated oven. Make sure you wait until the oven has been preheated thoroughly (the indicator light will turn off). To prevent heat loss and the cake from dropping, do not open the oven door during baking.
- Page 20 Use and Care Cooking pizza For best results when cooking pizza: · Preheat the oven for at least 10 minutes. · Use a light aluminum pizza pan, placing it on the shelf supplied with the oven. Don’t use the dripping pan since this will extend the cooking time, making it difficult to get a crispy crust.
- Page 21 Use and Care Cooking guide Note: Cooking times are approximate and may vary according to personal taste. When cooking using the grill or fan assisted grill, the dripping pan must always be placed on the 1st oven shelf from the bottom.
-
Page 22: Cooktop Cleaning & Maintenance
Use and Care Cooktop cleaning and maintenance Switch off your appliance before cleaning. The hotplates should be regularly cleaned with a moist cloth. Remove any burnt residues immediately after cooking, rinse with water and wipe dry with a clean cloth. Never use abrasive or corrosive detergents, cleaning powders, oven sprays, spot-removers, steel wool or scourers. -
Page 23: Oven Cleaning & Maintenance
If necessary, clean it but avoid using abrasive products or objects to do so. Should it become damaged, please contact Technika Service Department. We recommend you avoid using the oven until it has been repaired. - Page 24 Use and Care How to remove the oven door You can remove the oven door for better access to the oven when cleaning. There are 2 styles of oven door so you should first identify which style you have. Proceed as follows for each style: Oven door style 1: ·...
-
Page 25: Troubleshooting
Allow 2-4 hours for odour to dissipate (open all windows) Oven shelf tight Oven shelf not inserted Remove shelf and insert correctly. correctly, may be upside down or back to front. In case the appliance fails to operate correctly, contact Technika. -
Page 26: Disposal
For this reason, we strongly advise you contact the Technika Service Center, specifying the nature of the problem, the model of the equipment and the serial number. -
Page 27: Installation
Installation Technical data Voltage: 220-240 V Frequency: 50/ 60 Hz Circuit breaker: 32 amp Electric heating plate Ø180: 1500W Electric heating plate Ø145: 1000W Oven: 3350W Total Power: 8350W Oven capacity: 56 L Product dimensions: 540mm × 630mm × 910mm Net Weight: 46.5 kg Packaged Weight: 56.0 kg... -
Page 28: Instructions For Installation
Installation Instructions for installation This appliance shall be installed only by authorised persons and in accordance with the manufacturer's installation instructions, local regulations, municipal building codes, electrical wiring regulations, and any other statutory regulations. IMPORTANT: Installation, assembly and gas/electrical connections must be carried out by authorised personnel. Data Label - Make sure that the voltage and capacity of the power supply are in accordance with the data label located in the storage drawer or the rear panel of the appliance. -
Page 29: Dimensions
Installation Dimensions Combustible Surfaces Any adjoining wall surface must be 100mm minimum distance from the appliance. Make sure there is a minimum of 600 mm between the hob and any shelf, Rangehood or exhaust fan that may be installed directly above the hob. Zero clearance is permitted on the side and rear adjoining surfaces below the maintop. -
Page 30: Anti-Tilting Plate
Installation Anti-tilting plate The cooker is supplied with an anti tilting plate to prevent it from tipping. Install the plate as follows: · Determine the position of cooker and anti-tilt plate. · Securely fix the anti-tilt plate to the floor with appropriate fasteners. -
Page 31: Electrical Connection
When satisfied with the operation, please instruct the user on the correct method of operation. In case the appliance fails to operate correctly after all checks have been carried out, please call the Technika Service Centre. - Page 32 All Technika appliances are for Domestic use only, and must be installed by a licence installer into Domestic Applications only, without exception and to the required Authorities guidelines. Any installation outside of this will VOID warranty. ...
Need help?
Do you have a question about the TEE54SS and is the answer not in the manual?
Questions and answers