Table of Contents
Advertisement
Quick Links
Advertisement
Table of Contents

Related Manuals for VIA Technologies ARTiGO A800


Summary of Contents for VIA Technologies ARTiGO A800
- Page 2 USER MANUAL ARTiGO A800 Ultra Compact and Slim Size System with ARM based VAB-800 board 1.05-11282014-102800...
-
Page 3: Regulatory Compliance
The information and product specifications within this document are subject to change at any time, without notice and without obligation to notify any person of such change. VIA Technologies, Inc. reserves the right the make changes to the products described in this manual at any time without prior notice. -
Page 4: Safety Precautions
Battery Recycling and Disposal Only use the appropriate battery specified for this product. Do not re-use, recharge, or reheat an old battery. Do not attempt to force open the battery. Do not discard used batteries with regular trash. Discard used batteries according to local regulations. Safety Precautions Always read the safety instructions carefully. -
Page 5: Box Contents
ARTiGO A800 User Manual ARTiGO A800 User Manual ARTiGO A800 User Manual Box Contents 1 x ARTiGO A800 system 1 x AC-to-DC adapter, DC 5V/2A, 10W 1 x COM connector cable 2 x Jumper caps 4 x VESA mounting screws (M4 x 6mm) -
Page 6: Table Of Contents
ARTiGO A800 User Manual ARTiGO A800 User Manual ARTiGO A800 User Manual ARTiGO A800 User Manual Table of Contents 1. 1. 1. 1. Product Overview Product Overview ........ Product Overview Product Overview ................................................................ - Page 7 ARTiGO A800 User Manual ARTiGO A800 User Manual ARTiGO A800 User Manual ARTiGO A800 User Manual Appendix A. Power Consumption Report Appendix A. Power Consumption Report..........................31 Appendix A. Power Consumption Report Appendix A. Power Consumption Report ........
- Page 8 ARTiGO A800 User Manual ARTiGO A800 User Manual ARTiGO A800 User Manual ARTiGO A800 User Manual Lists of Figures Figure 1: Front Panel layout .................... 6 Figure 2: Rear Panel layout....................6 Figure 3: Front view dimension ..................7 Figure 4: Side view dimension..................7 Figure 5: Bottom view dimension ..................
- Page 9 ARTiGO A800 User Manual ARTiGO A800 User Manual ARTiGO A800 User Manual ARTiGO A800 User Manual Lists of Tables Table 1: USB 2.0 ports pinout ..................9 Table 2: Audio jack receptacle description.............. 10 Table 3: VGA connector pinout .................. 11 ®...
-
Page 10: Product Overview Product Overview
Front and rear I/O access enables the ARTiGO A800 to easily support various applications as well as for easy integration and quick setup. 1.1.4. Storage expansion The Micro SD slot enables the ARTiGO A800 to have a flexible storage of Micro SD card memory. -
Page 11: Mounting Solution
ARTiGO A800 User Manual ARTiGO A800 User Manual 1.1.5. Mounting solution ARTiGO A800 supports multiple methods for mounting; it can be mounted to VESA mountable surfaces or even to wall with the VESA mounting kit. 1.1.6. Networking support The ARTiGO A800 is equipped with RJ-45 port that supports high speed 100Mbit Ethernet. -
Page 12: Product Specifications
ARTiGO A800 User Manual ARTiGO A800 User Manual ARTiGO A800 User Manual ARTiGO A800 User Manual 1.2. Product Specifications Processor Processor Processor Processor Freescale Cortex-A8 Single-Core i.MX537 @ 800 MHz System Memory System Memory System Memory System Memory 1GB DDR3-800 SDRAM using 128M x16 memory devices ... - Page 13 ARTiGO A800 User Manual ARTiGO A800 User Manual ARTiGO A800 User Manual ARTiGO A800 User Manual Storage Storage Storage Storage Interface Interface Interface Interface Interface Interface Interface Interface eMMC Flash default 4GB 1 x Onboard Micro SD slot System Indicator...
- Page 14 ARTiGO A800 User Manual ARTiGO A800 User Manual ARTiGO A800 User Manual ARTiGO A800 User Manual System Dimension System Dimension (L x W x H) System Dimension System Dimension (L x W x H) (L x W x H) (L x W x H) ...
-
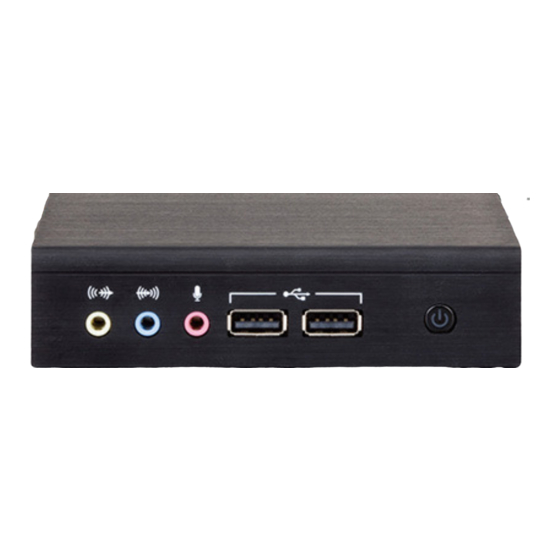
Page 15: Panel Layout
ARTiGO A800 User Manual ARTiGO A800 User Manual ARTiGO A800 User Manual ARTiGO A800 User Manual 1.3. Panel Layout Figure Figure 1 1 1 1 : Front Panel layout : Front Panel layout Figure Figure : Front Panel layout : Front Panel layout... -
Page 16: Dimensions
ARTiGO A800 User Manual ARTiGO A800 User Manual ARTiGO A800 User Manual ARTiGO A800 User Manual 1.4. Dimensions Figure Figure Figure Figure 3 3 3 3 : : : : F F F F ront view d ront view d... -
Page 18: External I/O Pin Descriptions And Functionality
2.2. USB 2.0 Port The ARTiGO A800 has four USB ports. There are two USB ports at the front panel and two additional ports at the rear panel. Each USB port gives complete Plug and Play and hot swap capability for external devices. The USB interface complies with USB UHCI, Rev. -
Page 19: Audio Jacks
ARTiGO A800 User Manual 2.3. Audio Jacks The ARTiGO A800 offers High Definition Audio through 3.5 mm TRS jack connectors at the front panel: Line-Out, Line-In and Mic-In. The Line-Out jack is for connecting external speakers or headphones. The Line- In jack is for connecting and external audio devices such as CD player, tape player, and etc. -
Page 20: Vga Connector
ARTiGO A800 User Manual 2.4. VGA Connector The ARTiGO A800 provides a high resolution VGA interface through DE-15 female connector on the rear panel to support analog VGA monitors. The VGA interface supports up to 1680 x 1050 @ 60Hz resolution. The pinout of the VGA connector is shown below. -
Page 21: Mini Hdmi ® Port
ARTiGO A800 User Manual ® 2.5. Mini HDMI Port ® ® The ARTiGO A800 has one mini HDMI port (19-pin HDMI Type C ® receptacle) connector as defined in the HDMI specification. The mini HDMI port is for connecting to HDMI displays. The pinout of the mini HDMI port is shown below. -
Page 22: Lan Port (Fast Ethernet)
ARTiGO A800 User Manual 2.6. RJ-45 LAN Port (Fast Ethernet) The ARTiGO A800 system is equipped with Fast Ethernet port on rear panel. The Fast Ethernet port is using an 8 Position 8 Contact (8P8C) receptacle connector (commonly referred to as RJ-45). It is fully compliant with IEEE 802.3 (10Base-T), (100Base-TX), and (100Base-FX) standards. -
Page 23: Dc-In Jack
ARTiGO A800 User Manual ARTiGO A800 User Manual ARTiGO A800 User Manual ARTiGO A800 User Manual 2.7. DC-In Jack The ARTiGO A800 comes with a DC-In jack on the rear panel that carries 5V external power input. Figure Figure Figure... -
Page 24: Com Connector
ARTiGO A800 User Manual 2.9. COM Connector The ARTiGO A800 is equipped with a COM connector on the bottom side of the chassis. The COM connector is used to attach additional COM connector cable for debugging or setting up the type of display interface in ARTiGO A800. -
Page 26: Hardware Installation Hardware Installation
3.1. Installing Micro SD Card Step 1 Step 1 Step 1 Step 1 At the bottom side of ARTiGO A800, remove the screw from Micro SD card access cover. Figure Figure 15 15: : : : Removing Micro SD card access cover... - Page 27 ARTiGO A800 User Manual ARTiGO A800 User Manual ARTiGO A800 User Manual ARTiGO A800 User Manual Step 3 Step 3 Step 3 Step 3 Gently slide the Micro SD card into the card slot reader with the label side face up then press the card until it locks into place.
-
Page 28: Removing Chassis Top Cover
ARTiGO A800 User Manual ARTiGO A800 User Manual ARTiGO A800 User Manual ARTiGO A800 User Manual 3.2. Removing Chassis Top Cover Step 1 Step 1 Step 1 Step 1 Remove six screws of the top cover from left and right sides and bottom side of the chassis. -
Page 29: Installing Wlan (Wifi) Kit
ARTiGO A800 User Manual ARTiGO A800 User Manual ARTiGO A800 User Manual ARTiGO A800 User Manual 3.3. Installing WLAN (WiFi) kit Step 1 Step 1 Step 1 Step 1 Mount the WLAN USB module (EMIO-1533) on the daughter board (P910-C) then secure it with two screws. - Page 30 ARTiGO A800 User Manual ARTiGO A800 User Manual ARTiGO A800 User Manual ARTiGO A800 User Manual Step 3 Step 3 Step 3 Step 3 Remove the antenna WLAN hole cover at the rear panel. Figure Figure 21 21: : : : Removing WL...
-
Page 31: Selecting Boot Device
ARTiGO A800 User Manual 3.4. Selecting Boot Device The ARTiGO A800 is equipped with onboard Boot Device select jumper labeled as “J4”. Boot Device select jumper is to specify the boot device between Micro SD, eMMC (onboard) and USB-OTG. The default setting is On (short) pins 3 and 4. -
Page 32: Connecting Com Connector (Optional)
The COM connector is used for debugging and setting up the display interface. Step 1 Step 1 Step 1 Step 1 At the bottom side of ARTiGO A800, remove the Micro SD card access cover. Step 2 Step 2 Step 2 Step 2 Gently attach the COM connector cable to the COM connector. -
Page 33: Installing Rubber Feet
ARTiGO A800 User Manual ARTiGO A800 User Manual ARTiGO A800 User Manual ARTiGO A800 User Manual 3.6. Installing Rubber Feet Step 1 Step 1 Step 1 Step 1 Locate the designated areas for rubber feet at the bottom side of the chassis. -
Page 34: Installing Vesa Mounting Kit (Optional)
ARTiGO A800 User Manual ARTiGO A800 User Manual ARTiGO A800 User Manual 3.7. Installing VESA mounting kit (optional) An optional VESA mounting kit is available for mounting the ARTiGO A800 behind the monitor or wall. Step Step 1 1 1 1... - Page 35 ARTiGO A800 User Manual ARTiGO A800 User Manual Step 3 Step 3 Step 3 Step 3 Attach the VESA bracket at the back of the ARTiGO A800 using four M4 x 6mm screws. Cautions: : : : Cautions Cautions Cautions 1.
- Page 36 ARTiGO A800 User Manual Step Step 4 4 4 4 Step Step Hook in the VESA bracket (with ARTiGO A800 system) by sliding into the VESA plate. Then connect all the necessary cables at the rear panel of the system.
-
Page 38: Software And Technical Supports
Supports Supports Supports Supports 4.1. Linux Driver Support The VIA ARTiGO A800 mainboard is highly compatible with Android 2.3 and Ubuntu 10.04. 4.1.1. Driver Installation Support and drivers are provided through various methods including: Drivers provided by VIA Using a driver built into a distribution package Visiting www.viaembedded.com... -
Page 40: A.1. Atg-A800-1S08A1
Power Consumption Report Power Consumption Report Power Consumption Report Power Consumption Report Power consumption tests were performed on the VIA ARTiGO A800. The following tables represent the breakdown of the voltage, amp and wattage values while running common system applications. A.1. ATG-A800-1S08A1... -
Page 41: A.1.4. S5 Status
ARTiGO A800 User Manual ARTiGO A800 User Manual ARTiGO A800 User Manual ARTiGO A800 User Manual A.1.4. S5 Status Mean Mean Input Voltage Input Voltage Measured Current Measured Current Total Power Consumption Total Power Consumption Mean Mean Input Voltage Input Voltage...
Need help?
Do you have a question about the ARTiGO A800 and is the answer not in the manual?
Questions and answers