Table of Contents
Advertisement
Quick Links
Original
Original
Original
Original
Original
Operating
Operating
Operating
Operating
Operating
Instructions
Instructions
Instructions
Instructions
Instructions
Multi-purpose power hoe
Multi-purpose power hoe
Multi-purpose power hoe
Multi-purpose power hoe
Multi-purpose power hoe
100-R
100-R
100-R
100-R
100-R
Honda engine
4242
Before commissioning the machine, read operating
instructions and observe warnings and safety instructions.
Operating Instructions No. 998 744b 01.10
Advertisement
Table of Contents

Related Manuals for Agria 100-R


Summary of Contents for Agria 100-R
- Page 1 Instructions Instructions Instructions Instructions Multi-purpose power hoe Multi-purpose power hoe Multi-purpose power hoe Multi-purpose power hoe Multi-purpose power hoe 100-R 100-R 100-R 100-R 100-R Honda engine 4242 Before commissioning the machine, read operating instructions and observe warnings and safety instructions.
-
Page 2: Amount Of Delivery
Please state these data when orde- ring spare parts to avoid wrong deli- Air filter veries. Only use original agria spare parts! Visual check Specifications, figures and dimensi- ons stated in these instructions are not binding. No claims can be derived Clutch from them. -
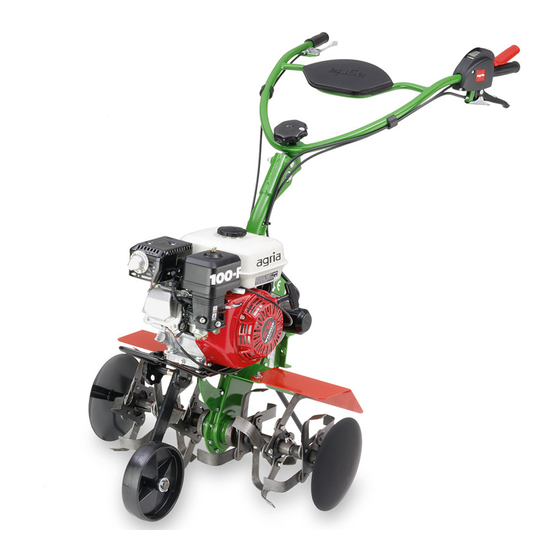
Page 3: Designation Of Parts
Designation of Parts agria Multi-Purpose Power Hoe 100-R... - Page 4 6 Engine type number 7 Starter handle 8 Cooling-air screen 9 Exhaust with guard 10 Spark plug, spark plug connector 11 Engine oil plug (also filling and control opening) 12 Engine oil drain plug 13 Fuel tap agria Multi-Purpose Power Hoe 100-R...
-
Page 5: Table Of Contents
Wheel Weight ........24 Maintenance Chart ....... 48 Attachments ........25 Declaration Conformity ....51 Coupling device ......26 Front Weight ........26 Note fold-out pages! Figs. A and B ......3 Fig. C ........50 agria Multi-Purpose Power Hoe 100-R... -
Page 6: Recommendations Lubricants, Anti-Corrosive Agents
Bio-anti-corrosives, you contribute Maintenance and Repair: to environmental protection and to the wellbeing of humans, animals and The trained mechanics of your agria plants. workshop expertly carry out any mainte- nance and repair work. Only carry out major maintenance work... -
Page 7: Unpacking And Assembly
4 corners and fold down the sides to remove the machine. Fit the hoeing tools and hoeing guards Fit the drive wheels 23-24 Mount the depth bar Carry out all steps for starting-up agria Multi-Purpose Power Hoe 100-R... -
Page 8: Safety Instructions
Any unauthorized changes to the multi- stop. purpose power hoe render manufactur- Foreign powered parts shear and crush! er liability null and void. agria Multi-Purpose Power Hoe 100-R... - Page 9 Ensure that all protective devices are other person using a bar or a rope. This mounted and positioned to provide pro- tection. With no attachment mounted, make sure PTO-shaft is covered with the cap. agria Multi-Purpose Power Hoe 100-R...
- Page 10 Linkage attachments as specified and and cleaning. only couple at specified points. Only use original agria spare parts. All Secure basic machine and attachment other commercial spare parts must cor- against unauthorized use and rolling off respond to quality and technical require- when you leave the machine.
- Page 11 If doing maintenance work. sickness and vomiting occur, see a doc- tor. If the fuel has contacted eyes, rinse them thoroughly, avoid inhaling of va- pours. Read and observe enclosed instruc- tions. agria Multi-Purpose Power Hoe 100-R...
-
Page 12: Safety Instructions
With the engine run- when the engine is running. ning, keep at a safe distance. Signs When working with the machi- ne, wear individual protective ear plugs. Wear protective gloves. Wear solid shoes. agria Multi-Purpose Power Hoe 100-R... -
Page 13: Specifications
Power hoe Clutch: V-belt clutches with idler pulleys posi- Machine dimensions: tioned between engine and gearbox Only use original agria spare parts! (see list of wear parts on p51) Gearbox: 3-speed mechanical gearbox 2 forward speeds and 1 reverse speed Hoeing and wheel shaft are roller chain driven via the gearbox. -
Page 14: Engine
VDE 0879 Valve lash (engine cold): Intake: ....0.15 mm ±- 0.02 mm Outlet: ....0.20 mm ± 0.02 mm Starter: Soft-pull recoil starter with mechanical decompression facility agria Multi-Purpose Power Hoe 100-R... -
Page 15: Devices And Operating Elements
3. Devices and Operating Elements The agria power hoe/multi-purpose Cooling machine type 100-R is a machine for soil The engine is fan-cooled. cultivation and is suitable for attachment Therefore, keep the grille at the recoil operation. The following attachments are... - Page 16 Fuel tap The fuel tap (B/13) is on the carburetor. Move the tap to the right to open it. Move the tap to the left to close it. agria Multi-Purpose Power Hoe 100-R...
-
Page 17: Safety Circuit Function
Do not tie down safety circuit lever. The safety circuit lever also serves emergency shut-off. In an emergency, move the lever to position “STOP” to shut off the engine fast. The lever automatically goes to STOP position. agria Multi-Purpose Power Hoe 100-R... -
Page 18: Clutch
(“0” – pawl locked in place). Otherwise clutch problems may result due to dis- tortion of the V-belt. Gearshifting Gears R, 1 and 2 are shifted with lever (A/6). There is a neutral position “0” between the individual speeds. agria Multi-Purpose Power Hoe 100-R... -
Page 19: Steering Handle
Steering handle side adjustment Loosen knob screw (1) until all not- ches are out of mesh. Swing the steering handle to the desi- red height and fit it into proper toothing. Re-tighten knob screw. agria Multi-Purpose Power Hoe 100-R... -
Page 20: Hoeing Tools
Insert R-clips (2) in hub/shaft holes Attach the hoeing tools with hex bolts to secure them. (7), pushing the bolts through the holes on hub and shaft. agria Multi-Purpose Power Hoe 100-R... -
Page 21: Depth Bar
Fold the beam up into a mesh with the notches and tighten the knob screw. 1 Front support wheel Transport position 2 Linch pin 3 Knob screw (clamping screw) Fold the support beam down and tighten the knob screw. agria Multi-Purpose Power Hoe 100-R... -
Page 22: Ridger
(ridging width adjust- ment) 7 Mouldboard 8 Hoeing blade 9 Hoeing blade attach- ment bolt 10 Hoeing blade 11 Set screw (adjustment of float) 12 Pin 13 Linkage 14 Clamping screw (slade adjustment) 15 Slade agria Multi-Purpose Power Hoe 100-R... -
Page 23: Drive Wheels
7 Wheel bolt rential hubs. Removing differential hubs To remove the hubs reverse the above process. For full tractive power, mount the wheels with the pointed parts of lugs showing in travelling direction (wheels seen from above). agria Multi-Purpose Power Hoe 100-R... -
Page 24: Differential Hub
Fitting wheel weights on models equipped with differential hubs Fit the wheel weights (2) with the hex bolts (4) and star washers (3) onto the wheel flange (torque 70Nm). 1 Drive-wheel 2 Wheel weight 3 Washer 4 Hex bolt agria Multi-Purpose Power Hoe 100-R... -
Page 25: Attachments
Then secure with a R-clip. Note To adjust the angle through which some attachments pivot, e.g. ridgers or ploughs, turn the set screws and lock nuts. Uncoupling To uncouple the rear attachments reverse the above process. agria Multi-Purpose Power Hoe 100-R... -
Page 26: Coupling Device
The front weight can stay mounted to 3 Clamping screw 4 Weight the holder for removal. Simply remove 5 Linch pin the front weight holder with the weight fitted to it from the base machine. agria Multi-Purpose Power Hoe 100-R... -
Page 27: Commissioning And Operation
Note: For reasons of transport, the engine is not filled with engine oil! Before you operate the engine the first time, fill in engine oil (see page 33)! agria Multi-Purpose Power Hoe 100-R... -
Page 28: Starting The Engine
Pull the starter rope on the handle until the star- ter clutch engages. Then pull hard and fast to pull the rope all the way out. After the start, let the rope glide back. Do not let it snap back. CHOKE to operation position. agria Multi-Purpose Power Hoe 100-R... -
Page 29: Shutting Off The Engine
This is to ensure the carburetor is empty and to avo- id resin deposits. The speed control lever is also the safety circuit lever. If necessary, move this lever to position “STOP” to shut off the engine. agria Multi-Purpose Power Hoe 100-R... -
Page 30: Hoeing
Only remove jammed objects with a tool, e.g. a woo- den stick. To clean or exchange the hoeing tools, recline the machine only backwards onto the handle- bar (before, remove the depth bar). agria Multi-Purpose Power Hoe 100-R... -
Page 31: Operation
2nd gear: trans- port Slightly pull the clutch lever (C/5), unlock pawl (C/6), slow- ly release the le- ver while pulling the speed control lever. The machi- ne starts moving forward. agria Multi-Purpose Power Hoe 100-R... -
Page 32: End Of Operation
Leave the transmission turned on (this keeps the machine from rolling off because the running drives act like a brake). Pull clutch lever in “start position”. Restart the engine. agria Multi-Purpose Power Hoe 100-R... -
Page 33: Maintenance
Use a funnel or a similar de- vice to fill the oil reservoir. Replace the oil filler plug (2) and tighten it. Only change oil while the engine is still warm, but not hot – dan- ger of burns! agria Multi-Purpose Power Hoe 100-R... -
Page 34: Air Filter
Do not oil the fil- ter element. Replace the filter element at 100-hour intervals or if it is extremely dirty. Reinstall the filter assembly as illu- strated. Attach the filter cover with the wing nut. agria Multi-Purpose Power Hoe 100-R... -
Page 35: Fuel System
Inspecting the fuel supply Remove the drain plug and open the fuel tap. Fuel supply will be OK, if fuel runs through the tap. Retighten the drain plug. Fuel drain plug agria Multi-Purpose Power Hoe 100-R... -
Page 36: Air Cooling System
100 operating hours (earlier in very dusty conditions). - Service Governor For smooth engine performance keep governor linka- ges, springs and actuating devices clean from dust and dirt. Do not bend or twist parts. (Governor linkages on carburetor B/2). agria Multi-Purpose Power Hoe 100-R... -
Page 37: Exhaust Pipe
Start the engine and wait until it has rea- ched operating temperature. Adjust the throttle stop screw while the engine is running and set to standard idle speed (1,250 rpm–1,600 rpm). - Service Throttle stop screw agria Multi-Purpose Power Hoe 100-R... -
Page 38: Machine
(see “transmission oil level) Inspect the gasket (4) and ex- change it if necessary. Re-fit the transmission housing cap (5) together with the gasket (4), hex bolts (7) and star was- hers (6). Install the pulley guard. agria Multi-Purpose Power Hoe 100-R... -
Page 39: Clutch Free Play
(3) and set pin (4) out of bracket in hand lever. Srew the set pin (4) in or out to a play of X or idling position at position „0“. Place cable end and set pin back into bracket and fit retaining spring (2). agria Multi-Purpose Power Hoe 100-R... -
Page 40: V-Belt
(12) and belt (6) has to be about 2,5 mm. If this is not the case, decoupling will not be adequate and wear on the belt will be rapid. Do not use conventional V-belts. Only use original and customised agria V-belts. Operate the attachments only with all guards mounted. agria Multi-Purpose Power Hoe 100-R... -
Page 41: Drive Wheels
Engine Clean the engine only with a cloth. Avoid cleaning it with a pressure washer, as wa- ter might leak into ignition and fuel system causing malfunctions. agria Multi-Purpose Power Hoe 100-R... -
Page 42: Storage
– Remove the carburetor drain plug (3) to drain the petrol into a suitable container or add fuel stabiliser (agria No. 799 09): Fill the fuel tank, then add stabiliser – Observe instructions. - Page 43 Because of severe corrosion do not park the machine - in humid rooms - in rooms where fertilizer is stored - in stables or adjacent rooms. g) Protect machine with cloth or a similar cover. agria Multi-Purpose Power Hoe 100-R...
-
Page 44: Troubleshooting And Remedies
6. Troubleshooting Observe safety instructions! Have all serious malfunctions on the machine or engine repaired by your agria workshop. They have the proper tools. Improper repairs can only add to the damage. Problem Possible cause Remedy Page Engine - Spark plug connector not connected... - Page 45 Ground drive - Incorrect clutch lever adjustment Adjust clutch lever or attachment drive does not stop with clutch pulled Excessive - Loose attachment bolts Re-tighten attachment bolts vibration = For this purpose contact your agria workshop. agria Multi-Purpose Power Hoe 100-R...
-
Page 46: Electric Wiring Diagram
Safety circuit 1 Engine 2 Solenoid ignition system 3 Engine shut-off switch (on speed control lever on engine) 5 Switch in safety circuit lever 6 Switch in clutch lever bl blue br brown Lubrication Chart agria Multi-Purpose Power Hoe 100-R... -
Page 47: Varnishes And Wear Parts
O-ring of housing cap (oil change) 210 98 Hoeing blade, left 210 99 Hoeing blade, right 210 98 210 99 Note: Only use original agria V- belts! Spare Parts 997 004 Power hoe 100 including attachments and accessory equipment agria Multi-Purpose Power Hoe 100-R... -
Page 48: Inspection And Maintenance Chart
A = Each time before you take up operation B = After each cleaning K = Checks and service to be executed by operator W = Maintenance to be executed by professional workshop * = after 2 years agria Multi-Purpose Power Hoe 100-R... - Page 49 1 Star knob screw for steering handle side-adjustment 2 Hex bolt for steering handle height-adjustment 3 Engine shut-off switch 4 Safety circuit lever 5 Clutch lever 6 Pawl of clutch lever 7 Speed control lever agria Multi-Purpose Power Hoe 100-R...
- Page 50 Designation of Parts Fig. C agria Multi-Purpose Power Hoe 100-R...
-
Page 51: Declaration Conformity
Declaration Conformity agria Multi-Purpose Power Hoe 100-R... - Page 52 GmbH Bittelbronner Straße 42 D-74219 Möckmühl Tel. +49/ (0)6298 /39-0 Fax +49/ (0)6298/39-111 e-mail: info@agria.de Internet: www.agria.de Your local agria specialist dealer:...
Need help?
Do you have a question about the 100-R and is the answer not in the manual?
Questions and answers