Table of Contents
Advertisement
Quick Links
Advertisement
Table of Contents

Related Manuals for Aircommand sandpiper


Summary of Contents for Aircommand sandpiper
- Page 1 Sandpiper Installation Guide May 2013 – Revision 7 Page 1 of 22 SANDPIPER OWNERS MANUAL - INSTALLATION - COMMISSIONING OF UNIT - MAINTENANCE - SPECIFICATIONS - OPERATING INSTRUCTIONS - CUT OUT TEMPLATES - SPARE PARTS - WIRING DIAGRAM - TROUBLESHOOTING GUIDE...
- Page 2 En el caso que se necesite hacer uso del servicio de garantía, el comprador debe ponerse en contacto con Aircommand Australia para la aprobación del servicio.
-
Page 3: Air Conditioner
Aircommand will not be held responsible for problems relating to incorrect or improper installation methods. -
Page 4: General Unit Information
IV. GENERATORS The Sandpiper is designed to run using mains power, however many owners may want to use portable generators to run the unit when in remote locations. Any generator used should deliver high quality, pure sine wave, alternating current at 50Hz, and be able to handle the compressor start up demand. -
Page 5: Before Installation
Failure to properly install the unit or attempting to modify it in any way can be extremely hazardous and may result in property damage and/or personal injury. Aircommand will not be held responsible for issues arising from incorrect or improper installation methods. -
Page 6: Installation
( The Sandpiper should be placed in the centre of the RV so that the duct lengths are as even as possible and also near to a power socket (the power cord is 2m... - Page 7 If you are using the supplied return air grille then the cut-out template can be found at the end of this installation manual Figure 4-If the filter of the Sandpiper is placed on the opposite Ensure the logo at the top of the return air grille is in...
- Page 8 Attach the ducting to the walls or floor using the ducting brackets and screws provided For ducting running up walls Aircommand recommends one ducting bracket per metre of ducting Ensure that all ducting is secure on the unit and also where the inner duct piece is attached 3.
-
Page 9: Commissioning Of The Unit
3 months of installation, and thereafter every 12 I. Filter months if the van is in constant use. The filter is the only part of the Sandpiper that requires III. Compressor mounts routine maintenance. It must be cleaned periodically to... - Page 10 Sandpiper Installation Guide May 2013 – Revision 7 Page 10 of 22 If you have a claim please contact Aircommand directly on (08) 8345 8444, alternatively you can fax (08) 8243 0628 or email service@aircommand.com.au, please have your unit serial number ready (which can be found on the sticker on...
-
Page 11: General Specifications
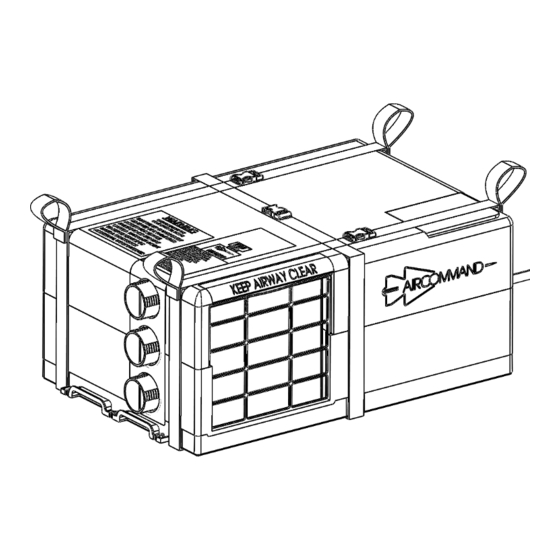
Sandpiper Installation Guide May 2013 – Revision 7 Page 11 of 22 GENERAL SPECIFICATIONS Air – Conditioner Height 287mm Width 442mm Length 652mm (692mm including hold down brackets) Weight 29kg AIRCOMMAND AUSTRALIA PTY LTD SANDPIPER MODEL NO. 7000001 240V 50HZ... -
Page 12: Operating Instructions
Sandpiper Installation Guide May 2013 – Revision 7 Page 12 of 22 OPERATING INSTRUCTIONS This appliance is not intended for use by persons (including children) with reduced physical, sensory or mental capabilities, or lack of experience and knowledge, unless they have been given supervision or instruction concerning use of the appliance by a person responsible for their safety. - Page 13 Sandpiper Installation Guide May 2013 – Revision 7 Page 13 of 22 COOLING Cycle mode button to highlight the snowflake icon “ ”. “ ” You may select High, Med, Low or Auto fan speeds by pressing the fan button ...
-
Page 14: Remote Control Instructions
Sandpiper Installation Guide May 2013 – Revision 7 Page 14 of 22 With “ ”blinking, Press “ ” or “ ” to change set time Press “ ” for 3 seconds to change between On and Off timer setting ... - Page 15 Sandpiper Installation Guide May 2013 – Revision 7 Page 15 of 22 Temperature set point display Fan speed display 16 °C – 30 °C High / Medium / Low / Auto Clock & Timer display Mode display Real time clock...
- Page 16 Sandpiper Installation Guide May 2013 – Revision 7 Page 16 of 22 SANDPIPER FLOOR TEMPLATE...
- Page 17 Sandpiper Installation Guide May 2013 – Revision 7 Page 17 of 22...
- Page 18 Top foam canopy Not shown 7001005 Outside fan assembly (inc. 3uF capacitor) Not shown 5601071 Remote control only Not shown 7000001 Sandpiper unit (without ducting) Not shown 7001009 Buckles and straps (all 3 included) Power cord and separate cable to interface...
- Page 19 Sandpiper Installation Guide May 2013 – Revision 7 Page 19 of 22 SANDPIPER WIRING DIAGRAM...
- Page 20 (between the return air grille and too close to cupboards/walls etc the return air inlet on the Sandpiper), refer to instruction manual for details of required distances between the inlet and surrounds.
- Page 21 Normal operation will resume once ice has been melted. RV is too large for the air The Sandpiper is intended to provide spot conditioner cooling and relief to certain areas immediately adjacent to the outlets, it is not intended to lower the temperature in all areas of the RV.
- Page 22 Sandpiper Installation Guide May 2013 – Revision 7 Page 22 of 22 unit will dehumidify air inside the caravan and provide more comfortable living conditions. In humid conditions close doors, windows and hatches. Run the inside fan on High or Medium, avoid...
Need help?
Do you have a question about the sandpiper and is the answer not in the manual?
Questions and answers