
Subscribe to Our Youtube Channel
Related Manuals for Duplo DF-520


Summary of Contents for Duplo DF-520
- Page 1 Duplo Folder Instruction Manual Please let our service people install the machine. DUPLO CORPORATION...
- Page 2 It was tasted by Japan Electrical Testing Laboratory Located at 14-12. Yoyogi 5-chome, Shibuya-ku. Tokyo 151, Japan under the test number 93-0407. ÜBEREINSTIMMUNGSERKLÄRUNG Die Duplo Corporation mit Sitz in 7-6, Izumi Honcho 1-chome, Komae-shi, Tokio 201, Japan, versichert, daß das folgende Produkt. Bezeichnung des Produkts: Papierfaltmaschine Typen-Nr.: DF-520...
-
Page 3: Safety Precautions
SAFETY PRECAUTIONS Thank you for purchasing a Duplo Folder This instruction manual describes the functions of the Duplo Folder , how to operate it, and safety precautions in use. Before using your unit, read this instruction manual carefully in order to use your unit correctly and get the best out of it. -
Page 4: Table Of Contents
CONTENTS WARNING ........5 10.USING NON-FIXED PAPER ....44 10-1. FIXED FOLDING PROCEDURE ....44 PRECATION ........7 10-2. SPECIAL FOLDING PROCEDURES ..46 3. INSTALLING THE UNIT ......8 11.CROSS FOLDING ....... 51 3-1. REMOVING THE PRESS RELEASE 11-1. PRECAUTIONS UPON USE ....51 LEVER ............ -
Page 5: Warning
WARNING Use only the power supply voltage displayed. + 6% AC230V –10% Voltages Other than 230V Prohibited Ensure that the total current of all the units connected to the wall outlet does not exceed power supply capacity. When using the extension cord, ensure that the total current of all the units con- nected to this extension cord does not exceed the specification of the extension cord. - Page 6 WARNING When not using the product for a long period of time due to vacations, etc., be sure to disconnect the power plug from the outlet. If it malfunctions, fire hazards caused by power leakage may result. Disconnect Plug Remove dusts on the blades of the power plug and the surface from which the blades extend with a dry cloth.
-
Page 7: Precation
PRECATION Do not install the product in environments other than those specified, as this will not only cause the product to rust and malfunction, but will lead to power leakage, fire hazards, and electrical hazards as well. Temperature : 5 ˚C to 35 ˚C Temperature Change Rate : Below 10 ˚C/h Humidity : 20%RH to 85%RH Humidity Change Rate : Below 20%/RH/h... -
Page 8: Installing The Unit
3. INSTALLING THE UNIT 3-1. REMOVING THE PRESS RELEASE LEVER This press release level is attached to the unit at shipment to prevent the rubber roll from becoming distorted. Be sure to remove it when installing the unit. Take note that the unit will be damaged if it is used without removing the lever. Remember to remove it in the following order when installing the unit. -
Page 9: Component Parts
3. INSTALLING THE UNIT 3-2. COMPONENT PARTS After checking that you have following parts, attach them to the unit. ò ó ô ö Duplo Folder Instruction Manual Please let our service people install the machine. DUPLO CORPORATION Name Qty. Name Qty. -
Page 10: Attaching The Parts
3. INSTALLING THE UNIT 3-3. ATTACHING THE PARTS First, attach the second folding plate. • Before starting, push the lock lever at the side of Lock lever the folding plate to “UNLOCK”. • Next, insert the folding plate into the unit. •... - Page 11 3. INSTALLING THE UNIT Attach the cross folding lever at its proper place. Cross folding lever <Parts Used> Cross folding lever ..........1 Note: • The unit has a built-in battery to protect the different types of data registered. • This battery must be charged when installing the unit for the first time.
-
Page 12: Names Of The Parts
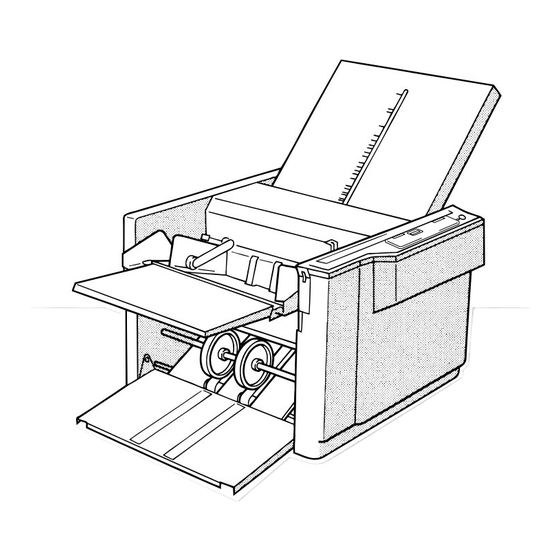
4. NAMES OF THE PARTS Jam correction handle Rubber roll Paper feed ring (For moving) Set knob First folding plate Top cove Control panel Paper feed table Cross folding lever Paper feed pressure adjusting lever Guide Second folding plate Auxiliary paper feed plate Stacker roller Power switch... -
Page 13: Names And Functions Of The Control Panel Parts Panel Parts
5. NAMES AND FUNCTIONS OF THE CONTROL PANEL PARTS PANEL PARTS –1 Name Function Start/stop button Starts/stops folding. Each time this button is pressed, start/stop is repeated alternately. Test button Each time this button is pressed, the unit folds two sheets of paper and stops. Number of sheets/ Sets the number of sheets to be folded and switches the input of the paper length. - Page 14 5. NAMES AND FUNCTIONS OF THE CONTROL PANEL PARTS Name Function Special folding This button is used to memorize the stopping position of the folding stopper, stacker, registration button etc. when moved in special folding modes such as cross folding and non-fixed folding modes, etc.
-
Page 15: Precautions Before Use
6. PRECAUTIONS BEFORE USE 6-1. PAPER TO BE USED • Straighten folded or curled paper before use. • Make sure that the ink on the paper has dried up properly before use. If the ink has not dried properly, it may dirty the machine, and cause other problems such as dirtying the folded surface with ink, etc. -
Page 16: Precautions For Stacking Paper
6. PRECAUTIONS BEFORE USE 6-2. PRECAUTIONS FOR STACKING PAPER • If the paper is not stacked neatly on the paper feed table, the unit will not be able to read the size of the paper accurately and as a result, may determine the paper as outside the standard size. - Page 17 6. PRECAUTIONS BEFORE USE • Adjust so that the front part of the paper touches the Paper paper feed ring in front lightly. (Arrow) Paper feed rings • The paper will be folded as shown in the figure if placed with the printed surface up on the paper feed table.
-
Page 18: General Precautions
6. PRECAUTIONS BEFORE USE 6-3. GENERAL PRECAUTIONS Occasionally make sure that the power plug is not abnormally hot. If the power plug is abnormally hot, contact your nearest dealer. Make sure that the power cord is not frayed nor scratched. Connect the power plug to the electrical outlet properly upon use. -
Page 19: Operation Procedures
7. OPERATION PROCEDURES 7-1. FIXED FOLDING OF FIXED PAPER Start the various fixed folding operations for fixed paper as follows. Insert the power cord in the electrical outlet and turn on the power. • Press “I” to turn on the power. •... - Page 20 7. OPERATION PROCEDURES Press the “fold mode selection” button and select the desired fold mode. • When the right “folding mode selection” button is pressed, the lamp on the right of that currently lit will light up. • When the left one is pressed, the lamp on the left of that currently lit will light up.
- Page 21 7. OPERATION PROCEDURES Adjust the paper feed pressure Paper feed pressure adjusting lever adjusting lever to “0”. • If the paper slips and no paper is fed, raise the paper feed pressure one level from 0 to 1. • If several sheets of paper are fed at one time, lower the paper feed pressure one level from 0 to –1.
- Page 22 7. OPERATION PROCEDURES Press the “test” button and perform test folding. • Two sheets of paper will be folded. Even after two folded sheets of paper have been ejected, the machine will not stop working when the stop button is pressed until the buzzer sounds and the motor inside stops completely.
- Page 23 7. OPERATION PROCEDURES Check the folded paper for testing. • Proceed onto the next step if the sheets of paper have been folded satisfactorily. Check the second ejected paper to confirm that folding is performed correctly. Paper for testing folding •...
- Page 24 7. OPERATION PROCEDURES Input the number of sheets to be folded on the keypad. • Press the numerical key buttons and input/set the number of sheets to be processed. • When this is input, the counter drops. • If this is not input, the counter increases. After completing all preparations, start operation.
-
Page 25: Folding Thick Paper
7. OPERATION PROCEDURES 7-2. FOLDING THICK PAPER When folding into two cardboard paper Corner and fine quality thick paper (157 g/m ), the corners and center of the folded part of the paper may bend due to conditions such as the using environment (terperature, humidity), paper size, fiber direction of the paper, etc. -
Page 26: Double Folding Thick Paper
7. OPERATION PROCEDURES 7-3. DOUBLE FOLDING THICK PAPER • When thick paper (above 105 g/ u ) such as fine quality paper, etc. is folded into fours, its thickness may cause its folds to open when it is ejected to the stacker. - Page 27 7. OPERATION PROCEDURES • While lifting up the stacker rolls with your hand, Stacer roller pull the levers (left and right) attached to the Lever Stacer lever stacker lever in the direction of the arrow, and adjust so that the stacker rolls are above the belt. Belt ö...
- Page 28 7. OPERATION PROCEDURES ù If there is folding slippage, adjust the stopping position of the folding stopper with the adjusting button of folding plate 1 or 2. û After completing all adjustments, press “special folding” registration 1 or 2 and register this special folding method.
-
Page 29: Special Folding Of Fixed Paper
7. OPERATION PROCEDURES ° After the operations have completed, be sure to Stacker rollers Lever lower the left and right levers attached to the Belts stacker lever in the direction of the arrow. If the stacker rolls are left lifted up, problems will occur when “folding mode”... - Page 30 7. OPERATION PROCEDURES For measurement A, press the “folding plate 1” adjusting button and move the folding stopper of the first folding plate to the corresponding position. • For measurement B, press the “folding plate 2” adjusting button and move the folding stopper of the second folding plate to the corresponding position.
- Page 31 7. OPERATION PROCEDURES Number Length of Paper Fold Folding Mode 40—91 mm B6: Single Fold, Double Fold, Letter Fold, Accordion Fold, Irregular Accordion Fold, Letter Fold A5: Double Fold, Letter Fold, Accordion Fold B5: Double Fold, Letter Fold, Accordion Fold A4: Double Fold B4: Double Fold 91—105 mm...
- Page 32 7. OPERATION PROCEDURES If there is folding slippage, adjust the stopping position of the folding stopper. • Press either the “folding plate 1” or “folding plate 2” button to adjust the stopping position of the folding stopper. If the paper is not ejected smoothly, adjust the stopping position of the stacker rollers properly.
- Page 33 7. OPERATION PROCEDURES After completing all adjustments, press “special folding” registration 1 or 2 button. • When registration button 1 is pressed, the folding method will be registered in special folding mode • When registration button 2 is pressed, the felding made it will be registered in special folding mode •...
-
Page 34: Calling The Registration
7. OPERATION PROCEDURES 7-5. CALLING THE REGISTRATION • When folding is to be carried out using the data that was registered during the special folding process, press the “folding mode selection” button and select the registered special folding mode, 1 or 2. •... - Page 35 7. OPERATION PROCEDURES ò Measure the length of the paper to be used, and input its length using the numerical keys. • If the measurements previously registered and currently being displayed are not to be used, press the “clear” button, erase these measurements, and input the desired measurements.
-
Page 36: Folding Adjustments And Registering Corrections
8. FOLDING ADJUSTMENTS AND REGISTERING CORRECTIONS 8-1. ADJUSTING THE FOLDING SLIPPAGE IN THE VERTICAL DIRECTION To adjust the folding slippage in the vertical direction, press the “folding stopper adjusting” button. Folding Plate 1 Folding Style Fold Surface A Adjustment Adjusting Button When A Press the left button is longer... - Page 37 8. FOLDING ADJUSTMENTS AND REGISTERING CORRECTIONS Folding Plate 2 Folding Style Fold Surface B Adjustment Adjusting Button When B Press the left button is longer Double Fold When B Press the right button is shorter When B Press the left button is longer Irregular Accordion Fold...
-
Page 38: Registering The Folding Stopper Correction
8. FOLDING ADJUSTMENTS AND REGISTERING CORRECTIONS 8-2. REGISTERING THE FOLDING STOPPER CORRECTION Use this correction registration function to memorize the position of the folding stopper after adjusting the folding slippage in the vertical direction. This function is extremely useful when folding the same type of paper (size, type, thickness) at the same folding speed. - Page 39 8. FOLDING ADJUSTMENTS AND REGISTERING CORRECTIONS After adjusting folding slippage, continue pressing the “fixed folding correction” button until the buzzer (pi, pi, pi) sounds. • When the value of the folding stopper correction is registered, the display lamp of the specified folding mode will start blinking.
-
Page 40: Adjusting The Folding Slippage In The Horizontal Direction
8. FOLDING ADJUSTMENTS AND REGISTERING CORRECTIONS 8-3. ADJUSTING THE FOLDING SLIPPAGE IN THE HORIZONTAL DIRECTION • If folding slips as shown in the figure because the paper is not cut straight, rotate the “slant correction” knob to adjust the folding slippage. Rotate the “slant correction”... -
Page 41: Using Art/Coated Paper
9. USING ART/COATED PAPER • Art/coated paper are difficult to fold as their printed surfaces tend to stick together easily and cause double feeding. • When folding such a kind of paper, observe the following precautions before starting folding operations. 9-1. -
Page 42: Operating Precautions
9. USING ART/COATED PAPER 9-2. OPERATING PRECAUTIONS If double-feed occurs frequently and Guide Paper cannot be corrected, reduce the amount of paper on the paper feed table until the middle of the guide (approx. 25mm) As the specific gravity of this type of paper is higher than that of normal paper, they tend to stick together, causing double-feeding to occur frequently. - Page 43 9. USING ART/COATED PAPER If the paper is not folded properly, adjust the speed control to a slower speed. When paper is folded at a high speed, as the front edges of the paper cannot reach the folding stopper due to various conditions such as environmental conditions (temperature, humidity), paper size, thickness of paper, paper couch conditions, and printed surface...
-
Page 44: Using Non-Fixed Paper
10. USING NON-FIXED PAPER 10-1. FIXED FOLDING PROCEDURE 9-1. Ł ‘ Ł Ł Start fixed folding operations for non-fixed paper according to the following procedure. Press the “Number of sheets/paper length” button and set the paper length input mode. • When the paper length input mode is set, the “paper size”... - Page 45 10. USING NON-FIXED PAPER Register the paper length input. • Continue pressing the “Number of sheets/paper length” button until the buzzer sounds. • The “paper size” and “Number of sheets/paper length” display windows will switch to the paper length folding mode display shown in the figure. The paper length registered will be kept even after the power is turned off.
-
Page 46: Special Folding Procedures
10. USING NON-FIXED PAPER 10-2. SPECIAL FOLDING PROCEDURES Press the “Number of sheets/paper length” button and set the paper length input mode. • When the paper length input mode is set, the “paper size” and “Number of sheets/paper length” display windows will display as shown in the figure. - Page 47 10. USING NON-FIXED PAPER Fold the paper as desired and measure the folded paper. Adjust the Accordion fold position of the folding stopper of the folding plate accordingly. • The figure on the right shows an example of an accordion fold. •...
- Page 48 10. USING NON-FIXED PAPER • The stopping position of the stacker rollers depends on the length of the paper fold. Refer to the following table “Stacker Roller Positions” when pressing the keys on the keypad. Stacker roller Number Length of Paper Fold Folding Mode 40—91 mm B6: Single Fold, Double Fold, Letter Fold, Accordion Fold, Irregular...
- Page 49 10. USING NON-FIXED PAPER Press the “test” button and carry out test folding. • Check the fold of the paper. If there is folding slippage, adjust the stopping position of the folding stopper. • Press either the “folding plate 1” or “folding plate 2”...
- Page 50 10. USING NON-FIXED PAPER After completing all adjustments, continue pressing “special folding” registration 1 or 2 button until the buzzer (pi, pi, pi) sounds. • This completes the registration of special folding. Once the values have been registered, they will be kept even after the power is turned off.
-
Page 51: Cross Folding
11. CROSS FOLDING • As shown in the figure, cross folding Folded Cross single means folding paper already folded into folding two parts into twos again, threes, or in other ways. Cross letter • Paper can be cross folded into various folding shapes depending on use. -
Page 52: Cross Folding Fixed Paper
11. CROSS FOLDING 11-2. CROSS FOLDING FIXED PAPER • The following describes the cross folding shown in the figure and the procedures for it. • Start cross folding according to the following procedures. Set the “single fold” mode first and fold the paper into two. - Page 53 11. CROSS FOLDING Open the top cover and move the Paper feed ring(For moving) paper feed ring at the far end to the folded edge of the paper. • Loosen the set screw and move the paper feed ring. • After moving the paper feed ring, tighten the set screw properly.
-
Page 54: Cross Folding Un-Fixed Paper
11. CROSS FOLDING Adjust the paper feed pressure Paper feed pressure adjusting lever adjusting lever to “3”. • When the paper slips or non-feed occurs, raise the paper feed pressure one level at a time until the optimum paper feed pressure is obtained. Set the paper feed pressure within the range of 3 to 6. - Page 55 11. CROSS FOLDING Next, set the single fold mode and perform test folding. • Make sure that the paper has been folded properly. Press the keys on the keypad to input the number of sheets to be folded, and start single folding. If the number of sheets to be folded is 520 sheets for example, press the keys on the keypad to input this value.
- Page 56 11. CROSS FOLDING Measure the length of the paper that has been folded into two, and input this value again. If the length is 180mm for example, input this value on the keypad. Register the paper length input. • Continue pressing the “Number of sheets/paper length”...
-
Page 57: Troubleshooting
11. CROSS FOLDING Press the keys on the keypad to input the number of sheets to be folded. Next start folding operations. • Paper will be folded according to the procedures described above. For details of other procedures, refer to “Operation Procedures”... -
Page 58: Paper Has Slipped Near The Paper Feed Section
12. TROUBLESHOOTING 12-2. PAPER HAS SLIPPED NEAR THE PAPER FEED SECTION The “Number of sheets/paper length” l l l l l -”. display window will show “- Increase the paper feed pressure. Paper feed pressure adjusting lever • Raise the paper feed pressure adjusting lever one level at a time. -
Page 59: Paper Has Jammed At The First Folding Plate
12. TROUBLESHOOTING 12-4. PAPER HAS JAMMED AT THE FIRST FOLDING PLATE The “Number of sheets/paper length” l l l l l -”. display window will show “- Turn off the power and disconnect control cord 1. Control cord 1 Be sure to turn off the power first when inserting and disconnecting the control cord or the unit will be damaged. -
Page 60: Paper Has Jammed At The Second Folding Plate
12. TROUBLESHOOTING After removing the paper, return the folding plate and top cover to the unit. Lock lever Lock the folding plate and insert control cord 1. Top cover Check that the folding plate has been set correctly. Always remove and return folding plates with First both hands. - Page 61 12. TROUBLESHOOTING Pull the jammed paper towards you to remove. After completing operations, slide the Slider Control cord 2 folding plate along the slider and return it to its original position. Lock lever Make sure that the folding plate has been set correctly.
-
Page 62: Paper Has Jammed Near The Stacker
12. TROUBLESHOOTING 12-6. PAPER HAS JAMMED NEAR THE STACKER The “Number of sheets/paper length” 2 2 2 2 2 -”. display window will show “- Pull the jammed paper in the stacker section towards you to remove. Paper receiving tray... -
Page 63: Emergency Stops
13. EMERGENCY STOPS An emergency stop device to ensure safety has been, or first folding plates and second forlding plates installed to the top cover of this unit. Take note that this emergency stop device will function as follows. If the top cover is open while the unit Top cover is operating, the “Number of sheets/ paper length”... -
Page 64: Error Messages
14. ERROR MESSAGES • This unit has a self-diagnosing function which will display the following error messages when problems arise while the unit is operating. • When error messages are displayed, refer to the following countermeasures. Display Check Correct No paper on the paper feed Load some sheets of paper. - Page 65 14. ERROR MESSAGES Display Check Correct Turn off the power and correct the First folding plate motor has cause of the lock. locked due to overload. Contact your serviceman. Isn't the control cord for first Turn OFF the power and insert the control cord in the connector.
-
Page 66: Trouble Shooting Guide
15. TROUBLE SHOOTING GUIDE Problem Check Correct ó (1) The unit does not start when Is there paper on the paper • Load some sheets of paper. the start button is pressed. feed plate? ò Does the paper feed plate •... - Page 67 15. TROUBLE SHOOTING GUIDE Problem Check Correct ó Is the paper feed pressure too • Lower the paper feed pressure (5) Double feed occurs frequently. high? gradually until the optimum pressure is obtained. ò Is the separator pressure too • Raise the separator pressure low? gradually until the optimum pressure is obtained.
- Page 68 15. TROUBLE SHOOTING GUIDE Problem Check Correct (8) When paper slips in the • Adjust each folding stopper vertical direction. finely. ó Was the speed changed • Use the original speed. halfway? Adjust each folding stopper finely again. ò Was the paper type (quality, •...
-
Page 69: Cleaning The Unit
16. CLEANING THE UNIT • As paper shreds, ink of printed paper on the rubber roll and paper feed ring will cause problems, clean these parts according to the following procedures. • To ensure safety, always turn off the power of the unit first before cleaning. 16-1. -
Page 70: Cleaning The Paper Feed Ring
16. CLEANING THE UNIT 16-2. CLEANING THE PAPER FEED RING Open the top cover. Top cover While rotating the paper feed ring in the direction of the arrow with your hand, clean it with a cloth moistened Paper feed ring with neutral detergent or alcohol, etc. -
Page 71: Specifications
17. SPECIFICATIONS Model Office use, desktop Type Max. 297 (W) x 432 (L) mm Paper size that can be folded Min. 128 (W) x 182 (L) mm Rough paper, fine quality paper, stencil paper, recycled paper, Paper quality drawing paper, thick paper art/coated paper Single fold, double fold, irregular accordion fold, letter fold, accordion fold, brochure fold, special cross fold (paper thickness: Folding mode... - Page 72 96V-92013...
Need help?
Do you have a question about the DF-520 and is the answer not in the manual?
Questions and answers