
Related Manuals for Ultrak KC4500MN


Summary of Contents for Ultrak KC4500MN
- Page 1 KC4500MN / KC6500MN 1/3" CCD BLACK-AND-WHITE CAMERA INSTALLATION INSTRUCTIONS Ultrak Worldwide Support Center: 1301 Waters Ridge Drive Lewisville, TX 75057 (800) 796-2288 (972) 353-6400 FAX (972) 353-6670 ®...
- Page 2 (972) 353-6400 ALL RIGHTS RESERVED. NO PART OF THIS PUBLICATION MAY BE REPRODUCED BY ANY MEANS WITHOUT WRITTEN PERMISSION FROM ULTRAK. THE INFORMATION IN THIS PUBLICATION IS BELIEVED TO BE ACCURATE IN ALL RESPECTS. HOWEVER, ULTRAK CANNOT ASSUME RESPONSIBILITY FOR ANY CONSEQUENCES RESULTING FROM THE USE THEREOF.
-
Page 3: Explanation Of Graphical Symbols
USERS OF THE PRODUCT ARE RESPONSIBLE FOR CHECKING AND COMPLYING WITH ALL FEDERAL, STATE, AND LOCAL LAWS STATUTES CONCERNING MONITORING RECORDING OF VIDEO AND AUDIO SIGNALS. ULTRAK SHALL NOT BE HELD RESPONSIBLE FOR THE USE OF THIS PRODUCT IN VIOLATION OF CURRENT LAWS AND STATUTES. -
Page 4: Important Safeguards
IMPORTANT SAFEGUARDS READ INSTRUCTIONS -- All the safety and operating HEED WARNINGS -- Follow all instructions marked on the instructions should be read before the appliance is operated. video monitor or equipment. RETAIN INSTRUCTIONS -- The safety and operating LIGHTNING -- For added protection for video monitor or instructions should be retained for future reference. -
Page 5: Fcc Compliance Statement
FCC COMPLIANCE STATEMENT INFORMATION TO THE USER : THIS EQUIPMENT HAS BEEN TESTED AND FOUND TO COMPLY WITH THE LIMITS FOR A CLASS B DIGITAL DEVICE, PURSUANT TO PART 15 OF THE FCC RULES. THESE LIMITS ARE DESIGNED TO PROVIDE REASONABLE PROTECTION AGAINST HARMFUL INTERFERENCE IN A RESIDENTIAL INSTALLATION. - Page 6 THIS PAGE INTENTIONALLY LEFT BLANK.
-
Page 7: Table Of Contents
TABLE OF CONTENTS SECTION 1 ABOUT THE KC4500MN/KC6500MN CAMERA ..1 PURPOSE............1 FEATURES ............1 SECTION 2 CAMERA CONTROLS AND CONNECTIONS ..3 CAMERA FRONT ..........4 CAMERA BACK ..........4 CAMERA TOP ........... 4 CAMERA BOTTOM ........... 6 SECTION 3 CAMERA INSTALLATION AND ADJUSTMENT .. - Page 8 THIS PAGE INTENTIONALLY LEFT BLANK. viii...
-
Page 9: About The Kc4500Mn/Kc6500Mn Camera
High-performance 1/3” SONY CCD Technology – A professional-level camera chip that achieves a very high quality picture. • Excellent Picture Quality – 380 lines of resolution for the KC4500MN and 570 lines of resolution for the KC6500MN. • 0.08 Lux @ F1.4 Sensitivity •... - Page 10 THIS PAGE INTENTIONALLY LEFT BLANK.
-
Page 11: Camera Controls And Connections
SECTION 2 CAMERA CONTROLS AND CONNECTIONS CAMERA CAMERA BACK FRONT VIDEO OUT 12VDC/24VAC CLASS 2 CAMERA TOP CAMERA BOTTOM continued on next page... -
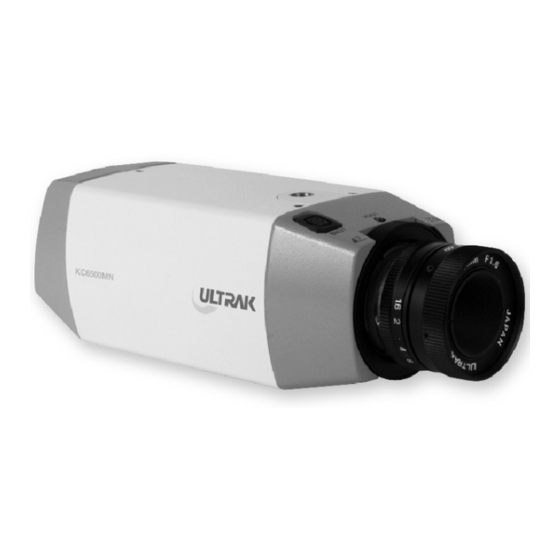
Page 12: Camera Front
CAMERA FRONT 1. Backfocus Lock Screw – Allows the user to secure the backfocus setting. 2. Backfocus Adjust Ring – Allows the user to adjust the backfocal length or picture focus of the lens by rotating it clockwise for CS-mount lenses or counterclockwise for C-mount lenses. - Page 13 CAMERA TOP, continued 8. Function Switches – This compartment houses switches for camera operation. A switch is in the ON position if it is positioned toward the front of the camera. If the position is set toward the back of the camera, the switch is OFF.
-
Page 14: Camera Bottom
CAMERA TOP, continued Phase – Phase adjustment is used in multi- • camera systems when power is supplied from different sources, thus causing the camera to be out of phase. This in turn affects auto-switching by causing rolling of the video during the switch interval. -
Page 15: Camera Installation And Adjustment
SECTION 3 CAMERA INSTALLATION AND ADJUSTMENT CONTENTS OF PACKAGE Installation of the KC4500MN/KC6500MN camera must be performed by qualified service personnel in accordance with all local and national electrical and mechanical codes. Carefully remove the black-and-white camera and its accessories from the carton and verify that they were not damaged in shipment. - Page 16 The maximum recommended load rating for the bracket is 11 pounds. The KC4500MN/KC6500MN observation camera has a ¼"-20 UNC mounting hole located at the top and the bottom of the camera housing to allow for bottom or top mounting.
- Page 17 Contact your authorized Ultrak dealer/ distributor to purchase longer cables. Plug the cable into the BNC output connector port labeled VIDEO OUT located on the back of the camera.
-
Page 18: Manual Iris Lens Adjustment
BASIC INSTALLATION, continued Apply 24V ac or 12V dc power to the camera. Plug the monitor’s power cable into a suitable wall outlet. Turn on the monitor’s power switch(es). The monitor should display images for the connected camera(s). For more information on system installation and camera display options, refer to the observation monitor or system manual. -
Page 19: Video-Type Auto-Iris Lens Installation And Adjustment
VIDEO-TYPE AUTO-IRIS LENS INSTALLATION AND ADJUSTMENT The KC4500MN and KC6500MN cameras support video- type auto-iris lenses to adjust for changing light levels. Perform the following steps to install and adjust a video- type auto-iris lens. Thread the video-type auto-iris lens onto the lens mount on the front of the camera. - Page 20 VIDEO-TYPE AUTO-IRIS LENS INSTALLATION AND ADJUSTMENT, continued Apply power to the camera. Adjust the focus ring on the lens for an optimum picture. If the picture is not visible, set the lens for proper exposure by adjusting the ALC (automatic level control) and Level on the lens.
-
Page 21: Dc-Type Auto-Iris Lens Installation And Adjustment
Thread the dc iris lens onto the lens mount on the front of the camera. If using an Ultrak lens, skip to step three. If using a non-Ultrak lens, use the manufacturer’s instructions to solder the connector that comes supplied with the camera to the lens control wires. -
Page 22: Backfocus Adjustment
DC-TYPE AUTO-IRIS LENS INSTALLATION AND ADJUSTMENT, continued Make sure that the EI switch located on the back of the camera is set to OFF. Apply power to the camera. Adjust the dc-type auto-iris lens for an optimum picture using the IRIS LEVEL control on the back of the camera. -
Page 23: Zoom Lens Backfocus Adjustment
BACKFOCUS ADJUSTMENT, continued 4. When the iris is open to the widest point, readjust the focus for a clear picture. If a clear picture is not visible, set the focus ring to midrange. 5. Loosen the backfocus lock screw. 6. Adjust the backfocus ring for a clear picture. 7. - Page 24 ZOOM LENS BACKFOCUS ADJUSTMENT, continued Loosen the backfocus lock screw. Adjust the backfocus ring for the clearest picture. Adjust the zoom on the lens to the far telephoto position. Adjust the backfocus ring for the clearest picture. Adjust the zoom on the lens back to the widest picture.
-
Page 25: Troubleshooting
SECTION 4 TROUBLESHOOTING If problems occur, verify the installation of the camera with the instructions in this manual and with other operating equipment. Isolate the problem to the specific piece of equipment in the system and refer to the equipment manual for further information. PROBLEM CHECK Make sure the system is plugged in. - Page 26 THIS PAGE INTENTIONALLY LEFT BLANK.
-
Page 27: Preventive Maintenance
SECTION 5 PREVENTIVE MAINTENANCE Following the preventive maintenance schedule allows detection and correction of minor faults before they become serious and cause equipment failure. Every three months, perform the following: Inspect all connecting cables for deterioration or other damage. Clean components with a clean damp cloth. Verify that all the mounting hardware is secure. -
Page 28: Specifications
SPECIFICATIONS Image Sensor: 1/3" black-and-white CCD Horizontal Frequency: 15.75 KHz Vertical Frequency: 60 Hz Resolution: KC4500MN: 380 TV lines KC6500MN: 570 TV lines Signal/Noise Ratio: 46dB (AGC off) Minimum Illumination: 0.08 Lux (F1.4) Video Output: 1.0 Vp-p, 75 Ohms unbalanced...
Need help?
Do you have a question about the KC4500MN and is the answer not in the manual?
Questions and answers