
Related Manuals for Siemens optiPoint 300 basic


Summary of Contents for Siemens optiPoint 300 basic
- Page 1 300 basic IP Telephone Operation and Andministration Manual Information and Communications...
- Page 2 All other brand and product names may be trademarks of their respective holders. Siemens AG provides this documentation without any warranty of any kind, either implied or expressed, including, but not limited to, the implied warranties of merchantability or fitness for a particular purpose.
-
Page 3: Table Of Contents
Contents Safety For your safety ......... . . 8 Protection of the telephone . - Page 4 HiPath system with DHCP server ......20 HiPath system without DHCP server ......21 Label quick-dial keys .
- Page 5 Adjusting date/time ........39 Customising the ringer .
- Page 6 Terminal reset ......... . . 61 Telephone restart .
- Page 7 Errors ..........80 Error messages .
-
Page 8: Safety
There is always the danger of small objects being swallowed by young children. In the case of the optiPoint 300 basic, this applies in particular to the connecting cord clip. Please make sure that such items are not accessible to children. -
Page 9: Product Information
These operating instructions are laid out in a user-oriented man- ner, which means that you are led through the operation of the optiPoint 300 basic step by step – starting from the description of simple basic functions, continuing through the setting of all oper- ating parameters, and ending with the special functions and ad- ministrative tasks at the end of the manual. -
Page 10: Echo Effect
For example, if the echo occurs during a teleconference, it may be that the loudspeakers and microphones need to be repositioned. Service The Siemens service department can only help you with trouble or defects on the unit itself. Should you have any questions regarding the opera- tion, your specialist retailer or network administrator will gladly help you with the right answers. -
Page 11: Notes And Symbols
Product information Notes and symbols Safety Information that is important for preventing injury or damages is marked specially, as they are important instructions for correct use of the unit. This symbol indicates a hazard. Failure to follow the in- structions given may result in injury or in damage to the unit. -
Page 12: Product Description
ISDN system or to the PSTN. You can use the optiPoint 300 basic in the same way as you would use a normal telephone – the only difference being that you’re making it via a data network. The telephone is equipped with an... -
Page 13: Layout Of The Telephone
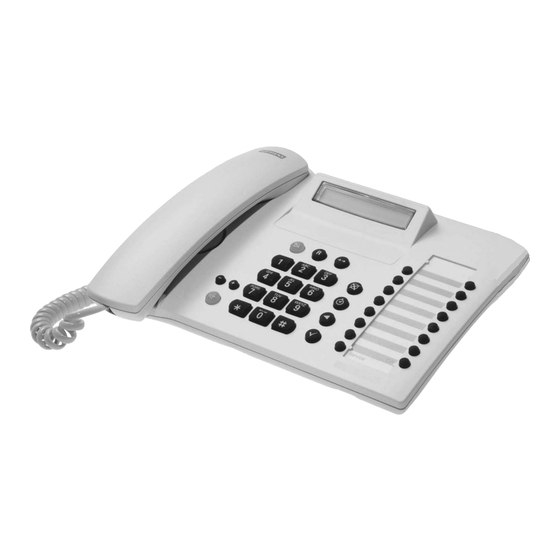
Product information Layout of the telephone handset key block with 3 function keys one-line numerical display key block (fourteen quick-dial keys and two special function keys) key block with 4 function keys dialling keypad function key two control keys... -
Page 14: Standard Package
Product information Standard package The complete optiPoint 300 basic IP telephone package consists of the following items: – IP phone optiPoint 300 basic – Handset – Handset cord – LAN cable – Power supply unit – Installation and Startup manual (not shown) –... -
Page 15: Display And Controls
Elapsed call duration is being displayed Caller identification not available Enter PIN Not used In idle mode the optiPoint 300 basic displays the current date on the left side of the bottom line and the time of day on the right side. 12—01—00 2—36P... -
Page 16: Symbol Keys
Display and controls Symbol keys The symbol keys on the telephone are used to control the indivi- dual operating steps or functions. Symbol Explanation Turns mute on and off – Put caller on hold to consult with someone else or –... -
Page 17: Programmable Keys
Display and controls Programmable keys The optiPoint 300 basic is equipped with fourteen programmable quick-dial keys for frequently called numbers. In addition, there are two special function keys: : CW key Controls the call waiting function Service key Controls the service and programming modes If you press one of these keys, the preprogrammed function is car- ried out. -
Page 18: Installation
Installation Installation This chapter tells you how to connect the components of the opti- Point 300 basic telephone to one another prior to use. Connecting the telephone to a LAN and configuring it for proper operation are tasks of the network administrator. They are de- scribed in the chapter entitled "Configuration and administration". -
Page 19: Integrating The Telephone Into The Communication Environment
IP address assigned. The procedure for set- ting up the network environment for the telephone is described be- low. Note that the optiPoint 300 basic can operate with a HiPath 5500/ 5300, but this is not mandatory. -
Page 20: Hipath System With Dhcp Server
Installation HiPath system with DHCP server The optiPoint 300 basic telephone comes with factory settings that enable it to get an IP address automatically from the DHCP serv- er, once it is connected to a LAN. While the phone searches for a server, “DHCP”... -
Page 21: Hipath System Without Dhcp Server
Installation HiPath system without DHCP server If there is no DHCP server in the environment, you will have to manually enter an IP address and other required parameters us- ing the keypad. Flashing programming and initialisation symbols, – – – – – – – – – – – flashing dash line –... -
Page 22: Label Quick-Dial Keys
Installation Label quick-dial keys To ease use of the quick-dial keys, you can remove the key over- lays and label them in accordance with their intended function. Push forward the transparent foil cover of the labelling cards and remove it. Take out the key overlays and write the required names or functions on it. -
Page 23: Operation
Operation Operation This chapter tells you how to use the optiPoint 300 basic tele- phone. Basic operation All of the optiPoint 300 basic functions are performed using the telephone keys. The unit can be used as a traditional telephone. Simply enter the number you want to dial on the keypad. -
Page 24: Making A Call
Operation Making a call You can make a telephone call with the handset picked up or in the cradle. If you make a call with the handset picked up, the number you want to call will be automatically dialled six seconds after you have finished entering it. -
Page 25: Dialling With Handset In Cradle (On-Hook Dialling)
Operation Dialling with handset in cradle (on-hook dialling) Idle mode 12 – 03 – 00 12 – 34 Enter telephone number 0089722_ Enter IP address 093_324_5_ Pick up handset to start dialling The number you have entered will be checked. If you have entered an IP address incorrectly, the error tone will sound. -
Page 26: Incoming Call
An incoming call will be indicated by the ringer tone and by the dis- play. If the optiPoint 300 basic is in idle mode, you will hear the ringer and the display will show the caller's identification. Up to 20 digits can be displayed, so if the caller's number is longer than this, only the last 20 places will be shown. -
Page 27: Second Incoming Call
Operation Second incoming call With the call-waiting feature enabled , you can use the tele- phone to receive a second incoming call without disconnecting the first caller. When you pick up the new call, the previous caller will be put on background hold and the connection to the new caller becomes the active connection. -
Page 28: Placing A Second Call (Consultation)
Operation Placing a second call (consultation) While speaking to a caller, you can temporarily put him or her on background hold while you consult a third individual by placing a new call. Place a second call Active connection 008972212345 R Request consultation Current call becomes connection no. -
Page 29: Changing Between Callers
Operation Changing between callers You can change from the active connection to the one that is on hold, and vice versa. Connection no. 1 is active 1 – 008972212345 Change to the connection currently on hold Connection no. 2 becomes the active connection 2 –... -
Page 30: Terminating A Connection
Operation Terminating a connection Ending a call If you end the call, your optiPoint 300 basic will return to idle mode, showing the appropriate display. If a second call is on offer due to call-waiting, you will hear the ringer. -
Page 31: Changing The Settings
Current connection 008972212345 If no setting changes are made, the optiPoint 300 basic returns to the standard display after three seconds. Any changes you made but did not confirm will remain effective, but only for the duration of the current call. -
Page 32: Using The Mute Control
Operation Using the mute control While speaking on the telephone, you may wish to use the mute control in order to speak to someone who is in the room with you without being overheard by your caller. Current connection is blinking 008972212345 q Activate mute... -
Page 33: Enable Call-Waiting
Call-waiting symbol is displayed 12 – 03 – 00 12 – 34 Display elapsed call duration While speaking on your optiPoint 300 basic, you can have either the current connection or the elapsed call duration shown on the display Current connection 008972212345... -
Page 34: Adjusting Handset Volume
? Confirm the new setting Current connection 008972212345 If no setting changes are made, the optiPoint 300 basic re- turns to the standard display after three seconds. Any changes you made but did not confirm will remain effec- tive, but only for the duration of the current call. -
Page 35: Adjusting Ringer Volume
? Confirm the new setting Caller identification 008972212345 If no setting changes are made, the optiPoint 300 basic re- turns to the standard display after three seconds. Any changes you made but did not confirm will remain effec- tive, but only for the duration of the current call. -
Page 36: Adjusting Display Contrast
Idle mode 12 – 03 – 00 12 – 35 If no setting changes are made, the optiPoint 300 basic returns to the standard display after three seconds. Any changes you made but did not confirm will have no effect. -
Page 37: Advanced Dialling Features
Operation Advanced dialling features Your optiPoint 300 basic telephone supports advanced dialling with the redial and quick-dial features. Using these features is more convenient than manually entering a telephone number or IP address when you are making a call or consulting a second caller. -
Page 38: Programming The Unit
Operation Programming the unit You can program your optiPoint 300 basic for the various ad- vanced features supported. To program these features, you must go into programming mode; to start, press Service and then the function key you wish to pro- gram. -
Page 39: Editing The Redial Number
Operation Editing the redial number The redial buffer contains the number last dialled. You can dial this number, modify it, or erase it. Idle mode 12 – 03 – 00 12 – 34 Press special function key Service "Service" to change to service mode Do not enter PIN –... -
Page 40: Customising The Ringer
Operation Customising the ringer The sound produced by the ringer can be customised to give you the desired loudness, tune and sequence. You can choose the loudness and tune of the ringer amongst eight possible settings, and select the desired sequence out of three possible sequences. ("Nil"... - Page 41 Operation Changing ringer tune current tune setting t >>>_____ + or- Tune changes (ringer will sound) t >>>>>___ j Save changes and move to sequence parameter Changing ringer sequence Current sequence setting 5 >>_ + or- Sequence changes (ringer will sound) 5 >_ Saving new settings Save changes (audible...
-
Page 42: Incoming Call While In Programming Mode
Operation Incoming call while in programming mode You can continue to receive calls on your optiPoint 300 basic while you are programming it. If call-waiting has been enabled, then the incoming call will be audibly signalled by CW-tone, and you will see the call-waiting symbol flashing on the display. -
Page 43: Configuration And Administration
Configuration and administration This chapter tells you how to program some of the advanced set- tings of the optiPoint 300 basic and how to administer them in use. You should note that this work requires a sound understanding of network principles and network protocols. It will normally be car- ried out by a designated network administrator. -
Page 44: Service Mode
Configuration and administration Service mode Changing to service mode Idle mode 12 – 03 – 00 12 – 34 Press special function key Service "Service" to change to service mode Enter PIN – – – – – – ? Conform PIN <<<<<<... - Page 45 Configuration and administration When you are finished, press to exit service mode. The opti- Point 300 basic will return to idle, a beep will signal that you have ended service mode. ? Exit service mode Idle mode 12 – 03 – 00 12 –...
-
Page 46: Incoming Call While In Service Mode
Configuration and administration Incoming call while in service mode While in service mode, you can continue to receive calls. If call- waiting has been enabled, then the incoming call will be audibly signalled by CW-tone, and you will see the call-waiting symbol flashing on the display. -
Page 47: Configuration
Configuration and administration Configuration You can modify basic settings of the unit, such as the format used to display date/time information and the dialling technique used. Country setting Choose a country code to automatically adopt the correct date/ time display format and dialling parameters. Service mode 5F –... -
Page 48: Daylight Savings Time
Configuration and administration Daylight Savings Time Enable this setting if you want your optiPoint 300 basic telephone to change with Daylight Savings Time (DST) practice. Service mode 5F – _ Select DST setting 5F – 103 ? Confirm Enable or disable setting 5F –... -
Page 49: Administration
Configuration and administration Administration To get the most out of your optiPoint 300 basic telephone in the network environment, you will need to make several settings. Firmware version (read only) You can read the current firmware version. It will be displayed, but cannot be modified. -
Page 50: Ip Assignment By Dhcp
Configuration and administration IP assignment by DHCP You must indicate whether the DHCP should automatically make an IP address assignment. Service mode 5F – _ Select DHCP IP assignment 5F – 203 ? Confirm Change setting 5F – 203 1 ? Save change There are two possibilities for this setting: 1 = IP address assigned by DHCP server... -
Page 51: Hipath
Configuration and administration HiPath You must indicate if you intend to operate your unit in a HiPath en- vironment. Service mode 5F – _ Select HiPath setting 5F – 205 ? Confirm Change setting as required 5F – 205 2 ? Save change You can change the factory default if necessary. -
Page 52: Ip Address
Configuration and administration IP address If you have disabled DHCP assignment of the IP address, then you must manually specify a IP address here. If DHCP assign- ment is enabled and working, then this function will only display the assigned IP address, but you will be able to change it. Service mode 5F –... -
Page 53: Gatekeeper's Ip Address
Configuration and administration Gatekeeper’s IP address You can display the current gatekeeper IP address and modify it if necessary. Service mode 5F – _ Select gatekeeper IP address setting 5F – 209 ? Confirm Change setting P4 244 233 250 123 ? Save change Download server’s IP address You must specify the IP address of the server that will be used to... -
Page 54: Sntp Server Ip Address
Configuration and administration SNTP server IP address You must specify the IP address of the server that will be used to synchronise date and time information. Service mode 5F – _ Select SNTP setting 5F – 211 ? Confirm Change server's IP address P6 244 189 012 245 ? Save change... -
Page 55: Terminal Nic Mac (Read Only)
Configuration and administration Terminal NIC MAC (read only) You can display the NIC MAC terminal, but you may not change it. Service mode 5F – _ Select NIC MAC 5F – 213 ? Confirm Setting is displayed P7 08 00 2A 3b 4C 5d HiPath PIN If you use the telephone in a HiPath environment (the HiPath op- tion is set to 1, see function no. -
Page 56: Administration From A Web Server
Configuration and administration Administration from a web server The complete administration of the optiPoint 300 basic is only available from the web server. The telephone is temporarily locked when the changed data from the web server are transmitted. If you press a key or lift the handset in this phase you will hear a negative acknowledgement signal. -
Page 57: Diagnostics
? End display test Keyboard test This test allows you to check the keys of your optiPoint 300 basic unit one by one: as you press a key, a click will sound to indicate that it has registered, but without performing the normal function of the key. -
Page 58: Audio Loop Test
Configuration and administration Audio loop test The handset's sound pickup and speaker are connected by an au- dio loop. You can test both components by blowing into the pickup microphone. Service mode 5F – _ Select audio loop test 5F – 303 ? Confirm Blow into microphone ? End audio loop test... -
Page 59: Rom Test
Configuration and administration ROM test This test allows you to check that the unit's ROM is free of defects. Service mode 5F – _ Select ROM test 5F – 305 ? Confirm Dash characters displayed while test in progress 5F – 305 – – – Test passed 5F –... -
Page 60: Ping Test
Configuration and administration PING test This sends a ping command to a specified IP address. The result is displayed in the form OK/not OK and the time, in milliseconds. Service mode 5F – _ Select PING test 5F – 306 ? Confirm Enter IP address 1P 213 156 189 012... -
Page 61: Terminal Reset
– Restart by the HiPath web administrator Restore factory default settings You can restore your optiPoint 300 basic unit's factory default set- tings at any time. Settings that have been changed with an admin- istrator PIN can be reset in this way without having to enter the PIN. -
Page 62: Telephone Not Available
If you press a key, an error signal will sound, and the same will happen if you pick up the handset (you will not hear the usual dial tone). The optiPoint 300 basic telephone automatically reverts to idle mode once the web server procedure has been completed. -
Page 63: Download
Configuration and administration Download The optiPoint 300 basic comes with a complete functioning firm- ware package. After installing and initialising the unit, the admin- istrator can download applications software from the web server. A download from the web server can only be performed by the administrator, not by a normal telephone user. -
Page 64: The Web Pages
The web pages Introduction This chapter describes the web management interface for the optiPoint 300 basic, which allows the administrator to install and configure IP-phone telephony devices. On the web pages banner, you will find the product name "HiNet LP 2100". The current release of the web pages doesn’t show the product name "HiPath optiPoint 300 basic", nevertheless it works... -
Page 65: User Error Handling
When a client visits an optiPoint 300 basic page via a HiPath page, the optiPoint 300 basic page will appear within the HiPath frameset. If a link from a HiPath page is to any optiPoint 300 basic page other than the frameset then the optiPoint 300 basic frameset will not be present. -
Page 66: Overall Structure
The web pages Overall structure... -
Page 67: Frameset
The web pages Pages The following sub-sections contain the optiPoint 300 basic web pages. Textual links are shown as blue text underlined on the screen. Certain dynamic output is colour-coded. Frameset Two horizontally oriented frames will be displayed within the browser window. -
Page 68: Home Page
The web pages Home page The textual link "administrator" leads to "Administration page" (via Administrator login if necessary). HiPath administrator login The button "Login" leads to the requested page if the entered password is OK, otherwise this page will appear again. The button "Cancel"... -
Page 69: Local Administrator Login
The web pages Local administrator login The button "Login" leads to the requested page if the entered password is OK, otherwise this page will appear again. The button "Cancel" returns to the "Home Page". Administration... -
Page 70: General Information
The web pages General information Administrator settings... -
Page 71: Ip Address And Routing
The web pages IP address and routing... -
Page 72: Gatekeeper Information
The web pages Gatekeeper information Speech parameters Options for "Jitter buffer" are: – Short – Normal – Long... -
Page 73: Time & Date
The web pages Time & date... -
Page 74: File Transfer
The web pages File transfer Options for "Action on submit" are: – No transfer – Upload configuration – Download configuration – Download application... -
Page 75: Ftp Username & Password
The web pages FTP username & password When this page is being shown the information fields will allways be empty for security reasons. SNMP information... -
Page 76: Download Application
The web pages Download application Save (upload) configuration... -
Page 77: Restore (Download) Configuration
The web pages Restore (download) configuration Restart terminal... -
Page 78: Diagnostics
The web pages Diagnostics... -
Page 79: Change Administrator Password
The web pages Change administrator password... -
Page 80: Annex
Audible signal If you make an invalid entry or press a key that is not available, you will hear the audible error signal and the optiPoint 300 basic tele- phone will ignore the invalid command or entry. You can continue by pressing one of the available keys or making a valid entry. -
Page 81: Configurations
Annex Configurations Country settings DTMF pulse/pause Country Date Time (in msec) 01 = US MM-DD-YY 12 h 80/80 02 = D Germany DD-MM-YY 24 h 150/250 03 = F France DD-MM-YY 24 h 80/80 04 = I Italy DD-MM-YY 24 h 80/80 05 = ES Spain... -
Page 82: Factory Default Settings
Annex Factory default settings Local functions Function Default setting Quick-dial keys None Redial number None PIN for factory defaults 124816 Audio Function Default setting Loudspeaker volume Ringer volume Ringer tone Melody Sequence Handset volume Key click... -
Page 83: Configuration
Annex Configuration Function Default setting Country setting Date/Time: Format MM-DD-YY Date 00-00-00 Time 00-00A Call waiting enabled DTMF mode Inband Display contrast Daylight saving... -
Page 84: Administration
Annex Administration Function Default setting DHCP IP assignment Gatekeeper discovery IP address 0.0.0.0 HiPath E164 address null Gatekeepers 0.0.0.0 Terminal IP address 0.0.0.0 Terminal mask 255.0.0.0 DL Server IP address 0.0.0.0 SNTP IP address 0.0.0.0 Time zone offset IP routing 0.0.0.0 (all) Firmware DL filename optiPoint 300 basica... -
Page 85: Technical Data
Annex Technical data Protocols H.323, H.225, H.245, TCP/IP, FTP, DHCP, SNTP, SNMP, RTP Gatekeeper routed and direct routed call model Voice algorithms G.711 (64 kbit/s) Interfaces IEEE 802.3 Ethernet (10 Mbit/s) 1 x RJ 45 TP Pin assignment: Pin 1 TX + LAN receptacle Pin 2 TX - (X401) -
Page 86: Abbreviations
Annex Abbreviations CLIR Calling Line Identification Restriction DHCP Dynamic Host Configuration Protocol Daylight Saving Time File Transfer Protocol Gatekeeper Internet Protocol ISDN Integrated Services Digital Network Local Area Network Light-Emitting Diode Media Access Control MIB2 Managemant Information Base (release 2) Network Interface Card Personal Identification Number PSTN... -
Page 87: Index
Index Index Abbreviations Gatekeeper’s IP address application software GK discovery IP Application version Audio frequency dialling Audio loop test handset volume HiPath HiPath 5500/ 5300 call duration call-waiting CLIR idle mode configure IP-phones Inband connect the components IP address consultation IP assignment control keys cookie... - Page 88 Index Quick-dial web management interface quick-dial keys, programming western plug RAM test Redial reset terminal ringer loudness ringer sequence ringer tune ringer volume safety second call serial number service mode SNTP server IP address speakerphone speakerphone volume speakerphone, turning on Subnet mask symbol keys symbols...
- Page 90 1PA31003-A2058-A101-2-7619 Reference No.: A31003-A2058-A101-2-7619 • Gedruckt in der Bundesrepublik Deutschland © Siemens AG 2000 • Information and Communication Networks • Hofmannstr. 51 • D-81359 München •...
Need help?
Do you have a question about the optiPoint 300 basic and is the answer not in the manual?
Questions and answers