Table of Contents
Advertisement
Quick Links
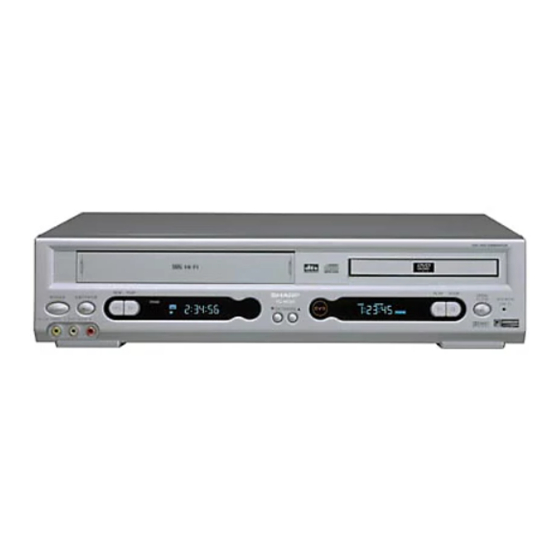
VCR/DVD COMBINATION
MODEL
DV-NC55U
REW
PLAY
POWER
EJECT/ STOP
STANDBY
/
AV 2 IN VDEO
L(MONO)-AUDIO-R
IMPORTANT /
For VCR Function
EZ SET UP
(AUTO CHANNEL /CLOCK SET UP)
EZ SET UP
(PROGRAMACIÓN AUTOMÁTICA DE CANAL/PUESTA EN HORA DEL RELOJ)
1
Connect Antenna/Cable
to Unit first.
En primer lugar conecte
la antena/el cable a la
unidad.
OPERATION MANUAL
PLAY STOP
OPEN/
CLOSE
CH(TRACKING)
IMPORTANTE
2
Then, plug into AC Power
Outlet.
A continuación,
enchúfelos al
tomacorriente de CA.
Please read this Operation Manual carefully
before using your Unit.
VCR DVD
(AV 1 )
Instrucciones importantes de seguridad y guía
rápida de operación en español ➝Página 105
3
Do not press the POWER
button until completion of
EZ Set Up.
No pulse el botón de
ALIMENTACIÓN
(POWER) hasta haber
terminado la EZ SET UP.
QSURROUND
QSURROUND
4
EZ SET UP complete.
EZ SET UP completo.
Detail: Please see page 26
Detalle: véase la página 26
Advertisement
Chapters
Table of Contents

Related Manuals for Sharp DV-NC55U


Summary of Contents for Sharp DV-NC55U
- Page 1 VCR/DVD COMBINATION MODEL DV-NC55U OPERATION MANUAL Please read this Operation Manual carefully before using your Unit. PLAY STOP PLAY OPEN/ POWER EJECT/ STOP CLOSE VCR DVD (AV 1 ) STANDBY CH(TRACKING) AV 2 IN VDEO L(MONO)-AUDIO-R Instrucciones importantes de seguridad y guía rápida de operación en español ➝Página 105...
- Page 2 Code that provides guidelines for proper grounding and, in particular, specifies that the cable ground shall be connected to the grounding system of the building, as close to the point of cable entry as practical. ® ® As an Partner, SHARP has determined that this product meets the guidelines for NERGY NERGY energy efficiency.
-
Page 3: Important Safeguards And Precautions
IMPORTANT SAFEGUARDS AND PRECAUTIONS Caution READ THE SAFETY AND OPERATING INSTRUCTIONS before operating this Unit and retain the instructions for later use. FOLLOW INSTRUCTIONS AND HEED ALL WARNINGS on this Unit and in this manual. Installation 1. Operate only from a power source indicated on this Unit or in this manual. If you are unsure of your power supply, ask your local power company. - Page 4 IMPORTANT SAFEGUARDS AND PRECAUTIONS 7. Never open, remove covers or make any adjustments not described in this manual. Attempting to do so could expose you to dangerous electrical shock or other hazards. It may also cause serious damage to this Unit. 8.
- Page 5 Unit in cold areas. Others 1. It is the intent of Sharp that this product be used in full compliance with the copyright laws of the United States and that prior permission be obtained from copyright owners whenever necessary.
-
Page 6: Table Of Contents
Automatic Head Cleaning System ....55 VCR Setup ............ 30 Audio Output Mode ........56 Menu Screen ............ 30 Sharp Super Picture ........57 Mode Selection ..........31 Channel Setting ..........32 Auto Repeat ..........58 Adding Channel Memory/Erasing Channel Auto Zero Back .......... - Page 7 Contents Cassette Erase Protection ........ 63 Programmed Playback ....... 94 Recording Speeds ..........63 Title Programmed Playback ......94 Recording Hi-Fi Stereo Sound ......63 Chapter Programmed Playback ....... 95 MTS (Multi-channel TV Sound) Broadcasts Track Programmed Playback ......96 Recording ..........
-
Page 8: Types Of Discs That Can Be Played On This Unit
Types of Discs that Can Be Played on This Unit This Unit can play back discs bearing any of the following marks: [8cm(3") disc/12cm(5") disc] 2 on the next page 3 on the next page 4 on the next page Audio CDs [8cm(3") disc/12cm(5") disc] CD-R/CD-RW... - Page 9 Types of Discs that Can Be Played on This Unit • The specific playback functionality for some DVD discs is determined by the disc manufacturer. Because this Unit plays disc data in accordance with the disc manufacturer’s guidelines, some functions may not be available on some discs. Be sure to read the instructions provided with the disc.
-
Page 10: Disc Handling And Maintenance
Disc Handling and Maintenance Handling Precautions • Hold the disc by the edges so the surface will not be soiled with fingerprints. Fingerprints, dirt and scratches can cause skipping and distortion. • Do not write on the label side with a ball-point pen or other writing utensils. -
Page 11: Features
• 19 µ Clear Picture System (in EP mode) • Simple Recording Timer • Sharp Super Picture • Exact Rec/Tape Remaining I DVD • Plays DVD, CD (Digital Audio) discs as well as CD-R/CD-RW discs recorded in MP3 file format •... -
Page 12: Major Components
Major Components VCR Main Unit (Front) Numbers in refer to the main pages in this Operation Manual where the topic is explained. Cassette compartment CH (TRACKING) POWER Front AUDIO/ PLAY STOP PLAY OPEN/ EJECT/ STOP POWER CLOSE VCR DVD (AV 1 ) STANDBY VIDEO input CH(TRACKING) - Page 13 Major Components DVD Main Unit (Front) Numbers in refer to the main pages in this Operation Manual where the topic is explained. Disc tray POWER OPEN/CLOSE PLAY PLAY STOP OPEN/ POWER EJECT/ STOP CLOSE VCR DVD (AV 1 ) STANDBY CH(TRACKING) AV 2 IN VDEO L(MONO)-AUDIO-R...
-
Page 14: Loading The Batteries
Major Components Remote Control Unit (VCR Operation Buttons) • The explanations on this page use the VCR/DVD CHANGE Switch in the VCR position. Numbers in refer to the main pages in this Operation Manual where the topic is explained. TIMER ON/OFF TV/VCR TIMER POWER... - Page 15 Major Components Remote Control Unit (DVD Operation Buttons) • The explanations on this page use the VCR/DVD CHANGE Switch in the DVD position. Numbers in refer to the main pages in this Operation Manual where the topic is explained. REPEAT, PROGRAM POWER VCR/DVD SELECTOR...
- Page 16 Major Components Main Unit (Rear) DVD/VCR AV 1 OUT AV 1 IN IN FROM DVD OUT ANTENNA AV 2 OUT DIGITAL AUDIO AUDIO AUDIO UHF/VHF CATV (MONO) OUT TO TV S-VIDEO OUTPUT VIDEO VIDEO CHANNEL AUDIO To an AC outlet DVD/VCR shared AUDIO output jacks VCR AUDIO input jacks...
-
Page 17: Basic Connection
Basic Connection Caution: • Be sure to turn off the Unit and equipment to be connected before connecting. • Read through the operation manual for the equipment to be connected. • Be sure that the colors of the jacks and plugs match up when connecting the cable. •... -
Page 18: Av Connection
Basic Connection AV Connection (for connection to a TV with AV jacks) 1 Disconnect the TV antenna from the TV. 2 Connect the antenna, Unit, and TV using the Audio/Video cable and coaxial cable (supplied) as shown. Connect the flat twin lead cable to a transformer Antenna (300 ohm to 75 ohm,... -
Page 19: Watching Clearer Dvd Images
Basic Connection Watching clearer DVD images In order to view clearer DVD images, it is recommended that you use a commercially available S-video cable when connecting your TV to DVD OUT. Videos cannot be viewed when connected to DVD OUT. In order to watch videos, make sure to connect your TV to the DVD/VCR jack. -
Page 20: Cable Tv Connections
Cable TV Connections Your Unit is capable of receiving the following non-scrambled channels. • Scrambled channels can be received with the cable box supplied by your cable TV company. Connections for the CATV system Set the 3 ↔ 4 OUTPUT CHANNEL selector on the rear of the Unit to 3 or 4. (See page 17) Check your TV/CATV system referring to the following steps. - Page 21 Cable TV Connections Connection with cable box • Connect as shown below. With this connection, it is possible to record descrambled CATV signals. Coaxial cable Cable Box (Not supplied) TV Rear DVD/VCR AV 1 IN IN FROM From AV 1 OUT DVD OUT ANTENNA AV 2 OUT...
- Page 22 Cable TV Connections Connection with cable box, A/B switch and splitter By using an A/B switch or splitter, it is possible to switch between the cable box and the Unit output. For example, while recording a TV program with the Unit, it is possible to watch a CATV program (including descrambled programs) using the A/B switch.
- Page 23 2 and the Unit must be the same. • If you turn off the cable box, you cannot record or view a CATV program. • If you have questions regarding any connection procedure, please contact your cable company or the nearest Sharp Authorized Service.
-
Page 24: Audio Connections
Audio Connections Connecting to Audio Equipment Connecting the Unit to audio equipment provides normal stereo sound plus powerful stereo sound enhanced by Dolby Digital (5.1 channel) and DTS. Playing 2 channel audio I Analog Connection I Digital Connection DVD/VCR DVD/VCR AV 1 OUT AV 1 IN IN FROM... -
Page 25: Playing Dolby Digital (5.1 Channel) And Dts Audio
Audio Connections Playing Dolby Digital (5.1 channel) and DTS audio • Connecting an amplifier with a Dolby Digital/DTS digital surround processor or a Dolby Digital/DTS digital surround decoder to the Unit’s coaxial digital jack provides richer, more powerful audio play. •... -
Page 26: Ez Set Up (With Auto Clock Setting)
EZ Set Up (With Auto Clock Setting) Important! (Caution during EZ Set Up): VCR / DVD COMBINATION • Do not press the POWER button on the Unit or remote control. PLAY PLAY STOP OPEN/ POWER EJECT/STOP CLOSE VCR DVD STANDBY (AV 1 ) CH(TRACKING) AV 2 IN VDEO... -
Page 27: Preparations Before Using The Unit
Preparations Before Using the Unit The following preparations are necessary for watching the VCR or DVD. Make sure that the Unit and the TV are connected as shown below. The following pages describe how to operate this Unit. 1 Connect the TV to DVD/VCR shared output jacks. The Unit 2 Connect to the TV to DVD output jacks. - Page 28 Preparations Before Using the Unit 1 Connect the TV to DVD/VCR shared output jacks. The Unit 2 Connect to the TV to DVD output jacks. VCR / DVD COMBINATION PLAY PLAY STOP OPEN/ POWER EJECT/STOP CLOSE VCR DVD STANDBY (AV 1 ) CH(TRACKING) AV 2 IN VDEO L(MONO)-AUDIO-R...
-
Page 29: Vcr Setup
VCR Setup VCR Setup ..................30 Menu Screen .................. 30 Mode Selection ................31 Channel Setting ................32 Adding Channel Memory/Erasing Channel Memory ....33 Clock Setting .................. 34 Auto Clock Setting ..............34 Manual Clock Setting ..............35 Automatic Daylight Saving-Time (D.S.T.) Adjustment ....36 OSD Language Setting .............. -
Page 30: Vcr Setup
VCR Setup Menu Screen MENU screen is a home screen used to select various screen Menu Screen functions. A sub-menu will appear once you select an item for the menu. See the following pages for details on each menu procedure. M E N U T I M E R S E T U P... -
Page 31: Mode Selection
VCR Setup Mode Selection You can use the SET UP–selection screen to select the mode for basic features. Preparation TIMER POWER TV/VCR EJECT ON/OFF • See Watching VCR on page 27. VCR/DVD VCR MENU DISPLAY SCREEN SELECTOR DVD SETUP VCR MENU OPEN/ FUNCTION Press VCR MENU to display the menu screen. -
Page 32: Channel Setting
VCR Setup Channel Setting Your Unit can receive a maximum of 181 channels as shown below by presetting the channels into memory. (VHF: 2 to 13, UHF: 14 to 69, CATV: 1 to 125) TIMER POWER TV/VCR EJECT ON/OFF Preparation VCR/DVD VCR MENU •... -
Page 33: Adding Channel Memory/Erasing Channel Memory
VCR Setup Adding Channel Memory/Erasing Channel Memory Use this function to manually add or erase channels to/from the memory. TIMER POWER TV/VCR EJECT ON/OFF Select the channel to be added with the number buttons and the VCR/DVD VCR MENU DISPLAY VCR MENU SCREEN SELECTOR... -
Page 34: Clock Setting
VCR Setup POWER Clock Setting TIMER POWER TV/VCR EJECT ON/OFF Auto Clock Setting VCR/DVD VCR MENU DISPLAY SCREEN SELECTOR DVD SETUP VCR MENU FUNCTION OPEN/ PROGRAM ZOOM CONTROL CLOSE (If you DO know a channel that carries EDS signals) TITLE DVD MENU Preparation CANCEL... -
Page 35: Manual Clock Setting
VCR Setup Manual Clock Setting Preparation • See Watching VCR on page 27. Press VCR MENU. Select “CLOCK” with ' / " and then press TIMER POWER TV/VCR EJECT ON/OFF SET. VCR/DVD VCR MENU VCR MENU DISPLAY SCREEN SELECTOR DVD SETUP OPEN/ FUNCTION M E N U... -
Page 36: Automatic Daylight Saving-Time (D.s.t.) Adjustment
VCR Setup Automatic Daylight Saving-Time (D.S.T.) Adjustment This Unit is equipped with an internal Automatic Daylight Saving-Time Adjustment function. In spring (first Sunday in April) and autumn (last Sunday in October), the time is adjusted as shown below. This function has been preset to ON at the factory. -
Page 37: Osd Language Setting
VCR Setup OSD Language Setting Preparation • See Watching VCR on page 27. TIMER POWER Press VCR MENU to display menu screen. TV/VCR EJECT ON/OFF VCR/DVD VCR MENU DISPLAY SCREEN SELECTOR DVD SETUP VCR MENU Caution: OPEN/ FUNCTION PROGRAM ZOOM CONTROL CLOSE When you use the Unit for the first time or the power is interrupted... -
Page 38: Vcr Display Information
- - - - - - - Function status S T O P 1 2 3 Fast Sharp Super Picture forward S . P I C T U R E O N S T E R E O Stereo/SAP mode... -
Page 39: Dvd Setup
DVD Setup DVD Setup ..................40 About the SETUP Screen .............. 40 TV MODE Setting ................41 PARENTAL Level Setting ............... 42 AUDIO Setting ................44 Setting the COMPRESSION (Dolby Digital output level) .... 44 Setting the DOLBY DIGITAL ............45 DISC LANGUAGE Setting ............. -
Page 40: Dvd Setup
DVD Setup About the SETUP Screen This section describes how to specify various basic settings using the (Example) TV MODE SETUP SETUP screen. The list below shows all the items you can set and TV MODE SETUP adjust. See the following pages for details on each setup procedure. •... -
Page 41: Tv Mode Setting
DVD Setup TV MODE Setting Preparation • See Watching DVD on page 28. TIMER POWER While this Unit is stopped, press DVD SETUP to display the TV/VCR EJECT ON/OFF SETUP screen. VCR/DVD VCR MENU DISPLAY SCREEN SELECTOR DVD SETUP DVD SETUP When you use the Unit for the first time, press DVD SETUP. -
Page 42: Parental Level Setting
DVD Setup PARENTAL Level Setting Certain discs come preset with country codes and parental level settings defined for particular countries. Discs equipped with the parental lock function are rated according to their content. The rated TIMER content allowed by a parental lock level and the way a DVD can be POWER TV/VCR EJECT... - Page 43 DVD Setup Press ENTER and then use \ or | to change the parental level. PARENTAL SETUP SELECT LEVEL Can be changed to any number CODE: TIMER between 1 and 8 POWER TV/VCR EJECT ON/OFF RETURN or OFF. VCR/DVD VCR MENU DISPLAY SCREEN SELECTOR...
-
Page 44: Audio Setting
DVD Setup AUDIO Setting COMPRESSION .... Use this setting for increasing the average volume of Dolby Digital audio when playing a DVD. TIMER DIGITAL ....Use this setting for specifying the type of POWER TV/VCR EJECT ON/OFF DVD SETUP digital output when playing a disc recorded VCR/DVD VCR MENU DISPLAY... -
Page 45: Setting The Dolby Digital
DVD Setup Press ENTER and then use ' or " to select “COMPRESSION”. Press ENTER to display the settings you can select. AUDIO SETUP COMPRESSION: TIMER POWER TV/VCR EJECT ON/OFF DIGITAL: VCR/DVD VCR MENU DISPLAY SCREEN SELECTOR DVD SETUP OPEN/ FUNCTION PROGRAM ZOOM CONTROL... -
Page 46: Disc Language Setting
DVD Setup DISC LANGUAGE Setting Use this setting for selecting the language for subtitles, audio tracks and disc menu. TIMER Setting SUBTITLE, AUDIO and MENU POWER TV/VCR EJECT ON/OFF languages from 8 languages VCR/DVD VCR MENU DISPLAY SCREEN SELECTOR DVD SETUP DVD SETUP OPEN/ FUNCTION... -
Page 47: Selecting Languages From Other
DVD Setup Selecting languages from OTHER Select “OTHER” with ', ", \ and |, then press ENTER to set the “OTHER” input item (two letters). TIMER DISC LANGUAGE POWER TV/VCR EJECT ON/OFF SUB TITLE:ENGLISH VCR/DVD VCR MENU ENGLISH CHINESE DISPLAY SCREEN SELECTOR DVD SETUP... -
Page 48: Osd Language Setting
DVD Setup OSD LANGUAGE Setting Preparation • See Watching DVD on page 28. TIMER POWER Press DVD SETUP. SETUP screen appears. TV/VCR EJECT ON/OFF VCR/DVD VCR MENU DISPLAY SCREEN SELECTOR DVD SETUP DVD SETUP OPEN/ FUNCTION Caution: PROGRAM ZOOM CONTROL CLOSE TITLE DVD MENU... -
Page 49: Dvd Display Information
DVD Display Information Operation Mode Indicators Each time ON SCREEN on the remote control unit is pressed, the display on the TV screen changes the mode in the following sequence: AUTO mode → ON mode → OFF mode • AUTO mode ..Displays indicators for 3 seconds when operation begins. •... -
Page 50: Language Code List For Disc Language
Language Code List for Disc Language Code Language Name Code Language Name Code Language Name Code Language Name Frisian Slovenian Afar Malagasy Irish Samoan Abkhazian Maori Scots Gaelic Shona Afrikaans Macedonian Galician Somali Ameharic Malayalam Guarani Albanian Arabic Mongolian Gujarati Serbian Assamese Moldavian... -
Page 51: Watching The Vcr
Manual ..................55 Blue Screen Noise Elimination ............55 Automatic Head Cleaning System ..........55 Audio Output Mode ................. 56 Sharp Super Picture ............... 57 Auto Repeat ..................58 Auto Zero Back ................59 DPSS (Digital Program Search System) ........60 Skip Search/Instant Replay ............ -
Page 52: Preparing To Use Vcr
Preparing to Use VCR Connecting the Unit and TV using an antenna cable and the DVD/VCR shared output jack POWER TIMER POWER TV/VCR EJECT ON/OFF TV/VCR Turn on the TV and switch the TV channel to the external “VIDEO” or VCR/DVD VCR MENU DISPLAY... -
Page 53: Playback
Playback Inserting a Video Cassette VCR / DVD COMBINATION Gently insert the video cassette into the cassette compartment. The PLAY PLAY STOP OPEN/ POWER EJECT/STOP CLOSE VCR DVD STANDBY (AV 1 ) Unit turns on automatically and “ ” appears on the VCR Front CH(TRACKING) AV 2 IN VDEO L(MONO)-AUDIO-R... -
Page 54: Video Search
Playback Video Search Use the following procedure to quickly find the section you want, while viewing the picture. VCR / DVD COMBINATION During playback, press FFè for forward video search, or PLAY PLAY STOP OPEN/ POWER EJECT/STOP CLOSE VCR DVD STANDBY (AV 1 ) CH(TRACKING) -
Page 55: Tracking Control System
Playback Tracking Control System Automatic VCR / DVD COMBINATION This function automatically adjusts the tracking to match the PLAY PLAY STOP OPEN/ POWER EJECT/STOP CLOSE VCR DVD STANDBY (AV 1 ) CH(TRACKING) recorded tape. Auto tracking engages in the following cases: AV 2 IN VDEO L(MONO)-AUDIO-R •... -
Page 56: Audio Output Mode
Audio Output Mode Your Unit has 3 channels for audio recording (2 on the Hi-Fi track and 1 on the linear track). You can select the audio output channels in playback mode on the SET UP-selection screen. Press VCR MENU to display the menu screen. Select “SET UP”... -
Page 57: Sharp Super Picture
• The ON/OFF status of the Sharp Super Picture can be checked when ON SCREEN is pressed to display OSD. • When the Unit power is turned off, the Sharp Super Picture setting is retained in memory. • If power is interrupted for more than 60 seconds (power failure, etc.),... -
Page 58: Auto Repeat
Auto Repeat This function replays the specified part. Press VCR MENU to display the menu screen. Select “SET UP” with ' / " and then press SET. M E N U TIMER POWER TV/VCR EJECT ON/OFF T I M E R VCR/DVD VCR MENU S E T U P... -
Page 59: Auto Zero Back
Auto Zero Back This function automatically forwards or rewinds the cassette to the “0:00.00” point. Use this function to return to a recording start point. Reset the counter to “0:00.00” with CANCEL before recording. Press Æ Æ Æ Æ Æ REC to start recording. TIMER POWER TV/VCR... -
Page 60: Dpss (Digital Program Search System)
DPSS (Digital Program Search System) You can quickly locate a desired section of a cassette with this feature. Index Signal An index signal is automatically recorded on a cassette at the start of ordinary recording, simple recording timer and timer recording. Current tape position TIMER POWER... -
Page 61: Skip Search/Instant Replay
Skip Search/Instant Replay Skip Search With this feature, you can set a forward video search time to approx. 30, 60, 90 or 120 seconds of recorded material. After searching, normal playback will resume automatically. • Press SKIP SEARCH during playback. TIMER POWER TV/VCR... -
Page 62: Tv Program Recording
TV Program Recording Preparations • See Preparing to Use VCR on page 52. • If necessary, set “SAP” on the menu screen. (See MTS (Multi- channel TV Sound) Broadcasts Recordings on page 64.) Without a Cable Box TIMER POWER TV/VCR EJECT ON/OFF VCR/DVD... -
Page 63: To Watch Another Tv Program While Recording
TV Program Recording To Watch Another TV Program While Recording While recording, press TV/VCR to select “TV” (the “VCR” indicator will disappear), then select the program you wish to view using the TV tuner. TIMER POWER TV/VCR EJECT ON/OFF TV/VCR At the end of the tape, your Unit will automatically stop recording, VCR/DVD VCR MENU... -
Page 64: Mts (Multi-Channel Tv Sound) Broadcasts Recording
MTS (Multi-channel TV Sound) Broadcasts Recording Your Unit can record stereo or SAP (Separate Audio Program) broadcasts, where available. If the broadcast is in stereo, the Unit automatically records the stereo sound in dynamic Hi-Fi. If the broadcast is in SAP, you can record both the MAIN and the SAP sound by using the menu screen to set the SAP mode to ON. -
Page 65: Simple Recording Timer
Simple Recording Timer The Simple Recording Timer (SRT) enables you to set the recording stop time. The SRT can be set on the TV screen by using the remote control. The SRT cannot be set if the clock has not been set. Make sure the clock is set before setting the SRT. -
Page 66: Changing The Contents Of The Simple Recording Timer
Simple Recording Timer Changing the Contents of the Simple Recording Timer Press Æ Æ Æ Æ Æ REC. The stop time flashes on the TV screen. Change the stop time as desired using Æ Æ Æ Æ Æ REC. TIMER POWER TV/VCR EJECT... -
Page 67: Timer Recording
Timer Recording Preparations • See Preparing to Use VCR on page 52. • Check that the clock is displaying the correct time. • Insert a cassette with the erasure protection tab opening covered. • If necessary, set “SAP” on the menu screen. (See MTS (Multi- channel TV Sound) Broadcasts Recording on page 64.) TIMER POWER... - Page 68 Timer Recording Select the desired channel with ' / " and then press | | | | | . (Example) Channel 07 1 / 2 D A T E S T A R T S T O P 8 / 1 0 - - : - - - - : - - S P - / - - - - - - - : - - - - : - - - -...
-
Page 69: Confirming Timer Programs
Timer Recording Confirming Timer Programs You can see on the Timer setting screen a list of all timer programs that are already set. TIMER ON/OFF Preparation TIMER POWER TV/VCR EJECT ON/OFF • See Preparing to Use VCR on page 52. VCR/DVD VCR MENU DISPLAY... -
Page 70: Cancelling Timer Programs
Timer Recording Cancelling Timer Programs Perform the following procedure to cancel timer programs that have already been set. TIMER ON/OFF Preparation TIMER POWER TV/VCR EJECT ON/OFF • See Preparing to Use VCR on page 52. VCR/DVD VCR MENU DISPLAY SCREEN SELECTOR DVD SETUP VCR MENU... -
Page 71: Tape Remaining
Tape Remaining With this feature, you can display the remaining amount of tape on the TV screen, during Recording or Playback a tape. Insert a cassette. Press ON SCREEN until the tape is running. The tape remaining TIMER counter will display on the TV screen after few seconds as POWER EJECT TV/VCR... -
Page 72: Exact Rec
Exact Rec When the tape is expected to run out halfway during timer recording (except for the Simple Recording Timer) in the SP (Standard Play) mode, the mode will automatically change to the EP (Extended Play) mode to prevent termination of the recording. Press VCR MENU to display the menu screen. -
Page 73: Tape Dubbing
• You can also use the front AV jacks. Select “AV 2” (Aux. 2 input) by pressing INPUT twice. • If source VCR is a monaural mode, connect the audio cable to “AUDIO-L” of the dubbing VCR. VCR/DVD COMBINATION Sharp Viewcam (for playback) Audio/Video cable (supplied with Viewcam) -
Page 74: Watching A Dvd, While Recording Or Recording A Video Using The Timer
Watching a DVD, While Recording or Recording a Video Using the Timer You can enjoy watching your favorite DVDs while recording or recording a video with the timer (Timer Standby). Follow these steps in order to watch a DVD while recording or recording a video with the timer. - Page 75 Watching a DVD, While Recording or Recording a Video Using the Timer Press îOPEN/CLOSE. The disc tray will close. OPEN/CLOSE • Watch so that your fingers do not get caught when the disc tray closes. VCR / DVD COMBINATION PLAY PLAY STOP OPEN/ POWER...
-
Page 76: Recording A Dvd Disc Onto Video Cassette
Recording a DVD Disc onto Video Cassette Use the following procedure to record the images and sounds on a DVD disc onto video cassette. Recording a DVD disc onto video cassette VCR DVD indicator (Tape Editing mode) VCR / DVD COMBINATION Preparation PLAY PLAY STOP... -
Page 77: Watching The Dvd
Watching the DVD Preparing to Use DVD ..............78 Playback ..................79 Basic Play ..................79 Fast Forward/Fast Reverse ............80 Slow-Motion Play ................80 Still/Pause ..................81 Frame Advance ................81 Skip (Forward/Reverse) ..............81 Zooming an Image ................. 82 Playing MP3 Discs ................ -
Page 78: Preparing To Use Dvd
Preparing to Use DVD The following steps are necessary to display the DVD screen on the When connecting the unit and the TV using the DVD output jack VCR / DVD COMBINATION PLAY PLAY STOP OPEN/ POWER EJECT/STOP CLOSE VCR DVD STANDBY (AV 1 ) CH(TRACKING) -
Page 79: Playback
Playback Preparation • See Preparing to Use DVD on page 78. • The icons below are used in this Operation Manual: ..Indicates the functions that can be performed for DVDs..Indicates the functions that can be performed for AUDIO CDs. -
Page 80: Fast Forward/Fast Reverse
Playback Fast Forward/Fast Reverse Press FWD è or È REV during playback. VCR / DVD COMBINATION • The disc begins fast scan at ×2 speed (1). Scanning speed selection PLAY PLAY STOP OPEN/ POWER EJECT/STOP CLOSE VCR DVD STANDBY (AV 1 ) CH(TRACKING) AV 2 IN VDEO L(MONO)-AUDIO-R... -
Page 81: Still/Pause
Playback Still/Pause Press âPAUSE/STILL during playback. VCR / DVD COMBINATION PLAY PLAY STOP OPEN/ POWER EJECT/STOP CLOSE VCR DVD STANDBY (AV 1 ) CH(TRACKING) If you press ûPLAY while paused (STILL/PAUSE), normal AV 2 IN VDEO L(MONO)-AUDIO-R playback resumes. PLAY Frame Advance Press âPAUSE/STILL during playback. -
Page 82: Zooming An Image
Playback Zooming an Image While a disc is playing, press ZOOM. • Each press of ZOOM cycles through the zoom settings in the following sequence: ZOOM ZOOM 1 (×1.2) → ZOOM 2 (×1.5) → ZOOM 3 (×2.0) → Off. • When playing a Pan & Scan disc while is selected as the “TV MODE”... -
Page 83: Playing Mp3 Discs
• Depending on the character or symbol, MP3 folders or files have their names replaced, for example: SHARP_1 → SHARPO1, SHARP 1 → SHARPN1, SHARP-1 → SHARPM1. • The playing time may not be correctly displayed during MP3 file playback. -
Page 84: To Play Mp3 Discs
Playing MP3 Discs To play MP3 discs Press POWER to turn on this Unit. Load the MP3 recorded CD-R or the CD-RW. POWER • The folder selection screen will be displayed as well as the TIMER POWER TV/VCR EJECT ON/OFF “SELECT/ENTER button”. -
Page 85: About The Function Control Screen
About the Function Control Screen Using Function control, you can check at a glance and change the current settings of the following items: SUBTITLE, ANGLE, AUDIO, VIRTUAL DOLBY, DIGITAL GAMMA and DIGITAL SUPER PICTURE. Function control also allows you three ways of direct skips (title,chapter and time). •... -
Page 86: Direct Skip (Title/Chapter/Time)
About the Function Control Screen Direct skip (title/chapter/time) Use the following procedure to perform the Direct title skip, Direct chapter skip, or Direct time skip. FUNCTION CONTROL TIMER POWER Press FUNCTION CONTROL during playback. TV/VCR EJECT ON/OFF • The Function control screen appears. VCR/DVD VCR MENU DISPLAY... -
Page 87: Subtitle Language Setting
About the Function Control Screen Subtitle language setting Use the following procedure to perform the Subtitle language setting. FUNCTION Press FUNCTION CONTROL during playback. CONTROL • The Function control screen appears. TIMER POWER TV/VCR EJECT ON/OFF VCR/DVD VCR MENU DISPLAY SCREEN SELECTOR DVD SETUP... -
Page 88: Angle Setting
About the Function Control Screen Angle setting You can change the angle of view when playing a DVD video disc that contains scenes recorded from multiple angles. Use the following procedure to perform the Angle setting. FUNCTION CONTROL TIMER POWER Press FUNCTION CONTROL during playback. -
Page 89: Audio Setting
About the Function Control Screen Audio setting A number of different methods are used to record audio onto a DVD video disc, including multi-channels (used for voiceovers in other languages), Dolby Digital (5.1ch), DTS, and Linear PCM. This Unit FUNCTION provides a number of different audio modes from which you can CONTROL TIMER... -
Page 90: Virtual Dolby (Qsurround) Setting
About the Function Control Screen VIRTUAL DOLBY (QSURROUND) setting This function allows you to enjoy a “surround sound” effect when you are using an analog connection (using AV1 OUT on this Unit) to 2- FUNCTION channel audio equipment (TV, etc.). CONTROL TIMER POWER... -
Page 91: Digital Gamma Setting
About the Function Control Screen DIGITAL GAMMA setting DIGITAL GAMMA is a digital image quality enhancement function that gives a richer image by brightening the darker and more obscure portions of the image without altering the brightness of the FUNCTION brighter portions, thereby making the entire image easier to see. -
Page 92: Digital Super Picture Setting
About the Function Control Screen DIGITAL SUPER PICTURE setting DIGITAL SUPER PICTURE is a digital image quality enhancement function that gives a clearer image by sharpening the details and outlines in the image and reducing the amount of picture noise. FUNCTION The DIGITAL SUPER PICTURE setting can be varied as desired. -
Page 93: Direct Selection Of Scenes
Direct Selection of Scenes Selecting Scenes by Title Number TITLE Press TITLE to show the title screen. TIMER POWER TV/VCR EJECT ON/OFF (Example) VCR/DVD VCR MENU DISPLAY SCREEN SELECTOR DVD SETUP DISCOVERY EUROPE FUNCTION OPEN/ PROGRAM ZOOM CONTROL CLOSE TITLE DVD MENU DISCOVERY AFRICA DVD MENU... -
Page 94: Programmed Playback
Programmed Playback The three types of programmed playback provided by this Unit are title programmed playback (DVD discs), chapter programmed playback (DVD discs) and track programmed playback (audio CD discs). TIMER RETURN POWER TV/VCR EJECT ON/OFF VCR/DVD VCR MENU Title Programmed Playback DISPLAY PROGRAM SCREEN... -
Page 95: Chapter Programmed Playback
Programmed Playback Chapter Programmed Playback Press PROGRAM twice while the disc is stopped. (Press once TIMER RETURN POWER TV/VCR EJECT ON/OFF for a title and twice for a chapter.) • The “CHAPTER PROGRAM” screen appears. VCR/DVD VCR MENU DISPLAY PROGRAM SCREEN SELECTOR DVD SETUP... -
Page 96: Track Programmed Playback
Programmed Playback Track Programmed Playback Press PROGRAM while the disc is stopped. TIMER RETURN POWER TV/VCR EJECT • The “TRACK PROGRAM” screen appears. ON/OFF VCR/DVD VCR MENU DISPLAY PROGRAM SCREEN SELECTOR DVD SETUP TRACK PROGRAM FUNCTION OPEN/ PROGRAM ZOOM CONTROL CLOSE =TRACK TITLE... -
Page 97: Repeat Playback
Repeat Playback Chapter Repeat Example: To repeat play the chapter you are currently viewing. TIMER POWER TV/VCR EJECT ON/OFF Play the chapter you want to repeat. VCR/DVD VCR MENU (REPEAT) and then press û û û û û PLAY to repeat the chapter Press DISPLAY SCREEN... -
Page 98: A-B Repeat
Repeat Playback A-B Repeat A-B repeat allows you to repeat specified section on the disc. TIMER POWER TV/VCR EJECT ON/OFF Press (REPEAT) three times while a disc is playing. VCR/DVD VCR MENU While you are playing a disc, press ûPLAY when you reach the DISPLAY REPEAT SCREEN... -
Page 99: Resume Function
Resume Function This function enables you to resume the playback from the location you specify. Press ËSTOP at the desired point during playback. • “RESUME” appears followed by “RESUME” on the screen. • This Unit stores the location where you stopped. TIMER POWER TV/VCR... -
Page 100: Troubleshooting
Troubleshooting The following problems do not always denote a broken this Unit. Perform the checks listed below before calling service. I VCR/DVD Problem Suggested Solution • No power • Is the power cord connected properly? • Is the power cord firmly plugged into the power outlet? •... -
Page 101: Service Information (For The U.s.)
If this should happen, unplug the Unit and plug it in again after a few minutes. Service Information (For the U.S.) For the location of the nearest Sharp Authorized Service Center, or to obtain product literature, accessories, supplies or customer assistance, please call 1-800-BE-SHARP (1-800-237-4277) or visit SHARP’s website... -
Page 102: Glossary
Full Automatic This function automatically turns the power on and starts to playback when a tape with Playback the erasure protection tabs removed is inserted. Sharp Super Enhanced picture quality during playback. Picture S-VHS Quasi This function facilitates S-VHS software playback. The original high picture quality of S- Playback VHS (horizontal resolution of 400 lines) cannot be played. - Page 103 Glossary This is a digital sound system developed by Digital Theater Systems for use in cinemas. This system uses 6 audio channels and provides accurate sound field positioning and realistic acoustics. (By connecting a DTS Digital Surround decoder, you can also listen to DTS Digital Surround sound.) This refers to a high-density optical disc on which high-quality pictures and sound have been recorded by means of digital signals.
-
Page 104: Specifications
Specifications Signal System NTSC DVD/VCR shared output jacks VIDEO jack: RCA Pin-jack AUDIO jack: RCA Pin-jack DVD output jacks VIDEO jack: S-Video jack AUDIO jack: RCA Pin-jack DIGITAL AUDIO IF: Coaxial digital AUDIO output jack: RCA Pin-jack VIDEO input jacks VIDEO jack: RCA Pin-jack AUDIO jack: RCA Pin-jack Video Recording System... -
Page 105: Español (Guía De Operación Rápido)
ESPAÑOL (Guía de operación rápido) IMPORTANTES MEDIDAS DE SEGURIDAD Y PRECAUCIONES .. 107 Guía de operación rápida en español .......... 110 Conexión de la TV ................ 110 Ajuste del Selector 3 ↔ 4 OUTPUT CHANNEL ......110 Preparación de la unidad de control remoto ......... 111 EZ Set Up (Con Puesta en Hora Automática del Reloj) .... - Page 106 Como socio de E ® , SHARP ha determinado que este producto cumple con las pautas de E NERGY NERGY ®...
-
Page 107: Importantes Medidas De Seguridad Y Precauciones
IMPORTANTES MEDIDAS DE SEGURIDAD Y PRECAUCIONES Precaucion LEA LAS SIGUIENTES INSTRUCCIONES DE SEGURIDAD Y DE OPERACION antes de operar esta unidad y mantenga las instrucciones para uso luego. SIGA LAS INSTRUCCIONES Y TODAS LAS ADVERTENCIAS de esta unidad y de este manual. Instalacion 1. - Page 108 IMPORTANTES MEDIDAS DE SEGURIDAD Y PRECAUCIONES 7. Nunca abra ni quite las cubiertas ni haga ajustes no descritos en este manual. Si trata de hacerlo, lo puede exponer a electrochoques peligrosos o a otros peligros. Podría ocasionar también un serio daño a esta unidad. 8.
- Page 109 Otros 1. Es intención de Sharp que este producto sea utilizado de total conformidad con las leyes de copyright de los Estados Unidos y que se obtenga el consentimiento previo de los titulares del copyright siempre que sea necesario.
-
Page 110: Guía De Operación Rápida En Español
Guía de operación rápida en español Conexión de la TV Precaución: • Asegurese de apagar la unidad y el equipo que va a ser conectado antes de conectar. • Lea el manual de operaciones para información sobre el equipo que se va a conectar. •... -
Page 111: Preparación De La Unidad De Control Remoto
Guía de operación rápida en español Preparación de la unidad de control remoto Abra la tapa del Cargue las dos pilas (R6 UM/SUM-3 o Cierre la tapa del compartimiento de pilas AA) suministradas con la unidad de compartimiento de pilas en la dirección de las control remoto de manera que los polos en la dirección de la... -
Page 112: Preparaciones Antes De Usar La Unidad
Guía de operación rápida en español Preparaciones antes de usar la unidad Las siguientes preparaciones son necesarias para poder ver el VCR o DVD. Asegúrese de que la unidad y el TV esten conectados como se muestra abajo. Las siguentes páginas explican como operar esta unidad. 1 Conecte el televisor a los enchufes de salida compartidos de DVD / VCR La Unidad... -
Page 113: Usando El Vcr
Guía de operación rápida en español I Usando el VCR Escogiendo el Idioma para el OSD. Preparacion • Vea Viendo el VCR en la página 112. TIMER POWER TV/VCR EJECT ON/OFF VCR/DVD VCR MENU Pulse VCR MENU para visualizar la pantalla del menu. DISPLAY SCREEN SELECTOR... -
Page 114: Puesta En Hora Manual Del Reloj
Guía de operación rápida en español Puesta en Hora Manual del Reloj Preparacion TIMER • Vea Viendo el VCR en la página 112. POWER TV/VCR EJECT ON/OFF Pulse VCR MENU. Seleccione “RELOJ” con ' / " y luego VCR/DVD VCR MENU VCR MENU DISPLAY SCREEN... -
Page 115: Introducción De Un Videocasete
Guía de operación rápida en español Introducción de un Videocasete Introduzca con cuidado el videocasete en su compartimiento. La unidad se encenderá automáticamente y “ ” aparecerá en el VCR / DVD COMBINATION visualizador multifuncional. Si el videocasete se introduce mal, el PLAY PLAY STOP OPEN/... -
Page 116: Grabación Con El Temporizador
Guía de operación rápida en español Grabación con el Temporizador Preparaciones • Vea Viendo el VCR en la página 112. • Cerciórese de que el reloj está mostrando la hora correcta. TIMER POWER • Introduzca un videocasete estando tapado el orificio que ha TV/VCR EJECT ON/OFF... -
Page 117: Usando El Dvd
Guía de operación rápida en español I Usando el DVD Realice la configuración inicial Preparacione • Vea Viendo el DVD en página 112. Cuando utilice el reproductor de la unidad por primera vez, deberá ajustar el idioma a usar para la OSD (presentación de pantalla al encender). -
Page 118: Compruebe El Disco
Guía de operación rápida en español Compruebe el disco Antes de colocar un disco, revise para asegurarse que es un tipo de disco soportado por la unidad. Tipos de discos soportados Tipo de disco Contenido del disco Tamaño del disco Disco de video DVD Números de región: 12cm (5") /... -
Page 119: Operaciones Principales Durante La Reproducción De Discos
Guía de operación rápida en español Pulse ûPLAY. TIMER POWER • Hay un botón en el reproductor de la unidad y uno en el control TV/VCR EJECT ON/OFF remoto. Los dos botones tienen el mismo efecto al ser pulsados. VCR/DVD VCR MENU DISPLAY SCREEN... - Page 120 Product, and shall constitute full satisfaction of all claims, whether based on contract, negligence, strict liability or otherwise. In no event shall Sharp be liable, or in any way responsible, for any damages or defects in the Product which were caused by repairs or attempted repairs performed by anyone other than an authorized servicer.
Need help?
Do you have a question about the DV-NC55U and is the answer not in the manual?
Questions and answers