Table of Contents
Advertisement
Quick Links
C
© 2013 Roche Diagnostics
ACCU‑CHEK is a trademark of Roche.
Roche Diagnostics GmbH
M
Sandhofer Strasse 116
68305 Mannheim, Germany
www.accu‑chek.com
man_cover_06658768001_02_EN.indd 4-1
ONR 4285 – 4all 4468
V1/1 – man_cover_06658768001_02_EN_ Format 127 x 154 mm – Black
(2013) Frau Ritzerfeld
Prüfmittelnummer n/a
R2/1 – man_cover_06658768001_02_EN_ Format 127 x 154 mm – Black
R2/2 – man_cover_06658768001_02_EN_ Format 127 x 154 mm – PMS 287 CVC
User's Manual
Blood Glucose Meter
03.09.2013 15:40:52
Advertisement
Table of Contents

Related Manuals for Roche Accu-Chek Active


Summary of Contents for Roche Accu-Chek Active
- Page 1 R2/1 – man_cover_06658768001_02_EN_ Format 127 x 154 mm – Black R2/2 – man_cover_06658768001_02_EN_ Format 127 x 154 mm – PMS 287 CVC User’s Manual Blood Glucose Meter © 2013 Roche Diagnostics ACCU‑CHEK is a trademark of Roche. Roche Diagnostics GmbH Sandhofer Strasse 116 68305 Mannheim, Germany www.accu‑chek.com man_cover_06658768001_02_EN.indd 4-1...
-
Page 2: Explanation Of Symbols
Explanation of symbols This User’s Manual features three types of warning: Various symbols are featured on the packaging and type plate of the meter. Their meanings are as This symbol indicates a possible risk of injury follows: or of damage to your own health or the health of others. -
Page 3: Table Of Contents
Contents Contents Intended use � � � � � � � � � � � � � � � � � � � � � � � � � � � � � � � � � � � � � � � � � � � � � � � � � � � � � � � � � � � � � � � � 2 About this User’s Manual �... -
Page 4: Intended Use
Intended use Intended use The Accu-Chek Active blood glucose meter • Healthcare professionals must also read the instructions and notes in Chapter 10 “Testing The Accu‑Chek Active blood glucose meter is blood glucose in more than one patient”. intended to be used for quantitative blood glucose tests in fresh capillary blood. -
Page 5: About This User's Manual
About this User’s Manual About this User’s Manual Read this User’s Manual carefully and completely before testing blood glucose for the first time. If you have any questions, please contact your customer support and service centre (see page 63). This User’s Manual will provide you with all the information you need to operate, troubleshoot and care for your blood glucose meter. -
Page 6: Getting To Know The Blood Glucose Monitoring System
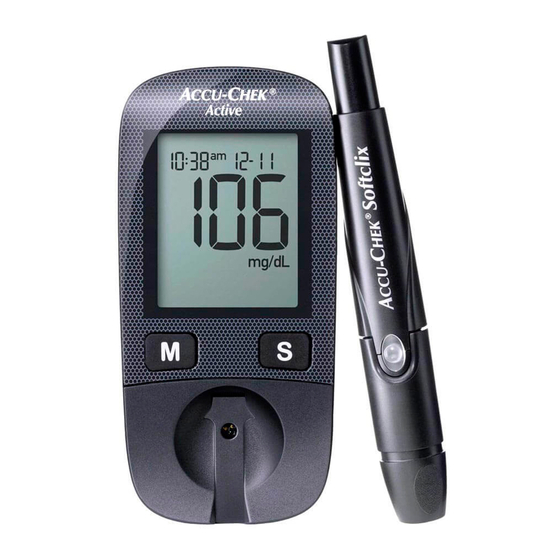
Getting to know the blood glucose monitoring system Getting to know the blood glucose monitoring system The Accu-Chek Active blood glucose meter and its components 1. Display 6. Locking catch displays the current and saved test results or opens the battery compartment cover device messages 7. - Page 7 Getting to know the blood glucose monitoring system Buttons of the blood glucose meter Overview of the M and S button functions: M button S button Press the M button to Press the S button to turn the meter on and call up turn the meter on and call up saved values settings, e.g.
- Page 8 Getting to know the blood glucose monitoring system The main features • Short testing time • Memory The meter needs only approximately 5 seconds The meter automatically saves up to 500 test for each test. results with the time and date of the test and all other information that is important for the test.
-
Page 9: Steps Before Testing
Steps before testing Steps before testing Unpacking the contents Check that the contents of the package are complete. You will find a list with the contents on the box. If anything is missing, please contact your customer support and service centre (see page 63). Checking the unit of measurement Test results can be displayed in two different units of measurement (mg/dL or mmol/L). -
Page 10: Checking The Display
Steps before testing Checking the display You can check if all of the display elements are properly displayed, by carrying out a full display check. mg/dL meter mmol/L meter With the meter turned off, press Compare the elements displayed on your meter with the display the M and S buttons at the same shown here. - Page 11 Steps before testing Inserting the code chip A code chip is used to give the meter information about the properties of the test strips. This is why each test strip box contains a code chip. • Each time you open a new test strip box, you must replace the old code chip from the meter with the new...
-
Page 12: Changing Settings
Changing settings Changing settings Overview You can make changes to the meter settings for the time format, time, date and beep. The meter is delivered with the date and time pre‑set. You may need to adjust the settings to your time zone. - Page 13 Changing settings Go to the next setting Turning the meter off Order of the settings Turning off Time format Time (hour) Time (minute) Year Date (month) Press the M and S buttons briefly at the same time. Date (day) When the final display appears on the display, the modified settings are also saved.
-
Page 14: Setting The Time Format
Changing settings Setting the time format You can choose between two formats: 24-hour format Time from 0:00 to 23:59, date in the day‑month format (DD‑MM) Time from 12:00 to 11:59 followed by am or pm, date in the month‑day 12-hour format format (MM‑DD) When you change the time format, the time and date are changed accordingly. -
Page 15: Setting The Time And Date
Changing settings Setting the time and date 24-hour format Setting the hours 24-hour format 12-hour format 12-hour format The hours flash on the display. Press the M button to set the Press the S button. Next come hours. the minutes. 24-hour format Setting the minutes�... - Page 16 Changing settings 24-hour format Setting the month 24-hour format 12-hour format 12-hour format The month flashes on the Press the M button to set the Press the S button. Next comes display. month. the day. 24-hour format Setting the day 24-hour format 12-hour format 12-hour format...
- Page 17 Changing settings Setting the beep Beep is on Turning the beep on or off Beep is off The beep symbol appears Press the M button briefly to turn The beep symbol appears together with (on) on the the beep on or off. together with (off) on the display.
-
Page 18: Testing Blood Glucose
Testing blood glucose Testing blood glucose Using the Accu‑Chek Active meter, you can test blood glucose in two different ways. You can either apply the blood drop to the test field while the test strip is in the meter (see page 19), or you can remove the test strip from the meter and then apply the blood drop to the test field (see page 20). - Page 19 Testing blood glucose Testing blood glucose Turning the meter on mg/dL meter mmol/L meter Take a test strip from the test The meter turns on and first Following the display check, the strip container. Close the test performs a default display check code number is displayed (689 is strip container again (approx.
- Page 20 Testing blood glucose If you missed the code number on the display after sliding in the test strip, remove the test strip from the meter and slide it in again. Check that this code number is Following the code number, the the same as the code number on test strip symbol and the flashing the label of the test strip...
- Page 21 Testing blood glucose Applying blood With test strip in the meter mg/dL meter mmol/L meter Lance the side of a fingertip with Apply the blood drop to the The test is over in approximately your lancing device. centre of the green field and then 5 seconds.
- Page 22 Testing blood glucose Applying blood With test strip outside the meter Lance the side of a fingertip with When the test strip and the The test strip and blood drop your lancing device. flashing blood drop symbols are symbols flash afterwards on the displayed: display.
-
Page 23: Turning The Meter Off
Testing blood glucose Turning the meter off Turn off mg/dL meter mmol/L meter Gently slide the test strip into the The test is over in approximately Remove the test strip from the test strip guide in the direction of 8 seconds. The test result meter. -
Page 24: Notes On Blood Glucose Testing
Testing blood glucose Notes on blood glucose testing Incorrect test results could lead to incorrect therapy recommendations resulting in serious adverse health effects. Therefore, follow the following instructions: • Use only test strips which are within the use by date. •... - Page 25 Testing blood glucose Marking test results You can mark test results to describe certain events connected to the test result or particular characteristics of the test result. You can only mark a test result while the test strip is still in the meter and the test result is being displayed.
- Page 26 Testing blood glucose mg/dL meter No marker Control Before meal mmol/L Test reminder meter Other In the example above, the Before meal marker ( symbol) was selected. After meal After choosing the desired marker, you can turn the meter off. The test result is saved together As long as the test result is being displayed on the display, you can with the marker.
- Page 27 Testing blood glucose Setting a test reminder mg/dL If the meter is switched on at meter the time of the test reminder, the meter cancels the test reminder. If you perform a blood glucose test up to 1 hour before a test reminder, the meter cancels the test reminder.
- Page 28 Testing blood glucose Checking your test results The test strip itself allows you to estimate the test result through colour comparison and thus also to check the displayed result. After the blood glucose test The label on the test strip container shows blood glucose values in mg/dL and mmol/L next to each coloured dot.
- Page 29 Testing blood glucose Symbols before, during or after a blood glucose test The following symbols can appear on the display before, during or after a test. For further information, please refer to the “Symbols, problems and error messages” chapter (see page 52). Symbol Meaning The battery is almost empty.
- Page 30 Testing blood glucose Evaluating test results Blood glucose results are influenced, amongst others, by nutritional choices, medicine taken, state of health, stress and physical activity. • Do not change your therapy without talking about it with your healthcare professional first. •...
- Page 31 Testing blood glucose Did you bend the test strip while sliding it into the test strip guide on the meter? Did you apply the blood drop immediately after it had formed on your finger? Did you bend or move the test strip before or during the test? Are the test strips past their use by date (check next to the symbol on the test strip container label and also the...
-
Page 32: Using The Meter As A Diary
Using the meter as a diary Using the meter as a diary The meter can save up to 500 test results with the time and the date and calculate averages from the saved test results. The meter automatically saves all test results. If the memory is full the oldest test result is deleted to create space for the new one, when you perform a new blood glucose test. - Page 33 Using the meter as a diary Order of the saved test results In increasing order up to the to the averages oldest test result (memory location 500) In decreasing order down to the newest test result (memory location 1) mg/dL meter mmol/L meter Press the M button to retrieve the older test results.
-
Page 34: Retrieving Averages
Using the meter as a diary Retrieving averages The averages calculated by the meter are calculated for 3 groups of test results and for 4 time periods per group. The meter calculates the averages in the following order: Group Test results Period (days) All test results Only test results which have been marked with... - Page 35 Using the meter as a diary Order of the averages Before meal mg/dL (7, 14, 30, 90 = number of days taken into account) meter All results ➞ ➞ ➞ Results marked with (Before meal) mmol/L meter ➞ ➞ ➞ “Before meal”...
- Page 36 Using the meter as a diary Back Turn off No average To go back to the saved test To turn the meter off: If there are no test results saved results: for the selected average, three Press the M button and S button dashes are displayed.
-
Page 37: Analysing Test Results On The Pc
The meter has a built‑in USB (Universal Serial Bus) port for transferring saved test results to a computer (PC) that is equipped accordingly. Roche Diagnostics offers a variety of special diabetes management hardware and software products which enhance the integrated diary functions of your meter. With these hardware and software products, you and your healthcare professional can manage your test results more effectively and use graphs and tables to understand them better. - Page 38 • If you already have a diabetes management product from Roche Diagnostics for transferring and evaluating test results, it may not recognise more recent meters and the results will therefore not be transferred. You may need a more recent version of your diabetes management software. In this case, contact your customer support and service centre.
-
Page 39: If The Transfer Is Unsuccessful
Analysing test results on the PC The meter is supplied with electricity via the USB cable while it is connected to the computer. Nonetheless, there must be a battery in the meter. To turn the meter off, unplug the For approximately 3 seconds, USB connector from the meter is displayed. -
Page 40: Checking Your Meter
Checking your meter Checking your meter You can check whether the meter provides accurate test results by performing a control test. To perform a control test, glucose control solution is applied to the test strip instead of blood. Perform a control test using Accu‑Chek Active control solutions •... - Page 41 Checking your meter Carrying out a control test mg/dL meter mmol/L meter Read the package insert which The meter turns on and first Following the display check, the comes with the control solutions. performs a default display check code number is displayed (689 is (approx.
- Page 42 Checking your meter mmol/L meter mg/dL meter When the flashing blood drop is Hold the bottle downwards at an The test starts. The flashing displayed on the display and the angle. hourglass symbol indicates that beep sounds, you have approx. the test is in progress.
- Page 43 Checking your meter These figures mmol/L meter are only examples Accu‑Chek ® Active Control Level mg/dL mmol/L 40-70 2�2-3�9 135-182 7�5-10�1 Control solution Unit of mg/dL used measurement meter While the result of the control After marking the result as a Then remove the test strip from test is being displayed: control test:...
- Page 44 Checking your meter Sources of inaccurate control tests If the result of the control test is outside the specified concentration range, repeat the control test. If the result of the second test is also outside the concentration range, check the following points. If your responses to the questions below are different from those given, make the respective corrections when you perform the next test.
- Page 45 Checking your meter Are the test strip guide and measurement window clean? Has the control solution been open for less than 3 months? Once opened, control solutions keep for only 3 months. They must not be used after this period. Have you read the section “Treating the control solutions properly”...
-
Page 46: Cleaning The Meter
Cleaning the meter Cleaning the meter If the meter is dirty, it may be necessary to clean it. Healthcare professionals using the meter to test several patients’ blood glucose must also read the instructions on disinfection (see page 49). • Use only cold water as a cleaning agent. •... - Page 47 Cleaning the meter Cleaning the measurement window CLICK Carefully dab the measurement Place the cover straight and Slide the cover closed. The cover window and its surrounding area centred onto the meter. must audibly CLICK into place. using a lightly moistened cloth or In doing so, the guides on the cotton swab.
-
Page 48: Changing The Battery
Changing the battery Changing the battery When the battery symbol appears on the display for the first time, the battery is almost empty. You can perform approximately 50 more tests with the battery. Change the battery as soon as possible. The battery has already lost a lot of power and changeable conditions (e.g. - Page 49 Changing the battery Never throw batteries into a fire. They may explode. CLICK Dispose of used batteries in an environmentally friendly way at a collection depot or follow local guidelines.* * In Australia: Dispose of used batteries in line with local council regulations.
-
Page 50: Testing Blood Glucose In More Than One Patient
Testing blood glucose in more than one patient Testing blood glucose in more than one patient Information for healthcare professionals Only health care professionals are allowed to perform blood glucose tests, and nursing staff for inpatients and outpatients are allowed to perform blood glucose tests on more than one patient using the same Accu‑Chek Active meter. -
Page 51: Disinfecting The Meter
Testing blood glucose in more than one patient Disinfecting the meter The following parts of the meter may become contaminated: • the case • the cover • the measurement window The meter, the cover and the measurement window must be carefully cleaned and disinfected after every use (see the “Cleaning the meter”... -
Page 52: Test And Storage Conditions
Test and storage conditions Test and storage conditions So that the meter works reliably and you obtain accurate test results, make sure that the following conditions are met. Temperature • Do not use test results obtained at the limits of •... - Page 53 Test and storage conditions Light conditions Avoid sudden changes in light conditions while Do not perform a test when the meter and the testing. The flash of a camera, for example, can test strips are exposed to direct sunlight. Go to a lead to incorrect test results.
-
Page 54: Symbols, Problems And Error Messages
Symbols, problems and error messages Symbols, problems and error messages In addition to test results, time and date, other symbols and error messages also appear in your meter’s display. The following provides an overview of all symbols and error messages. Please pay attention to all symbols and error messages when you use the meter. - Page 55 Symbols, problems and error messages Symbol Meaning When an average is displayed (memory): the symbol is preceded by the number of days taken into account. Together with error message E‑5: The meter is exposed to too much light. Flashing – A test is in progress or an average is being calculated. The beep is turned on.
- Page 56 Symbols, problems and error messages Symbols appearing in the numeric field mg/dL meter mmol/L meter Symbol Meaning • The code chip has not been correctly inserted into the meter. Remove the code chip and re‑insert it. • There is no code chip in the meter. Insert the code chip that belongs to the Accu‑Chek Active test strips you are currently using.
- Page 57 Symbols, problems and error messages Symbol Meaning The test result has been lost from memory. Decimal point: displayed by mmol/L meters and is part of the test result (e.g. 8.2 mmol/L is displayed as The meter is connected to a computer (PC). The meter has been disconnected from the computer (PC).
- Page 58 Symbols, problems and error messages Problems Problem Cause and solution The meter will not turn on. • The battery is empty or there is no battery in the meter. Insert a new battery. • You have inserted the battery the wrong way round. Remove the battery and place it in the battery compartment as shown on page 46.
-
Page 59: Error Messages
Symbols, problems and error messages Error messages When an error occurs, an error message appears on the display and two beeps sound. Turn the meter off. Depending on the situation, either briefly press the M button and S button or remove the test strip from the meter to turn the meter off. - Page 60 Symbols, problems and error messages Error message Cause and solution • The code chip cannot be read. Remove the code chip and re‑insert it into the meter. • The incorrect code chip is currently in the meter. Remove the code chip and insert the code chip that belongs to the Accu‑Chek Active test strips you are currently using.
-
Page 61: Disposing Of Your Meter
Disposing of your meter Disposing of your meter During blood glucose testing the meter may come into contact with blood. Used meters therefore carry a risk of infection. After having removed the battery, please dispose of your used meter according to the regulations applicable in your country. -
Page 62: Technical Data And System Components
Technical data and system components Technical data and system components Technical data Meter type Accu‑Chek Active (Model GU) Catalogue no./Serial See type plate on the back of the meter Test principle Determination of glucose in fresh capillary blood by reflectance photometry. If using other sample material, please refer to the package insert that comes with the Accu‑Chek Active test strips. - Page 63 Technical data and system components Altitude sea level to 4000 m Dimensions 97.8 × 46.8 × 19.1 mm Weight without battery: approx. 46 g with battery: approx. 50 g Display 96‑segment liquid crystal display (LCD) Interface USB (Micro B) Safety class Electromagnetic This blood glucose meter meets the electromagnetic immunity requirements compatibility...
-
Page 64: System Components
System components The Accu‑Chek Active blood glucose monitoring system comprises the following components in addition to the meter: Accu-Chek Active test strips Use only these test strips when you test blood glucose using the Accu‑Chek Active meter. Accu-Chek Active control solutions Use only these control solutions when you carry out control tests using the Accu‑Chek Active meter... -
Page 65: Customer Support And Service Centre
For questions on how to operate your Accu‑Chek Active meter, or regarding implausible test results, or if you suspect the meter or test strips to be defective, contact your Roche Diagnostics customer support and service centre. Do not attempt to repair or modify the meter yourself. Our staff will help you solve any problems you might be experiencing with the meter or test strips from Roche Diagnostics. - Page 66 Customer Support and Service Centre Hong Kong Thailand Roche Diagnostics (Hong Kong) Roche Diagnostics (Thailand) Ltd Limited 18th Floor, Rasa Tower Level 17, Tower 1, Metroplaza 555 Phaholyothin Road, 223 Hing Fong Road, Kwai Chatuchak Chung Chatuchak, Bangkok 10900 New Territories...
-
Page 67: Alphabetical Index
Index Index display 4 display check sources of error drop (symbol) control test 42 testing blood glucose 28 alternative sites 23 apple core (symbol) 23 storage conditions 50 electromagnetic field 51, 58, apple (symbol) sun (symbol) error messages 57 applying blood 19, 20, symbols (display) 52 exp (symbol) - Page 68 man_06658768001_02_EN.indb 66 14.08.2013 10:20:46...
- Page 69 man_06658768001_02_EN.indb 67 14.08.2013 10:20:46...
- Page 70 man_06658768001_02_EN.indb 68 14.08.2013 10:20:46...
Need help?
Do you have a question about the Accu-Chek Active and is the answer not in the manual?
Questions and answers