Table of Contents
Advertisement
Quick Links
Advertisement
Table of Contents

Related Manuals for Roche Accu‑Chek Aviva Insight


Summary of Contents for Roche Accu‑Chek Aviva Insight
- Page 1 User’s Manual Accu‑Chek Aviva Insight Diabetes Manager ®...
-
Page 3: Table Of Contents
Contents Testing Your Blood Glucose Understanding Your Diabetes Manager 1.1 Introduction 3.1 Performing a Blood Glucose Test 1.2 About This User’s Manual 3.2 Adding Information to a Blood Glucose Result 1.3 The Accu‑Chek Aviva Insight Diabetes Manager 3.3 Delivering a Bolus Without Bolus Advice at a Glance 3.4 Understanding Blood Glucose Results 1.4 Home Screen... - Page 4 Bolus Advice Changing Meter Settings 5.1 Overview 7.1 Overview 5.2 Before Using Bolus Advice 7.2 Date, Time and Time Format 5.3 Delivering a Bolus Using Bolus Advice 7.3 Mode Settings: Sound, Vibration 7.4 Mode Settings: Signal Suspension Changing Bolus Advice Settings 7.5 Home Screen Default 6.1 Overview 7.6 Touchscreen: Tone, Vibration...
- Page 5 Meter Reminders 10 Travel Settings 8.1 Overview 10.1 Overview 8.2 Blood Glucose Test Reminder: After Meal 10.2 Turning On Flight Mode 8.3 Blood Glucose Test Reminder: After High Blood 10.3 Turning Off Flight Mode Glucose Result 11 My Data 8.4 Blood Glucose Test Reminder: After Low Blood Glucose Result 11.1 Overview 8.5 Doctor Visit Reminder...
- Page 6 12 Care and Maintenance 14.6 List of Icons 12.1 Overview 14.7 Guarantee 12.2 Charging the Battery 14.8 Additional Supplies 12.3 Power‑Saving Tips 14.9 Information for Healthcare Professionals 12.4 Changing the Battery 14.10 Meter Information 12.5 Cleaning the Meter 14.11 Error Log 12.6 Touchscreen Calibration 14.12 Radio Frequency (RF) Signal 12.7 Meter Function Test...
-
Page 7: Understanding Your Diabetes Manager
Understanding Your Diabetes Manager 1.1 Introduction Read this User’s Manual carefully before you use your Accu‑Chek The Accu‑Chek Aviva Insight diabetes manager is intended for the Aviva Insight diabetes manager. To use it correctly and quantitative measurement of blood glucose. The Accu‑Chek Aviva dependably, you need to understand the meter’s operation, Insight diabetes manager is intended for self‑testing, outside the screen displays and all individual features. - Page 8 If you have any questions Any object coming into contact with human blood is a potential about the meter screens, contact Roche. source of infection (see: Clinical and Laboratory Standards On the meter screens, the activation chip is referred Institute: Protection of Laboratory Workers from Occupationally to as a code chip.
-
Page 9: About This User's Manual
1.2 About This User’s Manual To help you fully benefit from your Accu‑Chek Aviva Insight This User’s Manual includes the following for the appropriate and diabetes manager (hereafter referred to as the meter), the convenient use of the meter: functions and features of this product are assigned as Basic Optional. -
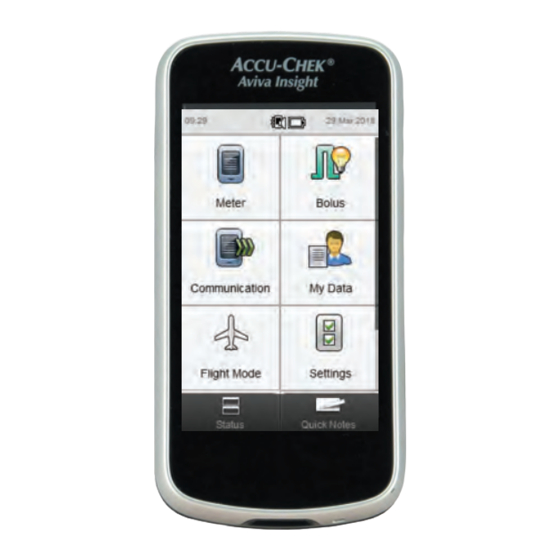
Page 10: The Accu-Chek Aviva Insight Diabetes Manager At A Glance
1.3 The Accu‑Chek Aviva Insight Diabetes Manager at a Glance... - Page 11 The Accu‑Chek Aviva Insight diabetes manager does Memory not include a memory card unless it is Expansion part of the Accu‑Chek Insight diabetes Port therapy system. Do not remove the memory card. Roche will not replace a removed memory card.
- Page 12 The meter is provided with a black Activation activation chip. Do not remove it. If the Chip activation chip is missing, contact Roche. Only remove the battery door to replace the battery. See the Changing the Battery Door Battery section in the Care and Maintenance chapter in this User’s...
- Page 13 Test Strip Yellow Window ‑ Touch blood drop or control solution here. Metallic End ‑ Insert this end into the meter. Test Strip Container (for example) Control Solution Bottle (for example)
-
Page 14: Home Screen
1.4 Home Screen Home screen refers to the screen that is displayed when the meter is powered on. Home screen can be either the Main Menu or Status screen. To change the Home screen default, see the Home Screen Default section in the Changing Meter Settings chapter in this User’s Manual. - Page 15 1.4.1 Main Menu Screen Title Bar Scroll Bar Displays meter information. See the Appears when there is more information following table. than fits on the screen. Menu Selections Go to Status Screen Go to Quick Notes Screen See the Status Screen section in this See the Quick Notes Screen section in this chapter.
- Page 16 The Title Bar shows the time of day and date. In addition, the following icons may be displayed. Icon Name Description Sound / Vibrate Displayed when both sound and vibrate are turned on. Sound Displayed when only sound is turned on. Vibrate Displayed when only vibrate is turned on.
- Page 17 1.4.2 Status Screen The Status screen displays information for the most recent valid blood glucose test. Title Bar Displays meter information. Blood glucose result with colour status bar Last blood glucose test date and time Additional information See the next page. Go to Main Menu Go to Quick Notes See the Main Menu Screen section in this...
- Page 18 Additional Information The following shows possible additional information and is stored in the electronic logbook with the blood glucose test: Meal time icon with description (for example, Before Meal) Carbohydrates icon with the carbohydrate amount (for example, 60 g), or the carbohydrates accepted icon carbohydrates not accepted icon may be displayed Health event icon with description (for example,...
-
Page 19: Turning The Meter On Or Off And Power Management
1.5 Turning the Meter On or Off and Power Management Power Button Press and release the power button. If the Turn meter on battery power is extremely low, the meter does not turn on. Charge the battery. Press and release the power button. The Turn meter off meter requires about 2 seconds to fully power off. - Page 20 Power Management When the meter is on and the touchscreen is not touched, the meter The following table shows the different states of battery power automatically dims the brightness of the display after 15 seconds level: and completely powers off after 2 minutes, unless you are Full Partial performing either a blood glucose test or a control test.
- Page 21 When the battery power level is low, the meter displays a message to recharge. Allowing the battery to fully drain reduces the ability of the battery to hold its charge. It is recommended that you recharge the battery on a regular basis, for example, once every day. Keeping the meter plugged in to charge does not harm the battery.
-
Page 22: Navigation
1.6 Navigation The meter has a full‑colour display utilising touchscreen technology. Making a Selection Scrolling the Screen Press and hold your finger anywhere in the middle of the screen Press a selection until it is highlighted in blue, then release. To and then move your finger up or down to scroll the screen. - Page 23 Setting a Value Choosing from a List Select the value to be changed (Hour is selected). Select an item on the list. The radio button on the left side of the screen indicates the choice (Before Meal is chosen). Press and release + to increase, or press and release ‑ to decrease.
- Page 24 Message Screens > When a message screen appears, the selection choice (for symbol on the right side of the screen indicates the selection displays another screen. example, No, and OK) is shaded and is inactive for 3 seconds. This prevents accidental confirmation of the message before you read it.
- Page 25 Navigation Selections The screen displayed requires your Proceed to the next screen without saving acknowledgement (for example, confirm the settings or data. Next is used when there are M‑58 Temperature out of range message). multiple steps or screens (for example, the Next Setup Wizard for setting up the meter).
- Page 26 Keyboard Return to the previous Save and return to the previous screen screen without saving Backspace to erase Change between a keyboard with letters and a keyboard with numbers, punctuation and Change between a keyboard with letters characters and a keyboard with additional selections Insert a space Change between lowercase letters and capital letters...
-
Page 27: Quick Notes Screen
1.7 Quick Notes Screen An event (for example, Snack) may have an impact upon your Choose up to four events. Scroll the screen for more choices. blood glucose results or collected data. The Quick Notes feature Select Save to store a Quick Notes record to the logbook with the is a convenient way to record events as they occur and are useful current date/time stamp. -
Page 28: Using The Test Strips
1.8 Using the Test Strips Use only Accu‑Chek Aviva test strips. WARNING Use the test strip immediately after removing it from the test strip container. Do not store test strips in high heat and moisture areas Do not apply blood or control solution to the test strip before (bathroom or kitchen)! Heat and moisture can damage the test you insert it into the meter. -
Page 29: Summary Of Features
1.9 Summary of Features The status screen gives you quick access to information about Data management: your most recent blood glucose test. • Electronic logbook containing the record of each blood Bolus advice is optional and it calculates an insulin bolus for glucose result, including meal time, carbohydrates, health you that is customised to the time of day and your changing events, bolus, basal and notes. - Page 30 Reminders: • Alarm clock reminders for when to test throughout the day • Reminders for testing after a high blood glucose result, after a low blood glucose result, or after a meal • Appointments with your healthcare professional or for a laboratory test •...
-
Page 31: Startup
Startup 2.1 Before You Get Started Before you can use the meter, it must be prepared as follows: Remove and discard the tab from the back of the meter. Continue to the next section, Charging the Battery. -
Page 32: Charging The Battery
2.2 Charging the Battery Charge the battery by plugging the USB cable into either a power NOTE outlet or a computer. Use the USB cable and USB power adapter supplied with the meter to avoid problems when charging the Allowing the battery to fully drain reduces the ability battery. - Page 33 Charging the Battery Using a Power Outlet Clear Plastic Cover To assemble the power Slide on the pronged plug adapter, remove the clear where the clear plastic cover plastic cover by pressing the was located until it firmly centre of the release button. clicks into place.
- Page 34 Plug the power adapter into a When the battery icon is power outlet. If the battery is shown as fully charged extremely low on power, the you can unplug the meter. meter does not turn on for a number of minutes. Plug the smaller end of the When the connection is USB cable into the meter.
- Page 35 Charging the Battery Using a Computer NOTE Connection Options screen does not appear Set as default chosen previously. To remove the default, go to the Main Menu and select Communication > Settings. Choose Prompt upon USB connect. Select Save. Plug the smaller end of the Plug the larger end of the Choose Charge...
- Page 36 NOTE NOTE When the battery icon is The PC must be turned on The computer is not shown as fully charged and not in sleep or standby charging the battery if the you can unplug the meter. mode to charge the battery. meter does not display the battery charging screen or the battery charging icon,...
-
Page 37: Setup Wizard
2.3 Setup Wizard The first time you turn the meter on, the Setup Wizard is WARNING activated. You must complete the Setup Wizard before performing a blood glucose test for the first time. It is important to discuss your individual settings for warning limits, time blocks, bolus advice and bG test reminders with The Setup Wizard assists you in selecting settings for: your healthcare professional. - Page 38 NOTE The Setup Wizard is activated every time you turn the meter on until you complete the process. If you turn the meter off during the Setup Wizard, you must reconfirm all of the settings in order to complete the Setup Wizard. To return to a previous screen in the Setup Wizard, select Back.
-
Page 39: Completing The Setup Wizard
2.4 Completing the Setup Wizard Refer to the Important Information section of this User’s Manual for detailed explanations of the various settings in the Setup Wizard. Power Button Starting with the meter The meter vibrates, beeps turned off, press the power and displays this splash button to turn on the meter. - Page 40 If you are using the Accu‑Chek 360° configuration software: Plug the meter into the PC, choose PC setup and then select Next to continue the setup using the software. You do not need to follow the rest of the steps in this section. Choose the desired language To proceed with the setup on Select...
- Page 41 Set the date and time. Select Choose the appropriate Set the Hyper (upper) and Choose the appropriate Next. carbohydrate unit. Select Hypo (lower) warning limits. insulin increment. Select Next. Select Next. Next.
- Page 42 Set the maximum amount for Choose to receive bolus Set the start time and end Set the target range. Select any single bolus. Select Next. advice. Choose to not time for the first time block. Next. receive bolus advice. Select Select Next.
- Page 43 NOTE If you choose not to receive bolus advice, the Setup Wizard skips Step 14. Set the Carbohydrate ratio Select OK. Insulin sensitivity. Select Next.
- Page 44 NOTE If bolus advice is on, you can also set the carbohydrate ratio and insulin sensitivity for each time block. To reset all edited time blocks to their default values, select Cancel and then Yes. This restarts the meter setup process. If you chose not to receive bolus advice, Done appears...
- Page 45 NOTE Consult your healthcare professional and read the next section Important Information for help with the settings in the Setup Wizard. For additional assistance with the bolus advice settings, read the Bolus Advice chapter of this User’s Manual. Set the Meal rise, Snack...
-
Page 46: Important Information
2.5 Important Information 2.5.1 Carbohydrate Unit You have a choice among different carbohydrate units in the NOTE meter that best fit your needs. The following carbohydrate units are available: The gram equivalent for KE, BE and CC can be changed using the Accu‑Chek 360°... - Page 47 2.5.2 Warning Limits 2.5.3 Insulin Increment You can select hyper (high) and hypo (low) blood glucose warning Insulin increment is the amount in units (U) by which your insulin limits that best fit your needs. dose is adjusted when programming a bolus or when entering a manual logbook entry.
- Page 48 2.5.5 Time Blocks Setting time blocks to fit your own schedule helps you and your You can set a different blood glucose target range for each time healthcare professional see how patterns in your blood glucose block. The target range for each time block must be within the levels may be affected by your daily activities and lifestyle.
- Page 49 2.5.6 Bolus Advice Carbohydrate Ratio The bolus advice feature calculates a bolus for you that is customised to the time of day and your changing situations. This The carbohydrate ratio is the amount of insulin necessary to function is activated only if you set up bolus advice on your meter. account for a certain amount of carbohydrates.
- Page 50 Insulin Sensitivity The insulin sensitivity is the amount of insulin necessary to lower Health events available on the meter are: your blood glucose by a certain amount. Exercise 1 Exercise 2 Talk to your healthcare professional to determine the appropriate Stress insulin sensitivity settings for you.
- Page 51 Advice Options Acting Time Meal rise, snack size, acting time and offset time are advice The period of time from the start of a bolus until your blood options. Below are detailed descriptions of each of these settings. glucose level is expected to return to the target level. You can adjust the length of the acting time to fit your individual Meal Rise needs, within a specified time interval (1 ½...
-
Page 53: Testing Your Blood Glucose
Testing Your Blood Glucose 3.1 Performing a Blood Glucose Test Wash and dry your hands. NOTE Prepare the lancing device. You need the meter, a test strip, a lancing device and a lancet. Set up the meter before you perform your first blood glucose test. - Page 54 NOTE Do not touch the blood drop to the test strip until the Apply Drop screen is displayed. Be careful not to put any fluids into the test strip slot. If a test strip error occurs, remove and discard the test strip.
- Page 55 An image of the test strip Apply Drop screen Gently squeeze your finger to container is displayed for a appears. Perform a finger assist the flow of blood. This few seconds. Continue to the prick with the lancing device. helps you get a blood drop. next step.
- Page 56 NOTE For information about blood glucose results, see the Understanding Blood Glucose Results and Unusual Blood Glucose Results sections in this chapter. The blood glucose result must be used within 10 minutes for bolus Touch the blood drop to the Analyzing screen The result appears on the advice.
- Page 57 If bolus advice is enabled: If bolus advice is not Go to the Delivering a enabled: Bolus Using Bolus Advice • Add information to be section in the Bolus saved with the blood Advice chapter in this glucose result: Continue User’s Manual.
-
Page 58: Adding Information To A Blood Glucose Result
3.2 Adding Information to a Blood Glucose Result Adding information to the entry fields provides you with a record of the circumstances surrounding your blood glucose result. This information is helpful later for determining patterns in your blood To add an entry, select it glucose levels. - Page 59 Screens for Adding Entries for Detailed bG Result Meal Time Carbohydrates Health Events Basal Insulin Choose the meal time. Select Set the amount of Choose up to four health Set the basal insulin amount. Save. carbohydrates consumed. events. Select Save. Select Save.
- Page 60 Note Type a note (up to Perform one of the following: 60 characters) to save with Save the entries and this record. proceed with bolus delivery: Select Bolus Select continue to Delivering a Bolus Without Bolus Advice. Save the entries and do not proceed with bolus delivery: Select Done.
-
Page 61: Delivering A Bolus Without Bolus Advice
3.3 Delivering a Bolus Without Bolus Advice Correction Bolus Insulin to return an out‑of‑target NOTE blood glucose result to a target bG Result value. When the Bolus screen first No bG Test is displayed if appears there are no bolus there is no current bG result. - Page 62 NOTE If you set either the Correction Bolus or Carbohydrate Bolus first: The ability to edit the Total Bolus is disabled; however, the Total Bolus updates accordingly. If you set the Total Bolus first: The ability to edit the Correction Bolus and Carbohydrate Bolus is disabled; however, the Correction Bolus updates accordingly.
- Page 63 Select Next. Review the bolus amount. Select Back to adjust or select to record the bolus. Deliver the bolus using your pen or syringe.
-
Page 64: Understanding Blood Glucose Results
3.4 Understanding Blood Glucose Results The status bar indicates how the blood glucose result compares NOTE to the target blood glucose range for the current time block. Treat low or high blood glucose as recommended by your healthcare professional. Status Bar... - Page 65 Status Bar Descriptions The following are status bar descriptions with sample displays: Green indicates the result is Blue indicates the result is Blue with Hyper indicates the within the target range for above the target range for the result is above the hyper the current time block.
- Page 66 Yellow indicates the result is Red with Hypo indicates the below the target range for the result is below the hypo current time block. The result warning limit. is not below the hypo warning limit.
- Page 67 LO or HI Display The blood glucose result may be below the measuring range of The blood glucose result may be above the measuring range of the meter. If you are experiencing any of the common symptoms the meter. If you are experiencing any of the common symptoms of low blood glucose, contact your healthcare professional of high blood glucose, contact your healthcare professional immediately.
-
Page 68: Unusual Blood Glucose Results
3.5 Unusual Blood Glucose Results If your blood glucose result does not match the way you feel, follow these steps: Troubleshooting Checks Actions Wash your hands with warm soapy water and dry thoroughly. 1. Did you wash your hands? Repeat the blood glucose test with a new test strip. Discard the test strips if they are past the use by date. - Page 69 Read the Performing a Blood Glucose Test section in this 6. Did you follow the directions? chapter and repeat the blood glucose test. Contact Roche if you still have problems. Perform a control test. See the Performing a Control Test section 7.
-
Page 70: Symptoms Of Low Or High Blood Glucose
3.6 Symptoms of Low or High Blood Glucose Being aware of the symptoms of low or high blood glucose can WARNING help you understand your test results and decide what to do if they seem unusual. If you are experiencing any of these symptoms, test your blood glucose. -
Page 71: Control Testing
Control Testing 4.1 When to Perform a Control Test 4.2 About the Control Solutions Performing a control test lets you know the meter and test strips Use only Accu‑Chek Aviva control solutions. are working properly. You should perform a control test when: Close the control solution bottle tightly after use. -
Page 72: Performing A Control Test
4.3 Performing a Control Test You need the meter, a test strip, and control solution Level 1, NOTE Level 2 or both. The control level is printed on the bottle label. Do not touch the control solution drop to the test strip until the Apply Drop screen is displayed. - Page 73 An image of the test strip Apply Drop screen Select the control solution to Put the meter on a flat container is displayed for a appears. The test strip is test. You will enter the level surface, such as a table. few seconds.
- Page 74 Remove the bottle cap. Wipe Squeeze the bottle until a tiny Analyzing screen Wipe the tip of the bottle with the tip of the bottle with a drop forms at the tip. Touch appears when there is a tissue. Cap the bottle tissue.
- Page 75 NOTE If you choose No Entry select Done, the Control result screen shown in Step 10 is not displayed. Go to Step 11. The control result appears on Within range means that the Remove and discard the used the display. Choose the meter and test strips are test strip.
-
Page 76: Out-Of-Range Control Results
4.4 Out‑of‑Range Control Results If the control result is out of range, check this list to help solve the problem: Troubleshooting Checks Actions Discard the test strips or control solutions if either is past the use by date. If the control solution was opened more than 3 months 1. - Page 77 Read the Control Testing chapter and repeat the control test. 6. Did you follow the directions? Contact Roche if you still have problems. If you chose the wrong control solution level, you can still 7. Did you choose the correct control solution level, either 1 or 2,...
-
Page 79: Bolus Advice
Bolus Advice 5.1 Overview Important information regarding the use of bolus advice is Definitions of the bolus advice settings are in the Important presented in this Overview and the Before Using Bolus Advice Information section in the Startup chapter in this User’s Manual. -
Page 80: Before Using Bolus Advice
5.2 Before Using Bolus Advice 5.2.1 Intended Users You need to understand certain information in order to use bolus WARNING advice. Working closely with your healthcare professional, you must be very familiar with your diabetes therapy. Bolus advice Always compare the recommendation with how you actually calculates recommended boluses for you. - Page 81 5.2.2 Information not taken into account when bolus 5.2.3 Warning messages advice is used After performing a blood glucose test, warning messages about your blood glucose result may be displayed. Take careful note of It is possible that the values entered when setting up bolus these messages.
- Page 82 5.2.4 Summary If your blood glucose result is outside the meter’s measurement It is recommended you set up bolus advice with your healthcare range, the meter displays a message of either LO or HI. No professional. bolus advice will be recommended for a LO or HI result. Retest Carefully check all of your entries.
-
Page 83: Delivering A Bolus Using Bolus Advice
5.3 Delivering a Bolus Using Bolus Advice NOTE Bolus advice is only available if it has been set up, which is indicated by this icon for the Bolus selection on the Main Menu and on other screens: . If bolus advice has not been set up or it has been turned off, this icon is displayed: ... - Page 84 To add or adjust an entry, select it and refer to the instructions on the following pages. When the entries are complete, choose one of the following: Select Bolus to proceed with bolus advice (go to Step 3). Select Done to save the entries and not proceed with bolus advice.
- Page 85 NOTE Detailed bG Result screen is displayed if a bG test was performed in Step 1. The Bolus Input screen is displayed if Bolus was selected on the Main Menu in Step 1. Result, Carbohydrates Health Events entries are used in the calculation of the bolus advice recommendation. All of the entries are saved as a record.
- Page 86 NOTE The latest blood glucose result can only be used for bolus advice within 10 minutes after the test. At 2 minutes, a countdown timer appears on the top of the screen displaying the remaining time. Once the 10 minutes have elapsed, it is not possible to proceed with bolus advice and the Bolus selection on the screen is deactivated.
- Page 87 Screens for Adding or Adjusting Entries for Bolus Advice Meal Time Carbohydrates Health Events Basal Insulin Choose an applicable meal Set the amount of Choose up to four health Set the basal insulin amount. time. Select Save. carbohydrates consumed. events. Select Save. Select Save.
- Page 88 Note For multiple health events, this screen displays “‑‑‑ %”. You must enter a summarised health event percentage for the selected health events, even if this percentage is zero. Select Save. Type a note (up to If multiple health events have 60 characters) to save with been selected, this screen is this record.
- Page 89 Indicates if bolus advice is enabled or Icon disabled. Current bG result. No bG Test displayed if 10 minutes or more have bG Result elapsed since the last blood glucose result was obtained. A calculated value representing the effective amount of insulin currently in the body that is working to lower blood Active Insulin glucose.
- Page 90 Only displayed if less than 2 minutes are Countdown remaining to use the bG Result for bolus Timer advice. Insulin to return an out‑of‑target blood Correction glucose to a target value. The amount Bolus displayed has been adjusted by the Health Event Percentage. Insulin to account for the food you eat.
- Page 91 NOTE If a Carbohydrate Bolus is entered (callout 8) and no Carbohydrate Amount has been entered (Carbs displays Entry), you should consider entering an amount for carbohydrates. Select Back to enter an amount. An amount is not required, but the more complete the data the more accurate any future bolus advice recommendations are when using bolus advice.
- Page 92 Review the bolus amount. Select Back to adjust or select to record the bolus. Deliver the bolus using your pen or syringe.
-
Page 93: Changing Bolus Advice Settings
Changing Bolus Advice Settings 6.1 Overview WARNING You can make changes to bolus advice to adjust for your It is strongly recommended that you discuss possible individual therapy requirements: updates to your bolus advice settings with your healthcare professional prior to making changes. Bolus advice settings Set up bolus advice Health event percentages... - Page 94 NOTE When editing a setting, any unsaved changes are discarded if the meter turns off or if a test strip is inserted into the meter. If bolus advice is turned off, see the Changing Meter Settings chapter in this User’s Manual to change the time blocks and other meter settings.
-
Page 95: Setting Up Bolus Advice
6.2 Setting Up Bolus Advice Review the following in this User’s Manual: WARNING Overview section in the Bolus Advice chapter The bolus advice feature should not be used if you are Before Using Bolus Advice section in the Bolus Advice using an intermediate‑acting insulin like Neutral Protamine chapter Hagedorn (NPH) insulin or any other intermediate‑acting... - Page 96 NOTE After bolus advice is set up the settings can be changed, or bolus advice can be turned off. If bolus advice is turned off, the settings are discarded.
- Page 97 Main Menu > Settings > Bolus Advice From the Main Menu, select Select Bolus Advice. Select Yes. Set the default Carbohydrate Settings. ratio Insulin sensitivity. Select Next.
- Page 98 NOTE End time of a time block is the same as the Start time of its following time block. Only an End time can be changed, which changes the Start time of the following time block. Changing the End time of the last time block does not change the Start time...
- Page 99 Set the time. Select Next. Set the Upper value Set the Carbohydrate ratio Edit any other time block Lower value. Select Next. Insulin sensitivity. Select (reference Step 6). Once all Done. time blocks are complete, select Next and continue to Step 11.
- Page 100 Set the percentages for Set the Meal rise, Snack size, Select OK. health events. Scroll the Acting time Offset time. screen to see more health Select Next. events. Select Next.
-
Page 101: Bolus Advice: Time Block Settings
6.3 Bolus Advice: Time Block Settings Main Menu > Settings > Bolus Advice > Time Blocks This section is for changing the settings for individual time blocks if bolus advice has been set up. These time block settings include: Start time End time Target range Carbohydrate ratio... - Page 102 NOTE End time of a time block is the same as the Start time of its following time block. Only an End time can be changed, which changes the Start time of the following time block. Changing the End time of the last time block does not change the Start time...
- Page 103 Set the time. Select Next. Set the Upper value Set the Carbohydrate ratio Edit any other time block Lower value. Select Next. Insulin sensitivity. Select (reference Step 4). Once all Done. time blocks are complete, select Done and continue to Step 9.
- Page 104 Select Save.
-
Page 105: Bolus Advice: Adding A Time Block
6.4 Bolus Advice: Adding a Time Block This section is for adding a time block if bolus advice has been To add a time block, decrease the last time block’s end time. set up. After the time block is created, it may be necessary to change the end time and other information for each time block until all of the Before adding a time block, have the following information time blocks are set up the way you want them. - Page 106 Main Menu > Settings > Bolus Advice > Time Blocks From the Main Menu, select Select Bolus Advice. Select Time Blocks. Select the last time block. Settings.
- Page 107 NOTE Decrease the End time for the last time block by any amount in order to create a new time block. This creates a time block by splitting the last time block into two time blocks. Do not decrease the End time until it equals the Start...
- Page 108 Set the Upper value Set the Carbohydrate ratio It may be necessary to Lower value for the new time Insulin sensitivity for the change the end times and block. Select Next. new time block. Select Done. settings of other time blocks. Select a time block to edit and continue to Step 10, or if you do not need to make any...
- Page 109 NOTE End time of a time block is the same as the Start time of its following time block. Only an End time can be changed, which changes the Start time of the following time block. To change the Start time of the first time block, the time blocks must be reset.
- Page 110 Set the Carbohydrate ratio Edit any other time block Select Save. Insulin sensitivity. Select (reference Step 9). Once all Done. time blocks are complete, select Done and continue to Step 14.
-
Page 111: Bolus Advice: Deleting Time Blocks
6.5 Bolus Advice: Deleting Time Blocks This section is for deleting time blocks if bolus advice has been After time blocks are deleted, it may be necessary to change the set up. There are two different methods for deleting time blocks. end times and other information for the remaining time blocks The first method deletes one or more time blocks by combining until all of the time blocks are set up the way you want them. - Page 112 6.5.1 Bolus Advice: Deleting One or More Time Blocks This method of deleting one or more time blocks is accomplished by combining time blocks. Main Menu > Settings > Bolus Advice > Time Blocks From the Main Menu, select Select Bolus Advice.
- Page 113 NOTE For this example, the last three time blocks are combined into one time block. The target range, carbohydrate ratio and insulin sensitivity values in this first time block selected, are used in the resulting time Increase the End time until it Select Yes.
- Page 114 NOTE End time of a time block is the same as the Start time of its following time block. Only an End time can be changed, which changes the Start time of the following time block. Changing the End time of the last time block does not change the Start time...
- Page 115 Set the time. Select Next. Set the Upper value Set the Carbohydrate ratio Edit any other time block Lower value. Select Next. Insulin sensitivity. Select (reference Step 7). Once all Done. time blocks are complete, select Done and continue to Step 12.
- Page 116 Select Save.
- Page 117 6.5.2 Bolus Advice: Deleting a Single Time Block To delete a time block, decrease the time block’s end time until it equals its start time. Main Menu > Settings > Bolus Advice > Time Blocks From the Main Menu, select Select Bolus Advice.
- Page 118 Decrease the End time until it Select Yes. It may be necessary to equals the Start time. Select change the end times and Next. other information for the remaining time blocks. Select a time block to edit and continue to Step 8, or if you do not need to make any changes, select Done...
- Page 119 NOTE End time of a time block is the same as the Start time of its following time block. Only an End time can be changed, which changes the Start time of the following time block. Changing the End time of the last time block does not change the Start time...
- Page 120 Set the Carbohydrate ratio Edit any other time block Select Save. Insulin sensitivity. Select (reference Step 7). Once all Done. time blocks are complete, select Done and continue to Step 12.
-
Page 121: Bolus Advice: Resetting All Time Blocks
6.6 Bolus Advice: Resetting All Time Blocks This section is for resetting and re‑entering the settings for all of WARNING the time blocks if bolus advice has been set up. One reason for resetting the time blocks is to change the start time of the first It is strongly recommended that you discuss possible time block. - Page 122 Main Menu > Settings > Bolus Advice > Time Blocks From the Main Menu, select Select Bolus Advice. Select Time Blocks. Select Reset. Settings.
- Page 123 Select Yes. Set the Start time Set the default Upper value Set the default Carbohydrate time for the first time block. Lower value. Select Next. ratio Insulin sensitivity. Select Next. Select Next.
- Page 124 NOTE End time of a time block is the same as the Start time of its following time block. Only an End time can be changed, which changes the Start time of the following time block. Changing the End time of the last time block does not change the Start time...
- Page 125 Set the time. Select Next. Set the Upper value Set the Carbohydrate ratio Edit any other time block Lower value. Select Next. Insulin sensitivity. Select (reference Step 10). Once all Done. time blocks are complete, select Done and continue to Step 15.
- Page 126 Select Save.
-
Page 127: Health Event Percentages
6.7 Health Event Percentages Main Menu > Settings > Bolus Advice > Health Events This section is for changing health event percentages if bolus advice has been set up. WARNING It is strongly recommended that you discuss possible updates to your bolus advice settings with your healthcare professional prior to making changes. - Page 128 Select Health Events. Set the percentages for Select Save. health events. Scroll the screen to see more health events. Select Save.
-
Page 129: Advice Options: Meal Rise, Snack Size, Acting Time, Offset Time
6.8 Advice Options: Meal Rise, Snack Size, Acting Time, Offset Time Main Menu > Settings > Bolus Advice > Advice Options This section is for changing the values for meal rise, snack size, acting time and offset time if bolus advice has been set up. WARNING It is strongly recommended that you discuss possible updates to your bolus advice settings with your healthcare... - Page 130 Select Advice Options. Set the Meal rise, Snack size, Select Save. Acting time Offset time. Select Save.
-
Page 131: Turning Off Bolus Advice
6.9 Turning Off Bolus Advice Once turned off, bolus advice must be set up to be used again. Main Menu > Settings > Bolus Advice > Bolus Advice Settings From the Main Menu, select Select Bolus Advice. Select Off. Select Save. All bolus advice settings are Settings. -
Page 133: Changing Meter Settings
Changing Meter Settings 7.1 Overview You can make the following changes to the meter to adjust it to Time blocks your individual therapy requirements and personal preferences. Start times, end times and target ranges for time blocks Consult with your healthcare professional to ensure the Add or delete a time block appropriate settings are selected. - Page 134 NOTE When editing a setting, any unsaved changes are discarded if the meter turns off or if a test strip is inserted into the meter. If bolus advice is turned on, see the Changing Bolus Advice Settings chapter in this User’s Manual to change the time blocks, health events and advice options (meal rise, snack size, acting time and offset time).
-
Page 135: Date, Time And Time Format
7.2 Date, Time and Time Format Main Menu > Settings > Date and Time From the Main Menu, select Select Date and Time. Date and Time: Select and Settings. set the appropriate fields. Time Format: Choose 12 hr or 24 hr. Select Save. -
Page 136: Mode Settings: Sound, Vibration
7.3 Mode Settings: Sound, Vibration You can choose whether you want the meter to sound, vibrate, or do both at the same time as an event occurs (such as a Warning). You can adjust the sound volume. Main Menu > Settings > Mode Settings From the Main Menu, select Select Mode... - Page 137 To Activate a Mode: Choose the desired mode The radio button with the Press the radio button to the setting. Set the volume, if gray dot indicates the mode left of the mode’s name. Go applicable. Select Save. that is activated. Select Save. to Step 4.
-
Page 138: Mode Settings: Signal Suspension
7.4 Mode Settings: Signal Suspension Main Menu > Settings > Mode Settings > Signal Suspension You can suspend the signals for Warnings for a specified period of time. However, since Error and Maintenance messages require your immediate attention, you cannot suspend these event signals. - Page 139 Select Signal Suspension. Select On: Set the Start time is selected, scroll the Select Save. time. Continue to screen and choose either Step 5. Once or Repeat. Select Save. Select Off: Select Save. Go to Step 6.
-
Page 140: Home Screen Default
7.5 Home Screen Default The Home screen is the screen displayed when the meter is powered on or after you complete a meter function, like changing a setting. You can choose either the Main Menu or Status screen to be the Home screen. Main Menu >... - Page 141 Select Home Screen. Choose a screen. Select Save.
-
Page 142: Touchscreen: Tone, Vibration
7.6 Touchscreen: Tone, Vibration You can choose whether you want the meter to emit a tone, vibrate, do both at the same time or do neither when you make a selection on the touchscreen. Main Menu > Settings > Meter Settings > Touchscreen From the Main Menu, select Scroll the screen and select Settings. - Page 143 Select Touchscreen. Choose the desired touchscreen setting. Select Save.
-
Page 144: Brightness
7.7 Brightness You can adjust the brightness level of the meter display for different lighting conditions. Main Menu > Settings > Meter Settings > Brightness From the Main Menu, select Scroll the screen and select Settings. Meter Settings. - Page 145 Select Brightness. Set the brightness level. Select Save.
-
Page 146: Background Colour
7.8 Background Colour You can choose the background colour of the meter display to be either dark or light. Main Menu > Settings > Meter Settings > Background Color From the Main Menu, select Scroll the screen and select Settings. Meter Settings. - Page 147 Select Background Color. Choose the desired background colour. Select Save.
-
Page 148: Language
7.9 Language You can select a language for the screen text from a predefined list. Main Menu > Settings > Language From the Main Menu, select Scroll the screen and select Choose the desired language. Settings. Language. Select Save. -
Page 149: Time Block Settings
7.10 Time Block Settings Main Menu > Settings > Time Blocks This section is for changing the settings for individual time blocks when bolus advice is turned off. These time block settings include: Start time End time Target range NOTE It is recommended that you discuss possible updates to your time block settings with your healthcare professional prior to making changes. - Page 150 NOTE NOTE End time of a time block is the same as the Start Time Blocks cannot be time of its following time block. Only an End time can be selected if it is shaded. changed, which changes the Start time of the following The shading means time block.
- Page 151 Set the time. Select Next. Set the Upper value Edit any other time block Lower value. Select Save. (reference Step 3). Once all time blocks are complete, select Done.
-
Page 152: Adding A Time Block
7.11 Adding a Time Block This section is for adding a time block if bolus advice is turned NOTE off. It is recommended that you discuss possible updates to Before adding a time block, have the following information your time block settings with your healthcare professional available: prior to making changes. - Page 153 Main Menu > Settings > Time Blocks NOTE Time Blocks cannot be selected if it is shaded. The shading means bolus advice is turned on. If Time Blocks shaded, go to the Bolus Advice: Adding a Time Block section in the Changing Bolus Advice Settings chapter in this From the Main Menu, select...
- Page 154 NOTE Decrease the End time for the last time block by any amount in order to create a new time block. This creates a time block by splitting the last time block into two time blocks. Do not decrease the End time until it equals the Start...
- Page 155 NOTE End time of a time block is the same as the Start time of its following time block. Only an End time can be changed, which changes the Start time of the following time block. To change the Start time of the first time block, the time blocks must be reset.
- Page 156 Set the time. Select Next. Set the Upper value Edit any other time block Lower value. Select Save. (reference Step 7). Once all time blocks are complete, select Done.
-
Page 157: Deleting Time Blocks
7.12 Deleting Time Blocks This section is for deleting time blocks if bolus advice is turned NOTE off. There are two different methods for deleting time blocks. The first method deletes one or more time blocks by combining time It is recommended that you discuss possible updates to blocks. - Page 158 7.12.1 Deleting One or More Time Blocks This method of deleting one or more time blocks is accomplished by combining time blocks. Main Menu > Settings > Time Blocks NOTE Time Blocks cannot be selected if it is shaded. The shading means bolus advice is turned on.
- Page 159 NOTE For this example, the last three time blocks are combined into one time block. The target range values in this first time block selected are used in the resulting time block. Select the first time block Increase the End time until it Select Yes.
- Page 160 NOTE End time of a time block is the same as the Start time of its following time block. Only an End time can be changed, which changes the Start time of the following time block. Changing the End time of the last time block does not change the Start time...
- Page 161 Set the Upper value Edit any other time block Lower value. Select Save. (reference Step 6). Once all time blocks are complete, select Done.
- Page 162 7.12.2 Deleting a Single Time Block To delete a time block, decrease the time block’s end time until it equals its start time. Main Menu > Settings > Time Blocks NOTE Time Blocks cannot be selected if it is shaded. The shading means bolus advice is turned on.
- Page 163 Select the time block to Decrease the End time until it Select Yes. delete. equals the Start time. Select Next.
- Page 164 NOTE End time of a time block is the same as the Start time of its following time block. Only an End time can be changed, which changes the Start time of the following time block. Changing the End time of the last time block does not change the Start time...
- Page 165 Set the time. Select Next. Set the Upper value Edit any other time block Lower value. Select Save. (reference Step 6). Once all time blocks are complete, select Done.
-
Page 166: Resetting All Time Blocks
7.13 Resetting All Time Blocks This section is for resetting and re‑entering the settings for all of NOTE the time blocks if bolus advice is turned off. One reason for resetting the time blocks is to change the start time of the first It is recommended that you discuss possible updates to time block. - Page 167 NOTE Time Blocks cannot be selected if it is shaded. The shading means bolus advice is turned on. If Time Blocks shaded, go to the Bolus Advice: Resetting All Time Blocks section in the Changing Bolus Advice Settings chapter Select Time Blocks.
- Page 168 Set the Start time Set the default Upper value Select OK. Select a time block to edit time for the first time block. Lower value. Select Next. and continue to Step 9. If you Select Next. do not need to make any changes, select Done and the...
- Page 169 NOTE End time of a time block is the same as the Start time of its following time block. Only an End time can be changed, which changes the Start time of the following time block. Changing the End time of the last time block does not change the Start time...
- Page 170 Edit any other time block (reference Step 8). Once all time blocks are complete, select Done.
-
Page 171: Warning Limits: Hypo, Hyper
7.14 Warning Limits: Hypo, Hyper Main Menu > Meter > Warning Limits You can set blood glucose warning limits for hypoglycaemia (hypo) or hyperglycaemia (hyper) conditions. The meter displays the appropriate warning if your blood glucose result is below the hypo Select Meter on either the... - Page 172 Select Warning Limits. Set the Hyper limit and the Hypo limit. Select Save.
-
Page 173: Insulin Increment
7.15 Insulin Increment Insulin increment is the amount by which your insulin dose is adjusted when programming a bolus or when entering a manual logbook entry. The insulin increment can be set to either 0.5 or 1 U. Main Menu > Settings > Insulin Increment From the Main Menu, select Scroll the screen and select Choose the desired... -
Page 174: Max Bolus Amount
7.16 Max Bolus Amount Max bolus serves as a safety measure against unintended large Main Menu > Settings > Max Bolus boluses. It is a meter setting that specifies a maximum amount of insulin that can be delivered in any single bolus. A bolus that is From the Main Menu, select larger than the max bolus amount requires an additional Settings. - Page 175 Scroll the screen and select Set the Max Bolus amount. Bolus. Select Save.
-
Page 176: Carbohydrate Unit
7.17 Carbohydrate Unit You have a choice of different carbohydrate units (Grams, BE, KE or CC). Main Menu > Settings > Carbohydrate Unit NOTE The gram equivalents for KE, BE and CC can be changed using the Accu‑Chek 360° configuration software. The default gram equivalents are shown on the screen in Step 3. -
Page 177: Meter Reminders
Meter Reminders 8.1 Overview WARNING NOTE The meter will not display reminders while it is connected and Blood glucose is sometimes shortened to bG, but it means communicating to a Continua Certified manager. ® the same thing. - Page 178 bG Test Reminders: After Meal, After Low bG, After High bG After Meal reminds you to test after you mark a blood glucose After Meal Reminder and After Low bG Test Reminder: Select result as Before Meal. Snooze to reschedule the reminder in 5 minutes, or select Dismiss to end the reminder.
- Page 179 Alarm Clock Reminders: bG Test, Other, Basal Injection Medication Reminders A medication reminder can be used to let you know when it is Alarm clock reminders are a helpful way to remind you to test your blood glucose, or for any other daily appointment. time to take a medication.
-
Page 180: Blood Glucose Test Reminder: After Meal
8.2 Blood Glucose Test Reminder: After Meal Main Menu > Meter > bG Test Reminders > After Meal Select Meter on either the Select bG Test Reminders. Select After Meal. Set the Remind after time. To Main Menu or Status screen. change the tone, select Tone and continue to the next step;... - Page 181 NOTE Select to hear the tone. Scroll the screen for more tone choices. Choose a tone. Select Save. Select to activate the reminder. Select Save.
-
Page 182: Blood Glucose Test Reminder: After High Blood Glucose Result
8.3 Blood Glucose Test Reminder: After High Blood Glucose Result Main Menu > Meter > bG Test Reminders > After High bG Select Meter on either the Select bG Test Reminders. Select After High Set the threshold. Set the Main Menu or Status screen. Remind after time. - Page 183 NOTE Select to hear the tone. Scroll the screen for more tone choices. Choose a tone. Select Save. Select to activate the reminder. Select Save.
-
Page 184: Blood Glucose Test Reminder: After Low Blood Glucose Result
8.4 Blood Glucose Test Reminder: After Low Blood Glucose Result Main Menu > Meter > bG Test Reminders > After Low bG Select Meter on either the Select bG Test Reminders. Select After Low Set the threshold. Set the Main Menu or Status screen. Remind after time. - Page 185 NOTE Select to hear the tone. Scroll the screen for more tone choices. Choose a tone. Select Save. Select to activate the reminder. Select Save.
-
Page 186: Doctor Visit Reminder
8.5 Doctor Visit Reminder Main Menu > Settings > Reminders > Dr. Visit From the Main Menu, select Select Reminders. Select Visit. Set the date and time. To Settings. change the tone, select Tone and continue to the next step; otherwise go to Step 6. - Page 187 NOTE Select to hear the tone. Scroll the screen for more tone choices. Choose a tone. Select Save. Select to activate the reminder. Select Save.
-
Page 188: Lab Test Reminder
8.6 Lab Test Reminder Main Menu > Settings > Reminders > Lab Test From the Main Menu, select Select Reminders. Select Test. Set the date and time. To Settings. change the tone, select Tone and continue to the next step; otherwise go to Step 6. - Page 189 NOTE Select to hear the tone. Scroll the screen for more tone choices. Choose a tone. Select Save. Select to activate the reminder. Select Save.
-
Page 190: Customised Reminder
8.7 Customised Reminder Main Menu > Settings > Reminders > Customized NOTE If you previously named the reminder, the name is displayed instead of Customized. From the Main Menu, select Select Reminders. Select Customized. Settings. - Page 191 NOTE Select to hear the tone. Scroll the screen for more tone choices. Set the date and time. To Choose a tone. Select Save. To change the reminder change the tone, select Tone name, scroll the screen and and continue to the next step; select Edit Name;...
- Page 192 Delete the previous name. Select to activate the Type a name. Select reminder. Select Save.
-
Page 193: Alarm Clock Reminder
8.8 Alarm Clock Reminder Main Menu > Settings > Reminders > Alarm Clock From the Main Menu, select Select Reminders. Select Alarm Clock. Settings. - Page 194 NOTE To change this reminder: Select the field to change and Scroll the screen to refer to the instructions on display additional the following pages. When reminders. setup is completed, select Reminders that are Save. are shown with a green indicator. Select a reminder.
- Page 195 Alarm Clock Detail Entries Screens for Entries of an Alarm Clock Reminder The reminder type is displayed when the Type Type Time reminder occurs. Time The time of day the reminder occurs. The reminder occurs one time or every day Recurrence at the same time.
- Page 196 NOTE Recurrence Tone Select to hear the tone. Scroll the screen for more tone choices. Choose Once or Repeat. Choose a tone. Select Save. Select Save.
-
Page 197: Medication Reminder
8.9 Medication Reminder Main Menu > Settings > Reminders > Medication From the Main Menu, select Select Reminders. Select Medication. Settings. - Page 198 NOTE To change this reminder: Select the field to change and If you previously refer to the instructions on named the reminder, the following pages. When the name is displayed entries are completed, select instead of Medication. Save. Reminders that are are shown with a green indicator.
- Page 199 Medication Reminder Entries Screens for Entries of a Medication Reminder Time The time of day the reminder occurs. Time Recurrence Reminder occurs one time or every day at Recurrence the same time. Tone Choose a unique tone for each reminder. Edit Name Name the reminder.
- Page 200 NOTE Tone Edit Name Select to hear the tone. Scroll the screen for more tone choices. Choose a tone. Select Save. Delete the previous name. Type a name. Select...
-
Page 201: Communication
Communication 9.1 Overview The meter can communicate with a PC using a USB connection to control and share data, as well as send and receive data from Accu‑Chek 360º software or any compatible software. -
Page 202: Connecting The Meter To A Pc Using A Usb Cable
9.2 Connecting the Meter to a PC using a USB Cable Plug the smaller end of the Plug the larger end of the USB cable into the meter. USB cable into an available USB port on the PC. - Page 203 NOTE If the meter is already connected to a PC with a USB cable but is charging in idle status, you can establish a data connection. From the Main Menu, select Communication > Connect to The meter cannot be used to perform a bG test while connected to a PC.
- Page 204 NOTE If the meter does not respond automatically to being connected to a PC, select Connect to PC from the Communication menu. By selecting Charge only, the meter charges its battery through the USB connection and does not otherwise communicate with the PC. Select Set as default to not see this screen again in the...
- Page 205 When the meter successfully When the meter has battery charge screen connects to the PC, the completed transferring data, appears. After about Connected screen appears Complete screen 3 seconds, the meter screen and data transfer begins. Do appears. goes blank. Charging not disconnect the USB cable continues.
-
Page 206: Changing Usb Cable Connection Settings
9.3 Changing USB Cable Connection Settings Communication Settings menu allows you to choose what the meter does when you connect it to a PC with a USB cable. Main Menu > Communication > Settings From the Main Menu, select Select Settings. Communication. - Page 207 Option Description Connect to PC The meter automatically connects to the PC. The meter takes no immediate action upon being connected and charges the Charge only battery only. Prompt upon USB The meter prompts you to choose your desired communication setting upon connect being connected.
-
Page 209: Travel Settings
Travel Settings 10.1 Overview Most airlines and many governments ban the use of wireless NOTE radio devices during flight. Flight Mode enables the meter to comply with these regulations while retaining your ability to use Turning the Flight Mode on can also help to conserve the non‑wireless functions of the meter. -
Page 210: Turning On Flight Mode
10.2 Turning On Flight Mode Main Menu > Flight Mode From the Main Menu, select Select Flight Mode Select OK. Flight Mode. -
Page 211: Turning Off Flight Mode
10.3 Turning Off Flight Mode Main Menu > Flight Mode From the Main Menu, select Select Flight Mode off. Select OK. Flight Mode. -
Page 213: My Data
My Data 11.1 Overview Analysing your information stored in the meter is an effective way NOTE for you and your healthcare professional to determine how well you are controlling your diabetes. This analysis is a valuable tool Reviewing reports consumes battery power. It is for making improvements to your diabetes management. -
Page 214: The Logbook
11.2 The Logbook From the logbook records stored in the meter, you are able to The meter automatically stores up to 2,000 logbook records with view a specific blood glucose result with its attributes (e.g., meal the time and date. You can review up to the last 250 logbook time, carbohydrates, health event and bolus). - Page 215 Before reviewing logbook records or control results on a PC, the stored logbook records must first be transferred to a PC running a compatible software application. For product availability, contact Roche. Control results are not used in any report or graph on the meter.
- Page 216 11.2.1 Understanding the Logbook Meal time icon Health event icon Time of record Date of record Quick Notes icon Basal icon Indicates bG column Indicates bolus column Indicates carbohydrate column Blood glucose result...
- Page 217 Bolus type icon NOTE Carbohydrates icon Logbook screen displays the records in the order in Carbohydrate amount which they occurred with the most recent record shown on top. Carbohydrates advice accepted icon Bolus advice not accepted icon Carbohydrates advice not accepted icon Bolus advice accepted icon Bolus amount bG value range icon...
- Page 218 Icon descriptions Icon Icon name Description Icon background colour indicates where the blood glucose result falls within the target range. The background colours of this icon represent: Green: within target range bG Value Range Indicator Yellow: below target range Red: hypo Blue: above target range or hyper Meal time Icon is displayed when information exists for this record regarding meal time.
- Page 219 Icon Icon name Description Health event Icon is displayed when information exists for this record regarding health events. Basal insulin Basal insulin entered into your logbook record. Bolus advice accepted Bolus advice recommendation from the meter was accepted. Bolus advice not Bolus advice recommendation from the meter was changed prior to delivery.
- Page 220 11.2.2 Viewing and Adjusting Logbook Data Main Menu > My Data > Logbook NOTE Logbook data that has been used for bolus advice (with the exception of notes) cannot be adjusted. Blood glucose results cannot be adjusted. From the Main Menu, select Select Logbook.
- Page 221 NOTE Scroll down to view additional records if they are present. Logbook records which have been used for bolus advice contain either the Bolus advice accepted icon: or the Bolus advice not accepted icon: . These records are locked and can be viewed but not adjusted. Locked logbook records do not display the Save button...
- Page 222 Screens for Viewing and Adjusting Entries in the Logbook Meal Time Carbohydrates Health Events Choose applicable meal time. Set the amount of Choose up to four health If bolus advice is turned on Select Save. carbohydrates consumed. events. Select Save. and multiple health events Select Save.
- Page 223 NOTE Bolus Basal Insulin If a Carbohydrate Bolus is entered and no Carbohydrate Amount has been entered (Carbohydrates displays No Entry on the bG Record screen in Step 4), you are prompted to enter an amount for carbohydrates. An amount is not required, but the more complete the data the more accurate any future bolus advice recommendations are when using bolus advice.
- Page 224 11.2.3 Adding New Data to the Logbook Main Menu > My Data > Add Data Note Type a note to save with this Select Quick Notes to make record. Select an update. Select Note type a note using the keyboard. Select Back From the Main Menu, select Select...
- Page 225 Screens for Adding New Data Date and Time Meal Time Carbohydrates Select any of the options on Set the date and time. Select Choose an applicable meal Set the amount of Add Data screen and Save. time. Select Save. carbohydrates consumed. refer to the instructions on Select Save.
- Page 226 Health Events Bolus Choose up to four health If bolus advice is turned on Set bolus amounts. Select events. Select Save. and multiple health events Save. have been selected, this screen displays “‑‑‑ %”. You must enter a summarised health event percentage for the selected health events, even if this percentage is zero.
- Page 227 NOTE Basal Insulin Note If a Carbohydrate Bolus is entered and no Carbohydrate Amount has been entered (Carbohydrates displays No Entry on the Add Data screen in Step 3), you are prompted to enter an amount for carbohydrates. An amount is not required, but the more complete the data the more accurate any future bolus advice recommendations are when using bolus advice.
-
Page 228: The Trend Graph
11.3 The Trend Graph With the trend graph, the meter displays your blood glucose trends and other information using logbook data for the time scale and meal time you choose. 11.3.1 Understanding the Trend Graph Times of day or days of the month Hypo warning Red horizontal line... - Page 229 Moves forward or back in time by the Blue line: indicates the basal insulin Basal value time scale chosen. Example: For a amount Scroll 7‑day time scale, selecting the scroll Blood glucose Displayed as Xs and connected with left/right left icon shows the data from the result lines buttons...
- Page 230 NOTE If data is not available, the No Data Available screen is displayed. Trend graphs do not include corrupt results or control results. On the upper right side of the graph, the maximum bolus amount indicator is the pink tick mark with the largest value shown beside it (on this example screen: 15 U).
- Page 231 NOTE On the lower right side of the graph, the maximum carbohydrate amount indicator is the brown tick mark with the largest value shown beside it (on this example screen: 80 g). The purpose of this indicator is to adjust the scale for the bottom portion of the graph based on the single biggest carbohydrate amount (callout 4) for the time chosen (callout 6).
- Page 232 11.3.2 Viewing the Trend Graph Main Menu > My Data > Trend NOTE Select to view a list of trend icons and their explanations. From the Main Menu, select Select Trend. Select Configure Data. change how the trend graph displays your trend data.
- Page 233 When you have finished, select Back to return to the trend graph displaying your data in the manner you selected. Select any of the options on Configure Graph screen and refer to the instructions in the rest of this section.
- Page 234 Screens for Configuring the Trend Graph Time Scale Data Options Meal Time Select the time scale. Select Select one or more data Select the meal time. Select Save. options. Select Save. Save.
-
Page 235: The Standard Week
11.4 The Standard Week With the Standard Week graph, the meter displays your blood NOTE glucose averages, number of tests and standard deviations for each day of an average week, calculated using logbook data from The standard deviation measures how spread out the blood the time scale and meal time you choose. - Page 236 11.4.1 Understanding the Standard Week Graph and Table Standard Week Graph Days of week Indicates each blood glucose result. “X” in the centre of a circle indicates the average of all blood glucose results for the selected criteria. Time scale Meal time selection...
- Page 237 Moves forward or back in time by the The top of the box indicates the time scale chosen. Example: For a standard deviation above the Scroll 7‑day time scale, selecting the scroll average and the bottom of the box left/right left icon shows the data from the indicates the standard deviation buttons...
- Page 238 Standard Week Table Select Table to switch to the standard week table. The standard week table displays the same data as the standard week graph in table format. To return to the standard week graph from the standard week table, select Graph. Highest blood glucose result for each day of the week Blood glucose average for each day of the week...
- Page 239 11.4.2 Viewing Standard Week Data Main Menu > My Data > Standard Week NOTE If there is no data available to display the standard week graph and table for the time scale or meal time chosen, the No Data Available screen is displayed.
- Page 240 To change the time scale and Select either of the options meal time displayed for the on the Configure Data screen standard week, select and refer to the instructions Configure. in the rest of this section. Select Back when finished to return to the Standard Week graph or table.
- Page 241 Screens for Configuring Standard Week Data Time Scale Meal Time Select a time scale. Select Select a meal time. Select Save. Save.
-
Page 242: The Standard Day
11.5 The Standard Day With the Standard Day graph, the meter displays your blood glucose averages, number of tests and standard deviations for each time block, calculated using logbook data from the time scale and meal time you choose. NOTE NOTE Refer to the Changing Meter Settings chapter in this The standard deviation measures how spread out the... - Page 243 11.5.1 Understanding the Standard Day Graph and Table Standard Day Graph Time of day The top of the box indicates one standard deviation above the average and the bottom of the box indicates one standard deviation below the average. The box is not displayed if there is not enough data to determine Box for each standard deviation.
- Page 244 Moves forward or back in time by the Scroll time scale chosen. Example: For a 7‑day left/right time scale, selecting the scroll left icon buttons shows the data from the 7 days before the dates currently shown. Meal time selection Blood glucose unit of measurement Indicates each blood glucose result.
- Page 245 Standard Day Table Select Table to switch to the standard day table. The standard day table displays the same data as the standard day graph in table format. To return to the standard day graph from the standard day table, select Graph. Blood glucose average for each time block Lowest blood glucose result for each time block Time block...
- Page 246 11.5.2 Viewing Standard Day Data Main Menu > My Data > Standard Day NOTE If there is no data available to display the standard day graph and table for the time scale or meal time chosen, No Data Available screen is displayed. The standard day graph and table do not include corrupt results, control results, HI values or LO values.
- Page 247 Screens for Configuring Standard Day Data Time Scale Meal Time To change the time scale and Select either of the options meal time displayed, select on the Configure Data screen Configure. and refer to the instructions in the rest of this section. Select a time scale.
-
Page 248: Target Data
11.6 Target Data The meter displays a pie chart and table illustrating your blood glucose results as “Above”, “Within”, “Below” and “Hypo” for the time scale and meal time you choose. - Page 249 11.6.1 Understanding the Target Chart and Target Table Target Chart Legend Blood glucose result categories Represents the percentages for the Target chart blood glucose result categories Time scale Moves forward or back in time by the time scale chosen. Example: For a Scroll 7‑day time scale, selecting the scroll left/right...
- Page 250 Target Table Select Table to switch to the target table. The target table displays the same data as the target chart in table format. To return to the target chart from the target table, select Chart. Number of occurrences Meal time selection Legend Blood glucose result categories...
- Page 251 11.6.2 Viewing Target Data Main Menu > My Data > Target NOTE If there is no data available to display the target chart and table for the time scale or meal time chosen, the Data Available screen is displayed. The target chart and table do not include corrupt results, control results, or HI and LO results.
- Page 252 Screens for Configuring Target Data Time Scale Meal Time To change the time scale and Select either of the options meal time displayed, select on the Configure Data screen Configure. and refer to the instructions in the rest of this section. Select a time scale.
-
Page 253: The Bg Averages Table
11.7 The bG Averages Table The bG Averages table displays your blood glucose averages and standard deviations for the time scale and meal time you choose. NOTE The standard deviation measures how spread out the blood glucose results are from the blood glucose average. A high standard deviation means the blood glucose results vary greatly around the blood glucose average. - Page 254 11.7.1 Understanding the bG Averages Table Data for all test results marked as Other icon Other Data for all test results marked as Fasting icon Fasting Data for all test results marked as Bedtime icon Bedtime After meal Data for all test results marked as icon After meal Before meal...
- Page 255 Time scale Blood glucose standard Calculated for the meal time Moves forward or back in time by the deviation time scale chosen. Example: For a Scroll 7‑day time scale, selecting the scroll left/right Number of Used to calculate the averages and left icon will show the data from the buttons tests...
- Page 256 11.7.2 Viewing the bG Averages Table Main Menu > My Data > bG Averages NOTE If there is no data available to display the bG averages table for the time scale or meal time chosen, the No Data Available screen is displayed. Calculations do not include corrupt results, control results, HI values or LO values.
- Page 257 NOTE Select to view a list of meal time icons and their explanations. Select Time Scale to adjust Choose a time scale. Select Select Back when finished to the time scale of the bG Save. return to the My Data menu.
- Page 259 If you drop the meter or think it is not giving accurate results, contact Roche. Do not attempt to repair the meter yourself. If you have any questions about the care and maintenance of the...
- Page 260 Roche. the Changing Meter Settings chapter in this User’s Manual. Contact Roche to get a replacement battery and then follow the Only turn on the touchscreen tone and vibration features when steps in this section.
- Page 261 WARNING Follow these steps to prevent possible damage Battery to the meter contacts. Do not try to force the Meter battery into the meter. The Contacts battery only goes in one way. Open the battery door on the Align the new battery by Slide the (+) (‑) end of the back of the meter by pushing placing the (+) (‑) end as...
- Page 262 Put the battery door back in Charge the battery. See the After the battery is fully place and snap it closed by Charging the Battery charged, confirm the date pushing the battery door in section in the Startup and time are correct on either the direction of the arrow.
- Page 263 12.5 Cleaning the Meter Keep the meter free of dust. If you need to clean or disinfect it, follow these guidelines carefully to help you get the best Make sure the meter is performance possible. turned off. WARNING Do not allow any liquid to enter the slots in the meter Do not spray a cleaning solution directly onto the meter Do not immerse the meter in liquid...
- Page 264 NOTE Gently wipe the meter’s surface with a soft cloth You can use a standard slightly dampened (wring out touchscreen cleaning any excess liquid) with one of cloth for normal cleaning these cleaning solutions: of the touchscreen. 70 % isopropyl alcohol Mild dishwashing liquid mixed with water 10 % household bleach...
- Page 265 12.6 Touchscreen Calibration Calibrating the touchscreen can help improve the meter’s touch sensitivity. Main Menu > Settings > Meter Settings > Touchscreen > Screen Calibration From the Main Menu, select Scroll the screen and select Select Touchscreen. Select Screen Calibration. Settings.
- Page 266 NOTE Touchscreen calibration instructions only appear in English. Screen text: Briefly press Screen text: New calibration center of target. Repeat as settings calculated. Tap target moves around screen. screen anywhere to use new settings. Wait for 30 seconds to keep old settings. Restoring old settings in : 30 sec (countdown timer).
- Page 267 12.7 Meter Function Test If the meter display is faulty, or you cannot hear or feel the alerts, you can let the meter check the display, vibration and sound functions for proper operation. Main Menu > Settings > Meter Settings > Meter Function Test From the Main Menu, select Scroll the screen and select Settings.
- Page 268 Select Meter Function Test. Touch the screen where indicated.
- Page 269 Display Test Vibration Test Sound Test If the meter does not perform as described in the meter function test, contact Roche. The display cycles through The meter vibrates three The meter emits a sound. colours (red, blue, green and times.
- Page 271 NOTE For most problems, the meter displays a message with a short If you have a problem not included here, contact Roche. description of the problem and a proposed solution. This chapter If you drop the meter or think it is not giving accurate...
- Page 272 The power‑up cycle can take a minute or more. Resetting the meter does not require you to remove the battery. The display is damaged. Contact Roche. The meter is defective. Contact Roche. The temperature may be outside the Move the meter to an area with the proper temperature.
- Page 273 Battery must be The rechargeable battery has a The battery may need replacing. Contact Roche before attempting to charged more often limited number of charge cycles replace the battery. See the Changing the Battery section in the than it did when it was after which its charge capacity is Care and Maintenance chapter in this User’s Manual.
- Page 274 Meter Settings chapter in this User’s Manual. Perform a meter function test. See the Meter Function Test section in the Care and Maintenance chapter in this User’s Manual. If the meter function test indicates there is a problem with the sound, contact Roche.
- Page 275 Problem Possible Causes Possible Solutions Start time: Cannot The first time set up (Setup Wizard) To change the Start time for the first time block, select Reset on the change the Start time is already complete, and therefore Time Blocks screen.
- Page 276 Manual. If calibrating the touchscreen does not solve the problem, contact Roche. If the touchscreen is calibrated and you still think it is not operating properly, the following may help you know when a selection is made: Set up the touchscreen to emit a tone, vibrate, or do both.
- Page 277 Meter Settings chapter in this User’s Manual. Perform a meter function test. See the Meter Function Test section in the Care and Maintenance chapter in this User’s Manual. If the meter function test indicates there is a problem with vibration, contact Roche.
- Page 278 The power‑up cycle can take a minute or more. was removed and Resetting the meter does not require you to remove the battery. reinserted. If this does not solve the problem, contact Roche. E‑60 Internal clock error Contact Roche.
- Page 279 Information Messages Screen Message Possible Causes Possible Solutions Battery low is displayed while the meter is The computer USB port cannot charge the Charge the meter battery using a power plugged into a computer with a USB cable. meter battery. outlet.
- Page 280 Screen Message Possible Causes Possible Solutions Bolus too high The total bolus amount is greater than the Check the accuracy of all entries. If NOTE: This message can only occur if maximum allowed total bolus amount. The necessary, contact your healthcare bolus advice is turned off.
- Page 281 Screen Message Possible Causes Possible Solutions Insulin sensitivity not valid The insulin sensitivity is outside of the Check your entries and contact your acceptable meter range. healthcare professional to determine the appropriate settings. Invalid bolus advice times The acting time value is less than the The acting time value must be set equal to offset time value.
- Page 282 Screen Message Possible Causes Possible Solutions Invalid setting with the text Hyper value The hyper warning limit value must be Either reset the hyper warning limit so it is must be greater than time block target greater than all of your target ranges in the above the target ranges of your time blocks ranges.
- Page 283 NOTE: Code chip and activation If you continue to receive this message, contact chip are interchangeable and mean Roche to get a replacement activation chip. Turn the the same thing. meter off and exchange the activation chip with the replacement activation chip. If this does not solve...
- Page 284 Code Screen Message Possible Causes Possible Solutions M‑54 Drop too small Not enough blood or control Discard the test strip and repeat the test with a fresh solution was drawn into the test test strip and a fresh drop of blood or control solution. strip for measurement, or it was applied after the test had started.
- Page 285 Code chip missing The activation chip is not inserted Turn the meter off and insert the activation chip. If you into the meter. need an activation chip, contact Roche. NOTE: Code chip and activation chip are interchangeable and mean the same thing.
- Page 286 Warning Messages Code Screen Message Possible Causes Possible Solutions W‑75 Above hyper warning Your blood glucose result is above Treat high blood glucose as recommended by your limit the hyper warning limit set in the healthcare professional. meter. Consider rechecking blood glucose, ketones and insulin.
- Page 287 Code Screen Message Possible Causes Possible Solutions W‑80 Below hypo warning Treat low blood glucose as recommended by your Your blood glucose result is below limit the hypo warning limit set in the healthcare professional. meter. If bolus advice is turned on, the meter displays a recommended number of fast carbohydrates for you to eat.
- Page 288 Possible Solutions W‑85 Bolus advice data When bolus advice is enabled, this Wait 8 hours for accurate bolus advice. For additional assistance, contact Roche. reset warning is displayed when either: The logbook entries have been deleted, or Internal clock error E‑60 has...
- Page 289 Technical Information 14.1 Product Limitations 14.2 Specifications Read the literature packaged with the test strips and control Blood volume Refer to the test strip package insert. solutions for the latest information on product specifications and limitations. Sample type Refer to the test strip package insert. Test time Refer to the test strip package insert.
- Page 290 System Construction Hand‑held operating Refer to the test strip package insert. Protection conditions class Memory The Accu‑Chek Aviva Insight diabetes 2000 logbook records Meter type capacity manager is suitable for continuous operation. Control Automatic 2 minutes solution power off Refer to the control solution package insert. storage conditions One custom lithium‑ion rechargeable...
- Page 291 Electromagnetic Compatibility Test Principle The meter meets the electromagnetic emission requirements as Refer to the test strip package insert. per EN 61326‑2‑6. Its electromagnetic emission is thus low. Interference on other electrically‑driven equipment is not Bluetooth Wireless Technology ® anticipated. The meter utilises Bluetooth wireless technology to communicate Performance Analysis and transfer information.
- Page 292 Changes or modifications to the device not expressly approved by Communication Commission (FCC) standards. The device Roche could void the user’s authority to operate the device. complies with FCC Part 15 Rules. Operation of the device is The device has been tested and found to comply with the limits subject to the following two conditions: (1) this device may not for a Class B digital device.
- Page 293 14.3 Product Safety Information 14.4 Discarding the Meter WARNING WARNING Choking hazard. Small parts. Keep away from children under During blood glucose testing, the meter itself may come into the age of 3 years. contact with blood. Used meters therefore carry a risk of infection.
- Page 294 14.5 Explanation of Symbols These symbols may appear on the packaging, on the type plate, and in the User’s Manual for the meter. This product fulfils the requirements of the Consult instructions for use European Directive 98/79/EC on in vitro diagnostic medical devices.
- Page 295 14.6 List of Icons The icons and icon names in the meter are: Icon Name Icon Icon Name Icon About or Information Analyzing Active Background Color Active Insulin Backspace (Keyboard) Add Data Basal Insulin Advice Options (Bolus Advice) Basal Insulin Locked After Meal Battery (Power Level)
- Page 296 Icon Name Icon Icon Name Icon bG Value Range Hypo Battery Charging (Empty) bG Value Range Low Battery Charging (Full) bG Value Range Normal Battery Charging (Partial) Bolus Bedtime Bolus Advice Before Meal Bolus Advice Accepted bG Averages Bolus Advice Not Accepted bG or bG Test Bolus Advice Setting bG Value Range Above...
- Page 297 Icon Name Icon Icon Name Icon Bolus Locked Carbohydrates Not Accepted Bolus Menu Chart Cancel Communication or Radio Connection Capital Letters (Keyboard) Connect to PC Carbohydrate Unit Control Test Carbohydrates Data Carbohydrates Accepted Date and Time Delete Carbohydrates Locked...
- Page 298 Icon Name Icon Icon Name Icon Device Connect Exercise 1 Device Settings Exercise 2 Fasting Devices Flight Mode Display Brightness Done Flight Mode (Turn Off) Edit Name Flight Mode (Turn On) Error Graph Error Log Health Event...
- Page 299 Icon Name Icon Icon Name Icon Health Event (Custom) Locked Health Event Locked Logbook Help Logbook Locked Main Menu Home Screen Maintenance Message Illness Manage Devices (Pairings) Insulin Max Bolus Insulin Increment Meal Language...
- Page 300 Icon Name Icon Icon Name Icon Note Meal Time Note Locked Meal Time Locked Other (Meal Time) Meter Pair (New) Meter Function Test PC (Computer) Meter Information Pen/Syringe (Bolus) Mode Setting My Data Play Tone No Entry (Meal Time) Premenstrual...
- Page 301 Icon Name Icon Icon Name Icon Snack Quick Notes Sound (Volume) Radio Connection Sound and Vibrate Reminder Reset Timeblocks Standard Day RF (Radio Frequency) Signal Standard Week Save Status Screen Setup Mode Stress...
- Page 302 Icon Name Icon Icon Name Icon System Settings Touchscreen Settings Table Trend Graph Target Data Vibrate Temperature Warning Time Scale Warning Limits Timeblock Settings Touchscreen Calibration...
- Page 303 14.7 Guarantee 14.9 Information for Healthcare Professionals The statutory provisions on rights in consumer goods sales in the country of purchase shall apply. WARNING 14.8 Additional Supplies Healthcare Professionals: Follow the infection control procedures appropriate for your facility. Refer to the test strip Test Strips package insert for additional healthcare professional information.
- Page 304 14.10 Meter Information This information is primarily for technical support purposes and may be requested by support personnel. Main Menu > Settings > About > Meter Information From the Main Menu, select Scroll the screen and select Select Meter Information. To see additional meter Settings.
- Page 305 14.11 Error Log Error Log screen displays up to the last 50 Errors and Maintenance messages starting with the most recent entry. Main Menu > Settings > About > Error Log From the Main Menu, select Scroll the screen and select Select Error Log.
- Page 306 Scroll to view all Error Log records. Select an Error Log record to see its details.
- Page 307 14.12 Radio Frequency (RF) Signal This information is primarily for technical support purposes and may be requested by support personnel. Main Menu > Settings > About > Radio Frequency Signal NOTE If the meter is not paired to a device, the Radio Frequency Signal button...
- Page 308 The names of the radio frequency devices with the radio frequency signal strength of each are displayed.
- Page 309 14.13 Meter Range Limits and Defaults Data Type Unit of Measurement Increments Default Setting Acting Time HH:MM 01:30 08:00 00:15 04:00 After High bG Reminder HH:MM 01:00 06:00 00:15 04:00 Duration (Remind after) After Low bG Reminder HH:MM 00:05 00:30 00:05 00:15 Duration...
- Page 310 Data Type Unit of Measurement Increments Default Setting Insulin Basal Insulin Increment bG Result mmol/L 33.3 No Entry (‑ ‑ ‑ mmol/L) bG Threshold (After High bG mmol/L 19.5 Hyper Warning Limit Reminder) bG Threshold (After Low bG mmol/L Hypo Warning Limit Reminder) Insulin Bolus Insulin...
- Page 311 Data Type Unit of Measurement Increments Default Setting Carb Ratio (insulin) grams No Entry (‑ ‑ ‑ No Entry (‑ ‑ ‑ Carbohydrates No Entry (‑ ‑ ‑ No Entry (‑ ‑ ‑ Control Result mmol/L 33.3 No Entry (‑ ‑ ‑ mmol/L) Customized 1, 2 and 3 (health...
- Page 312 Data Type Unit of Measurement Increments Default Setting Exercise 1 ‑50 (health event) Exercise 2 ‑50 (health event) Hyper Warning mmol/L 10.0 19.4 16.6 Limit Hypo Warning mmol/L Limit Illness (health ‑50 event) Insulin Increment U...
- Page 313 Data Type Unit of Measurement Increments Default Setting Insulin Sensitivity mmol/L 55.4 No Entry (‑ ‑ ‑ mmol/L) (bG) Insulin Sensitivity (insulin) Lower value mmol/L (Target Range) 1 or 0.5 (per the insulin Max Bolus No Entry (‑ ‑ ‑ increment value) Meal Rise (bG)
- Page 314 Data Type Unit of Measurement Increments Default Setting Premenstrual ‑50 (health event) grams No Entry (‑ ‑ ‑ No Entry (‑ ‑ ‑ Snack Size (carbs) No Entry (‑ ‑ ‑ No Entry (‑ ‑ ‑ Stress (health ‑50 event) Upper value mmol/L 15.0...
- Page 315 Appendix A: Bolus Advice Overview Bolus Calculation The bolus recommended by the bolus advice feature of the meter Carbohydrate Bolus consists of two components: a recommendation for a A carbohydrate bolus is the amount of insulin that needs to be carbohydrate bolus that covers your food intake and a administered to cover the amount of carbohydrates you are recommendation for a correction bolus to adjust your blood...
- Page 316 Correction Bolus If your current blood glucose level is not within your target range, a correction bolus is recommended. Blood Glucose Limits 1. bG Result 2. Hyper Warning 3. Upper Target Limit 4. Target 5. Lower Target Limit 6. Hypo Warning Discuss your blood glucose limits with your healthcare professional.
- Page 317 The calculation for the recommended correction bolus depends on your current blood glucose result, your insulin sensitivity for the current time block, and whether you are planning to eat. Health event percentages are applied to the bolus advice recommendation. Example Bolus Advice Calculations Blood Glucose Level Without Food Intake (No Carbohydrates) Prior to a Meal...
- Page 318 Other Boluses Subsequent Carbohydrate Boluses Correction Bolus After a Meal If you are planning to eat several meals or snacks in a short After a meal, it is normal to allow for a rise of your blood glucose period of time, you should administer a carbohydrate bolus for level even if you administered the correct carbohydrate bolus.
- Page 319 Current bG Values Meal Bolus Bolus Not Required Currently Allowed bG Value: Meal Rise 1. bG Level 2. Hyper 3. Offset Time The dotted line shows how your blood glucose level might change after a carbohydrate bolus. Bolus advice tolerates an increase in your blood glucose level 4.
- Page 320 Subsequent Correction Boluses The difference between your current blood glucose level and your target blood glucose level is called Delta bG. A correction bolus administered according to the previous conditions covers this difference for a certain period of time. As the correction bolus starts to take effect, your current blood glucose level should fall and the covered Delta bG decreases after the offset time.
- Page 321 1. bG Result 2. Offset Time 3. Delta bG (Correction Insulin) 4. Correction Bolus 5. Acting Time 6. Time Subsequent Correction Boluses: If your blood glucose result is within Section A of the graph, a correction bolus is not recommended. If your blood glucose result is within Section B of the graph, a correction bolus is recommended.
- Page 322 Examples of Bolus Advice Recommendations The following graphs provide differing examples of how bolus advice considers different factors when calculations are made. The currently allowed blood glucose value considers the following factors: Target Range Mean Value Meal Rise Correction Bolus...
- Page 323 After a Correction Bolus Current bG Values Bolus Bolus Not Required Currently Allowed bG Value: Corrected bG 1. bG Level 2. Hyper 3. Offset Time 4. Acting Time 5. Corrected bG The above diagram shows an example of the effect of this rule. 6.
- Page 324 Current bG Values Bolus 1. bG Level 2. Hyper 3. Target Value 4. Target Range 5. Hypo 6. Time When a blood glucose result is greater than the currently allowed blood glucose value, a bolus is calculated (light blue) that only considers the difference between the current blood glucose value (orange dots) and the currently allowed blood glucose value (the top of the blue area).
- Page 325 Current bG Values Meal Bolus Bolus Not Required Currently Allowed bG Value: Meal Rise 1. bG Level 2. Hyper 3. Offset Time 4. Acting Time Subsequent Meals 5. Meal Rise 6. Target Value If you eat several meals in a row, the meal rise is restarted for 7.
- Page 327 Appendix B: Bolus Advice Calculations The Mathematical Basis for Bolus Calculations The following is a list of the most important formulas and the calculation principles on which bolus advice is based. It is difficult to accurately calculate a bolus yourself using these formulas when the acting time and offset time of recent meals and correction boluses are considered.
- Page 328 Carbohydrate Advice This calculation is made when the blood glucose result falls NOTE below the hypo warning limit. It is based on the other values A minimum amount of 12 g (or equivalent BE, KE or CC defined for the current time block and the result is calculated as a units) is always given.
- Page 329 Carbohydrate Bolus The following formula is used to calculate the bolus for meals: Carbohydrate Bolus = Carbohydrate Intake × Carbohydrate Ratio Where: Carbohydrate Ratio = Insulin ÷ Carbohydrates...
- Page 330 Currently Allowed Blood Glucose Value The target range average value used in the calculation of the When no meal rise or correction bolus acting time is currently in correction bolus, as shown below, changes with the definition for effect, a value of “0” is substituted for these parameters in the the time blocks.
- Page 331 Correction Bolus Generally, a correction bolus is only calculated if the current blood glucose value is above the hypo bG warning limit and outside the target range. If the current blood glucose value is above the target range, the currently allowed blood glucose value must also be exceeded.
- Page 332 Correction Bolus with Carbohydrate Intake Whenever carbohydrates have been entered, the related carbohydrate bolus is always offset against any (even negative) correction bolus. When a meal is eaten, the correction bolus is also calculated for blood glucose results that fall within the target range if: The current blood glucose result falls below the target range average value, or The current blood glucose result is above the currently allowed...
- Page 333 Glossary Term Definition The period of time from the start of a bolus until your blood glucose level is expected to return to the target Acting time level. A calculated value representing the effective amount of insulin currently in the body that is working to lower Active insulin blood glucose.
- Page 334 Term Definition Ante Meridiem (12‑hour clock notation for “before noon”) The amount of insulin delivered per hour that is required to cover your basal, meal‑independent insulin Basal rate needs. Bread Equivalent Reminders to retest your blood glucose after a high blood glucose result, after a low blood glucose result or bG test reminders after a meal.
- Page 335 Term Definition When enabled, bolus advice provides a suggestion for how much insulin should be delivered for a meal Bolus advice and/or to correct for a blood glucose level. °C Degrees Celsius (or Centigrade) Carbohydrate (or Carb) The amount of insulin necessary to account for a certain amount of carbohydrates. ratio Carbohydrates (or Carbohydrates include sugars and starches.
- Page 336 Term Definition Current time The time you set through the Settings menu and then in the Date and Time screen. Default The initial settings on the meter before you change or customise them. Discovery mode When your meter is “discoverable,” other Bluetooth devices can detect it, pair with it or connect to it. Dismiss Ends a reminder.
- Page 337 Term Definition Gigahertz Information about your current health status or activities (Exercise 1, Exercise 2, Stress, Illness, Premenstrual or Customized). Up to four health events can be selected and stored with a blood glucose Health event result. Each status or activity (health event) accounts for a certain percentage according to your settings and is used to adjust bolus advice recommendations.
- Page 338 Term Definition The amount in units (U) by which your insulin dose is adjusted when programming a bolus or when entering Insulin increment a manual logbook entry. Insulin sensitivity The amount of insulin necessary to lower your blood glucose by a certain amount. International Organization for Standardization Kohlenhydrateinheit (carbohydrate unit) Lanyard...
- Page 339 Term Definition The increase in blood glucose levels during or after meals that is considered normal within a certain range, Meal rise even though a bolus has been delivered. Information about the time point of a blood glucose result (before meal, after meal, bedtime, fasting or Meal time other).
- Page 340 Term Definition Personal Identification Number Post Meridiem (12‑hour clock notation for “after noon”) Quick Notes A logbook entry that can quickly be saved from the Main Menu or Status screen. A bG test reminder setting. The amount of time after a high blood glucose result, after a low blood glucose Remind after result or after a meal you want the reminder to occur.
- Page 341 Term Definition Snack size The snack size defines a threshold of carbohydrates above which a meal rise is triggered. Snooze Reschedules a reminder to reoccur in a preset amount of time (for example, in 5 minutes). As it is used in this User’s Manual, standard deviation measures how widely spread the blood glucose Standard deviation results are (e.g., if the bG results are close to the bG average, then the standard deviation is small).
- Page 342 Term Definition Touchscreen A screen that can be touched to interact with the device. Units (insulin units) Universal Serial Bus Warning Describes items and conditions that present hazards and may cause personal injury. Warning limit See Hyper warning limit or Hypo warning limit.
- Page 343 Index blood glucose result adding information 52 acting time detailed bG result 51, 52 description 45 screen 50 setting 39, 94, 123 status bar descriptions 59 activation chip 6 understanding blood glucose results 58 active insulin 83, 326 unusual blood glucose results 62 advice options 39, 45, 123 blood glucose testing 47 blue text 3...
- Page 344 bolus advice calculations connecting meter to a PC with USB cable 196 carbohydrate advice 322 Continua Certified manager 171, 284 carbohydrate bolus 309, 323 control solution 65, 67 correction bolus 310, 325 control solution bottle 7 correction bolus with carbohydrate intake 326 control test currently allowed blood glucose value 324 out‑of‑range results 70...
- Page 345 error log 299 home screen error messages, troubleshooting 272 description 8 set as main menu or status screen 134 hyperglycaemia symptoms 64 hyper warning limit 35, 165 flight mode 204, 205 hypoglycaemia symptoms 64 function test 261 hypo warning limit 35, 165 guarantee 297 icon list 212, 289 information messages, troubleshooting 273...
- Page 346 language 34, 142 meal time 53, 81, 216, 219, 228 lanyard attachment point 5 memory expansion port 5 LO 61 meter logbook cleaning 257 adding new data 218 discarding 287 function test 261 adjusting data 214 information for technical support 298 description 208 maintenance 253 record description 208...
- Page 347 navigation 16 radio frequency signal 286, 301 note, description 3 reminders after high blood glucose test 172, 176 after low blood glucose test 172, 178 after meal blood glucose test 172, 174 offset time alarm clock 173, 187 description 45 basal injection 173, 189 setting 39, 94, 123 bG test 173, 189...
- Page 348 scroll bar 9, 16 target chart 243 setup wizard 31, 33 target range 36, 93, 97, 103, 109, 113, 117, 119, 145, 149, 150, signal suspension 132 155, 159, 162, 163 snack size target table 244 description 45 test strip setting 39, 94, 123 description 7 sound, mode 130...
- Page 349 time blocks, bolus advice on vibration adding a time block 99 mode 130 changing start time, end time, target range, carbohydrate ratio touchscreen 136 or insulin sensitivity 95 volume buttons 5 deleting time blocks 105 resetting all time blocks 115 time blocks, explanation of 42 warning, description 3 time format 34...
- Page 351 Distributed in the United Kingdom by: Roche Diabetes Care Limited Charles Avenue, Burgess Hill West Sussex, RH15 9RY, United Kingdom Accu‑Chek Pump Careline UK Freephone number: 0800 731 22 91 ROI Freephone number: 1 800 88 23 51 calls may be recorded for training purposes Some mobile operators may charge for calls to these numbers.
- Page 352 The Bluetooth word mark and logos are registered trademarks ® owned by Bluetooth SIG, Inc. and any use of such marks by Roche is under license. All other product names and trademarks are the property of their respective owners.
Need help?
Do you have a question about the Accu‑Chek Aviva Insight and is the answer not in the manual?
Questions and answers