
Subscribe to Our Youtube Channel
Related Manuals for Bellfires BSV 19


Summary of Contents for Bellfires BSV 19
- Page 1 Bellfires ® BSV Models: BSV 19 BSV 21 BSV 25 BSV 28 BSV 36 SLEEPY HOLLOW CHIMNEY SUPPLY, LTD. 85 Emjay Blvd. Brentwood, New York 11717 1-800-553-5322 • FAX 631-231-2364 www.sleepyhollowsupply.com • www.bellfiresusa.com...
-
Page 2: Important Safeguards And Precautions
Bellfires® BSV IMPORTANT SAFEGUARDS AND PRECAUTIONS ® A properly installed Bellfires BSV fireplace and its associated components form a safety tested system. This manual serves as a guide for the proper and safe installation ® of a Bellfires fireplace. It does not serve as a substitute for the necessary professional judgment and skills of a trained installer. -
Page 3: Table Of Contents
Bellfires® BSV Table of Contents Important Safeguards and Precautions Introduction Essential Components BSV Parts BSV Exploded Views BSV Spider Damper Parts Safety Guidelines BSV Steps to Installation Measure Old Fireplace 14,15 BSV Firebox Dimension and Liner Size Charts BSV Smoke Dome Customization BSV and Super Flex Installation 18–34 BSV Spider Damper... -
Page 4: Introduction
Bellfires® BSV Introduction Early fireplaces were very inefficient, drawing a good deal of to improve the design. the heat up the chimney while admitting an unbearable amount of smoke into the room. In the late 1700’s, Benjamin Sleepy Hollow Chimney Supply has optimized the Bellfires® Thompson, Count of Rumford, recognizing that a fireplace designs, and produced a superior radiant firebox combining heats an area by radiation, began a series of experiments... -
Page 5: Essential Components
Bellfires® BSV Essential Components of a BSV Installation BSV 19 BSV 21 BSV 25 BSV 28 BSV 36 5”– 6” 6” – 7” 7” – 8” 8” 9” – 10” 10” 12 ” 12 ” 14 ” 14 ” 13 ”... -
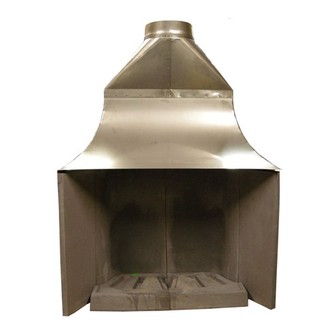
Page 6: Bsv Parts
Bellfires® BSV Component Identification Standard Bellfires® Super Vent Parts Rumford Smoke Dome (supplied) SS Lintel Hollow Wool Gasket (supplied) Refractory Firebox (supplied) Two Refractory Flares (supplied) 8” are standard with the option of ordering 12” wide flares Two Piece Refractory Hearth (supplied) -
Page 7: Bsv Exploded Views
Bellfires® BSV 19 Exploded View BSV 19 15 ” 18 ”... - Page 8 Bellfires® BSV 6”–7” 7”–8” 3” 3 ” 12 ” 12 ” 11 ” 11 ” BSV 25 BSV 21 Tall: 59 ” Tall: 56 ” 28” 25” 13 ” 13 ” 54 ” 51 ” 25 ” 28 ” BSV 21 BSV 25 Tall: 30 ”...
- Page 9 Bellfires® BSV 9”–10” 8” 4” 14 ” 3 ” BSV 36 18” 14 ” Tall: 64” 12” BSV 28 Tall: 61 ” 42 ” 16” 31” 13 ” 56 ” 59” 8 -12” 28 ” BSV 28 Tall: 33 ” 28 ”...
-
Page 10: Bsv Spider Damper Parts
Bellfires® BSV BSV Spider Damper Parts 1- Drop In Damper 28' Stainless Steel Cable 1 -Bracket 2 -Hammer Drive Pins 1- Stainless Steel Sash Chain 1 -Stainless Steel Ring (attach to chain) 1 -Stainless Steel Clamp (attach to cable) You need..Ladder Hammer Drill 1/4 inch Masonry Drill Bit... -
Page 11: Safety Guidelines
Bellfires® BSV Safety Guidelines Bellfires® fireplaces are not approved for use in mobile homes. There must be an air space clearance between the outermost portion of any section of the chimney system and any combustible surface. Although two inches is a typical clearance, adhere to the requirements set forth by the chim- ney manufacturer. - Page 12 Bellfires® BSV...
-
Page 13: Bsv Steps To Installation
Bellfires® BSV Steps to a Bellfires® BSV Installation Measurement Demolition and prep for new BSV Install Layout for Super Flex® new BSV Finish trim Install & facade new BSV... -
Page 14: Measure Old Fireplace
Bellfires® BSV (1) Measure Old Fireplace There are 6 Steps to a SuperVent installation. Measuring fireplace (depth Measure old fireplace to determine what of fireplace cavity) size BSV unit to use, and the appropriate liner size. Demolition of firebox and smoke chamber Plumb down to floor from front edge of smoke and preparation for the new BSV. - Page 15 Bellfires® BSV Flue size: Chimney height: Firebox: Metal Masonry Offset: Right Left Back Chimney top access:...
-
Page 16: Bsv Firebox Dimension And Liner Size Charts
Bellfires® BSV BSV Firebox Dimension and Liner Size Charts Bellfire Quick Reference Chart Models BR21, 25, and 28 (includes tall) Use this chart to determine which BSV model to install. SS Flue LIner to Fireplace Opening Ratio Use this chart to determine the liner size to use for your BSV model installation. -
Page 17: Bsv Smoke Dome Customization
Bellfires® BSV Notes on the Bellfires® Rumford Smoke Dome In other installation information that has circu- lated on BSV installations references were made to using stainless steel elbows off of the Smoke Dome for chimneys with offsets. Sleepy Hollow’s custom fabrication shop makes any dome to the exact dimensions required for your installation. -
Page 18: Bsv And Super Flex Installation
Bellfires® BSV (2) Demolition and Preparation for BSV Possibilities for installations are practically endless. Once you have prepared the firebox and chase for placement of the Bellfires® BSV firebox you are ready to trace the dimen - sions of the box and flares on the hearth floor. - Page 19 Bellfires® BSV Preparing the customer’s home for installation of Bellfires® BSV fireplaces is very important. Care should be taken to ensure that your customer’s home is protected from the process the installa- tion requires. Cover interior walkways with weather appropriate materials–snow and rain create problems that never come up when working in dry weather .
- Page 20 Bellfires® BSV Checking fit with a card- board template, a job that is much easier with cardboard than refractory. Once the firebox and smoke chamber are ready for place- Slipping on ment of Super Flex® liner and Super Skin. the Bellfires® Super Vent, its time to prepare the Super Wrapping Super Vent liner.
- Page 21 Bellfires® BSV Installing Super Flex® can be done from either the top or bottom of the chimney. Sleepy Hollow introduced to the industry the concept of winching–something that no other lining system had con- sidered. The Super Winch® simplifies flex liner installa- tion in situations where it is possible to use it.
- Page 22 Bellfires® BSV Insulating Smoke Dome Wrap Cera-Foil® around Smoke Dome. Notice that Smoke Dome can be laid on Cera-Foil and “rolled” to maximize the area covered by a single cut of blanket. Use either Super Cement or Spray Glue to adhere blanket to Dome.
- Page 23 Bellfires® BSV Tape all seams. See Catalog for: Completely wrapped and insu- Cordless Electric Rivet lated Smoke Dome waiting to Gun pg. 92 be riveted to Super flex liner Ultimate Hand Rivet Gun pg. 92 Cordless Angle Drill pg. 90 Insulated Smoke Dome being riveted to insulated Super Flex®...
- Page 24 Bellfires® BSV !!!IMPORTANT NOTE!!! Other installation informa- tion circulating on the The nice thing about using the Super Bellfires® has indicated it is Winch is that it will patiently hold Super possible to use stainless Flex in place until you are ready to lower it elbows between flex liner onto the Bellfires®...
- Page 25 Bellfires® BSV Smoke Dome and liner wiched into place, just a few inches above from where it will be lowered onto the installed Bellfires® firebox. The card- board template can be used to check for placement of the firebox and to be sure the Smoke Dome can be lowered and properly seated on the firebox.
- Page 26 Bellfires® BSV Insulating Bellfires® firebox Lay the Bellfires® firebox on its face. Unroll Cera- Foil blanket insulation over the back, from one edge to the other. Carefully cut with a sharp knife. Completely cover all the rear surface area and tape all seams with Cera-Foil®...
- Page 27 Bellfires® BSV Cutting of Bellfires® refracto- ry components is possible and many times necessary. If you will only be doing limit- ed Bellfires® installations it is possible to get by cutting flares and hearth extensions with circular saws and grinders fitted with diamond blades.
- Page 28 Bellfires® BSV The shiplap edge of the flare is buttered with Super Cement®. The back side of the flare should be insu- lated with Cera-Foil.
- Page 29 Bellfires® BSV The buttered, insulated flare is fitted to the fireback. A rubber mallet can be used to tap the flare to the fireback. Wipe off any Super Cement that seeps out of the connec- tion shiplap joint. Mix coarse pea size perlite with light masonry cement at a ratio of 7:1 (7 perlite, 1 masonry cement).
- Page 30 Bellfires® BSV Before pouring mixture, make sure the 1" Cera-Foil is snugged against back of firebox. Pour mixture behind firebox, tamping lightly inbetween pours. Be sure the mix is at least level with the height of the firebox. Place Cera-Foil gasket on top of refractory firebox.
- Page 31 Bellfires® BSV You are now ready to lay the hearth. Lay hearth piece (or pieces if two piece) on Cera-Foil blanket, trace outline and cut out the resulting piece and lay it on the floor of the fireplace. Place the rear refractory hearth piece down on the Cera-Foil.
- Page 32 Bellfires® BSV If you will be cutting the hearth piece by hand with a grinder, etc., you will need to carefully mark all four sides to be able align all cuts. Marked and ready to be cut.
- Page 33 Bellfires® BSV Bricking up the face. Adding the final backfill of perlite. Finishing up the face and cleaning up construction mess. Many possi- bilities exist for finish work to dress up the fireplace facade.
- Page 34 Bellfires® BSV Installing Bellfires® lintel Place lintel up against fire- place face. This will cover any space between the Smoke Dome and the fireplace face. Drill ” holes for each Super Rivet and then install rivets. Using the Super Brute to do the heavy duty job of installing Super Rivets.
-
Page 35: Bsv Spider Damper
Bellfires® BSV Spider Damper 25-2 25-1 25-3 25-4 25-5 Super Vent® chimney liner After the Super Flex® chimney liner has been installed, but before the chimney cap is placed, the BSV top mounted Spider Damper must be installed. The Spider Damper is placed in the top section of the Super Vent® chimney liner. - Page 36 Bellfires® BSV Spider Damper 26-1 3” 20” 26-4 26-3 Hearth 26-2 Now, go back inside to the BSV firebox. Take the "L" bracket (Part #23) and place it at wall of firebox (26-1) about 20" from hearth and no less than 3"...
-
Page 37: Build The Best Fire In The World
THIS TYPE OF FIRE IS NOT RECOMMENDED FOR from each tier of wood will always travel up through THE FIRST EIGHT TO TEN FIRES. BELLFIRES® MUST the flame and burn, thereby reducing particulate pollu - BE GRADUALLY BROKEN IN AND CURED WITH tion and unburned fuel. -
Page 38: Operation & Maintenance
Operating Instructions & Maintenance BSV Operating Instructions & Fireplace & Chimney Maintenance Keep These Instructions Chimney Maintenance for Future Use CREOSOTE–Formation and Need for Removal NEVER USE GASOLINE, GASOLINE-TYPE When wood is burned slowly it produces tar and other organic vapors which combine with expelled moisture LANTERN FUEL, KEROSENE, CHARCOAL- to form creosote. -
Page 39: Warranty
Bellfires® BSV CONDITIONS OF WARRANTY LIFETIME WARRANTY Bellfires® Manufacturing Company extends the following warranty on the BSV, sub- ject to the conditions of guarantee thereon. The fireplace is warranted for the life- time of the original owner from the date of installation. If examination by the Bellfires®...
Need help?
Do you have a question about the BSV 19 and is the answer not in the manual?
Questions and answers