Mercedes-Benz Comand Operating Instructions Manual
Hide thumbs
Also See for Comand:
- Operating instructions manual (298 pages) ,
- Operator's manual (271 pages) ,
- Supplement manual (190 pages)

Related Manuals for Mercedes-Benz Comand


Summary of Contents for Mercedes-Benz Comand
- Page 1 COMAND Operating Instructions É2075847501YËÍ 2075847501 Order no. 6515 7920 13 Part no. 207 584 75 01 Edition A-2016...
- Page 2 Symbols Publication details In this Operator's Manual you will find the fol- Internet lowing symbols: Further information about Mercedes-Benz WARNING vehicles and about Daimler AG can be found Warning notes make you aware of dangers on the following websites: which could pose a threat to your health or http://www.mbusa.com (USA only)
- Page 3 This will help you to obtain the maximum pleasure from your COMAND system and to avoid endangering yourself and others. The equipment level and functions of your COMAND system may differ depending on:...
-
Page 5: Table Of Contents
Contents Index ............4 Overview and operation ..... 19 Introduction ......... 14 System settings ........39 Vehicle functions ........ 53 Navigation ........... 63 Telephone .......... 111 Online and Internet functions ..147 Radio ..........165 Media ..........177 Sound ..........205 SIRIUS Weather ........ -
Page 6: Index
Index Alternative Route ........ 92 1, 2, 3 ... Ambient lighting 360° camera Setting (COMAND) ......54 Displaying images ......58 Armrest Settings ........... 58 Adjusting (COMAND) ....... 56 911 emergency call ......113 Audio CD/DVD and MP3 mode Switching to (Rear Seat Entertain- ment System) ........ - Page 7 ..........136 Rear Seat Entertainment System ... 227 Camera Selecting the screen ...... 228 360° camera (COMAND) ....58 Rear view camera ......59 Car pool lanes ........68 Date format, setting ......43 Category list (music search) .... 188 Day design, setting ......
- Page 8 ........183 Favorites (Internet) ......162 Removing/ejecting (Rear Seat Favorites button ........49 Entertainment System) ....232 Fuel consumption (COMAND) .... 56 DVD video Rear Seat Entertainment System ... 235 DYNAMIC SELECT Configuration via the controller ..60 Google™ Local Search Configuration via the DYNAMIC Calling up Local Search ....
- Page 9 Index Locator lighting Surround sound ......208 Heading up (navigation) ....101 Setting (COMAND) ......55 Lumbar support Home address Adjusting (COMAND) ....... 56 Entering and saving ......71 Incident (traffic report) ....... 94 Selecting map content ....100 Intermediate destinations Map (navigation) Accepting for the route ....
- Page 10 Ending the connection ....153 gation announcements ....31 Establishing a connection ....152 Alternative route ......92 Further Mercedes-Benz Apps ..158 Avoiding an area ......104 Manually setting the access data Basic settings ........66 of the mobile phone network pro- Blocking a route section affected vider ..........
- Page 11 Saving a contact ......126 Real-time traffic reports ..... 94 Searching for a contact ....124 Rear Seat Entertainment System Symbol overview ......124 Active COMAND source ....239 Phone call Adjusting sound settings ....230 Dialing ........... 119 Adjusting the brightness ....230 Picture viewer Adjusting the color ......
- Page 12 Index Setting route options (avoiding: Massage programs (COMAND) ..57 highways, toll roads, tunnels, fer- Resetting settings ......58 ries) ..........67 Seat functions (COMAND) ....56 Setting the route type (short Selecting for adjustment route, fast route, dynamic route or (COMAND) ........
- Page 13 Importing/exporting data ....49 Reconnecting a mobile phone Language ......... 48 automatically ......... 117 Text reader speed ......44 Rejecting a call (COMAND) .... 119 Time ..........41 Safety notes ........112 Time zone ........41 Sending DTMF tones ...... 121 Voice Control System ......
- Page 14 Index Reading .......... 140 Reading aloud ........ 141 Vehicle settings Settings ......... 138 Calling up ......... 54 Storing the sender as a new Video address book entry ......144 see Video DVD Using a phone number in the text .. 144 Video DVD Using text templates ......
- Page 15 Index Connecting a device via WPS PBC (USA) ..........46 Connecting a device via WPS PIN (CANADA) ........46 Connecting a device via WPS PIN (USA) ..........46 Connecting the device ..... 45 Selecting a hotspot ......45...
-
Page 16: Introduction
8 inches when operating COMAND. (20 cm) and more between the radiator and a person's body (excluding extremities: hands, COMAND calculates the route to the destina- wrists, feet and legs.) tion without taking account of the following, for example:... - Page 17 Further information on pro- operate the equipment. tection against theft can be obtained from an Canada only: The wireless devices of this authorized Mercedes-Benz Center. vehicle comply with Industry Canada license- exempt RSS standard(s). Operation is subject to the following two conditions:...
- Page 18 COMAND/mbrace equipment is required, and access to the vehi- cle or the EDR is needed. In addition to the If the vehicle is equipped with COMAND or vehicle manufacturer, other parties that have mbrace, additional data about the vehicle’s the special equipment, such as law enforce-...
- Page 19 Your COMAND equipment These operating instructions describe all standard and optional equipment available for your COMAND system at the time of pur- chase. Country-specific differences are pos- sible. Please note that your COMAND system may not be equipped with all the features described.
- Page 21 Overview ..........20 Touchpad ..........25 Basic functions ........30 Character entry (telephony) ....32 Character entry (navigation) ....33 Favorites ..........35...
-
Page 22: Media
Controller and buttons ( page 24) COMAND consists of: the display the COMAND control panel with a single drive or DVD changer the controller and buttons the touchpad two connection options for USB devices or via Media Interface in the center console ®... -
Page 23: Sirius Weather
! Do not use the space in front of the dis- Internet browser play for storage. Objects placed here could Mercedes-Benz Apps with Google™, damage the display or impair its function. Local Search, Destination/Route down- Avoid any direct contact with the display load, Facebook, Google Street View™,... - Page 24 Overview Below it you will see the main display field. The climate control status display is briefly displayed when you operate the climate con- trol system. The example shows media playback in SD memory card mode. Cleaning instructions ! Do not touch the display. The display has a very sensitive high-gloss surface;...
-
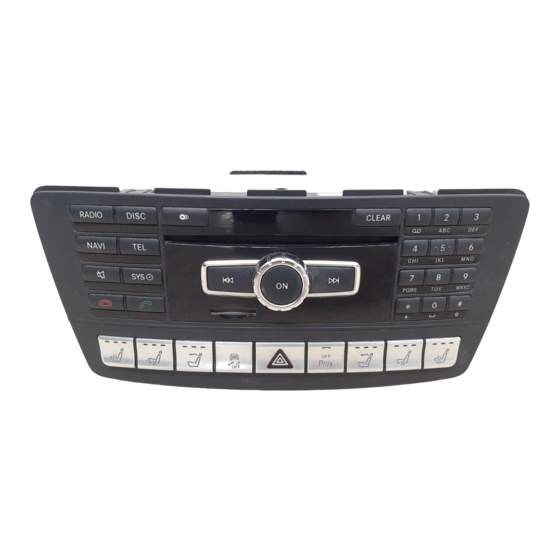
Page 25: Control Panel
Overview COMAND control panel Function Page Function Page Switches to radio mode Selects the next station from the station list Calls up the Radio menu Skips forwards to a track Switches to the last selec- Fast forward ted media mode... -
Page 26: Back Button
To exit the menu: briefly press the % on/off button. button. For AMG vehicles: the controller is equipped COMAND changes to the next higher menu with buttons : and ?. level in the current operating mode. To call up the basic display: press the % button for longer than two seconds. -
Page 27: Clear Button
Touchpad Clear button To delete individual characters: briefly press the $ button on the control panel. Briefly press the j clear button on the controller. To delete individual characters: briefly press the $ button on the control panel. To delete an entire entry: press and hold Touch-sensitive surface the $ button on the control panel. -
Page 28: Calling Up Quick Access For Audio And Telephone
Touchpad Hiding the quick access for audio and Use one finger to touch the touch-sensitive telephone surface. Glide your finger up, down, to the left or right. The selection in the display moves in accordance with the direction of move- ment. -
Page 29: Touchpad
Touchpad Moving the map Touch the touch-sensitive surface with two fingers, spaced slightly apart. Glide your fingers away from each other. The map scale is magnified. Zooming out of the map Use one finger to press the touch-sensitive surface until you reach the pressure point. The crosshair is shown. -
Page 30: Character Suggestions
Touchpad Character suggestions To exit the menu To return to handwriting recognition Character recognized To use the phone book or text templates Character suggestions To change the input line or the position of To select a character suggestion: turn the the cursor controller. -
Page 31: Changing The Input Language For Handwriting Recognition
Touchpad Searching in lists Press the touchpad. A symbol is shown. The phone book search is used as an exam- To select p: glide your finger to the left ple. or right and press. You determine the first letter of the contact To select the desired input line: glide up or you are looking for with the first character you down and press. -
Page 32: Basic Functions
Press the q control knob. When you switch on COMAND, a warning message will appear. COMAND calls up the previously selected menu. If you switch off COMAND, playback of the current media source will also be switched off. Adjusting the volume Call up quick access ( page 26). -
Page 33: Traffic Announcements
Press the W or X button on the mul- appears. tifunction steering wheel. To switch navigation announcements You can set the volume for navigation back on: switch COMAND off and then on announcements to be different from the again ( page 30). volume of the respective media source. -
Page 34: Entering Characters
Character entry (telephony) To show the menu: slide 4 the con- To select Tel/®: slide 5 and press the controller. troller. The menu for the selected functions The communication menu appears. Phone appears. Depending on the operation, the is at the front. marking is shown in main function bar (top) To select Internet, for instance, turn and or menu bar (bottom). - Page 35 Switches the character bar to upper-case or lower-case letters Characters (orange-color) entered by Changes the country setting for the user the character bar Characters YORK automatically added by Deletes a character or an entry COMAND...
- Page 36 5 and press the controller. Slide 5 the controller repeatedly until the Selected character : is entered in the character bar disappears. upper line. COMAND adds the missing Turn and press the controller. characters and shows the entry that best matches the current input.
-
Page 37: Adding
Favorites Favorites Symbol Function Overview of favorites Deletes a character/an entry è Switches to keyword search page 72) 4, 5 Selects the input line 2, 3 Moves the cursor within the input line ¬ Confirms an entry & Cancels input To add a new favorite ( page 35) To rename a selected favorite... -
Page 38: Deleting
Favorites To select Reassign: turn and press the To show the menu bar: slide 6 the con- controller. troller. The categories for the available favorites To select Rename: turn and press the con- are displayed. troller. Navigation Enter characters using the controller. Entertainment To finish the entry: select OK. - Page 39 Favorites To select Yes: turn and press the controller. The favorite is deleted. To select No: turn and press the controller. The process is canceled.
- Page 41 Your COMAND equipment ....40 Important safety notes ....... 40 Display settings ........40 Time settings ........41 Text reader settings ......44 Voice Control System settings ..44 WiFi ............44 Bluetooth ® settings ......48 Setting the system language ..... 48 Calling up the favorite functions ..
-
Page 42: Setting
Setting the brightness These operating instructions describe all standard and optional equipment available The brightness detected by the display light for your COMAND system at the time of pur- sensor affects the setting options for this chase. Country-specific differences are pos- function. -
Page 43: Date
This function is activated when the vehicle leaves the factory. The display is set perma- Night Mode Press the Ø button on the COMAND nently to night design. control panel. Auto If the... - Page 44 The changeover to summer time advan- ces the time by one hour. Press the Ø button on the COMAND control panel. Press Vehicle in the main function bar.
- Page 45 Setting the time and date format Year/ YY/MM/DD Use this function to set the time and date for- Month/Day mat for all displays in the vehicle. date format, Press the Ø button on the COMAND year (two dig- control panel. its) YYYY/MM/DD Year/ Press Vehicle in the main function bar.
-
Page 46: Voice Control System
Activate WiFi on COMAND and WiFi on the The # dot indicates the current setting. device you wish to connect. If COMAND is to be used as a WiFi hotspot: Voice Control System settings COMAND must be connected to an Inter- ®... -
Page 47: Wifi
The WiFi menu appears. To select the Activate O option: press the controller. Available WiFi hotspots are searched for and displayed. Press the Ø button on the COMAND control panel. Connecting the device Press Vehicle in the main function bar. General notes The vehicle menu is displayed. - Page 48 WiFi To select WiFi: turn and press the control- Press the Ø button on the COMAND ler. control panel. The WiFi menu appears. A search for hot- spots is carried out. Press Vehicle in the main function bar. To select a hotspot: turn and press the The vehicle menu is displayed.
- Page 49 Connect via WPS PBC. The vehicle is displayed with the SSID HOTSPOT XXXXX. Press the Ø button on the COMAND To confirm the entry: press the controller. control panel. Connecting a device via WPS PBC (Can- ada) Press Vehicle in the main function bar.
-
Page 50: Bluetooth Settings
Setting the system language Changing the name of the SSID (USA) in order to be connected to COMAND. Every ® Bluetooth device has its own specific Blue- ® tooth name. ® Bluetooth technology is a standard for short-range wireless data transmissions up to approximately 10 meters. -
Page 51: Calling Up The Favorite Functions
Calling up the Favorites function using the Voice Control System, English will be the controller: selected. Press the Ø button on the COMAND Press the favorites button on the controller. control panel. The favorites are displayed. To select the desired function, e.g. -
Page 52: Importing/Exporting Data
PIN protection for you. Alternatively, you can deactivate PIN protection by resetting your personal COMAND data page 51). Importing/exporting data Press the Ø button on the COMAND control panel. Press Vehicle in the main function bar. The vehicle menu is displayed. -
Page 53: Reset Function
Mercedes-Benz is not liable for any loss of If you select the process is canceled. data. Reset function You can reset COMAND to the factory set- tings. Amongst other things, this will delete all personal COMAND data. These include: Station presets Entries in the destination memory... - Page 55 Your COMAND equipment ....54 Important safety notes ....... 54 Vehicle settings ........54 Seats ............ 56 360° camera ........58 Rear view camera ........ 59 DYNAMIC SELECT ........ 59...
-
Page 56: Calling Up
To select the desired vehicle setting: These operating instructions describe all standard and optional equipment available turn and press the controller. for your COMAND system at the time of pur- The main area with the setting element is chase. Country-specific differences are pos- active. - Page 57 Vehicle settings Setting the color Setting the delayed switch-off time Call up Vehicle Settings page 54). Interior lighting delayed switch-off To select Ambient Light Color: turn and The interior lighting is activated for the dura- press the controller. tion of the delayed switch-off time when the The setting element is active.
-
Page 58: Seat Functions
For further information on energy consump- Selecting the adjustment function tion, see the vehicle Operator's Manual. and seat Press the Ø button on the COMAND control panel. Displaying the fuel consumption A bar graph displays the fuel consumption. To select... - Page 59 Seats To change the setting: slide 4 or 1 Classic Massage the controller. Single and twin waves moving upwards The change will be visible in the setting ele- across the entire back ment. Mobilizing Massage To exit the menu: press the % button. Mobilization via stronger single and twin waves moving upwards across the entire back...
-
Page 60: Settings
You are always responsi- Press the Ø button on the COMAND ble for safe maneuvering and parking. Make control panel. sure that no persons or animals are in the maneuvering range. -
Page 61: Rear View Camera
Drive system Suspension This function activates the rear view camera when reverse gear is engaged. Steering Press the Ø button on the COMAND Climate control control panel. ECO start/stop function In a few countries, the ECO start/stop Press Vehicle in the main function bar. -
Page 62: Configuration Via The Dynamic Select Controller
DYNAMIC SELECT For AMG vehicles, you can press DYNAMIC To select Drive, Suspension, Steering, SELECT to configure the following settings for Climate Control Eco Start/Stop Individual drive program: Function: turn and press the controller. Drive system To select Drive, Suspension Trans‐... - Page 63 DYNAMIC SELECT You can choose from the following settings for the ECO start/stop function: Switches the ECO start/stop function Unlit Switches the ECO start/stop function Setting options (AMG vehicles) You can choose from the following settings for the drive: Race Comfort Sport Sport +...
- Page 65 Your COMAND equipment ....64 Introduction ......... 64 Basic settings ........66 Destination entry ........ 69 Personal POIs and routes ....82 Route guidance ........87 Real-time traffic reports ..... 94 Storing destinations ......98 Map functions ........100 Navigation functions ......107 Problems with the navigation sys- tem .............
-
Page 66: Gps Reception
Digital maps do not cover all areas nor standard and optional equipment available all routes in an area. For example, a route may for your COMAND system at the time of pur- have been diverted or the direction of a one- chase. Country-specific differences are pos- way street may have changed. -
Page 67: Introduction
Introduction Entry restriction Calling up the map while navigation mode is switched on: For vehicles in certain countries, there is a From any menu, press the ß button. data entry restriction. The navigation menu appears. Entries can be made when the selector lever Press the controller. -
Page 68: Moving
If there has been no route calculated, Requirement: the map is in full screen mode, COMAND uses the selection as the new the menu is faded out ( page 65). basic setting. -
Page 69: Basic Settings
A route may include a ferry, for instance, even though Avoid Ferries is ena- bled. COMAND will notify you of this visually and through a navigation message. To switch to navigation mode: press the Ø button. To show the menu: slide 6 the control- ler. -
Page 70: Car Pool Lanes
TION ASSIST displays a warn- tion Assist ing in the multifunction dis- play, a message appears in the COMAND display when driving on a highway. This can help you start a rest stop To switch to navigation mode: press the search. -
Page 71: Address Entry Menu
You must observe the legal requirements for unusual street name. the country in which you are currently driving While entering an address, you can also when operating COMAND. switch to other destination entry options: Destination entry may be blocked while driv- Keyword search ( page 72) ing, depending on the country specifications. - Page 72 Destination entry Entering an address To select Town: press the controller. Enter the city, e.g. York. Then call up The example shows you how to enter a city, the list and select an entry. Proceed in the street and house number for an address, e.g. same way as when entering a street.
-
Page 73: Destination Entry
As "My While route calculation is in progress, an Address". arrow will indicate the direction to your COMAND stores your home address under destination. Once the route has been cal- My Address in the list of contacts. culated, route guidance begins. If the vehi-... -
Page 74: Keyword Search
Destination entry Selection Continue: If Calculate Alter‐ The keyword search is used to help find des- native Routes is activated, alternative tinations using fragments of words. If you routes are calculated ( page 67). You can enable the appropriate setting in the search display these and select them for route options, the keyword search is tolerant of errors (... -
Page 75: Selecting Search Options
The number of ada): a mobile phone must be connected exact/total hits is shown in brackets. ® via Bluetooth page 114) or USB page 196) with COMAND. Further search results are displayed, if Search and/or Fuzzy Search are activated in the search options ( page 73). -
Page 76: Selecting An Address Book Con Tact As A Destination
Contacts. Select the destination. The address entry menu appears, showing the contact and associated destination address. COMAND automatically stores the last 50 To start route calculation: select Start destinations. To switch to navigation mode: press the Selecting a destination from POIs Ø... - Page 77 Destination entry To switch to navigation mode: press the Ø button. To show the menu: slide 6 the control- ler. To select Destination: turn and press the controller. Select From POIs.
-
Page 78: Defining The Position For The Poi Search
Destination entry Defining the position for the POI search Selection Instructions Near Destination Call up the POI menu ( page 74). (when route guidance is To select Near Destination: turn and press the controller. active) Select a POI category ( page 77). -
Page 79: Selecting
Position and after entering another city. Requirement for "Calling up POI": a mobile Turn and press the controller. phone must be connected to COMAND The G symbol after an entry shows that page 114). further categories are available. Requirements for "Viewing the vicinity of the Select a sub-category. - Page 80 78) and select the POI. To show the menu: slide 6 the control- Calling up a POI ler. Select Call. To select Destination: turn and press the If a phone number is available, COMAND controller. switches to the telephone function. Select Using Map.
-
Page 81: Creating
You can also map the route to the destination yourself by entering up to four intermediate destinations. The sequence of the intermedi- ate destinations can be changed at any time. COMAND provides a selection of predefined To select a POI category or Other : turn and POIs in eight categories, e.g. - Page 82 Select a personal POI If the intermediate destination has a tele- Card page 85). phone number and a mobile phone is con- From Enter a destination nected to COMAND ( page 114), the call Mercedes- from Mercedes-Benz is connected. Benz Apps Apps ( page 82).
-
Page 83: Editing
Destination entry Editing intermediate destinations Accepting intermediate destinations for the route You can perform the following functions: To select Start in the intermediate desti- change intermediate destinations nations menu: press the controller. switch the sequence of the intermediate The route is calculated with the entered destinations in the intermediate destina- intermediate destinations. - Page 84 Select From Mercedes-Benz Apps. every country. Please observe the country- The list of Mercedes-Benz Apps appears. specific regulations and always drive at a suit- able speed. Personal POIs are filed in categories: Using geo-coordinates...
-
Page 85: Settings For Personal Pois
Personal POIs and routes Alert when approaching Settings for personal POIs Displaying on the map Requirement: an SD memory card with per- sonal POIs is inserted ( page 183). Requirement: an SD memory card with per- If the vehicle is approaching a personal POI, sonal POIs is inserted ( page 183). -
Page 86: Saving
To Memory Card: turn and press route based on a different map from the the controller. one used by COMAND. Points on the route Enter the name. may therefore be situated off the digital Select a category. roads. For this reason an imported route... -
Page 87: Personal Pois And Routes
If a large number of entries are stored, a reg- ler. ister for quick selection appears. Personal If a mobile phone is connected to COMAND POIs and routes can be saved and sorted with and the telephone number is available, the different character sets (e. -
Page 88: Recording The Route
To select Destination: turn and press the if route recording is started manually, it controller. must be finished manually before COMAND Select From Memory Card. is switched off (e. g. when the engine is switched off). -
Page 89: General Notes
For this purpose, the ommendations. relevant times must be correctly stored in the database. COMAND calculates the route to the destina- tion without taking account of the following, for example: Change of direction traffic lights... -
Page 90: Lane Recommendation
(white dot) Change of direction (turn right here) Distance to the next change of direction COMAND announces the imminent change of The image shows an example of route guid- direction. The change of direction is ance at a highway intersection when driving announced ahead of time, with the announce- on a highway. - Page 91 Route guidance Calling up the selection mode Possible lane ;: you will be able to complete the next change of direction in this lane. Recommended lane =: in this lane you will be able to complete the next change of direc- tion and the one after that.
- Page 92 Internet access page 149) Canada: view the vicinity of the destina- tion if street images are available and a mobile phone is connected to COMAND ® via Bluetooth page 114) or USB page 196)
-
Page 93: Route Guidance Continue
Select +: turn and press the controller. COMAND automatically switches the naviga- tion announcements back on when: a new route is calculated. you switch COMAND on again or start the engine. A navigation message is given if the route is recalculated during dynamic route guidance due to new traffic reports ( page 94). -
Page 94: Alternative Route
149) ler. Canada: view the vicinity of the destina- To select Route: turn and press the con- tion if street images are available and a troller. mobile phone is connected to COMAND Select Alternative Route. ® via Bluetooth page 114) or USB Route 1 is shown. -
Page 95: Off-Road
The COMAND system is unable to assess these factors or take them into consideration. Route guidance to an off-road destina-... -
Page 96: Real-Time Traffic Reports
COMAND is able to guide you to a destination Real-time traffic reports on the map even from an off-road location. -
Page 97: Real-Time Traffic Reports
Real-time traffic reports Traffic symbol information Traffic jam on the route Affected roads with indication of direction Slow-moving traffic on the route Symbol for report type, e.g. traffic flow Road blocked message Traffic disruption To switch to navigation mode: press the Traffic warning Ø... -
Page 98: Real-Time Traffic Report
Real-time traffic reports To select Details: turn and press the con- The report shows the following information: troller. State/province, road and display of the The report shows the following information: affected direction State/province, road and display of the Section of the road to which the traffic affected direction report applies Section of the road to which the traffic... -
Page 99: Reading Out Traffic Reports
To cancel the read-aloud function: select To select Traffic: turn and press the con- Cancel Read-Aloud Function. troller. COMAND reads out the current report and then exits the read-aloud function. To select Traffic Information On Map: turn and press the controller. -
Page 100: Saving
Adding to a contact the current vehicle position or the crosshair position, if these are saved personal routes If the memory is full, COMAND overwrites the oldest destination. You can save destinations permanently in the address book ( page 98) and on an SD memory card ( page 99). -
Page 101: Storing Destinations
To switch to navigation mode: press the ß button. When the map is shown, press and hold the COMAND controller until you hear a tone. The current vehicle position is saved to the "Last destinations" memory. If an SD memory card is inserted, the cur-... -
Page 102: Map Settings
Map functions To switch to navigation mode: press the of, support of or advertising by these compa- nies for the navigation system itself. ß button. To show the menu: slide 6 the control- ler. Map settings To select Destination: turn and press the controller. -
Page 103: Heading
Map functions Selecting map orientation Map orien- Explanation tation North Up 0 The map view is displayed so that north is always up. Heading ¤ The map view is aligned to the direction of travel. The direction of travel is always at the top;... -
Page 104: Selecting Text Information On The Map
Map functions Custom Symbols allows symbols to be For further information on range, see the vehi- selected from other/all available catego- cle Operator's Manual. ries. To switch to navigation mode: press the Turn and press the controller. ß button. You have the option of selecting symbols to To show the menu: slide 6 the control- be displayed O or not displayed ª... -
Page 105: Rotating The 3D Map
To select Options: turn and press the con- troller. Select Content. Select Version. Information on the current map version is shown. COMAND displays the navigation map in the globe. This allows for a realistic map display free from distortion in all map scales. -
Page 106: Avoiding An Area
Entry. General notes If you select Using Map, the map with crosshair appears. COMAND enables you to avoid areas you do If you select Address Entry, the address not wish to drive through. entry menu appears where you can enter... - Page 107 Map functions To select an area: when the map with To select Display/Change: press the con- troller. crosshair appears, press the controller. The map with the crosshair appears. A red square appears on the map, symbol- izing the area to be blocked. The area currently blocked is displayed as a red square.
-
Page 108: Updating
For North American countries, it is possible to update the map data for COMAND free of You can display the SIRIUS XM service infor- charge for a period of three years. Information mation. -
Page 109: Navigation Functions
If you start the update with the engine switched off and the starter battery has insufficient power, COMAND may automatically switch off. This protects the battery. In order to prevent this, a suitable power supply to the vehicle must be maintained. -
Page 110: Info On Navigation
Navigation functions The current direction of travel with bear- ing (360 degree format) and compass direction Longitude and latitude coordinates in degrees, minutes and seconds Height (rounded off) above sea level Number of GPS satellites from which a signal can be received To select Show on Map: turn and press the... -
Page 111: Problems With The Navigation Sys
Continue route guidance manually ( page 91). Problem Possible causes/consequences and M Solutions COMAND is unable to COMAND has to redetermine the position of the vehicle if the determine the vehicle's vehicle has been transported. position. Example: After transporting the vehicle by ferry After transporting the vehicle by motorail Start the vehicle and pull away. - Page 112 Check the readability of the data medium, e.g. in a PC. To restart the update: insert the DVD. Insert an SD memory card or USB stick. COMAND asks for an activation code during the map update. The code must be validated in the vehicle. Switch on the ignition.
-
Page 113: Telephone
Your COMAND equipment ....112 Important safety notes ..... 112 General notes ........112 Telephone menu overview ....113 Connecting/disconnecting a mobile phone ........114 Setting the reception and trans- mission volume ......... 118 Using the telephone ......119 Phone book ........123 Address book ........ -
Page 114: Interface
These operating instructions describe all standard and optional equipment available for your COMAND system at the time of pur- General notes chase. Country-specific differences are pos- sible. Please note that your COMAND system... -
Page 115: Emergency Call
If no bars are shown, reception is either very a mobile phone network is available poor or there is none at all. the mobile phone is connected to COMAND Receiver icon shows whether a call is active/ ® via Bluetooth... -
Page 116: Telephony
Connecting/disconnecting a mobile market are equally suitable. You can obtain phone more detailed information about suitable mobile phones and about the connection Prerequisites between the mobile phone and COMAND on the Internet at ® For telephony via the Bluetooth interface, www.mercedes-benz-mobile.com. -
Page 117: Searching For A Mobile Phone
Searching for a mobile phone Authorizing a mobile phone (connect- ing) Before using your mobile phone with COMAND for the first time, you will need to search for the phone ( page 115) and then authorize it ( page 116). Depending on the... -
Page 118: Authorizing A Mobile Phone (Con Necting)
COMAND and for the A code is displayed in COMAND and on the ® PBAP and MAP Bluetooth profiles individ- mobile phone. -
Page 119: Establishing The Connection From The Mobile Phone
Depending on the mobile phone can start the search on your mobile phone. used, you may have to confirm the connection Mobile phone: start the search for a Blue- to COMAND and for the PBAP and MAP Blue- ® tooth device (see manufacturer's operat- ®... -
Page 120: Displaying Connection Details
To close the detailed display: slide 9 Mercedes-Benz USA, LLC recommends de- the controller. authorization in COMAND and on the mobile phone. Subsequent authorization may other- wise fail. Setting the reception and transmis- To call up the telephone menu: press the sion volume % button. -
Page 121: Making A Call
Using the telephone To select Conn. Device: turn and press Rejecting a call the controller. To select Reject: turn and press the con- The device list appears. troller. To highlight the desired mobile phone in the device list: turn the controller. Press ~ on the multifunction steering To select G: slide 9 the controller. -
Page 122: Functions Available During A Call
Using the telephone Using call lists To select Speed Dial Preset List: turn and press the controller. To call up the telephone menu: press the The speed dial list is displayed. % button. To select an entry and make a call: turn and To switch to the menu bar: slide 6 the press the controller. -
Page 123: Sending Dtmf Tones
Using the telephone Adding a call Sending DTMF tones This function is not supported by all mobile phones. Answering machines or other devices can be controlled by DTMF tones, e.g. for remote query functions. If you would like to listen to the messages on your answering machine, for example, dial the corresponding number. -
Page 124: Call Waiting
Using the telephone Switching between the calls To select Conference in the telephone menu: turn and press the controller. Press 6 on the multifunction steering The new participant is included in the con- wheel. ference call. Conference is displayed in the telephone menu. -
Page 125: Calling Up
Phone book Rejecting: These contacts will remain there even when you connect COMAND to a different mobile To select Reject: turn and press the con- phone. You can view these contacts even troller. without a mobile phone. Press ~ on the multifunction steering wheel. -
Page 126: Searching For A Contact
Æ Contact that has been entered, edi- firming with the controller each time. ted or saved on COMAND. To end the search: select ¬. \ Contact with voice tag The contacts in the phone book are dis- These contacts have also been played. -
Page 127: Adding Information To A Contact
Phone book Using the touchpad Adding a new contact You determine the first letter of the contact you are looking for with the first character you enter. Draw the letter on the touchpad surface. The first contact with the selected first character is highlighted in the phone book. -
Page 128: Saving A Contact
No.: turn and press up automatically after the mobile phone is the controller. connected to COMAND. To select a category for the number, e.g. To call up the telephone menu: press the Home: turn the controller and press to con- % button. -
Page 129: Introduction
Familiarize yourself with the address book plays the copy ¥ with the changed data. functions before beginning your journey. You can use COMAND when the road and traffic conditions permit. You could otherwise Deleting a contact become involved in an accident in which you You can delete contacts that have been or others could be injured. -
Page 130: Calling Up
Address book To select Search: turn and press the con- Before selling your vehicle, delete the troller. contacts saved in COMAND using the reset function ( page 51). To select characters: turn the controller and press to confirm. The first contact with the selected first... -
Page 131: Adding A New Contact
Adding a new contact You can enter address data directly into the address book. If you store telephone num- bers in the COMAND phone book, these are also saved in the address book. If you store a navigation destination, COMAND creates an Call up the address book ( page 128). -
Page 132: Adding Information To A Contact
Address book Adding information to a contact Making a call A maximum of five telephone numbers can be Call up the address book ( page 128). saved for one contact. To select a contact: turn and press the con- troller. Call up the address book ( page 128). -
Page 133: Changing The Category Of An Entry
Address book Displaying sub-entry information Changing the category of an entry Call up the address book ( page 128). Call up the address book ( page 128). Select an entry: turn and press the control- Select an entry: turn and press the control- ler. -
Page 134: Automatically Importing Contacts From The Phone
Search for an address book entry with a up automatically after the mobile phone is voice tag ( page 128). connected to COMAND. To select G: slide 9 the controller. Connect a mobile phone ( page 114). To select... -
Page 135: Importing Contacts
Source Prerequisites Saving or editing the contact data on Memory card The SD memory card is COMAND does not change the contacts on inserted. It contains the mobile phone. If automatic download- importable contact details. ing of phone contacts is activated, COMAND displays the copy ¥... -
Page 136: Deleting Imported Contacts
To switch to the menu bar in the telephone vCards (vcf files) may be located in the main menu or the address book: slide 6 the directory or in folders. COMAND allows you controller. to select the relevant folders directly. -
Page 137: Call Lists
You can also call up the list of dialed calls If you connect a different mobile phone to by pressing the 6 button when the tele- COMAND, the call lists from the new mobile phone menu is shown. In this case, the list phone are displayed. -
Page 138: Book
Call lists To call up the telephone menu: press the To select G: slide 9 the controller. % button. To select Save: turn and press the control- To switch to the menu bar: slide 6 the ler. controller. Select Entry. To select Call Lists: turn and press the... -
Page 139: Speed Dial Deleting
Speed dial lists Select Continue. To select G: slide 9 the controller. The address book is displayed. Select Assign Speed Dial Preset. Search for the desired contact and high- The phone book is displayed. light ( page 128). Search for a contact ( page 124). -
Page 140: Calling Up The Settings Menu
Messages (text messages and e-mails) To select G: slide 9 the controller. To read and write e-mails in COMAND, the e- mail account first needs to be configured To select Delete All Speed Dial Pre‐ page 139). sets: turn and press the controller. -
Page 141: Account
All Messages The e-mail account is now configured. E- mails can now be received and sent in All the messages are displayed. COMAND. New Messages Only the messages that are new on the Deactivating the e-mail function mobile phone are displayed. -
Page 142: Reading
Messages (text messages and e-mails) To select G: slide 9 the controller. Reading messages To select Own E-Mail Address: turn and In the message menu press the controller. The input menu for entering your own e- mail address is displayed. Downloading messages manually To call up the telephone menu: press the % button. -
Page 143: Displaying Details
Displaying details and phone numbers The message is displayed. To scroll through the message or select COMAND can also show a shortened sender phone numbers in the text: turn the con- display in full. troller. To call up the telephone menu: press the The display scrolls up or down line by line, % button. -
Page 144: Writing
Messages (text messages and e-mails) COMAND contains templates which you Writing text messages can use when writing your messages Writing a new text message page 143). To send the text message: select OK. Answering a text message Observe the requirements for the message function ( page 138). -
Page 145: Forwarding
Entering text and sending e-mails To select an input line for text: select 5 in the character bar. Enter characters. COMAND contains templates which you can use when writing your messages page 143). Displays text templates To send the e-mail: select OK. -
Page 146: Editing Text Templates
Messages (text messages and e-mails) Editing text templates To select a usable telephone number while the message is displayed: turn the control- ler. To select Use: press the controller. To select Call: turn and press the control- ler. The call is made. It is possible that a highlighted numerical sequence may not contain a telephone number. -
Page 147: Deleting
To select Delete: turn and press the con- troller. To select Yes: turn and press the controller. The message is deleted from the mobile phone and COMAND. To select No: turn and press the controller. The process is canceled. This delete function is not supported by all mobile phones. - Page 149 Your COMAND equipment ....148 Important safety notes ..... 148 General notes ........148 Conditions for access ....... 149 Setting up an Internet connection (Canada) ..........149 Establishing/ending the connec- tion ............. 152 Google™ local search ....... 153 Destination/route download ... 155 Further Mercedes-Benz Apps ...
- Page 150 These operating instructions describe all cle is in motion standard and optional equipment available for your COMAND system at the time of pur- The connection may be lost if: chase. Country-specific differences are pos- the mobile phone network coverage is sible.
-
Page 151: Conditions For Access
® connected via Bluetooth page 114) with current Internet connection. Therefore, you COMAND. If you are using Internet access for cannot establish an Internet connection dur- the first time, you must enable the connected ing a service call. mobile phone for Internet access Canada: a mobile phone must be connected page 149). -
Page 152: Selecting
Setting up an Internet connection (Canada) To select Configure Internet Set‐ If the mobile phone network provider pro- tings: turn and press the controller. vides multiple access data options, the rele- The device list is displayed. vant access data still has to be selected. This depends on the data package used, for exam- To select Search for Bluetooth... -
Page 153: Calling Up The Device List
Setting up an Internet connection (Canada) phone network provider to obtain the precise Input field Meaning access data. Auto DNS: Automatic allocation of Explanation of the access data DNS servers is activated. Input field Meaning If the function is deactiva- ted, the DNS server Phone Num‐... -
Page 154: Editing
A connection can be established by: To select G: slide 9 the controller. To select Change Configuration: turn entering a web address and press the controller. calling up the Mercedes-Benz mobile web- Select Predefined Settings Manual site Settings. calling up a Mercedes-Benz App The provider settings are displayed. -
Page 155: Google™ Local Search Calling Up Local Search
To select the scissors symbol: turn and press the controller. If the mobile phone Internet connection is Detailed connection status canceled, COMAND tries to reconnect. You To call up the telephone menu: press the should therefore always close the connection % button. -
Page 156: Entering A Search Position And Search Term
154). based on the shortest distance. You will first need to register COMAND Further information on how to make use of a before you can use the Internet functions. search result ( page 154). -
Page 157: Procedure And General Informa Tion
Select "Send to car". To select Search history: turn and press Select Mercedes-Benz as the vehicle the controller. brand. The most recent search queries are dis- Enter the mbrace e-mail address or the played. vehicle identification number. -
Page 158: Displaying Destinations In The Vehicle
To select Details: turn and press the con- The menu with the Internet functions is dis- troller. played. The destination address is shown. To select Mercedes-Benz Apps: turn and press the controller. Using a destination for route guidance To select Download POI: turn and press the controller. -
Page 159: Deleting A Destination From The Server
Select Import. The menu with the Internet functions is dis- The entry is saved on the SD card. played. To select Mercedes-Benz Apps: turn and Deleting a destination from the server press the controller. To select Download POI: turn and press Destinations on the server are automatically the controller. -
Page 160: Mercedes-Benz Apps
You cannot delete the Mercedes-Benz Mobile Website menu. To be able to use Mercedes-Benz Apps, you first have to register. To do so, you have to enter your name and postal address once in Calling up Mercedes-Benz Apps the vehicle and confirm the general terms and conditions. -
Page 161: Web Browser
Internet pages cannot be shown while the Press the % button for longer than two vehicle is in motion. seconds. The Mercedes-Benz Apps menu or the Internet menu appears. Entering a web address Resetting adjustments With the reset function, all Mercedes-Benz Apps settings are reset to the factory set- tings. -
Page 162: Menu Functions
Web browser To close the website: select &. Navigating the website To call up the previous website: select Step Result To call up the next website: select u. Turn the control- Navigates from one ler. selectable item (e.g. To refresh the website: select Î. link, text field or The website is refreshed. - Page 163 Web browser To show the menu: press the % but- Settings ton. Overview To select 3: turn and press the control- ler. To show the menu: press the % but- A menu appears. The # dot indicates the ton. current setting. To select 3: turn and press the control- Select Zoom.
-
Page 164: Creating Favorites
Web browser Changing settings Option Function To select the desired setting: turn and Deletes all personal press the controller. data. Switch the setting on O or off ª. Deletes data in the Cache Changing the character size or character cache. code. -
Page 165: Favorites Menu
Web browser Deleting favorites Adding to favorites To call up the menu: press the % button. Press the % button. The last function called up appears. To select 3: turn and press the control- ler. Select TEL/® in the main function bar by sliding 5, turning and pressing the con- Select Add to Bookmarks... -
Page 167: Radio
Your COMAND equipment ....166 Switching on the radio ..... 166 Overview ..........166 Setting the waveband ....... 167 Station ..........167 Tagging music tracks ....... 169 Displaying the artist and track ..169 Calling up sound settings ....169 Displaying information ..... -
Page 168: Overview
Overview These operating instructions describe all standard and optional equipment available for your COMAND system at the time of pur- chase. Country-specific differences are pos- sible. Please note that your COMAND system may not be equipped with all the features described. -
Page 169: Setting The Waveband
Select è and enter the first letters of the required station using the controller. Press to confirm. COMAND displays a list of available sta- tions. To select stations from the list: turn the controller and press to confirm. - Page 170 Station Saving/deleting a station Set the desired station in radio mode. Press and hold the controller until the pre- set list appears. To select the preset number: turn and press the controller. A tone confirms that the storing process was successful. Moving highlighted stations In radio mode: slide 6 the controller.
-
Page 171: Displaying Information
Information on the currently received pro- Select Tag This Track. gram is displayed. A message appears in COMAND about stor- If available, you will see: ing the track information. the track that is currently being played the artist of the track that is currently being... -
Page 172: Registering
These include environmental or topo- graphical conditions as well as other factors beyond the control of Mercedes-Benz USA, LLC. This means operation may not be possi- ble in certain areas. These include:... -
Page 173: Overview
Selecting a channel Changing channels When the display/selection window in the satellite radio display is selected, slide 1 or turn the controller. COMAND switches to the next available channel. Main function bar Preset Entering channel numbers directly Channel name and channel number... -
Page 174: Memory Functions
To enter the required search term: turn and Press the z key on the number keypad. press the controller. COMAND sets the selected channel. Direct and indirect results are shown. You can only select currently permitted Select the required result. -
Page 175: Music And Sports Alerts
Satellite radio Slide 9 the controller. To select Options in the radio menu bar: turn and press the controller. To select the Delete Highlighted Sta‐ To select Alert for Artist, Track & tion/Channel option in the additional Sports Event: turn and press the control- menu: turn and press the controller. -
Page 176: Tagging Music Tracks
Satellite radio Editing music and sport alerts To select Info in the radio menu bar: turn and press the controller. Select Edit Alert. Information on the currently received pro- A list of set sport alerts appears. gram is displayed. Select Manage Music Alerts. - Page 177 Satellite radio tion previously selected is still available, it will be played. Sound settings Information on sound settings ( page 206).
- Page 179 Your COMAND equipment ....178 Activating media mode ....178 Audio/video mode ......179 Media search ........187 ® Bluetooth audio mode ....190 Operation with the Media Inter- face ............ 195 Video DVD mode ....... 198 Picture viewer ........203...
-
Page 180: Activating Media Mode General Notes
If playable music files are found, they will be standard and optional equipment available played by COMAND. for your COMAND system at the time of pur- chase. Country-specific differences are pos- sible. Please note that your COMAND system Switching on automatically... -
Page 181: Safety Notes
Audio/video mode Using the main function bar Using the device list In Media mode, slide 6 the controller. To display the main function bar: slide 5 The media menu bar appears. the controller. To select Devices: turn and press the con- To select Media: turn and press the con- troller. -
Page 182: Notes
For multisession CDs, the content of the first COMAND supports the following video for- session determines how COMAND will proc- mats: ess the CD. COMAND only plays back one DVD-V session and gives priority to the first session on the CD. -
Page 183: Copyright
WMA Pro ble with the audio CD standard and therefore 5.1 surround sound may not be able to be played by COMAND. Only use tracks with a bit rate of at least Playback problems may occur when playing 128 kbit/s and a sampling rate of at least copied discs. -
Page 184: Inserting
Slots: slide 6 , The DVD changer has a magazine with six turn and press the controller. trays. COMAND switches to the next empty mag- To insert the CD/DVD into the maga- azine tray. zine tray: press the V button. -
Page 185: Inserting
High temperatures can dam- Disc name age the card. Empty tray no. 4 COMAND supports SD memory cards Current disc (Secure Digital), SDHC memory cards (Secure Digital High Capacity), and SDXC To select the data medium: turn and press... -
Page 186: Audio/Video Mode
Audio/video mode Playing similar tracks The side with the contacts must face down- wards. To select Play More Like This: turn and The music is played while the files are loa- press the controller. ded in the background. If there are no sup- ported audio/video files, you will see a message to this effect. -
Page 187: Selecting A Track
Audio/video mode Selecting an active partition To continue playback: in audio/video mode, slide 6 the controller. To select Select Active Partition: The media menu bar is shown. turn and press the controller. To activate Ì in the Media menu bar: With the Select Active Partition turn and press the controller. -
Page 188: Gracenote ® Media Database
Emeryville, California, Insert an audio CD. USA on the COMAND hard disk. You will rec- In media mode, slide 6 the controller. ognize this by the logo in the bottom right- The media menu bar appears. -
Page 189: General Notes
Media search ground. It is however not possible to select General notes another CD in the CD changer. COMAND plays back files from the following Playing audio CDs data media: In Media mode, slide 6 the controller. Disc (CD/DVD) The media menu bar appears. -
Page 190: Current Tracklist
Media search Category list Searching by current track list In Media mode, slide 6 the controller. To select Current Track List in the cat- The media menu bar is shown. egory list: turn and press the controller. The selection list appears. To select Search: turn and press the con- Select the required track. -
Page 191: Media Search
The search result then dis- plays the entire text. To select Genres in the category list: turn and press the controller. COMAND searches all media sources. A selection list with Genres and media sour- ces appears. Select the desired Genres. - Page 192 General notes ® Before using your Bluetooth audio device ® Bluetooth audio mode with COMAND for the first time, you will need to authorize it. ® Connecting Bluetooth audio devices ® When you authorize a new Bluetooth audio device, it is connected automatically. Con-...
-
Page 193: Device List
® With some Bluetooth audio devices, menu: slide 6 the controller and press to playback must first be started on the device confirm. itself so that COMAND can play the audio To select Bluetooth Audio Devices: ® files. Bluetooth must also be given as a press the controller. - Page 194 ® The Bluetooth audio device must sup- so that COMAND can play the audio files. ® port Bluetooth version 2.1 for connection via Secure Simple Pairing. COMAND cre- ates a six-digit code, which is displayed on ®...
-
Page 195: Bluetooth ® Audio Mode
® Bluetooth audio mode Option 2: De-authorizing (deregistering) a Blue- ® tooth audio device To select Options: slide 6 and press the controller. ® To select a Bluetooth audio device from To select Bluetooth Audio Devices: ® the Bluetooth device list: turn the control- press the controller. -
Page 196: Stopped
Switching to Bluetooth audio Press the Õ button. To select Bluetooth Audio in the menu: turn and press the controller. COMAND activates the Bluetooth ® audio To select Connect Last Used Player: device. The basic display then appears. press the controller. -
Page 197: Operation With The Media Interface
Alphabetical order is the connection of mobile audio and video devi- most common. Once all the tracks in a ces. Media Interface in COMAND has two USB connections. The USB connection sockets are located in the stowage compartment under the armrest. -
Page 198: Selecting A Music File
For details and a list of supported devices, visit our website at http://www.mercedes- benz-mobile.com/. Then follow the instruc- tions in the "Media Interface" section. Or call the Mercedes-Benz Customer Assis- tance Center at 1-800-FOR-MERCedes Main function bar (1-800-367-6372) (for the USA) or Customer Display for the active data medium Relations at 1-800-387-0100 (for Canada). -
Page 199: Playback Options
Operation with the Media Interface Search function Selecting Search using media menu bar Slide 6 the controller. The media menu bar appears. To select Search: turn and press the con- troller. The category list appears. Overview To select a category, e.g. Current Track List: turn and press the controller. -
Page 200: Video Dvd Mode
COMAND. tion problems. To switch on full-screen mode: press the ! COMAND is designed to play discs that controller in the basic display. comply with the EN 60908 standard. There- To show the video menu: slide 6 the con- fore, you can only use discs with a maxi- troller in full-screen mode. -
Page 201: Function Restrictions
... appears. COMAND is set to region code 1 at the Function restrictions factory. This setting can be changed at an authorized Mercedes-Benz Center. It is also Depending on the DVD, certain functions or possible to play video DVDs with a different actions may not function at all. -
Page 202: Menu Options
Video DVD mode Video settings Main display field Media menu bar Setting the picture format The DVD basic display appears once the DVD has been inserted. DVD full-screen mode Once a video DVD has been inserted, the disc is played. To set full-screen mode: slide 5 the controller. -
Page 203: Dvd Functions
Video DVD mode To hide the video menu: slide 5 the con- DVD's control menu troller. Most DVDs have their own control menu To show the menu bars for the DVD basic which can be operated using the controller. display: press the controller. Showing the DVD's control menu The video menu is hidden and the DVD basic menu appears. -
Page 204: Pause Function
Video DVD mode Operating the DVD's own menu with the To select É in the menu of the DVD DVD overlay menu overlay menu: turn and press the control- ler. The Ë display changes to Ì. The video image is hidden. To continue playback: select Ì. -
Page 205: Picture Viewer
If pictures are stored on a medium (except on ler. ® Apple devices) which is connected to The device list appears. COMAND, you can view these on the COMAND display. The following data media and picture formats are supported: Data media: CD, DVD, USB devices, SD memory cards... - Page 206 To revert to the original size: press the con- troller. Press the % button. Closing the picture viewer Press the controller. The menu appears. To select Close Picture Viewer: turn and press the controller. COMAND returns to the last accessed media function.
-
Page 207: Sound
Your COMAND equipment ....206 Sound settings ........206 ® ® Harman/kardon Logic 7 sur- round sound system ......207 Bang & Olufsen BeoSound ....209... -
Page 208: Sound Settings
Setting treble, mid-range and bass These operating instructions describe all standard and optional equipment available for your COMAND system at the time of pur- chase. Country-specific differences are pos- sible. Please note that your COMAND system may not be equipped with all the features described. -
Page 209: Calling Up The Sound Menu
® ® Harman/kardon Logic 7 surround sound system Call up the sound menu ( page 206). Turn the controller until Balance/Fader brought to the front and then slide 6 the controller. To activate the menu for balance and fader: press the controller. To adjust the balance: slide 8 or 9 the controller. -
Page 210: Equalizer
® ® Harman/kardon Logic 7 surround sound system Overview of harman/kardon ® Logic7 ® sur- Adjusting the balance/fader round sound system Function Options Equalizer Sets treble, mid- range and base Balance/fader Adjusts the volume: right/left and front/rear Logic 7 Optimizes the sound playback Balance adjusts the volume left and right. -
Page 211: Calling Up The Sound Menu
Bang & Olufsen BeoSound Call up the sound menu ( page 207). Media Interface Turn the controller until Logic7 is in the ® Bluetooth audio mode center. video DVD (PCM, DTS ® and Dolby ® Digital Slide 6 the controller. audio formats) The left-hand rotary menu to switch sur- For the best sound, CD or WAV CD format... -
Page 212: Equalizer
Bang & Olufsen BeoSound To switch to the menu bar: slide 6 the To return to the menu: slide 5 the con- controller. troller. To select Sound: turn and press the con- To return to the basic menu: press the % troller. -
Page 213: Sound Profile
Bang & Olufsen BeoSound Setting the sound profile Sound playback for individual seats With the Sound Profile setting, you can For the best sound, the specific seats will select between two defined sound settings. need to be set. Call up the sound menu ( page 209). - Page 215 Your COMAND equipment ....214 Weather forecasts ......214...
-
Page 216: Features
These operating instructions describe all The weather data received from a weather standard and optional equipment available station is stored in COMAND for one hour. It for your COMAND system at the time of pur- can therefore be displayed again immediately chase. -
Page 217: Sirius Weather
Weather forecasts Switching the SIRIUS Weather display on/off Activating Returning to the current-day forecast: To select 5-Day: turn and press the con- troller. A menu appears. Press the % button. Select Current. To select TEL/® in the main function bar: The information chart shows the forecast slide 5 , turn and press the controller. - Page 218 Current Position in the menu. snow conditions (e.g. snow depth) COMAND receives the weather data for the temperature current vehicle position from the nearest The status of a facility is indicated as follows: weather station and displays it automati- cally.
- Page 219 Weather forecasts To search for a location: select Search Memory functions Areas: turn the controller and press to con- Storing the area in the weather memory firm. Select Other States (U.S.) At Cur‐ You can save locations that are called up fre- rent State/Province.
-
Page 220: Weather Map
To show the menu: press the controller. can develop To select Weather Table : press the con- hailstorm troller. the likelihood of a hailstorm COMAND receives the weather data for the Storm watch areas selected position from the nearest weather... - Page 221 Weather forecasts Shows areas for which storm advisories Displaying storm characteristics: have been issued (red areas). It is shown in Activate the Storm Characteristics dis- map scales 50 mi (50 km), 200 mi (200 km) play level ( page 218). and 500 mi (500 km).
- Page 222 Weather forecasts Legend: weather fronts Example: in the middle of the map you can see the current position of the tropical low- Weather Explanation pressure area (cyclone). To the right of this front a solid line shows the previous path with positions and times.
-
Page 223: Storm Watch Box
Weather forecasts Region of origin category Precipita- Color scale tion type Atlantic, North Name of tropical storm and South (Hurricane Cate‐ Rain Eleven shades from light (light Pacific Oceans gory 3) green) to heavy (red) Displays hurricane cat- Mixed Light (light violet) to heavy egories 1 through 5 (violet) Northwestern... - Page 224 Weather forecasts Activating/deactivating the display of areas To select Next: turn and press the control- in red: ler. The next storm is marked. Display the menu on the weather map Select Previous. page 218). The previous storm is highlighted. To select View: turn and press the control- ler.
- Page 225 Your COMAND equipment ....224 Overview ..........224 Basic functions ......... 229 System settings ........ 231 Audio CD/DVD and MP3 mode ..232 Video DVD mode ....... 235 Active COMAND media source mode ..........239 AUX mode .......... 241...
-
Page 226: Overview
Systems are available for Mercedes- standard and optional equipment available Benz vehicles. In this Operator's Manual, the for your COMAND system at the time of pur- Rear Seat Entertainment System Code 864 is chase. Country-specific differences are pos- used for illustration purposes. If you have a sible. -
Page 227: Rear-Compartment Screens
Overview Rear-compartment screens AUX jacks (AUX display) Display The same AUX jacks (AUX drive) can be found in the rear-compartment drive ( page 226). Remote control Selects a track; direct entry Exits a menu (back) Overview Two remote controls are supplied for the US and Canadian markets. - Page 228 Overview You can switch the screens back on. How- CD/DVD drive and AUX jacks ever, this will discharge the starter battery. Point the remote control at the rear-com- partment screen which has been selected for remote operation. Press button : on the remote control page 225).
-
Page 229: Indicator Lamp
Overview Cordless headphones Overview To adjust the headphones: open both sides of the headphones. Adjust the fit of the headphones by pulling the headphone band in the direction of the arrow. To switch the headphones on/off: press On/Off switch ;. To adjust the volume: turn volume control = until the desired volume is set. -
Page 230: Selecting The Screen
Overview Selecting the screen for the cordless Environmental note headphones Batteries contain dangerous substances. It is against the law to dispose of them with the household rubbish. They must be collected separately and recycled to protect the environment. Dispose of batteries in an environmentally friendly manner. -
Page 231: Basic Functions
The headphones' volume setting does not affect the main loudspeakers. To set on COMAND: press the $ but- ton, for example, to switch on an audio mode. The battery compartment is located on the To select Sound6 slide and press the left headphone. -
Page 232: Adjusting The Brightness
CD/MP3 are two possibilities: Video DVD the operating mode has been changed on Radio (active media source in COMAND) the other screen. the operating mode has not been changed. Switch on an operating mode (e.g. audio In the first case, the operating mode appears CD mode) ( page 232). -
Page 233: System Settings
System settings Changing the picture format Switching the display design To show the menu: press the 9 button on Select Settings using the : button and press 9 to confirm. the remote control. Select Mode, Night Mode Auto‐ Select DVD-Video using matic using the 9: buttons and... -
Page 234: Audio Cd/Dvd And Mp3 Mode
Audio CD/DVD and MP3 mode Depending on the vehicle equipment level, Audio CD/DVD and MP3 mode the rear-compartment drive is located: Important safety notes under the rear bench seat or WARNING in the center console between the driver's and front-passenger seats The CD/DVD drive is a class 1 laser product. - Page 235 Audio CD/DVD and MP3 mode The example shows audio CD mode. The num- Select Tracks (audio CD/DVD mode) or ber and the elapsed playback time for the Folder (MP3 mode) using current track are displayed. the :=; buttons on the remote control, and confirm by pressing the 9 Insert a CD/DVD ( page 232).
- Page 236 Audio CD/DVD and MP3 mode To interrupt playback: select É using Selecting a folder the :=; buttons on the remote This function is available in MP3 mode. control and press the 9 button to confirm. Select Folder in MP3 mode using The Ë...
-
Page 237: Video Dvd Mode
If an option is selected, it Further information ( page 198). Informa- remains selected after the Rear Seat Enter- tion regarding COMAND also applies to the tainment System is switched on or off. Rear Seat Entertainment System. Function restrictions... -
Page 238: Control Menu
Video DVD mode the menu stored on the DVD appears. If the Sets the treble DVD menu appears, you must start the film Sets the bass manually. To show: press the 9 button on the Select the corresponding menu item in the remote control. - Page 239 Video DVD mode To restart playback: select Ì and Select DVD Functions and press the 9 button to confirm. press the 9 button to confirm. Playback starts from the beginning of the Select Title Selection and press the 9 DVD. button to confirm.
-
Page 240: Rear Seat Entertainment System
Video DVD mode Back to the film remote control and press the 9 button to confirm. Press the k back button repeatedly A menu appears. until you see the film. Confirm Select by pressing the 9 button. A submenu is displayed. Select any menu item in the DVD menu and If available, additional options can now be press the 9 remote control button to con-... -
Page 241: Active Comand Media Source Mode
Select DVD-Video and press the 9 button Observe the sequence described below when on the remote control to confirm. playing a COMAND media source on the Rear Seat Entertainment System. Select DVD Functions and press the 9 button to confirm. - Page 242 If more than 8 seconds of track time have in COMAND. If the media source is activa- elapsed, the function skips back to the ted in COMAND, it is loaded on the Rear beginning of the track. Seat Entertainment System and is then If less than 8 seconds of track time have played.
-
Page 243: Aux Mode
AUX mode To select a folder: press the : button Connecting AUX equipment on the remote control. AUX drive jacks Highlight one of the two folder symbols with the = or ; button and press 9 The AUX drive jacks are located on the rear- to confirm. - Page 244 AUX mode REAR" (left-hand screen) or "R REAR" (right- hand screen) is highlighted in the window. Select in the menu using the 9=; buttons on the remote control and press the 9 button to confirm. Select Source from the AUX menu and press the 9 button to confirm.
Need help?
Do you have a question about the Comand and is the answer not in the manual?
Questions and answers