Mercedes-Benz COMAND Operator's Manual
Hide thumbs
Also See for COMAND:
- Operating instructions manual (298 pages) ,
- Operator's manual (271 pages) ,
- Supplement manual (190 pages)
Table of Contents
Advertisement
Quick Links
Download this manual
See also:
Operator's Manual
Advertisement
Table of Contents

Related Manuals for Mercedes-Benz COMAND


Summary of Contents for Mercedes-Benz COMAND
- Page 1 Bild in der Größe 215x70 mm einfügen COMAND Operator's Manual Order No. 6515 6711 13 Part No. 171 584 30 82 USA Edition A 2006...
- Page 2 Please make yourself familiar with your that we reserve the right to make changes COMAND control unit and read the instruc- in design and equipment. Therefore, infor- tions in this manual before operating the mation, illustrations and descriptions in COMAND system.
-
Page 4: Table Of Contents
Tips on caring for your CDs ..70 Quick reference COMAND ..32 Ejecting a CD ....53 Switching to Switching COMAND ON/OFF. - Page 5 Contents Selecting CDs ....76 SMS (Mail) ..... 118 Telephone* .
- Page 6 Contents Destination entry ....131 Navigation announcements ..153 POIs (Points of Interest) ... 179 Entering data .
- Page 7 Contents System ..... . . 191 System settings ....192 Calling up the System menu .
-
Page 8: Introduction
SMS, to adjust COMAND system settings. components. If you are operating how to initiate an emergency call and use COMAND for the first time, or if you have service numbers. rented or borrowed the vehicle, this is the Directories chapter you should read first. -
Page 9: Symbols
Display Words appearing on the A number of these symbols ap- COMAND display or the multi- pearing in succession indicates function display are printed in Highlights hazards that may result in a multiple-step procedure. -
Page 10: Operating Safety
Mercedes-Benz Center. consulting the COMAND screen to read nav- igational maps, instructions, or downloaded information. -
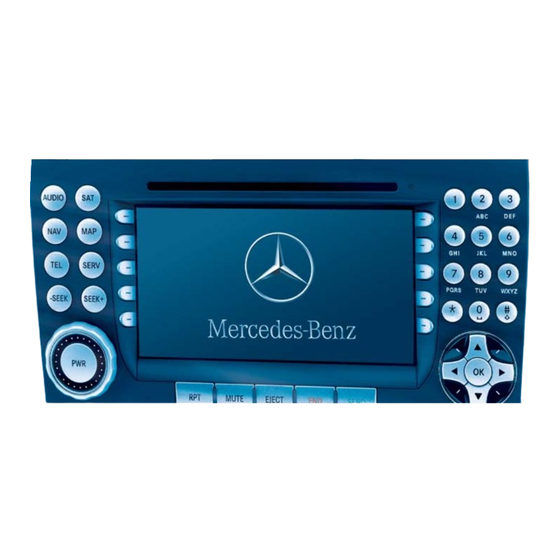
Page 12: At A Glance
At a glance Radio operating elements Single CD operating elements MP3 operating elements CD changer* operating elements Satellite Radio* operating elements Telephone* operating elements Navigation* operating elements Multifunction steering wheel Menu system Quick reference COMAND... -
Page 13: Radio Operating Elements
At a glance Radio operating elements... - Page 14 Page Function Page Function Page , , , Audio main menu Soft keys Tuning stations FM / AM Switching COMAND (multifunction buttons) ON/OFF Station memory, 44, 49 - selecting presets Entering frequency man- Volume adjustment ually ...
-
Page 15: Single Cd Operating Elements
At a glance Single CD operating elements... - Page 16 Single CD operating elements Function Page Function Page Function Page and Audio main menu Selecting tracks Switching COMAND ON/OFF Soft keys (multifunction buttons) Confirmation Single CD slot Volume adjustment - ...
-
Page 17: Mp3 Operating Elements
At a glance MP3 operating elements... - Page 18 MP3 operating elements Function Page Function Page Function Page and Audio main menu Selecting folders Switching COMAND ON/OFF and Soft keys (multifunction buttons) Selecting tracks MP3 CD slot Volume adjustment - ...
-
Page 19: Cd Changer* Operating Elements
At a glance CD changer* operating elements... - Page 20 and Magazine compartment buttons 1 to 6 Audio main menu Selecting CDs and Soft keys (multifunction buttons) Switching COMAND Selecting tracks ON/OFF - Entering track numbers Confirmation Volume adjustment ...
-
Page 21: Satellite Radio* Operating Elements
At a glance Satellite Radio* operating elements... - Page 22 Page Function Page Function Page , , , SAT main menu Soft keys Program category tuning Switching COMAND (multifunction buttons) ON/OFF Station tuning - Station memory, 89, 93 Entering channel manual- Volume adjustment selecting presets ...
-
Page 23: Telephone* Operating Elements
At a glance Telephone* operating elements... - Page 24 Entering unlock code Redialing Entering phone number Switching the telephone 7 Speed dial , , , Ending or refusing a call Soft keys 8 Selection buttons (multifunction buttons) Switching COMAND ON/OFF Confirmation 9 Volume adjustment...
-
Page 25: Navigation* Operating Elements
At a glance Navigation* operating elements... - Page 26 Page Navigation main menu Confirmation Ejecting navigation DVDs Navigation computer Cancelling route guidance Navigation DVD slot Switching COMAND ON/OFF Switching map display Cancelling navigation announcements Soft keys Volume adjustment (multifunction buttons) Switching navigation , , , , ,...
-
Page 27: Multifunction Steering Wheel
At a glance Multifunction steering wheel Function Page Function Page Multifunction display Single CD, MP3 and CD changer* mode: Volume setting: j Next track æ Volume up k Previous track ç Volume down Satellite radio* mode: Making calls: j Next station k Previous station Answering calls Telephone* mode:... -
Page 28: Selecting The Multifunction Display
At a glance Multifunction steering wheel Radio operation MP3 operation Selecting the multifunction display You can switch the multifunction display to the respective operating mode if you wish to operate the system using the buttons on the multifunction steering wheel. On the multifunction steering wheel, press è... - Page 29 At a glance Multifunction steering wheel Satellite radio* operation Telephone* operation In the list screen, instead of the telephone network information, either a phone book If a telephone has been installed, either the entry or one of the last 10 outgoing calls main display or a list appears.
-
Page 30: Menu System
Menu system Menu system The menu system allows for easy opera- Opening main menus Menu display tion of COMAND. Audio ( page 40): A display can be composed of 3 sections. Press . Each of the following main functions has a... - Page 31 At a glance Menu system The functions currently assigned to the Left side: In this example ( page 29): soft keys are displayed in the soft key sec- The selected operating mode is given. In ROAMING = telephone* is logged into a this example: Radio tions 1.
- Page 32 At a glance Menu system Example: Radio main menu: In some situations, soft keys may not have Exiting from submenus any function and thus not be available. You can exit the current submenu by Should a soft key not be available, it will Back pressing the soft key.
-
Page 33: Quick Reference Comand
Press . wheel This operating manual describes oper- Press . ation from COMAND and from the mul- If a telephone call is in progress (hands- tifunction steering wheel. COMAND switches on the last active free) you cannot switch the COMAND... - Page 34 Turn the rotary control located on or closed) the volume had been set to a value in a the COMAND control unit, certain range at the time the device was switched OFF. Press æ or ç on the multifunc-...
-
Page 35: Balance
At a glance Quick reference COMAND Press or : When adjusting the balance, the system Balance automatically stores the setting for the The cursor moves horizontally, adjust- A common balance setting applies to the currently active operating mode. ing the balance accordingly. -
Page 36: Bass And Treble
At a glance Quick reference COMAND Bass and treble settings for navigation an- Bass and treble nouncements are found under “Adjusting For the following operating modes, differ- the acoustics for navigation announce- ent settings for bass and treble can be se- ments”... -
Page 37: Sound Functions
At a glance Quick reference COMAND Storing new settings: The following sound functions are avail- Different sound functions* can be activat- able: ed for each one of the operating modes. Press or the Back soft key, Default Settings Example:... - Page 38 At a glance Quick reference COMAND Your harman/kardon® audio system LOGIC7® is not an artificial “effects” features the innovative LOGIC7® button. It automatically adapts itself to multi-channel surround sound technol- the incoming source material, adjust- ogy developed for the professional re- ing the seven outputs based on the cording industry.
- Page 39 At a glance Quick reference COMAND LOGIC7® playback works with all con- ventional stereo audio sources (e.g. stereo CD or stereo radio). If the radio reception is poor, the sys- tem should be switched back to Stan- dard stereo playback. Switching back to Standard stereo playback may im- prove audio quality.
-
Page 40: Audio
Audio Audio main menu Radio operation Single CD operation MP3 operation CD changer* operation Audio AUX operation... -
Page 41: Audio Main Menu
Audio Audio main menu Various audio sources can be selected in Calling up the Audio main menu the Audio main menu. Press . soft key is available only if a CD is loaded in the appropriate The Audio main menu appears. Selectable soft keys compartment. -
Page 42: Mute Function
Audio main menu Mute function The mute function is still activated if Switching the mute function ON: COMAND is switched OFF and then ON Press . again. The system is switched to mute. The mute function switches OFF if an- other audio source is selected. -
Page 43: Radio Operation
Audio Radio operation Radio Press the soft key. Safety instructions Switching wavebands The Radio main menu appears. The sta- FM/AM Press the soft key in the Radio tion last tuned to will begin to play. main menu. Warning In this example: The main menu for either the FM or AM In order to avoid distraction which could Weather Band... -
Page 44: Tuning To A Fm/Am Station
Audio Radio operation The waveband is indicated in the center Tuning to a FM/AM station of the status bar. AM broadcast band: The following options are available: In this example: MW (medium wave) Tuning via station search( page 44) = FM waveband 530 - 1710 kHz Tuning via station presets ( page 44) = selected station is stored on... - Page 45 On multifunction steering wheel Accessing via number keypad: Switch the multifunction display in the Switch to the desired waveband On COMAND control unit instrument cluster to the Radio display ( page 42). Switch to the desired FM or AM wave- ( page 27).
- Page 46 Audio Radio operation Tuning via Autostore presets The Autostore function allows placing of stations into the presets sorted by recep- tion quality ( page 50). The system will store the station with the strongest signal in preset 1. Ten presets each are available for FM and Switch to the desired waveband Use , , ...
- Page 47 Audio Radio operation Tuning via scan search Starting scan search Manual tuning Scan search is characterized as follows: Switch to the desired waveband Switch to the desired waveband ( page 42). ( page 42). Scan search performs two runs. Scan Press ...
- Page 48 Audio Radio operation Switch to the FM waveband Press the number buttons in succession: , , and . ( page 42). Manual tuning is also possible in all Press . wavebands by pressing or . Each number entered appears in the display.
-
Page 49: Weather Band
Tuning via station search On the multifunction steering wheel Tuning to a station on Weather Band Switch the multifunction display in the On the COMAND control unit Seven channels are available on the instrument cluster to Audio display Weather Band. -
Page 50: Storing Fm/Am Stations
Audio Radio operation Press one of the number keys Storing manually using the number - . keys - The system tunes to the station stored Tune to the station to be stored under this number. ( page 43). Press a number key between ... - Page 51 Audio Radio operation Use to select the Storing using Autostore Switch to the desired waveband Reprogram Autostore ( page 42). header entry. The Autostore function places stations into Autost. Press . the Autostore memory sorted by reception Press the soft key.
-
Page 52: Single Cd Operation
Audio Single CD operation Single CD operation Safety instructions Tips on caring for your CDs Warning Only touch the CD on the edges. Warning The CD drive is a Class 1 laser product. Clean the CD with a dry, lint-free cloth. There is a danger of invisible laser radiation Wipe the CD a straight line from the In order to avoid distraction which could... -
Page 53: Switching To Single Cd Mode
CDs with the vehicle at a standstill and oper- ate the audio system only when road, weath- er and traffic conditions permit. The COMAND CD drive may not be able Bear in mind that at a speed of just 30 mph to play audio CDs with copy protection. -
Page 54: Ejecting A Cd
COMAND is switched ON. Insert the CD face up. Single CD main menu Open the Audio main menu COMAND pulls in the CD. If the CD is ( page 40). an audio CD, the system switches to Single CD mode and starts playing the Press the soft key. -
Page 55: Selecting A Track
Audio Single CD operation The center of the status bar shows: The Single CD main menu shows the track Selecting via track skip title in the center if the CD contains corre- The track number and total number sponding text data. of tracks Forward skipping: If the CD does not contain any CD text da-... - Page 56 Audio Single CD operation Use or to select another track Press k for backward skipping. On the COMAND control unit from the list. Open the Single CD main menu The tracks skip immediately after ( page 53). pressing one of the buttons.
- Page 57 Audio Single CD operation Scan search automatically stops at the track listened to before the scan Entries beyond the number of available search was started. tracks on the CD are not possible. Starting scan search Wait approx. 3 seconds after entering Scan Press the soft key.
-
Page 58: Fast Forward/Reverse
Normal sequence tion is currently selected. An option will remain activated even if The tracks are played in the normal se- COMAND is switched OFF and then ON quence (e.g. track 1, 2, 3 etc.). again. -
Page 59: Mp3 Operation
Audio MP3 operation Safety Instructions Warning Your CD drive has been designed to play CDs which correspond to the IEC Warning The CD drive is a Class 1 laser product. 60908 standard. Therefore only CDs There is a danger of invisible laser radiation not exceeding a thickness of 1.3 mm In order to avoid distraction which could when you open or damage the cover. -
Page 60: Tips On Caring For Your Mp3 Cds
Permissible MP3 CDs Tips on caring for your MP3 CDs Tips on creating MP3 CDs In MP3 mode COMAND can read CD-R and Only touch the CD on the edges. CD-RW CDs. Clean the CD with a dry, lint-free cloth. - Page 61 When creating an MP3 CD, you can assign session contains data in MP3 format, names to the MP3 tracks and folders. Example of a correct track name: COMAND will treat the CD as a conven- COMAND uses these names in MP3 mode Track1.mp3 tional audio CD.
-
Page 62: Tips On Creating Mp3 Tracks
Fixed and variable bit rates up to 320 The music tracks that you can create for folder. COMAND will then display the root kbps play back in MP3 mode are generally directory name as a folder name. -
Page 63: Switching To Mp3 Mode
Open the MP3 main menu ( page 63); ejected before inserting the new CD. Warning Inserting a second CD in the slot with Load an MP3 CD into the COMAND CD another CD still loaded will cause dam- In order to avoid distraction which could drive. -
Page 64: Ejecting A Mp3 Cd
MP3 CD has been loaded. 3 Elapsed track time 4 Track number within the current fold- COMAND loads the MP3 CD data. This er/number of tracks in current folder may take a while depending on the number of folders and tracks. -
Page 65: Selecting Folders
The folder list only contains folders in deviate from the actual time elapsed. ing the selection. which MP3 tracks are stored. The COMAND changes the folder and Selecting folders Only one folder can be viewed at a time. loads the data from the new folder. -
Page 66: Selecting A Track
Press or to select a folder. Forward skipping: The next track is played. Press . COMAND changes the folder and loads the data from the new folder. It may take a while to load the data, de- pending on the number of folders and... - Page 67 Audio MP3 operation For forward skipping press ; Press or to select a different Selecting via track list track. The track list contains all tracks in the cur- rent folder. Only one track can be viewed The current track remains playing while For backward skipping press .
- Page 68 Audio MP3 operation Starting scan search In the MP3 main menu ( page 63) It is not possible to enter a number Scan press the soft key. greater than the number of tracks in the current folder. The scan search starts. Wait approx.
-
Page 69: Fast Forward/Reverse
Press the soft key. The following options are available: The track playing when scan search is Normal sequence The COMAND plays tracks in a folder in ended remains selected. succession. Repeat track ( page 69) Once all the tracks in a folder have... - Page 70 The option is activated. A correspond- The solid circle indicates which op- ing display will appear in the status bar The COMAND will repeat the tracks in Normal sequence tion is currently selected. for all options except the current folder until this function is canceled.
-
Page 71: Cd Changer* Operation
Audio CD changer* operation Safety instructions Tips on caring for your CDs Warning Only touch the CD on the edges. Warning The CD changer is a Class 1 laser product. Clean the CD with a dry, lint-free cloth. There is a danger of invisible laser radiation Wipe the CD a straight line from the In order to avoid distraction which could when you open or damage the cover. -
Page 72: Cd Changer Mode
Audio CD changer* operation Switching to CD changer mode Loading CDs Open the CD changer main menu ( page 75); Warning In order to avoid distraction which could Load an audio CD into the CD changer. lead to an accident, the driver should insert CDs with the vehicle at a standstill and oper- CD changer ate the audio system only when road, weath-... - Page 73 Audio CD changer* operation LEDs in the buttons indicate the status of the corresponding magazine compart- The CD changer may not be able to play ment. audio CDs with copy protection. Button LED OFF: Magazine compartment empty In order to load CDs, you will need to open the glove box.
- Page 74 Audio CD changer* operation Wait until the LED in the button 2 Loading options: Open the glove box flashes green. ( Vehicle owner's manual). Loading a single magazine compart- ment ( page 73) This indicates that the CD changer re- quests a CD.
-
Page 75: Ejecting Cds
Audio CD changer* operation Insert an audio CD into the CD slot 1 Ejecting one CD within approx. 15 seconds. Insert the If, for example, only compartments 1 CD face up. through 4 are to be loaded instead of The CD is pulled in; the magazine com- all six compartments, simply do not in- partment is loaded. -
Page 76: Cd Changer Main Menu
Audio CD changer* operation The CD will be pulled in again if it is not The CD changer ejects the CDs one af- removed from the slot within 15 sec- ter another. If you eject the CD you are currently lis- onds. -
Page 77: Selecting Cds
Audio CD changer* operation If the CD does not contain any CD text da- ta, the number of the CD and the track soft key is shaded out if no CD number are displayed instead of the name is loaded. The system will not switch to of the CD and the track title. - Page 78 Audio CD changer* operation Use or to select another CD Selecting via CD list Selecting via CD Selection menu from the list. Magaz. Press the soft key. The CD Selection menu appears. You This selection is possible only if at least The system will skip empty CD changer see the list of all six compartments.
-
Page 79: Selecting A Track
Selecting via track skip of the previous track. Selecting via track list ( page 79) The tracks skip immediately after On the COMAND control unit pressing one of the buttons. Selecting via manual entry of the track Open the CD changer main menu number ( page 79) ( page 75). - Page 80 Audio CD changer* operation Press , or wait approx. 3 seconds Selecting via track list without changing the selection. The track list contains all tracks of the cur- rent CD. Only one list entry is visible at a The track is changed. The newly select- time, it is the number of the track currently ed track is played.
-
Page 81: Fast Forward/Reverse
Audio CD changer* operation Starting scan search Fast forward/reverse Scan Press the soft key. Entries beyond the number of available Open the CD changer main menu tracks on the CD are not possible. ( page 75). Press and hold or . When you start scan search, playback Wait approx. - Page 82 Audio CD changer* operation Repeat CD CD Random Explanation of the playback options Normal sequence The tracks are played in the normal se- It is only possible to select this function This selection is only possible if at least quence (e.g. track 1, 2, 3 etc.). if at least two audio CDs are loaded in two CDs are loaded in the CD changer.
- Page 83 Press or to select a different option. Press . The option is activated. A correspond- ing display will appear in the status bar Normal sequence for all options except An option will remain activated even if the COMAND is switched OFF and then ON again.
-
Page 84: Audio Aux Operation
An external audio source can be con- Please refer to the appropriate operat- Open the Audio main menu nected to COMAND via the 1/8" sock- ing manual for the operation of the ex- ( page 40). et located inside the glovebox. -
Page 86: Satellite Radio
Satellite radio* General information Satellite radio operation... -
Page 87: General Information
Satellite radio* General information Program categories Introduction to satellite radio The channels are categorized. Categories Note that categories and channels Sirius Satellite Radio provides 100 chan- allow you to tune to stations broadcasting shown in illustrations are dependent on nels, so called streams, of digital-quality a certain type of program (category mode) programming content delivered by the radio, among others music, sports, news,... -
Page 88: Satellite Radio Operation
Satellite radio* Satellite radio operation Satellite radio operation After activation of the Satellite radio Switching to Satellite radio mode service Press . Credit card information is also required The SAT main menu appears. for your application. Different menus appear depending on The radio station selected last is audible, The activation process takes approxi- Satellite radio service activation. -
Page 89: Sat Main Menu
Satellite radio* Satellite radio operation Info Status bar, in this example: SAT main menu shows additional text information relat- SAT (on the left) = the selected mode Station information is displayed on the ed to the current channel. main area and in the center of the status SAT5 = location in the program Scan bar. -
Page 90: Selecting A Station
Satellite radio* Satellite radio operation You can also adjust the following: Tuning a station within the selected The system will tune to the station category ( page 91) stored under this number. Balance ( page 34) Tuning via scan search ( page 92) Bass and treble ( page 35) Accessing via Presets menu. - Page 91 Satellite radio* Satellite radio operation Use or to choose a preset and Use or to select the category press ; from the list. If an entry is made and the channel is Channel un- not available, the message available appears.
- Page 92 The channels identified for the currently immediately. selected category are sorted numerically by channel number, which appear in the status bar one at a time. Tuning using COMAND control unit Press or . The search proceeds in ascending or- der;...
-
Page 93: Obtaining Additional Text Information
Satellite radio* Satellite radio operation Tuning using the multifunction steering Tuning via scan search Obtaining additional text wheel information Scan search is characterized as follows: Switch the multifunction display in the Additional text information (artist and Scan search plays a channel for instrument cluster to Satellite radio track title) related to the current broadcast approx. -
Page 94: Storing Stations
Satellite radio* Satellite radio operation Press for more than 2 seconds. Storing via Presets menu Storing stations Presets Press the soft key. The currently selected station is stored Two options are available: in the corresponding preset location. The Preset list appears. Storing using the number keys Storing using the Presets menu Resetting Presets menu... -
Page 95: Calling The Sirius Service Center
Satellite radio* Satellite radio operation It may be necessary to call the Sirius Ser- Calling the Sirius Service Center vice Center if, for example: Service Press the soft key. you want to cancel the subscription or to re-subscribe at a later date you forget to pay the bill you sell the car to another person The telephone number of the Sirius... -
Page 96: Telephone
Telephone* Important notes Telephone operation Phone book SMS (Mail) -
Page 97: Important Notes
Whether or not prohibited by law, for safety running. Doing so could lead to malfunction reasons, the driver should not use the cellu- using the COMAND control unit, of the vehicle's electronic system, possibly lar telephone while the vehicle is in motion. - Page 98 If the signal is very weak (display in the should only be used inside the vehicle if COMAND control unit and the multi- status bar): function steering wheel. Unless other- they are connected to a separate exte-...
- Page 99 Telephone* Important notes Telephone being Make sure that the air vents are not The telephone cannot, or not yet, be used If the message activated, please wait pointed in the direction of the micro- in the following situations: is displayed, phones located in the overhead control Please insert phone The telephone is already unlocked, but...
-
Page 100: Telephone Operation
( page 104), press and hold for longer than 2 seconds; The telephone is switched ON automatical- Insert the mobile phone into the ly when COMAND is activated. The cell cradle*. phone must be readily inserted into the Phone not installed Switch COMAND OFF ( page 32). -
Page 101: 911 Emergency Call
Placing an emergency call The following conditions must be met for a “911” emergency call: An emergency call can be placed using the cell phone or the COMAND control unit. cell phone readily inserted in cradle Press the soft key. -
Page 102: Entering The Pin (Only Gsm)
Telephone* Telephone operation If necessary, press to select Press . Using the COMAND control unit after PIN and unlock code entry Press to confirm if you want to The telephone establishes the connec- Press repeatedly until the Tele- place the 911 emergency call. - Page 103 Telephone* Telephone operation The PIN protects the telephone against un- Press the corresponding number key If the input is incorrect, message Wrong PIN number - for each digit. authorized use. Your PIN is found in the will appear briefly. telephone service provider's documenta- In case of erroneous entry, you can de- Re-enter the PIN.
-
Page 104: Entering The Unlock Code
Telephone* Telephone operation After entering all digits, press or the Entering the unlock code soft key. The unlock code protects the telephone All telephone functions are available if against unauthorized use. To activate the the correct number has been entered. unlock code ( Telephone Operation Guide). -
Page 105: Switching To Telephone Mode
Telephone operation Press . Switching to telephone mode Telephone main menu The Telephone main menu appears. When COMAND is switched ON, switching to telephone mode from any other mode is Warning done as follows: Some jurisdictions prohibit the driver from On the COMAND control unit using a cellular telephone while driving. - Page 106 Telephone* Telephone operation READY = telephone is logged into your If the message soft key Please Enter PIN: mobile communcations home network appears, see “Enter- Provides access to the SMS menu and ready for use, ing the PIN” ( page 101). ( page 118), ROAMING = telephone is logged into a mo-...
-
Page 107: Answering An Incoming Call
Ending or refusing a call The caller’s name only appears if the number and the name are stored in the On the COMAND control unit phone book ( page 114). Press . Answering calls If the multifunction display in the instru-... -
Page 108: Placing An Outgoing Call
Telephone* Telephone operation On the multifunction steering wheel selecting an entry in the accepted and After entering the phone number, press . missed calls list ( page 109) Press t . selecting an entry in the dialed calls list The telephone dials the entered num- ( page 110) ber. -
Page 109: Accepted And Missed Calls
The telephone establishes the connec- After switching to telephone operation, On the COMAND control unit tion with the number dialed last. COMAND can display the number of Immediate re-dialing of the number dialed missed calls in the status bar. last can be initiated: When pressing s only once, the di- Press ... - Page 110 Telephone* Telephone operation COMAND automatically creates a list of accepted and missed calls. This list can If no calls have been received yet the The list shows up to ten calls you re- contain 10 entries max. Recvd.# soft key is shaded out and with- ceived last.
-
Page 111: Dialed Calls
The number in the phone book that be- aled calls without function. longs to the highlighted name is shown COMAND automatically creates a list of di- in the status bar. aled calls. This list can contain 10 entries max. The list is sorted chronologically, the... - Page 112 Telephone* Telephone operation Switching between number and name dis- Selecting a list entry and establishing the play: connection: If you press s twice, the telephone Use or to select the desired Press the soft key. will immediately establish a connection entry.
-
Page 113: Speed Dial
( Telephone Operation in the status bar. Guide). You can retrieve the entries of the speed dial memory via COMAND. Open the Telephone main menu ( page 104). Press a number key between and and hold it for more than approx. - Page 114 The microphone switches OFF or ON. You can also transmit the The display of the soft key changes ac- characters and (#). On the COMAND control unit cordingly. Press . The other party cannot hear you if the microphone is switched OFF;...
-
Page 115: Phone Book
Switch the multifunction display in the instrument cluster to the Telephone Opening the phone book main display ( page 28). On the COMAND control unit Press j or k. Press the soft key in the Telephone An example for the Phone Book menu is A phone book entry appears on the main menu ( page 104). - Page 116 Switching between number and name of the highlighted entry. Pager number display In the instrument cluster the name of Open the phone book from COMAND the category assigned to the phone ( page 114). Home number, e.g. , appears in the multi-...
-
Page 117: Selecting A Phone Book Entry And Establishing A Connection
Switch the multifunction display in the instrument cluster to the Telephone Select an entry using or . On the COMAND control unit main display ( page 28). If you press and hold either one of the Open the phone book ( page 114). -
Page 118: Deleting A Phone Book Entry
Telephone* Phone book Deleting a phone book entry Select the phone book entry to be de- leted from COMAND ( page 116). Delete Press the soft key. The delete prompt is displayed. Use to select the menu item Press . -
Page 119: Sms (Mail)
Telephone* SMS (Mail) SMS messages can be received if your ve- SMS inbox hicle is equipped with a telephone and If no SMS messages have been re- Open the Telephone main menu SMS messaging is available from your car- ceived the soft key is without func- ( page 104). - Page 120 Telephone* SMS (Mail) Subject The SMS inbox shows the list of received The SMS inbox offers the following op- Press the soft key. messages. The list is sorted chronological- tions: The first characters of the message ly, the last message received is displayed Switching between subject and sender.
-
Page 121: Reading A Message
Telephone* SMS (Mail) Switching between subject and sender Reading a message Deleting a message Sender You can either see the soft key or In the SMS inbox ( page 118), In the SMS inbox ( page 118), Subject use or to select a message. soft key. -
Page 122: Navigation
Navigation* Important notes Navigation main menu Destination entry Route guidance During route guidance Last destinations and destination memory POIs (Points of Interest) -
Page 123: Important Notes
Navigation* Important notes Safety instructions The route calculated by COMAND is a rec- Warning ommendation on how to best reach your se- Warning lected destination. The Navigation DVD module contains a During route guidance, you will not receive Class 1 laser product. There is a danger of... -
Page 124: Tips On The Navigation Dvd
DVD. Only use Mercedes-Benz navigation DVDs designed for the SLK-Class (R171) 1 Ejecting DVDs COMAND system. No other CDs or DVDs 2 DVD slot will work. Using other navigation CDs or DVDs might lead to malfunctions. Because of changes in local traffic patterns Your Navigation DVD drive has been (e.g. -
Page 125: Travelling Abroad
DVD. If your vehicle has been transported by a GPS (Global Positioning System) sig- car, train or ferry, COMAND may require nals received make it possible to deter- Travelling abroad some time to find its exact position. -
Page 126: Trip Interruption During Route Guidance
2 and 12 hours after interruption: ance restrictions: Continue Route guidance manually COMAND does not output navigation in the Navigation main menu Trip interruption means parking the ve- announcements. ( page 127). hicle and switching COMAND OFF. -
Page 127: Selection Lists
Navigation* Important notes You can select a list item using or . Selection lists If, as shown in the example, you can see Some menus provide lists from which you Page soft keys, then you can use the can select an item. soft keys to scroll up or down the list, page Example: Menu to select a street by page. -
Page 128: Navigation Main Menu
Navigation* Navigation main menu Navigation main menu Calling up the Navigation main menu Press . If route guidance is active, a prompt is This menu item only appears: displayed instead, asking if route guid- if the route guidance had previously The Navigation main menu appears if ance is to be cancelled ( page 157). -
Page 129: Avoiding Certain Road Types
Navigation* Navigation main menu Last destinations Selectable soft keys Avoiding certain road types You can select from the list of last des- Home soft key Certain road types to be avoided can be tinations ( page 174), or of such that Provides access to the input of a home defined for the system’s route calculation. -
Page 130: Adjusting The Acoustics For Navigation Announcements
Navigation* Navigation main menu Use or to select an option. Bass/Treble/Balance Setting bass, treble or balance Press . Volume ( page 130) In the Setting Mode mode menu press Bass Treble ance soft key. Setting This will switch the option ON or OFF. Press the soft key in the Naviga- Press ... - Page 131 Navigation* Navigation main menu Press the or key to select the Adjusting the volume desired setting. Automatically generated navigation an- Press . nouncements are superimposed over any other active audio source. The volume dif- The new setting is stored. ference is adjustable.
-
Page 132: Destination Entry
For character entry, the 12 button keypad or the keypad menu can be used. Use to enter a space. For more convenient entry, COMAND A key must be pressed once or several offers only available characters from times in quick succession:... - Page 133 Navigation* Destination entry Wait until the character display disap- Confirming the data entry pears, or press . After entering all the characters the data The character is entered. entry must be confirmed. Press and hold for approx. 2 sec- Deleting a character onds;...
-
Page 134: Entering A Home Address
Navigation* Destination entry Enter or change the home address, us- Entering a home address Change ing the soft key. If a home address has already been es- One frequently used destination address tablished, the home address appears. The Navigation main menu with menu can be established as the home address. - Page 135 Navigation* Destination entry Current location Selectable menu items To save the displayed address as home address, press . Provides access to save the current lo- Destination memory cation as home address, or select a You can select destinations from the home address using the map.
-
Page 136: Destination Entry Menu
Navigation* Destination entry Destination entry menu Entering a destination Open the Navigation main menu Open the Destination entry menu. The ( page 127). Destination entry menu represents the starting point. The destination displayed last can now be adopted ( page 137), or another location can be entered ( page 137). -
Page 137: Selecting The Region
Navigation* Destination entry POIs Selectable soft keys soft key Selecting the region Provides access to the input of a POI soft key In the Destination entry menu (Point of interest) ( page 179), Provides access to destination input di- ( page 135) the region currently selected List rectly via road map ( page 146), soft key... -
Page 138: Entering A City
Navigation* Destination entry Use or to select a region. Accepting the displayed destination Press and hold for approx. 2 sec- The selected region appears black. onds. Press . Selecting a different region deletes the Do not confuse the button with the city last entered. - Page 139 Navigation* Destination entry Use or to select the destina- Switching to a selection list is possible at For smaller cities with up to any time while entering a city. tion city. 15 streets: Page soft keys allow scrolling Select Street menu ( page 141).
-
Page 140: Narrowing Of The Destination After Selecting A City
Navigation* Destination entry soft key Narrowing of the destination after Provides access to destination input di- selecting a city rectly via road map ( page 146), Besides entering a street name CityCtr soft key ( page 140), the following soft keys are Provides access to the input of a city available for narrowing the destination. -
Page 141: Entering A Street In The Destination City
Navigation* Destination entry Press . Entering a center Selecting a center Use the keypad menu or the 12 button The Start Route Guidance menu keypad to enter the data of the center ( page 152) appears. ( page 131). Entering a street in the destination After entering the center a selection city list of centers appears indicated by... - Page 142 Navigation* Destination entry If no streets are registered for the se- Use the keypad menu or the 12 button Selecting a street lected city: keypad to enter the data of the street Select City Center menu ( page 139). ( page 131). The appropriate menu can be identified After entering the street a selection list Select...
-
Page 143: Narrowing Of The Destination
Navigation* Destination entry If the street extends through several Narrowing of the destination after city centers, the list of city centers re- selecting a street ferring to the street selected appears. Selecting the city center referring to the street selected The system distinguishes between streets with the same name in a city by specifying the center. -
Page 144: Entering An Intersection
Navigation* Destination entry soft key The following soft keys can also be select- Provides access to further destination Intrsct. soft key is only available if input directly via road map Mode soft key streets intersecting the destination ( page 146), For setting the route mode street are stored as intersections on Intrsct. -
Page 145: Entering A House Number
Navigation* Destination entry Press . Proceed the same as when entering a city name ( page 137). The Start Route Guidance menu ( page 152) appears. List of intersecting streets Entering a house number Use or to select an intersec- tion. - Page 146 Navigation* Destination entry Use , , , , or to Press and hold for approx. 2 sec- select the numbers. Press after onds to confirm the input; Hse. no. soft key is only available each selection; when registered house numbers are stored on the navigation DVD for the Use ...
-
Page 147: Entering A Destination Using The Map
Navigation* Destination entry Selecting a house number range Entering a destination using the map Press ; If no soft key is selected within approx. 8 seconds, the soft key dis- plays will disappear. Press the soft key if it appears in a menu. - Page 148 Navigation* Destination entry Selectable soft keys Moving the map and selecting a desti- nation Coord. soft key The destination selection will be lost Move the cursor using , , , Back Allows entering a destination via geo when pressing the soft key.
-
Page 149: Entering A Destination Via Geo Coordinates
Navigation* Destination entry Coord. Start route guidance to the selected Press the soft key. Entering a destination via geo destination coordinates The menu for entering coordinates ap- Press . pears. You can set the individual values Destination input via coordinates (longi- for the longitude and latitude in this tude and latitude) will only be possible if The Start Route Guidance menu... - Page 150 Navigation* Destination entry Press . Press to select the value you wish to set. The Start Route Guidance menu To store the indicated position, press Memory Select the desired value using ( page 152) appears if route guidance soft key.
-
Page 151: Storing Map Locations
Navigation* Destination entry Memory Storing current vehicle position Press the soft key. The system stores the current vehicle Route guidance is only possible to co- position. ordinates within the digital map range. While storage takes place, the Memory Storing map locations soft key display changes its color for a short period of time. - Page 152 Navigation* Destination entry Memory Press the soft key. The system stores the selected loca- tion. While storage takes place, the Memory soft key display changes its color for a short period of time.
-
Page 153: Route Guidance
Navigation* Route guidance Besides starting route guidance the follow- Starting route guidance menu Route calculation ing soft keys are available: You can start route guidance when the Depending on the distance to the destina- soft key destination input is complete and tion, route calculation can take some time. -
Page 154: Route Re-Calculation
Navigation* Route guidance Repeating a current navigation an- Route re-calculation Navigation announcements nouncement The system will calculate a new route dur- If a navigation announcement is not readily ing active route guidance if the driver fails Warning understood, it can be repeated at any time. to follow the route guidance. -
Page 155: Navigation Displays
If a new route guidance cycle is started, When the display unit is set to miles, the announcements are automatically the COMAND will indicate distances in switched ON again. miles (mi) or feet (ft). When the display unit is set to km, the... - Page 156 Navigation* Route guidance The circle shows the current vehicle lo- On the right-hand side of the display the Changing map scale cation. The arrow in the circle designates symbol for the next driving maneuver is in- the current driving direction. dicated (here left turn).
- Page 157 8 seconds, the soft key display your vehicle Operator's Manual). will disappear. When the display unit is set to miles, Compass symbol the COMAND will indicate distances in Press the soft key. Dynamic map orientation, driving direc- miles (mi) or feet (ft).
-
Page 158: Destination Reached
Navigation* Route guidance Split-screen mode Cancelling route guidance The map is shown on the left, while in- In navigation mode, press . Information concerning the current lo- formation concerning the next driving cation is shown in the status bar if GPS maneuver is shown on the right. -
Page 159: During Route Guidance
Showing soft key displays Provides access to the Display menu Detour soft key COMAND automatically hides the soft key ( page 167), Provides access to the Detour function displays, when not activated, after a cer- ( page 161), soft key tain period of time. -
Page 160: Info Menu
Navigation* During route guidance 1, 2 and 3 refer to the stop-over Selectable soft keys Info menu destination. You'll only see the details Route soft key: If the soft key displays are shown for the final destination when you arrive Info Provides access to the display of the ( page 158), press the... -
Page 161: Displaying The Route List
Navigation* During route guidance The list of road/route sections remain- Displaying the route list ing appears. In the Info menu ( page 159), press Route The road currently travelled on appears soft key. at the top. The route appears on the map. Press ... -
Page 162: Detour Function
Navigation* During route guidance Detour function is not active: The system gives you a full-screen map Detour function You can activate the function and set and freezes the map and screen show- The Detour function blocks a route seg- the length of a route segment to be ing the position of the vehicle. - Page 163 Navigation* During route guidance Press . Changing detour If the soft key displays are shown The system calculates a new route Detour ( page 158), press the soft key. avoiding the blocked segment if possi- ble. Change detour Use to select the menu item.
-
Page 164: Stop-Over
Navigation* During route guidance Stop-over The Stop-over function offers the option of selecting a stop-over destination while route guidance is active. A stop-over destination can be, for exam- ple, a gas station, a rest area, or a hospital, but also a regular destination. Once the stop-over destination has been reached, the system automatically calculates the route to the final destination. - Page 165 Navigation* During route guidance Route guidance to a stop-over destina- soft key tion is not active: Provides access to a list of parking ar- You can enter a stop-over destination; eas and multi-story car parks in the area, soft key Provides access to a list of restaurants Route guidance to a stop-over is al- in the area,...
- Page 166 Navigation* During route guidance Press . Press one of the soft keys, for example soft key. If appropriate destinations are avail- The arrows point in the direction of the One of several food categories can be able, a list with restaurants in the area destination.
- Page 167 Navigation* During route guidance Press to confirm the selection of the destination. The system begins to calculate the route to the selected stop-over destina- tion. Changing/deleting the stop-over desti- nation The soft key displays are shown ( page 158). St-over Press the soft key.
-
Page 168: Defining Route Guidance Displays
Navigation* During route guidance Use to select the View soft key Replace active stopover entry. Provides access to setting the map ori- entation ( page 169), Press . soft key The stop-over is deleted, a new stop- Provides access to the Position Display over destination can be entered menu ( page 170), ( page 164). -
Page 169: Setting Symbols Display
Navigation* During route guidance Standard option: Setting symbols display The symbols for the system default You can select which POIs will appear as setting are displayed on the map; symbols on the map. Personal option: The symbols to be displayed can be selected from a list ( page 169);... -
Page 170: Setting Map Orientation
Navigation* During route guidance Back Setting personal symbol display Finally, press the soft key or wait for the screen to change. Personal After activating the option Change ( page 168), press the soft key. The setting is stored. The list of available symbols appears. Setting map orientation One of the following orientations can be selected:... -
Page 171: Switching Gps Position Display On/Off
Navigation* During route guidance Changing map orientation Switching GPS position display Use or to select the desired ON/OFF option. If you activate GPS position display and full-screen map display ( page 156), the Press . following data is displayed in the status The orientation changes. -
Page 172: Automatic Map Toggling
Navigation* During route guidance Press . Switching automatic toggling ON/OFF Depending on the previous setting, In the Display menu ( page 167), Auto GPS position display will be switched press the soft key. ON or OFF. Option appears. Back Finally, press the soft key or wait for the screen to change. -
Page 173: Scales For Full-Screen And Split-Screen Map Display
Navigation* During route guidance In the Display menu, press the Zoom ( page 167) soft key. The solid circle shows the current The solid circle shows the current setting. setting. Use or to select the desired Standard setting option: option. - Page 174 Navigation* During route guidance Use or to select the desired op- tion. Press . Depending on the previous setting, the Standard setting (identical scale) or Manual (individual scale) option is acti- vated. Back Finally, press the soft key or wait for the screen to change.
-
Page 175: Last Destinations And Destination Memory
Navigation* Last destinations and destination memory Use to select the Selecting an entry from the Last desti- Last destinations memory Last destinations menu item. nations memory Last destinations memory automatical- Press . Last destinations Open the memory. ly stores the last destination for which route guidance had been started. - Page 176 Navigation* Last destinations and destination memory Selectable soft keys Deleting an entry from the Last destina- tions memory Save soft key Stores the selected entry in the Destina- Select an entry ( page 174). tion memory ( page 177), Delete Press the soft key.
-
Page 177: Destination Memory
Navigation* Last destinations and destination memory Starting route guidance to a destina- Destination memory tion from the Destination memory Calling up the Destination memory and Select a destination. selecting a destination Press . Open the Navigation main menu The Start Route Guidance menu ap- ( page 127). - Page 178 Navigation* Last destinations and destination memory Use to select the menu item Storing under the default name Press . Press and hold for approx. 2 sec- The name must have at least one char- onds; acter. The system deletes the entry from the destination memory.
- Page 179 Navigation* Last destinations and destination memory To select lower or upper case or to select special characters, the following shift Delete Do not confuse the soft key (de- fields on the display are available: letion of the last character) with the Back = upper case soft key (deletion of the complete...
-
Page 180: Pois (Points Of Interest)
Navigation* POIs (Points of Interest) POIs (Points of Interest) Use to select the POIs menu item. Entering POIs Press . The POIs main menu appears POIs include gas stations, airports, ( page 180). parking areas, rest stops, or hospitals, etc. -
Page 181: Selecting Poi In The Local Area Of The Current Position
Navigation* POIs (Points of Interest) Enter the desired details of a destina- Selection of one of the following menu Selecting POI in the local area of the tion ( page 135). items is possible: current position POIs Current position Press the soft key. - Page 182 Navigation* POIs (Points of Interest) Use or to select a POI. Selecting a POI category If you have selected the Restaurant Page category, another list will be displayed soft keys allow scrolling from which you can select a sub-cate- through the list page by page.
-
Page 183: Selecting Poi For A Selected City
Navigation* POIs (Points of Interest) Proceed with “Selecting a POI catego- Selecting POI for a selected city ry“ ( page 181) and “Selecting a POI“ In the POIs main menu ( page 180), ( page 181). Select city select the menu item. - Page 184 Navigation* POIs (Points of Interest) Selecting another region Entering POI names Selecting a POI Region Press the soft key. The region list appears. Please see “Selecting the region” ( page 136). Selecting a POI category Use or to select a category. Press .
-
Page 185: Selecting A Poi Using The Map
Navigation* POIs (Points of Interest) In the Destination entry menu ( page 135), press the soft key. The list also includes the distance “as The full-screen map appears. Symbols the crow flies” (as opposed to road dis- indicate the POIs. tance), and the direction to the POI. - Page 186 Navigation* POIs (Points of Interest) If required, use , , , , Symbol Prev. Next Press the soft key. Press the soft key to select or to move the map. the desired POI. A POI is selected and highlighted in col- Details If the soft key displays are hidden, or.
-
Page 188: Service
Service Tele Aid*... -
Page 189: Tele Aid
Even after termination of the connection, Roadside Assistance tions: the service may remain active for up to an- Mercedes-Benz Roadside Assistance will other 5 minutes in order to transmit any re- Emergency call system assist if technical problems with your vehi- quired data. -
Page 190: Information
You are prompted to confirm if route guid- cle Operator's Manual for additional ance to the address is to be started. COMAND reverts to the system last ac- information. tive before Tele Aid* was activated. Use to select the... - Page 191 Service Tele Aid* Even after the connection has been termi- Starting route guidance nated, the service will remain active for 5 You are prompted to confirm if route guid- minutes in order to transmit any required ance to the address is to be started. data.
-
Page 192: System
System System settings... -
Page 193: System Settings
ON and OFF ( page 195) Display soft key For changing the display settings ( page 196) Reset soft key For resetting COMAND to the factory settings ( page 197) Selectable soft keys Time soft key For setting the date and time... - Page 194 System System settings Press or . The following options are now available: Setting the time Depending on the selection, hours or There is no automatic change from day- minutes are set. light saving time to standard time. Setting the date This has to be changed manually.
- Page 195 System System settings Setting the date Setting the Date/Time format Format Press the soft key. You will see the date and time following The date can be set only if GPS recep- the currently selected format, as well tion is available. as a list of possible formats.
-
Page 196: Setting The Language
System System settings The following options are available: Setting the language Switching confirmation beeps and Instr. cluster settings acoustic signals ON/OFF The language setting changes the display The system switches to the language language as well as the language used for In the System menu, press the already set in the vehicle instrument Tones... -
Page 197: Display Settings
System System settings Use or to select an entry. The following option and soft key are avail- Display settings able: Press . Open the System menu ( page 192). Switching the display dimming charac- The requested sounds are switched ON Display Press the soft key. -
Page 198: Reset Function
Night mode Reset function The display is constantly set to night- Actuating the Reset function resets time design. COMAND to the factory settings. Automatic In addition, it deletes: The display will change depending on the illumination of the instrument clus- Telephone*: All phone book entries ter. - Page 199 System System settings Use to select the menu item Press . This resets the entire system. If you do not want to reset the system and not delete the data: Use to select the menu item Press . A prompt appears asking if resetting You will exit the reset screen.
-
Page 200: Glossary
Data saved on a storage medium can right speakers. deleted. be organized into directories for im- proved clarity. Can be likened to a filing COMAND cabinet containing a number of folders, (Binary digit) (Cockpit Management and Data Sys- each of which holds a number of docu- The smallest unit of digital information. - Page 201 Glossary LOGIC7® Multi session (Global System for Mobile communica- A 7-channel surround matrix that con- A method for recording data, e.g. for tion) verts any 2-channel material into CDs. Data is written to the CD in a num- A standard network protocol used breathtaking multi-channel surround ber of sessions.
- Page 202 Glossary Root directory Unlock code The uppermost directory on a storage (Short Message Service) Your unlock code prevents unautho- medium. With this function, you can receive, rized persons from using your tele- read and delete short text messages phone. The unlock code is a number Scan rate (MP3) (if SMS service is provided by your ser- string, which you have to enter when...
-
Page 204: Index
CDs ....51, 59, 70 COMAND ..... . 199 switching to . - Page 205 Index Display adjusting brightness ... . 197 Deleting File structure (MP3) ....60 switching design ....196 destination Folder.
- Page 206 Controls ..... . 26 starting route guidance to Mercedes-Benz Information ..189 Mute function ....41 Last destination .
- Page 207 Index Navigation soft key displays Phone book ....114 showing..... . 158 deleting entry .
- Page 208 Index Root directory ....61, 201 Scan search ....201 Setting Route display in CD changer mode .
- Page 209 COMAND..... . 32 Sound functions ....36 home address .
- Page 210 Index System language Track setting..... . . 195 forward Universal Time Coordinated System settings ....192 in CD changer mode .
- Page 212 We reserve the right to modify the techni- cal details of the COMAND system as given in the data and illustrations of this Opera- tor's Manual. Reprinting, translation and copying, even of excerpts, is not permitted without prior authorization in writing.
Need help?
Do you have a question about the COMAND and is the answer not in the manual?
Questions and answers