
Subscribe to Our Youtube Channel
Related Manuals for REI ECD-5500


Summary of Contents for REI ECD-5500
- Page 1 Heavy Duty AM/FM/CD Stereo Weather Band Radio, USB iPod® Control and Charging, Bluetooth® Hands Free Calling and Wireless Audio Streaming, Front/Rear Auxiliary Inputs Installation/ Operation Manual ECD-5500...
- Page 2 Thank you for purchasing ECD-5500 AM/FM/CD Receiver from REI. This product is designed and tested to with stand temperature and vibration extremes. Please read the owner’s manual carefully before attempting to install this unit. If you have an installation question or need installation assistance, please call the: SERVICE HOT LINE 1-877-726-4617 Toll Free USA &...
-
Page 3: Controls And Indicators
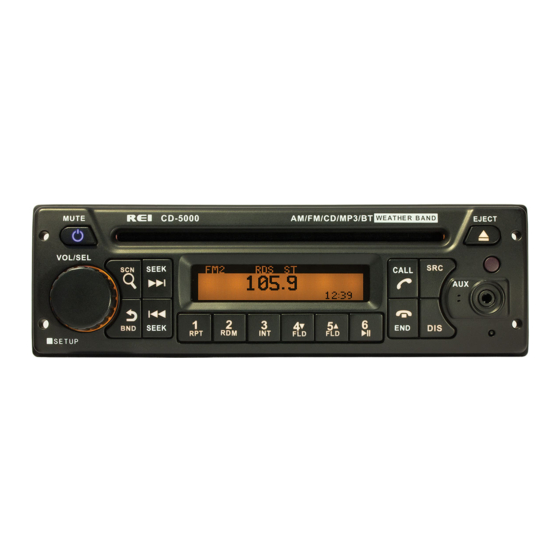
CONTROLS AND INDICATORS 1. Power 2. Select Knob 3. Scan /Search Button 4. Band /Back Button 5. Tune /Seek Down Button 6. Tune /Seek Up Button 7. Preset Memory/Recall, Media Control Buttons 8. Call Connect/Transfer Button 9. Call End Button 10. -
Page 4: Operation
OPERATION Power Button Press the Power Button to turn the unit ON or hold to turn the unit OFF. The button will illuminate RED when OFF and BLUE when ON. Note: Radio can also be powered on by pressing any front button when ANY . Select Knob Press and hold this button to access the radio SETUP MENU. - Page 5 10) DISP Button Press this button to change between Clock and Mode Information display. Setting the Time: With the radio’s BLUE power light ON, press and hold this button until the hour display begins to flash. Rotate Volume/Select Knob to adjust the hour. Press the DISP button again, and the minute display will flash.
-
Page 6: Weather Band Mode
WEATHER BAND MODE NOAA National Weather Radio Broadcasts from over 380 Locations throughout the U.S. on seven VHF/FM frequencies. Tune to receive continuous weather information 24 hours a day on one of the following frequencies. For local station listing see: http://www.nws.noaa.gov/nwr/nwrbro.htm Press preset 1 to select weather band channel 1 - 162.400MHZ Press preset 2 to select weather band channel 2 - 162.425MHZ Press preset 3 to select weather band channel 3 - 162.450MHZ... -
Page 7: Radio Operation
RADIO OPERATION 1. AM/FM Preset Mode Press the BAND button to switch from FM-1, FM-2, FM-3, AM-1, or AM-2. 2. Preset Number Displays the Preset Channel of the frequency. 3. Frequency Display Displays the Frequency of the current tuned station. 4. -
Page 8: Connecting A New Bluetooth® Device
3. Access the” Look for devices” feature of the Mobile device and begin searching. After searching, the Radio should appear in the list of devices as ECD-5500. Press to accept. 4. A prompt to bond should appear on your Mobile device. Press to accept and continue the process. - Page 9 BLUETOOTH® PHONE MODE 1. Bluetooth Phone ID Displays the ID of previously paired Bluetooth Phones. Rotate to the VOL/SEL knob to display other paired devices and press the VOL/SEL to initiate re-connection. 2. Display information Shows the connection status and phone number of the incoming or outgoing call. 3.
- Page 10 BLUETOOTH® STREAMING AUDIO MODE The unit allows you to play back audio files from your mobile device using a Bluetooth® connection. The Radio can control a Bluetooth® audio player via Advanced Audio Distribution Profile (A2DP) or Audio/Video Remote Control Profile (AVRCP). Bluetooth® audio players (or Bluetooth® adapters) compatible with these profiles can be connected to this Radio.
-
Page 11: Ipod®/Iphone® Operation
iPod®/iPhone® OPERATION To listen to audio through your apple device, verify that a 30-pin USB extension is connected to the USB pigtail on the rear of the radio. Next, connect the 30-pin cable to the Apple device. Once connected, the radio will automatically switch the source to iPod®... - Page 12 USB/CD OPERATION Insert a CD into the disc slot, or connect a USB storage device to the unit. The radio will automatically switch MODE’S and begin playback after the media is successfully loaded. Press and hold the SEEK UP/DOWN buttons to manually FF/REW though a track, or press and release to change tracks UP/DOWN.
- Page 13 Apple Inc., registered in the U.S. and other countries. Functionality may vary by model number, operation is not guaranteed. The Bluetooth® word mark and logos are registered trademarks owned by Bluetooth SIG, Inc. and any use of such marks by REI under license.
-
Page 14: Iso Installation
REQUIRED RADIO DIMENSIONS Verify the radio will fit by following the suggested dimensions below. Carefully cut or file as necessary until the sleeve easily slides into the opening. ISO INSTALLATION For installations that do NOT require the use of the DIN collar. The radio has threaded holes in the chassis side panels for ISO mount applications. - Page 15 Pass the harness and antenna cable through the DIN collar, and connect to the back of the radio. Verify clearance; then gently insert the radio into the DIN Collar until both spring clips are locked into place. If additional support is needed, bend the included support bracket, and secure it to the vehicle using a screw.
-
Page 16: Electrical Connections
4. To remove the radio, insert the two release keys into the holes on the front face of the radio. The tools must be inserted with the notched side facing the radio. Slide the keys foreword until you hear a click. Then pull the radio out, releasing it from the DIN collar. -
Page 17: Troubleshooting
TROUBLE SHOOTING Problem Cause Solution Backlighting is on, but no LCD display No power to BATTERY wire or blown 10A Check for both ACC & BATTERY voltage main fuse. with Multi-meter, check all fuses. Cannot tune radio stations The antenna cable is not connected. The signal Connect the antenna cable. - Page 18 SPECIFICATIONS AUDIO SECTION Power supply voltage (negative ground) ……………….……….12V DC (10V-18V) Standby Current…...……………………..…………..…………………………20mA Max Current Consumption……….……………………….……….….………..5A FM TUNER Range …………………………………………………..….(USA) 87.5 – 107.9 MHz (EUR) 87.50 – 108.00 MHz Usable Sensitivity (S/N = 30dB)…………………………...7.34dBf.(0.6uV/75ohms) Signal to noise ratio ………………………………….………………...58dB (Mono) Stereo separation (@ 1K Hz) ………………………….……..……………..…42 dB AM TUNER Range …………………………………………………..….…(USA)530 –...
- Page 19 AUXILIARY INPUT SPECIFICATIONS Input Voltage Maximum Voltage………………………………………………...1.0V Input impedance………………………………………………………………..10KΩ DIMENSIONS Chassis (W x H x D) ………...…………….178mm (7”) x 50mm (2”) x 154mm (6”) Nosepiece (W x H x D) ……….….188mm (7-3/8”) x 58mm (2-1/4”) x 17mm (5/8”) Weight ……………………………………………….…………………………3.5Ibs *Due to continuous product improvement, specifications and design are subject to change without notice.
- Page 20 Radio Engineering Industries, Inc. www.radioeng.com Rev 0.1 Date: 05-15-14...
Need help?
Do you have a question about the ECD-5500 and is the answer not in the manual?
Questions and answers