
Subscribe to Our Youtube Channel
Related Manuals for REI CD-3000


Summary of Contents for REI CD-3000
- Page 1 AM/FM/CD/MP3 Weather Band Radio Receiver with USB/SD & Auxiliary Inputs, 3 Built-in Microphone inputs for PA Announcements Installation/Operation Manual 50W x 4 CD-3000...
- Page 2 Thank you for purchasing the CD-3000 AM/FM/CD/MP3/USB/SD Receiver from REI. This product is designed and tested to withstand temperature and vibration extremes. Please read the owner’s manual carefully before attempting to install. If you have an installation question or need installation assistance, please call the: SERVICE HOT LINE 1-877-726-4617 Toll Free USA &...
-
Page 3: Controls And Indicators
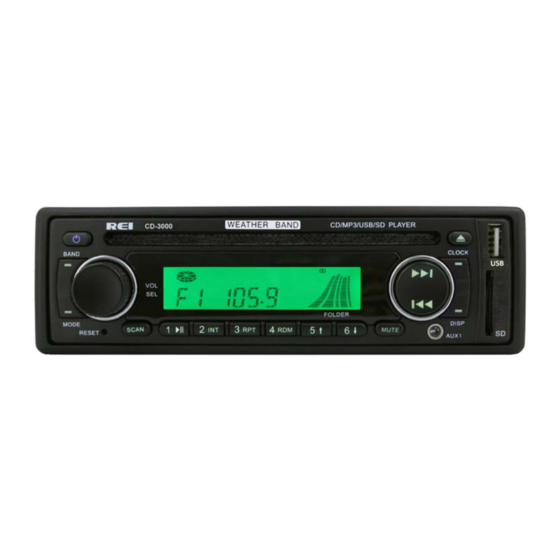
CONTROLS AND INDICATORS Power Button Volume/Select Knob Band Button Mode Button Reset Button Scan Button Preset Memory Buttons/r Playback Options Mute Button Radio Station Tune/Seek, Track Control Buttons (10) Front Auxiliary Input Jack (11) SD Card Input slot (12) Display Button (13) Clock Button (14) USB Input Slot (15) Eject Button... -
Page 4: Operation
OPERATION 1) Power Button Press the Power Button to turn ON or OFF the unit. A red light means the unit is in standby, a Blue light means the radio is on. 2) Volume/Select Knob Rotate the knob left or right to change the volume level. Press the knob to select one of the following functions: VOL---BASS---TREB---BAL---FAD Rotate the knob to adjust the desired setting. - Page 5 9) TUNE / SEEK /TRACK Buttons Under Radio mode, press the desired button to manually tune a station moving upward or downward. Press and hold button momentarily and the radio will automatically seek or down to the next available radio station. Press and hold button for 3 seconds and the radio continuously tunes up or down until the button is released.
- Page 6 RADIO SYSTEM MENU Press and hold the VOL/SEL button for 2 seconds. LCD will display MENU, make the desired selection below: To change display SCROLL OPTIONS, rotate VOL/SEL, then press to choose: • Scroll OFF - RDS text will not display automatically, must press the DISP key to view •...
- Page 7 PA OPERATION The CD-3000 has three PA Microphone inputs, 2 Dynamic & 1 Carbon microphone input. All microphones have priority over all other audio modes and MUTE the source audio being played when keyed. When the PA is triggered, the front display will show MIC 1, MIC 2 or MIC, until the trigger is un-keyed.
-
Page 8: Radio Connections
RADIO CONNECTIONS Follow this easy wiring diagram when installing. Be sure to disconnect the battery negative terminal before beginning. -
Page 9: Radio Installation
REQUIRED RADIO DIMENSIONS Verify the radio will fit by following the suggested dimensions below. RADIO INSTALLATION Verify lock Clips on the DIN collar are pressed inward. Place the collar into the dash opening. Bend the locking tabs outward as shown on the drawing below to secure into place in the Dash Opening. -
Page 10: Troubleshooting
RADIO REMOVAL To remove the radio, disconnect the rear support stud if installed. Carefully release the front Trim Ring lock tabs at the top and bottom of the nosepiece. Then insert the two release keys on both sides of the nosepiece and pull the radio out. TROUBLESHOOTING Problem Cause... -
Page 11: Specifications
SPECIFICATIONS: General Specifications Operating Voltage (10.0 –15.6V allowable) Maximum Current Consumption Standby Current Consumption 10mA POWER OUTPUT Continuous Output (4Ω, 20 to 20,000 Hz at 1% THD) 4 x 22 Watts Maximum Power Output 4 x 50 Watts Speaker load Impedance 4-8 Ohms FM STEREO RADIO Frequency range... -
Page 12: Usb Interface
Usable Discs: SVCD, CD-R/RW, CD-Audio, CD-MP3, CD-WMA USB INTERFACE USB Standard USB1.1/2.0 (Full Speed) Maximum Supply Current 500mA File System Fat16/32 Decoding Format same as CD SD CARD INTERFACE Frequency Response (+/- 1dB) 10 – 20,000Hz Dynamic Range 80dB (1kHz) Harmonic Distortion 0.01% Decoding Format... - Page 13 Memo:...
- Page 14 Radio Engineering Industries, Inc. www.radioeng.com Rev A Date: 9-19-14...
Need help?
Do you have a question about the CD-3000 and is the answer not in the manual?
Questions and answers
Mode will not change when pushing mode button. So mic not working
If the microphone is not working and the mode button does not change modes on the REI CD-3000, check the following:
1. Microphone Issue:
- Ensure the microphone is connected to the correct MIC 1 or MIC 2 input.
- Make sure the correct microphone type is being used.
- Check that the microphone volume is not set to "0"; adjust the microphone volume.
2. Mode Button Issue:
- If the front controls are locked and the LCD display shows MIC / MIC 1 / MIC 2, the PA system may be triggered.
- Disconnect the microphone and verify correct pin connections.
- Replace the microphone if necessary.
These steps should help restore normal operation of the microphone and mode button.
This answer is automatically generated
I have a iPhone and 16 pro max and a CEI CD-3000 radio in my parabus and can’t get it to play my dm radio subscription from my phone thru the REI CD-3000 system using the usb jack on the radio. I’m Bart Long 540-325-7892 , bart.long@comcast.net. I thank you in advance for your assistance