Table of Contents
Advertisement
Quick Links
Advertisement
Table of Contents

Subscribe to Our Youtube Channel
Related Manuals for Elation emotion


Summary of Contents for Elation emotion
- Page 1 user manual ...
- Page 2 Elation Professional USA | 6122 S. Eastern Ave. | Los Angeles, CA. 90040 323-582-3322 | 323-832-9142 fax | www.elationlighting.com | info@elationlighting.com Elation Professional B.V.
-
Page 3: Table Of Contents
Keystone Feature (Standard and Extended Modes) Collage Generator (Extended Mode) Synchronization Fixture Control, Projector Control Content Management Application (CMA) Fixture Software, Firmware and Utilities DMX Channel Functions And Values Error Codes Cleaning and Maintenance Technical Specifications Optional Accessories EMOTION™ User Manual Ver. 1... -
Page 4: General Information
Please do not discard the shipping carton in the trash. Please recycle whenever possible. BOX CONTENTS (2) Omega Brackets (1) 5pin DMX Cable (1) powerCON Cable (1) Safety Cable Manual & Warranty Card EMOTION™ User Manual Ver. 1... - Page 5 You may also visit us on the web at www.elationlighting.com any comments or suggestions. For service related issue please contact Elation Professional®. ELATION SERVICE USA - Monday - Friday 8:00am to 5:00pm PST...
-
Page 6: Warranty
No accessories should be shipped with the product. If any accessories are shipped with the product, Elation Professional® shall have no liability what so ever for loss and/or or damage to any such accessories, nor for the safe return thereof. -
Page 7: Safety Instructions
Do not operate this fixture if the power cord has become frayed, crimped and/or damaged. If the power cord is damaged, replace it immediately with a new one of similar power rating. EMOTION™ User Manual Ver. 1... -
Page 8: General Guidelines
Use the original packaging and materials to transport the fixture in for service. DO NOT TOUCH the housing bare-hand during its operation. Turn OFF the power and allow approximately 15 minutes for the fixture to cool down before replacing or serving. EMOTION™ User Manual Ver. 1... -
Page 9: Fixture Overview
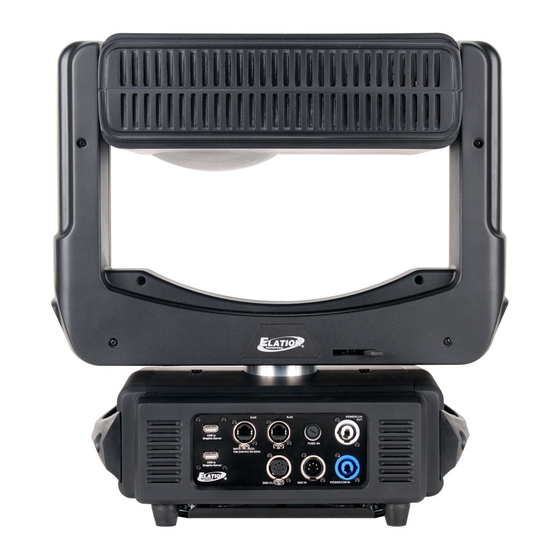
RIGHT Button Carrying Handle(s) MODE/ESC Button UP Button 5pin DMX Input powerCON Input powerCON Output Fuse RJ45 to Graphics Server RJ45 Art-NET Input USB 3.0 to Graphics Server USB 3.0 to Graphics Server 5pin DMX Output EMOTION™ User Manual Ver. 1... -
Page 10: Fixture Installation
10 times the weight of the fixture. Fixture installation must always be secured with a secondary safety attachment, such as an appropriate safety cable. Never stand directly below the device when mounting, removing or servicing. EMOTION™ User Manual Ver. 1... - Page 11 S A F E T Y C A B L E ALWAYS USE A SAFETY CABLE WHENEVER INSTALLING THIS FIXTURE IN A SUSPENDED ENVIRONMENT TO ENSURE THE FIXTURE WILL NOT DROP IF THE CLAMP FAILS. EMOTION™ User Manual Ver. 1...
- Page 12 The fixture provides a built-in rigging point for a safety cable on the hanging bracket as illustrated above. Be sure to only use the designated rigging point for the safety cable and never secure a safety cable to a carrying handle. EMOTION™ User Manual Ver. 1...
-
Page 13: Fixture Menu
NOTE: To access the LCD Menu Control Display via the internal battery, press and hold the MODE/ESC button for 3 seconds. The LCD Menu Control Display will shut OFF automatically about 1 minute from the last button press. EMOTION™ User Manual Ver. 1... - Page 14 . e l a t i o n l i g h t i n g . c o m ELATION© EMOTION™ S Y S T E M M E N U Features are subject to change without any prior written notice.
- Page 15 . e l a t i o n l i g h t i n g . c o m ELATION© EMOTION™ S Y S T E M M E N U Specifications and features are subject to change without any prior written notice.
-
Page 16: Emotion Overview
E M O T I O N O V E R V I E W The EMOTION™ is a next generation digital light, it contains an embedded projector; a powerful graphics engine and a custom designed Pan/Tilt system. The fixture can be completely controlled via DMX in one of two modes, a Standard Protocol mode to allow a minimum DMX footprint, or a full-featured Extended Protocol mode. -
Page 17: Standard Mode / Extended Mode Overview
STANDARD MODE / EXTENDED MODE OVERVIEW The Emotion Fixture has two distinct control modes that a control board can send commands to it with, a Standard Protocol mode and an Extended Protocol mode. The standard protocol mode allows the most number of fixtures per DMX universe using the fewest number of channels, 32. -
Page 18: Content Layers And Transistions
Reveal Rectangle Out Reveal Rectangle In Reveal Cross Out Reveal Cross In Pixelate Coarse Pixelate Medium Pixelate Fine Vertical Slats Coarse Vertical Slats Medium Vertical Slats Fine Horizontal Slats Coarse Horizontal Slats Medium Horizontal Slats Fine Swirl EMOTION™ User Manual Ver. 1... -
Page 19: Layer Display Mode
Content Fill on Gobo Inverted Black to Alpha Content Fill on Gobo Black to Alpha Content Fill on Negative Gobo Content Fill on Negative Gobo Inverted Black to Alpha Content Fill on Negative Gobo Black to Alpha Gobo Set Black Transparent EMOTION™ User Manual Ver. 1... -
Page 20: Stock Content Or User Content
Notice that the above list contains references user content; the Hog4 has a selection to make this choice in the background, without the user needing to keep track of DMX details. (Note: Using the EMOTION with other consoles may require a ™... -
Page 21: Live Effects
. e l a t i o n l i g h t i n g . c o m VIDEO FILE – STOCK CONTENT The Emotion fixture ships with 255 pieces of stock video content to be used with the fixture. These files cannot be removed from the fixture, but can be used anywhere when being used with the EMOTION fixture. - Page 22 Faux Tile Pixelate Gauss Blur Sharpen Cartoon Color Deconverge Fuzzifier Prism Gaussian Halo Sepia Red Tones Fire Gradient Gray Maker Gray Maker 2 Posterize Black White Negative Art Dot P Horizontal Mirror Tiles Rainbow Cycle EMOTION™ User Manual Ver. 1...
- Page 23 M1-Red Multiplier. M2-Green Multiplier. M3-Blue Multiplier. Gradient Green Delta 2 M1-Red Multiplier. M2-Green Multiplier. M3-Blue Multiplier. Gradient Blue Delta M1-Red Multiplier. M2-Green Multiplier. M3-Blue Multiplier. Gradient Blue Delta 2 M1-Red Multiplier. M2-Green Multiplier. M3-Blue Multiplier. EMOTION™ User Manual Ver. 1...
-
Page 24: Keystone Feature (Standard And Extended Modes)
This is required for a virtually seam-less output. Multi-Pane example, if you have four Emotion fixtures using a 4-part Multi-Pane Collage with individual 1024x768 video files, the resulting collage resolution will be much higher. In standard collage modes, a single file is divided by the number of parts in the collage. - Page 25 1x2 grid. DMX Values of 126-255 are reserved and default to no collage. (See the below Collage Cell Chart for more details) The Collage Cell Selection parameter determines which cell a particular EMOTION™ fixture will display. DMX values 0 up to 127 are used to step through the grid pattern determined by the Collage Cell parameter.
- Page 26 Standard Color Blend Curve w/Intensity Addition (63 = Max Addition) 64-95 Grey Scale Blend Curve w/Intensity Reduction (64 = Max Reduction) Grey Scale Blend Curve – No Adjustment 97-127 Grey Scale Blend Curve w/Intensity Addition (127 = Max Addition) EMOTION™ User Manual Ver. 1...
-
Page 27: Synchronization
. e l a t i o n l i g h t i n g . c o m COLLAGE EDGE CONTROL / ALIGNMENT PATTERN OUTPUT During Collage setup, it is helpful to view a grid or other technical images to help the process of aligning each individual EMOTION fixture to its portion of the total ™... -
Page 28: Fixture Control, Projector Control
The system is designed to help keep the movie playback time relatively in sync, as perceived. The system is not designed to frame lock or gen-lock, these features will not be supported in the Emotion fixture. Synchronization is used between multiple servers for Collage applications, or other perceived playback applications. - Page 29 This command is meant to change the orientation of the projected image. For example if the projector is hung inverted, the projector can ‘flip’ its output so that images remain upright. There is also the option to front-project or rear-project the image. EMOTION™ User Manual Ver. 1...
-
Page 30: Content Management Application (Cma)
Typically the CMA is installed on a laptop and is available when the fixtures are in use. The CMA is also responsible for all graphics engine management functions as well as managing user content. Graphics engine software updates are handled through the CMA as well. The CMA communicates with the Emotion graphics ... - Page 31 (where the ‘x’ would be the version number) The Windows installer process begins after double-clicking. Press ‘Next’ after being greeted by the setup wizard You must accept the License Agreement, and Press ‘Next’ to continue. EMOTION™ User Manual Ver. 1...
- Page 32 It is not recommended unless there is a specific need. Check the box if you would like a Desktop Shortcut added after installation, this is recommended to ease use EMOTION™ User Manual Ver. 1...
- Page 33 A dialog box may appear if there are other applications open when you are trying to install, choose option that best fits your need. It is recommended to reboot after installation anyways. EMOTION™ User Manual Ver. 1...
- Page 34 . e l a t i o n l i g h t i n g . c o m INSTALLATION OF THE CMA [continued] Press ‘Finish’ to end the installation process. EMOTION™ User Manual Ver. 1...
- Page 35 It is important to note that there is no direct control of the graphics engine IP address. If this functionality is needed, please use a router with a DHCP server set for your specific use. EMOTION™ User Manual Ver. 1...
- Page 36 . e l a t i o n l i g h t i n g . c o m GRAPHICS SERVER CONFIRGURATION Select the EMOTION™ to be viewed in the left-side tree view. Information will be displayed in the right panel.
- Page 37 Once the file is transferred to the graphics engine, a DMX address must be added. This can be accomplished by, right clicking on a file and pressing “Auto-Set DMX” will apply the next available DMX value. EMOTION™ User Manual Ver. 1...
-
Page 38: Fixture Software, Firmware And Utilities
Ethernet connection. Before updating software, be sure to power on, allow the Emotion fixture to find all network devices, and finish startup requirements. This process generally takes up to a minute- please do not start a software update process within 1 minute of powering on an EMOTION™... - Page 39 EMOTION™ MOTION SYSTEM FIRMWARE UPDATE The EMOTION™ fixture has a separate procedure to update the firmware of the motion system. This update process requires the use of a separate loading device. Please contact support for more information, and reference the procedures that are enclosed with the firmware device.
- Page 40 . e l a t i o n l i g h t i n g . c o m DOWNLOAD SYSTEM IMAGE The EMOTION™ fixture graphics system image is available on the support website. Please download this file and place it on the desktop for easy access.
- Page 41 system communications align. EMOTION™ GRAPHICS SYSTEM RESTORE – UTILITY MENU / USER MENU / USER CONTENT DELETION There is a helper utility on the USB stick to aid the recovery of a fixture in the event corrupted content is added by mistake.
-
Page 42: Dmx Channel Functions And Values
100% 0% FEh 00h General H UD i n W hite 255 100% 0% FFh 00h EMOTION™ User Manual Ver. 1... - Page 43 0 255 0% 100% 00h FFh 128 32 Keystone V ertical TBD 0 255 0% 100% 00h FFh EMOTION™ User Manual Ver. 1...
- Page 44 100% 0% FEh 00h General H UD i n W hite 255 100% 0% FFh 00h EMOTION™ User Manual Ver. 1...
- Page 45 100% 00h FFh 128 Transition E ffect 34 TBD 0 255 0% 100% 00h FFh 0 [Note 4 ] EMOTION™ User Manual Ver. 1...
- Page 46 Sync T o F ixture I D 54 0 255 0% 100% 00h FFh 0 [Note 8 ] EMOTION™ User Manual Ver. 1...
- Page 47 Mod1 -‐ r ed m ultiplier. Mod2 -‐ g reen m ultiplier. Mod3 -‐ b lue m ultiplier. Gradient B lue D elta 2 20 EMOTION™ User Manual Ver. 1...
- Page 48 Gobo I nverted C olor D istance f rom B lack t o A lpha 143 Gobo S et B lack T ransparent 144 EMOTION™ User Manual Ver. 1...
- Page 49 Black W hite 35 Negative A rt 36 Dot P 37 Horizontal M irror 38 Tiles 39 RainbowCycle 40 EMOTION™ User Manual Ver. 1...
- Page 50 24 Horizontal S lats C oarse 25 Horizontal S lats M edium 26 Horizontal S lats F ine 27 Swirl 28 EMOTION™ User Manual Ver. 1...
- Page 51 Fixture I D's m ust b e u nique, i .e. c annot b e d uplicated. Fixture I D's a re s et b y u sing t he C MA a pplication. EMOTION™ User Manual Ver. 1...
-
Page 52: Error Codes
The fixture will attempt to operate normally until the errors can be correct by a technician. The errors in question will remain flashing in the display as a reminder of internal errors. Pan Er Tilt Er EMOTION™ User Manual Ver. 1... -
Page 53: Cleaning And Maintenance
Regular inspections are recommended to insure proper function and extended life. There are no user serviceable parts inside this fixture, please refer all other service issues to an authorized Elation service technician. Should you need any spare parts, please order genuine parts from your local Elation dealer. -
Page 54: Technical Specifications
40° - 95°F (5° - 35°C) APPROVALS / RATINGS CE | IP20 Please Note: Specifications and improvements in the design of this unit and this manual are subject to change without any prior written notice. EMOTION™ User Manual Ver. 1... -
Page 55: Optional Accessories
O P T I O N A L A C C E S S O R I E S ORDER CODE ITEM TRIGGER CLAMP Heavy Duty Wrap Around Hook Style Clamp DRCEMO Dual Touring Road Case For EMotion™ AC5PDMX5PRO 5 ft. (1.5m) 5pin PRO DMX Cable CAT6PRO5 5 ft. (1.5m) CAT6 EtherCON Cable PLC6 6 ft.
Need help?
Do you have a question about the emotion and is the answer not in the manual?
Questions and answers