Table of Contents
Advertisement
Quick Links
Advertisement
Table of Contents

Related Manuals for Elation E SPOT III


Summary of Contents for Elation E SPOT III
- Page 1 E SPOT III™ user manual ...
- Page 2 Elation Professional USA | 6122 S. Eastern Ave. | Los Angeles, CA. 90040 323-582-3322 | 323-832-9142 fax | www.elationlighting.com | info@elationlighting.com Elation Professional B.V.
-
Page 3: Table Of Contents
C O N T E N T S General Information Warranty Safety Instructions General Guidelines Fixture Overview Fixture Installation Fixture Menu DMX Channel Functions And Values Error Codes Cleaning and Maintenance Technical Specifications Optional Accessories E SPOT III™ User Manual... -
Page 4: General Information
Please do not discard the shipping carton in the trash. Please recycle whenever possible. BOX CONTENTS (1) Omega Bracket (1) powerCON Cable Manual & Warranty Card E SPOT III™ User Manual... - Page 5 You may also visit us on the web at www.elationlighting.com any comments or suggestions. For service related issue please contact Elation Professional®. ELATION SERVICE USA - Monday - Friday 8:00am to 5:00pm PST...
-
Page 6: Warranty
No accessories should be shipped with the product. If any accessories are shipped with the product, Elation Professional® shall have no liability what so ever for loss and/or or damage to any such accessories, nor for the safe return thereof. -
Page 7: Safety Instructions
Do not operate this fixture if the power cord has become frayed, crimped and/or damaged. If the power cord is damaged, replace it immediately with a new one of similar power rating. E SPOT III™ User Manual... -
Page 8: General Guidelines
L E D L I F E The average LED Life (hours) may vary depending on several factors including but not limited to: Environmental Conditions, Power/Voltage, Usage Patterns (On-Off Cycling), Control and Dimming. E SPOT III™ User Manual... -
Page 9: Fixture Overview
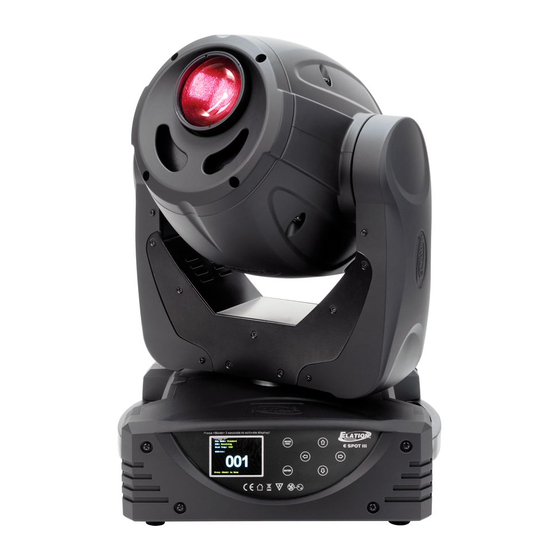
F I X T U R E O V E R V I E W Lens LCD Control Display ENTER Button LEFT Button DOWN Button RIGHT Button MODE/ESC Button UP Button Handles 3pin DMX OUT 3pin DMX IN 5pin DMX OUT 5pin DMX IN powerCON IN Power Switch Fuse E SPOT III™ User Manual... -
Page 10: Fixture Installation
10 times the weight of the fixture. Fixture installation must always be secured with a secondary safety attachment, such as an appropriate safety cable. Never stand directly below the device when mounting, removing or servicing. E SPOT III™ User Manual... - Page 11 S A F E T Y C A B L E ALWAYS USE A SAFETY CABLE WHENEVER INSTALLING THIS FIXTURE IN A SUSPENDED ENVIRONMENT TO ENSURE THE FIXTURE WILL NOT DROP IF THE CLAMP FAILS. E SPOT III™ User Manual...
- Page 12 The fixture provides a built-in rigging point for a safety cable on the hanging bracket as illustrated above. Be sure to only use the designated rigging point for the safety cable and never secure a safety cable to a carrying handle. E SPOT III™ User Manual...
-
Page 13: Fixture Menu
NOTE: To access the LCD Menu Control Display via the internal battery, press and hold the MODE/ESC button for 3 seconds. The LCD Menu Control Display will shut OFF automatically about 1 minute from the last button press. E SPOT III™ User Manual... - Page 14 Display Flash when NO DMX Signal Temperature C/F Celsius/Fahrenheit Temperature Switch Between Initial Status Control = XXX, ... Initial Effect Position Dimmer Modes Standard, Stage, TV, Architectural, Theatre Set Dimmer Mode Reset Default ON/OFF Password = 011 Restore Factory Settings E SPOT III™ User Manual...
- Page 15 Save and Exit Pan,Tilt,…… Save and Automatically Return Scene 001 --Fade Time-- Edit Scenes Manual Scenes Edit --Scene Time-- Scene 083 Input By Outside Stores Scenes via Ext DMX Console Rec. Controller XX~XX Automatic Scenes Recorder E SPOT III™ User Manual...
- Page 16 RDM protocol sends its own packages in the DMX512 data feed and does not influence conventional devices. If DMX splitters are used and RDM control is to be used, these splitters must support RDM. The number and type of RDM parameters depend on the RDM controller being used. E SPOT III™ User Manual...
- Page 17 Because calibration is an extremely delicate procedure, instructions on performing this action are left out of this manual. For a first time calibrator, please contact our customer support team for step-by-step instructions. E SPOT III™ User Manual...
- Page 18 MODE/ESC in order to return to the main menu. 2. Automatic Program Run “Function Mode”. ENTER to confirm. “Auto Program”. ENTER to confirm. elect “Master” or “Alone”. ENTER to confirm. MODE/ESC in order to return to the main menu. E SPOT III™ User Manual...
- Page 19 MODE/ESC in order to return to the main menu. 5. Automatic Scene Recording “Edit Program”. ENTER to confirm. “Edit Scenes”. desired scene numbers. A maximum of 250 scenes can be programmed. ENTER to confirm. MODE/ESC in order to return to the main menu. E SPOT III™ User Manual...
- Page 20 Auto Pro Part 1 is Program 2 Auto Pro Part 2 is Program 3 Auto Pro Part 3 is Program 6 The 3 Slave groups run the Auto Program in certain time segments, as shown in the following picture: E SPOT III™ User Manual...
-
Page 21: Dmx Channel Functions And Values
130-139 Gobo 6 Shake SLOW to FAST 140-149 Gobo 7 Shake SLOW to FAST 150-199 *Clockwise Gobo Wheel Rotation from FAST to SLOW 200-205 NO Rotation 206-255 *Counterclockwise Gobo Wheel Rotation from SLOW to FAST E SPOT III™ User Manual... - Page 22 NO Function (Shutter OPEN) 64-95 Strobe Effect SLOW to FAST 96-127 NO function (Shutter OPEN) 128-159 Pulse Effect In Sequences 160-191 NO Function (Shutter OPEN) 192-223 Random Strobe Effect SLOW to FAST 224-255 NO Function (Shutter OPEN) E SPOT III™ User Manual...
- Page 23 Internal Program 2 (Scene 9-16) 140-159 Internal Program 3 (Scene 17-24) 160-179 Internal Program 4 (Scene 25-32) 180-199 Internal Program 5 (Scene 33-40) 200-219 Internal Program 6 (Scene 41-48) 220-239 Internal Program 7 (Scene 49-56) 240-255 NO Function E SPOT III™ User Manual...
-
Page 24: Error Codes
The errors in question will remain flashing in the display as a reminder of internal errors. PAN Er Gobo Rot. Er TILT Er Prism Er Color Wheel Er Focus Er E SPOT III™ User Manual... -
Page 25: Cleaning And Maintenance
Regular inspections are recommended to insure proper function and extended life. There are no user serviceable parts inside this fixture, please refer all other service issues to an authorized Elation service technician. Should you need any spare parts, please order genuine parts from your local Elation dealer. -
Page 26: Technical Specifications
-13°F to 113°F (-25°C to 45°C) APPROVALS / RATINGS CE | RoHs Compliant | IP20 Please Note: Specifications and improvements in the design of this unit and this manual are subject to change without any prior written notice. E SPOT III™ User Manual... - Page 27 3rd party custom gobo vendors for accurate sizing. PHOTOMETRIC DATA Please Note: Specifications and improvements in the design of this unit and this manual are subject to change without any prior written notice. E SPOT III™ User Manual...
-
Page 28: Dimensional Drawings
. e l a t i o n l i g h t i n g . c o m DIMENSIONAL DRAWINGS Please Note: Specifications and improvements in the design of this unit and this manual are subject to change without any prior written notice. E SPOT III™ User Manual... -
Page 29: Optional Accessories
Heavy Duty Wrap Around Hook Style Clamp EWDMXSYSTEM Wireless DMX System (1 Transmitter, 1 Receiver) AC3PDMX5PRO 5 ft. (1.5m) 3pin PRO DMX Cable AC5PDMX5PRO 5 ft. (1.5m) 5pin PRO DMX Cable Additional Cable Lengths Available E SPOT III™ User Manual...
Need help?
Do you have a question about the E SPOT III and is the answer not in the manual?
Questions and answers