Table of Contents
Advertisement
Quick Links
Advertisement
Table of Contents

Subscribe to Our Youtube Channel
Related Manuals for Eaton menvier40


Summary of Contents for Eaton menvier40
- Page 1 Menvier40 Menvier100 Security System Installation Guide Issue 3...
- Page 2 Menvier40/100 © Eaton’s Security Business. 2014 IN NO EVENT WILL EATON’S SECURITY BUSINESS BE LIABLE FOR ANY SPECIAL, CONSEQUENTIAL , OR INDIRECT LOSS OR DAMAGE, INCIDENTAL DAMAGES, STATUTORY DAMAGES, EXEMPLARY DAMAGES, LOSS OF PROFITS, LOSS OF REVENUE, LOSS OF ANTICIPATED SAVINGS, LOSS OF BUSINESS OR OPPORTUNTIY, LOSS OF GOODWILL OR INJURY TO REPUTATION, LIQUIDATED DAMAGES OR LOSS OF USE, EVEN IF INFORMED OF THE POSSIBILITY OF SUCH DAMAGES.
-
Page 3: Table Of Contents
Power Availability ..........12 5. Technical Specification ........37 Bus Cabling Requirements ....... 12 General ............. 37 Cable Type ........... 12 Capacities (Menvier40) ........37 Cable Segregation ........12 Capacities (Menvier100) ........37 Cable Configuration and Length ....12 Capacities (Both) ..........37 Bus Termination ........... - Page 4 Menvier40/100 This page is intentionally blank. Page iv...
-
Page 5: Introduction
Both control units have identical hardware, but the a Security Grade 2 system. If you install any radio Menvier40 can handle up to 40 zones, while the devices this will limit approval to Security Grade 2 Menvier100 can handle up to 100 zones. See the in the ward in which they are used. -
Page 6: Installer Programming Interface
Part Sets the control unit ignores detectors that do not have the appropriate Part Set attribute. Ward Based System. In a ward based system the Menvier40 provides the equivalent of 5, smaller, independent alarm systems, called “wards”. The Menvier100 provides 10 wards. You can allocate any zone to each ward. -
Page 7: Before You Begin
Radio Site Survey Do NOT site the unit: If you intend to fit radio expanders you should conduct signal strength tests. Eaton’s Security In the entry or exit zones, or outside the area covered by the alarm system. Business produces the Scantronic 790r hand held... -
Page 8: Guided Tour
Before You Begin Menvier40/100 In the entry or exit zones, or outside the area covered by the alarm system. Close to or on large metal structures. Closer than one metre to mains wiring, metal water or gas pipes, or other metal surfaces. - Page 9 Menvier40/100 Before You Begin 1. Case back. 2. Fixing holes. 3. Cable entry holes for detector and keypad wiring. 4. Transformer. 5. Fused mains connector. 6. Mains cable anchor point. 7. Cable entry hole for mains supply. 8. Hole for back tamper fitting.
- Page 10 Before You Begin Menvier40/100 1. Bus cable connector. 2. Aux power. 3. Wired zone connectors. 4. Aux power. 5. Outputs (relay and transistorised). 6. 12V Siren/Bell supply. 7. Siren, strobe and TR. 8. Auxiliary tamper 9. Loudspeaker. Figure 4 Control Unit Main Connectors...
-
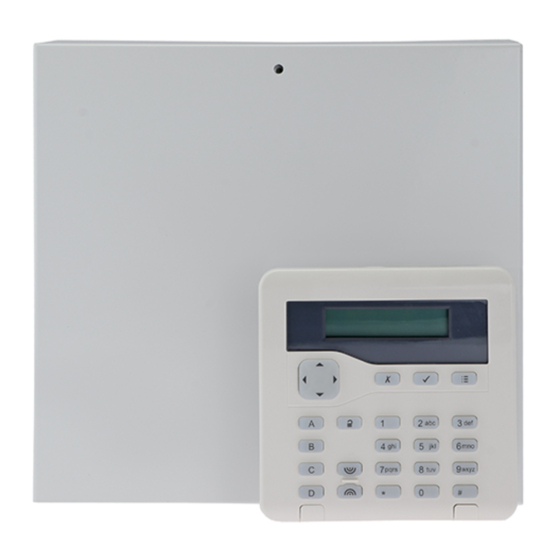
Page 11: I-Kp01 Controls And Displays
Menvier40/100 Before You Begin i-kp01 Controls and Displays 1. Central keyhole. 1. LCD display (2 x 20 characters). 2. Rear tamper shroud. 2. Programming keys. 3. Cable entry. 3. Navigation keys 4. Fixing holes. 4. Alert LEDs Figure 7 Keypad Rear Housing 5. - Page 12 Before You Begin Menvier40/100 KEY-K01/KP01/KPZ01 Controls and Displays Figure 10 Opening the Keypad 1. LCD display 2. Programming keys. 3. Navigation keys. This key has built-in alert LEDs. 4. Setting and unsetting keys. The ABCD keys have built-in status LEDs that can show the setting status of a part setting system.
-
Page 13: Expanders
Menvier40/100 Before You Begin 1. Tamper switch. 2. Sounder. 3. Connector for KEY-EP. 4. Sounder volume control. 5. Connector for control unit bus. 6. Jumpers for: 6a Addressing (not used in i-onEX control units). 6b LED functions and RS485 bus termination. - Page 14 Before You Begin Menvier40/100 1. Cable entry (also behind PCB). 2. Central keyhole. 3. PCB. 4. Relay card (i-rc01) connector. 5. Aux power. 6. Link to enable/disable front/rear tamper switch. 7. Lid tamper (rear tamper behind pcb). 8. Zone connectors 9.
- Page 15 Menvier40/100 Before You Begin 1. Cable entry (also behind PCB). 2. Antenna. 3. Central keyhole. 4. PCB. 5. Link to enable/disable front/rear tamper switch. 6. Lid tamper (rear tamper behind PCB). 7. Bus termination jumper. 8. Addressing button. 9. Fixing holes.
-
Page 16: Power Availability
You can connect up to 20 devices to the control Note that for Grade 3 this example assumes that unit bus on a Menvier40, or 45 on a Menvier100. the communicator has its own power supply. You may connect the devices either in daisy chain... -
Page 17: Bus Termination
10.5V even when running on the standby battery. expanders and keypads have a termination link on Eaton’s Security Business recommends that the their PCBs (see Figure 3 for the control unit and voltage at each device should stay above 12V. - Page 18 "floating zero Volt rail" if connected to the network, otherwise an earth fault will occur. Eaton’s Security Business recommends the EXP- Reducing Voltage Drop - Method 2: PSU. When installing a remote power supply, fit it Supply the detection devices from the Aux output close to the equipment that it is powering.
-
Page 19: Installation
Menvier40/100 3. Installation Note: The installation steps listed below assume that you have already decided on the required number and location for all keypads, expanders and power supplies. Caution: Static Electricity Like many other electronic products, the control unit, keypads and expanders contain components that are sensitive to static electricity. -
Page 20: Installing The Lid/Back Tamper
Installation Menvier40/100 Figure 22 Insert Tabs Figure 24 Fit Securing Screw When the PCB is in place, connect the wires from the transformer to the 20Vac connector on the PCB (11 in Figure 3). Installing the Lid/Back Tamper Figure 23. Push Home Clips... -
Page 21: Step 2. Run Bus Cable
Menvier40/100 Installation Step 2. Run Bus Cable Please read “Cabling Requirements on page 12. Step 3. Fit and Connect the Keypad(s) Siting the Keypad(s) Mark the position and fixing holes of the keypad back. Do site the keypad(s): Figure 26 Screw i-KP01 Back Box to Wall Within the area protected by the alarm system. -
Page 22: Keypad Addressing
Installation Menvier40/100 Keypad Connection Backlight Control for KEY-K01/KP01/KPZ01 Figure 28 shows the wiring connections at the You can control the brightness of the keypad keypad and control unit. backlights by fitting links over the BRIGHT jumper on the keypad pcb (see 1b in Figure 12 or 6b in Figure 14). - Page 23 Menvier40/100 Installation disable the ABCD LEDs. changes. The character at the right of the display shows “” when To Disable/Enable the Status Fault the LEDs are disabled and “” when the MENU LEDs are enabled. For 1. Enter Local Programming ABCD ...
-
Page 24: Tone Volume
Installation Menvier40/100 4. Permanently attached cable. Figure 29 External Prox Reader KEY-EP Siting the External Prox Reader Do site the External Prox Reader: At a convenient height and location for the user. Out of sight of potential intruders. Note that the external prox reader is fitted with a length of 2m of the appropriate cable. -
Page 25: Engineering Keypad
Menvier40/100 Installation Louder Addressing Expanders Note: This control changes the The control unit assigns addresses to all devices volume of non-alarm tones (for connected to the bus cable. You must start this example Exit/Entry tone). The process off from the Installer Menu, during the volume of alarm tones is fixed. -
Page 26: Step 6. Connect Wired Zones
Installation Menvier40/100 separate 4-wire CCL detectors, and that there are Step 6. Connect Wired Zones separate terminals for both alarm and tamper. The control unit and the wired expander Alarm Zone 0 connectors can be used for either four-wire CCL... - Page 27 Menvier40/100 Installation Wired Expander 100 Ohms Alarm contacts 2K2 EOL Zone 1 Tamper contacts Figure 39 FSL Zone Wiring – Control Unit Alarm contacts Figure 40 shows the wiring connections for FSL 2K2 EOL Zone 0 Tamper contacts zones on the EXP-W10 expander. Note that the connections are different on the expander Figure 41 FSL Zone Wiring –...
-
Page 28: Step 7. Connect Wired Outputs
+12V when inactive. If you wish to reverse the polarity of these two outputs see Changing the Polarity of a Wired Output in the Menvier40/100/300 Engineering Guide. Figure 47 shows an example of using an expander output to drive an LED. -
Page 29: Wired External Sounders On Expanders
4k7/4k7 FSL. Do not use any other FSL resistor combinations. Figure 47 Using Wired Expander Outputs. CC wiring Eaton’s Security Business does NOT recommend that you use CC wiring for this Wired External Sounders on Expanders application. The maximum length of wire allowable is only 6m. -
Page 30: Output On Key-Kpz01
"Dynamic" test calls occur 24 hours after the last may mimic alarm tones, they also give alert tones call made by the unit. See the Menvier40/100/300 and other progress tones when setting and Engineering Guide for details on how to program unsetting the alarm system. -
Page 31: Safety Notice
Fit ADSL Filter If the telephone line is being shared by a broadband service then you should fit a broadband filter to the line. Eaton’s Security Business provides the ADSL01 filter that plugs onto pins provided for the purpose on the main circuit board of the control unit (see 21 in Figure 3). -
Page 32: Step 9. Fit A Plug-By Communicator
Note that the output types shown in Figure 54 are the Factory default types. See the 4. Re-connect the battery. Menvier40/100/300 Engineering Guide for details 5. Fit the case lid. on how to change the defaults. 6. Apply mains power. -
Page 33: Step 10. Fit And Connect Battery
Step 11. Initial Power-Up use for the wired zones. Note: This initial choice fixes the wiring type for Please see the Menvier40/100/300 Engineering Guide the control unit and any attached wired for an explanation of bus addressing. expanders. If you wish to use a different wiring WARNING: During initial power-up all the keypad type on the expanders then use Installer Menu –... -
Page 34: Transferring To Another Keypad
Installation Menvier40/100 The display shows: 15. At this point you should leave the Installer Menu to save the changes you have made, see below. 9. Press . Diagnostic LED on Expanders The display shows: You may notice the DIAGNOSTIC LED flashing on an expander PCB. -
Page 35: Important! Saving Changes
Menvier40/100 Installation line of the display shows the first in the list of 1. Make sure the system is unset and showing found and lost devices. Press to see any the standby screen (time and date). other items in the list. -
Page 36: Restoring Factory Defaults Only
Installation Menvier40/100 Note: If you cannot enter Installer Menu then the 2. EITHER: Press to go back to the Installer control unit will start a tamper alarm when you Menu without changing defaults. open the control unit lid. OR: Press to load defaults. -
Page 37: Step 12. Commission The System
Program the system to suit user requirements. Page 34 is a summary of the Installer Menu on the control unit. Please see the Menvier40/100/300 Engineering Guide for a more detailed description. Note: make sure that you allocate keypads correctly to wards. For more information see “Assigning Wired Keypads to Wards”... -
Page 38: Installer Menu
Menvier40/100 Installer Menu Strobe on Set Zone tampers Call Mode 1 DETECTORS/ DEVICES Strobe on Unset System tampers Messages Detectors Part Set B Confirmation Phone Book Add/Del Detectors Name Confirmation Mode Triggers Program Zones Exit Mode Basic PSTN SMS Address Bus Device... - Page 39 Appears only when System Options – Confirmation – Confirmation Mode is “BS8243”. Appears only when System Options – Masking is “On”. There is one Shunt Group available on Menvier40, five available on Menvier100. Appears here only in a part setting system.
-
Page 40: Maintenance
Menvier40/100 See the Menvier30/40/100/300 Engineering Guide 4. Maintenance for more details. Note: If you are replacing a keypad on a single- The control unit should be inspected once per keypad system then you will have to re-program year. At each inspection:... -
Page 41: Technical Specification
You can connect any combination of these 5. Technical Specification devices to the bus. Capacities (Menvier100) General Zones 100 max (with expanders) Product name Menvier40 or Menvier100. Outputs 100 max (with expanders) Product 40 zone/100 zone hybrid Expanders and 45 max devices (see note) Description... -
Page 42: Security
Technical Specification Menvier40/100 mains is present the 1.5A power supply reserves Security 750mA to recharge batteries, leaving 750mA available to supply the system.) Security Grade Grade 2 or 3 Radio detector 16,777,214 (2 -2). The table below shows the current consumption of... -
Page 43: Outputs
Menvier100 must be fitted with a communicator of level ATS4 or above. the amount available from the power supply driving the When fitted with radio devices the Menvier40 and expander. Menvier100 are capable of compliance with EN50131 at Grade 2. -
Page 44: Compatible Equipment
Technical Specification Menvier40/100 i-kp01 Keypad (with internal prox Compatible Equipment reader, but without zones or external prox reader) key-ep External prox reader for 705rEUR-00 Two button HUD (single KEY-KPZ01/KP01 channel, top button is KEY-K01 keypad disabled) KEY-KP01 keypad with internal prox...
Need help?
Do you have a question about the menvier40 and is the answer not in the manual?
Questions and answers