Table of Contents
Advertisement
Quick Links
Advertisement
Table of Contents

Related Manuals for TouchTunes Virtuo 700259-001


Summary of Contents for TouchTunes Virtuo 700259-001
- Page 1 Installation and Setup Guide...
- Page 2 The content of this manual is furnished for informational use only, is subject to change without notice, and should not be construed as a commitment by TouchTunes Interactive Networks. TouchTunes Interactive Networks assumes no responsibility or liability for any errors or inaccuracies that may appear in this document.
-
Page 3: Table Of Contents
Contacting TouchTunes ........ - Page 4 Setting up TouchTunes Wireless Broadband ........
- Page 5 6 Setting up your Virtuo Activating the Operator Interface ..........80 Setting Up the Remote Control .
-
Page 7: Welcome
Welcome This section introduces Virtuo, provides important safety information, and describes how to get customer support. Topics Welcome About This Guide Disclaimer and Important Safety Information Contacting TouchTunes Virtuo Installation and Setup Guide 900475-001 Rev 11... -
Page 8: Welcome
TouchTunes Interactive Networks is not responsible for any damage resulting from the improper installation or connection of test kit components or any other external equipment to your kit. Nor is TouchTunes responsible for any damage caused during shipment (except the shipment to the original purchaser) or any damage caused by: •... - Page 9 THE MAINS PLUG OF THE POWER SUPPLY CORD OR APPLIANCE COUPLER SHALL REMAIN READILY ACCESSIBLE No serviceable parts inside, please contact TouchTunes Customer Support for service. Clean only with dry cloth. Do not block any ventilation openings. Install in accordance with the manufacturers instructions.
-
Page 10: Contacting Touchtunes
The date/time of the problem. • Actions performed immediately before the problem occurred. • Any additional comments. If you need assistance with this or any other TouchTunes product, please call or email technical support. We value your comments. Virtuo Installation and Setup Guide... -
Page 11: Introducing Virtuo
Introducing Virtuo This section introduces the exterior, interior and software features of your new TouchTunes Virtuo SmartJuke. Topics Introducing Virtuo Virtuo Features Overview Exterior Features Overview Interior Features Overview • Computer • Virtuo Computer Panel Connections • I/O Board •... -
Page 12: Introducing Virtuo
Introducing Virtuo Introducing Virtuo Introducing Virtuo TouchTunes introduces the world’s first SmartJuke—a revolutionary next-generation entertainment platform, with new features designed to enhance the customer experience and attract new TouchTunes users. TouchTunes Virtuo, more than just a jukebox. Virtuo is a SmartJuke—a... -
Page 13: Virtuo Features Overview
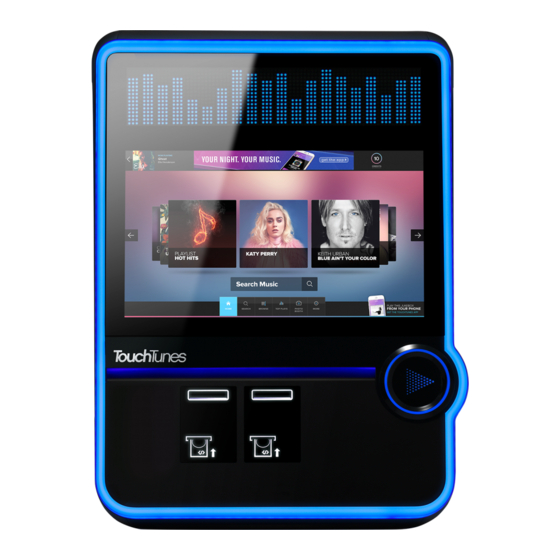
Introducing Virtuo Virtuo Features Overview Virtuo Features Overview Display High definition 26-inch wide screen with 16x9 aspect ratio provides more area to present rich content and enhance the music search and selection experience for the consumer. High Intensity LED Array Separate from the user interface, the LED panel allows information to be displayed to an extended audience, even when the unit is in pause mode. - Page 14 Introducing Virtuo Virtuo Features Overview TouchTunes Wireless Broadband TouchTunes wireless broadband enables operators to connect their jukeboxes to the Internet with a wireless high speed connection. This gives you: • real-time customer access to the entire TouchTunes catalog through TuneCentral •...
-
Page 15: Exterior Features Overview
Introducing Virtuo Exterior Features Overview Exterior Features Overview Virtuo’s visual features make the statement that this is more than a jukebox, with attractive visual components that invite and attract patrons to come and Play More! FRONT LIGHTING a continuous light that dims upon user interaction;... -
Page 16: Visual Components
Reflective wall wash: 6 dimmable zones provide a colorful aura • LED panel: 16-million color LED display area for displaying additional graphics • Brand bar backlight: single-color LED light strip illuminating the TouchTunes logo • Payment curtain: gradient lighting strip for illumination of the payment mechanisms •... -
Page 17: Interior Features Overview
Introducing Virtuo Interior Features Overview Interior Features Overview This figure illustrates the locations of Virtuo’s major internal components. Interior view: door and cabinet 1. LED panel 2. Touch screen 3. Payment acceptors 4. Power supply unit 5. Computer 6. I/O board 7. -
Page 18: Computer
Introducing Virtuo Interior Features Overview Computer The central computer in your Virtuo SmartJuke is a specially designed computer mounted inside Virtuo that runs the unit. Like a regular laptop or desktop computer, the computer contains a hard drive and USB connectors for attaching peripherals. -
Page 19: Virtuo Computer Panel Connections
Introducing Virtuo Interior Features Overview Virtuo Computer Panel Connections 6 pin power connector hard disk drive 24 pin power connector POWER HARD DISK USB ports RS232 port SERIAL USB 3.0 Ethernet USB 3.0 USB 3.0 ports port OPTICAL Reset button ports HDMI MONITOR... -
Page 20: I/O Board
Introducing Virtuo Interior Features Overview I/O Board The I/O board is an interface between the SmartJuke computer and Virtuo’s other components, providing controls and status indicators. Refer to the following figure to identify all components and connections on the I/O board for your Virtuo. -
Page 21: Amplifier
Introducing Virtuo Interior Features Overview Amplifier Virtuo’s DA950-V amplifier is a specially-designed dual amplifier with integrated power supply and support for two independently controllable audio zones. AC power Zone 1 Zone 1 Zone 2 Zone 2 inlet in/out * in/out * * Each zone’s ports are wired together to allow daisy-chaining to optional additional amplifiers. -
Page 22: Remote Control
Introducing Virtuo Remote Control Remote Control Virtuo’s wireless remote control is a single-frequency remote that transmits a 433.92 MHz and has these features: • improved range and reliability • light weight and robust • long battery life • integrated flash memory ensures that remote does not lose its ID when batteries drain •... -
Page 23: Payment Means
Introducing Virtuo Payment Means Payment Means The standard configuration for U.S. model Virtuos is: • one credit card reader • two ICT bill acceptors (600-note stacker). Payment acceptors NOTE Canadian Virtuos include one credit card reader, one coin acceptor and one bill acceptor. Virtuo Installation and Setup Guide... -
Page 24: Cable Routing And Intuitive Color Coding
Introducing Virtuo Cable Routing and Intuitive Color Coding Cable Routing and Intuitive Color Coding To eliminate needless cable tracing and the potential for connecting cables improperly, all Virtuo’s cables are labelled at both ends and are color coded, as are all connection ports on the main components (computer, power supply unit, I/O board, amplifier). -
Page 25: Cable Management Hardware
Introducing Virtuo Cable Routing and Intuitive Color Coding Cable Management Hardware Virtuo uses this cable management hardware: Plastic Conduit This tubing is used to contain multiple cables where they cross over the door hinge. This helps prevent cable pinching and fatigue when the door is opened and closed. If a wire does fail, it is easy to replace. -
Page 26: User Interface - Play More
User Interface - Play More! User Interface - Play More! Virtuo’s user interface represents a radical departure from GUIs previously employed by TouchTunes software or that of its competitors, with an inviting layout that presents patrons with a more attractive, entertaining, and user- friendly experience that invites them to Play More! Evolving from TouchTunes’... -
Page 27: Touch Screen Monitor
Introducing Virtuo User Interface - Play More! Touch Screen Monitor The touch screen is a 26-inch, high definition screen with a 16x9 landscape display. With a viewing space 60% larger than 19-inch screens, the landscape orientation is ideal for multiple users and increased social interaction, and lends itself to immediate recognition of content displayed on screen—both advertising and entertainment content. -
Page 28: Local Favorites
Introducing Virtuo User Interface - Play More! Local Favorites Formerly called Staff Picks, Local Favorites is content defined by local users. This increases the independence and ownership of the content for a location, and encourages customization and user involvement by local patrons. The default view and sort order of Local Favorites is by artists, alphabetically. -
Page 29: Content Sorting
Introducing Virtuo User Interface - Play More! Content Sorting Content sorting helps patrons browse content alphabetically, by popularity or by release date. Artist Top Hits Many users would rather pick a known hit from an artist and they may not always know the title of the song. A top hit listing per artist provides reassurance at this level. -
Page 30: Context Sensitive Help
Introducing Virtuo User Interface - Play More! Context Sensitive Help Customers can now use Help to help them navigate the Virtuo interface. When customers touch the Help button, help bubbles appear that explain the functionality of the page they’re on. Virtuo Installation and Setup Guide... -
Page 31: Scrubber
Introducing Virtuo User Interface - Play More! Scrubber The scrubber provides a rapid access, dynamic scroller which is context sensitive, allowing a large quantity of musical content to be browsed with ease. Virtuo Installation and Setup Guide... -
Page 32: New Search Engine
Introducing Virtuo User Interface - Play More! New Search Engine Search just got more intelligent with a powerful, flexible search engine with these enhancements: • no premium price for the feature • fuzzy phonemic allows for spelling mistakes • lyrics search now supported •... -
Page 33: Playlist Builder
Introducing Virtuo User Interface - Play More! Playlist Builder The Playlist Builder enables users to create custom playlists, providing a playful and powerful tool to end users who expect customization. In addition, this feature allows for a natural launchpad to MyTouchTunes. Virtuo Installation and Setup Guide... -
Page 34: Visible Play Queue
Introducing Virtuo User Interface - Play More! Visible Play Queue By pressing Show Queue users can see the first four songs in the play queue. This can influence patrons to play their own songs, and use the Play Next feature. Virtuo Installation and Setup Guide... -
Page 35: Two Screen Display
Introducing Virtuo User Interface - Play More! Two Screen Display The second screen LED display how shows service messages such as Pause and Volume Control. This interaction no longer impedes operation when a customer is using the SmartJuke. Live Equalizer A graphic equalizer style presentation on the LED area clearly identifies the source of... -
Page 36: Show Recommendations
Introducing Virtuo User Interface - Play More! Show Recommendations OpenStage’s powerful recommendation engine enhances the user experience by encouraging patrons to discover new music. Virtuo Installation and Setup Guide... -
Page 37: Custom Music Programming (Cmp)
Introducing Virtuo User Interface - Play More! Custom Music Programming (CMP) OpenStage now supports input and output volume levels for CMP, also called background music. For how to set the levels, see Setting Custom Music Programming (CMP) Levels. Operators can adjust the CMP levels through the Sound menu. -
Page 38: Expanded Language Support
Introducing Virtuo User Interface - Play More! Expanded Language Support OpenStage provides full user interface support in English, French and Spanish. Patrons can change the language on the interface during their session. The UI always resets to the default language when a new session starts. To configure the language options, in the Operator interface, select a default language from Software >... -
Page 39: Improved Mytouchtunes Drawer
Introducing Virtuo User Interface - Play More! Improved myTouchTunes Drawer myTouchTunes was redesigned for OpenStage to take advantage of the wide screen and the ability to swipe the screen. HD Attract Video Loops OpenStage now uses Virtuo’s HD video to attract customers with new, high definition promotional video loops when Virtuo is in attract mode. -
Page 40: Mytouchtunes Banners
User Interface - Play More! myTouchTunes Banners Virtuo has rotating TouchTunes banners to attract mobile app uses to use myTouchTunes. When customers touch a banner they’re directed to a billboard with information about the myTouchTunes mobile app. They can also scan the QR code on the billboard to download the myTouchTones mobile app to their device. -
Page 41: Improved Sound Using Bass Boost
Terms of Use Screen OpenStage has a redesigned Terms of Use screen that you access by touching the TouchTunes button in the lower left of the interface. The Terms of Use details the legal and licensing terms, privacy policy, and information about TouchTunes and its music partners. -
Page 42: Owner Profile Page
User Interface - Play More! Owner Profile Page The About TouchTunes portal now has an additional page that allows operators to publish their corporate profile and contact information onscreen rather than as a sticker affixed directly to Virtuo. To add or edit your information go to Adding Your Owner Profile. -
Page 43: Pre-Installation
Pre-Installation This chapter explains how to prepare to install a TouchTunes Virtuo SmartJuke for a location, including setting up communications connections and unpacking the unit. Topics Unpacking and Checking Virtuo Components Setting Up a Broadband Connection Preparing Tools for Installation... -
Page 44: Unpacking And Checking Virtuo Components
Pre-Installation Unpacking and Checking Virtuo Components Unpacking and Checking Virtuo Components A TouchTunes Virtuo is delivered in one box, including the hardware components and a parts kit. These tables show the weight and dimensions of Virtuo. 28.4 Virtuo weight Virtuo SmartJuke 120 lbs. - Page 45 3. Check the condition of the hardware components and parts kit items to ensure they are in good condition. CAUTION: Do not attempt installation if any hardware component or item in the parts kit is damaged. Contact your distributor or TouchTunes to report the damage immediately and request replacement parts.
-
Page 46: Setting Up A Broadband Connection
Setting Up a Broadband Connection Setting Up a Broadband Connection Every night, a TouchTunes SmartJuke contacts the main TouchTunes server over the Internet to do these tasks: • download any new songs chosen by the location owner or operator through the TouchTunes Operator Dashboard •... -
Page 47: Preparing Tools For Installation
Pre-Installation Preparing Tools for Installation Preparing Tools for Installation You may require these tools to install Virtuo. Ensure that you have all the tools at hand before beginning the installation: • spirit level to ensure Virtuo is level • Phillips screwdriver •... - Page 48 Pre-Installation Preparing Tools for Installation Virtuo Installation and Setup Guide...
-
Page 49: Installing Virtuo
Wall-Mounting the Virtuo SmartJuke Installing the hard drive Accessing the cable channel for Virtuo Connecting Virtuo to the broadband network (Internet) Setting up TouchTunes Wireless Broadband Connecting audio speakers to Virtuo Connecting power to Virtuo Tightening the wire strain-relief bracket... -
Page 50: Moving Virtuo To Its Mounting Location
Moving Virtuo to its Mounting Location Moving Virtuo to its Mounting Location IMPORTANT: TouchTunes recommends that you unpack the Virtuo as close as possible to its intended mounting location and enlist the help of an assistant when moving it to that location. -
Page 51: Wall-Mounting The Virtuo Smartjuke
Virtuo SmartJuke. To provide the best user experience for your patrons, as well as maximizing your gross coinage, TouchTunes strongly recommends that you adhere to these guidelines for wall-mounting the unit. - Page 52 After the wall bracket is securely attached, hang the Virtuo on the wall. CAUTION: The Virtuo is heavy and can cause injury if lifted incorrectly. TouchTunes recommends at least two people perform the following procedure. 7. Move the Virtuo so it is close to the wall bracket.
- Page 53 Installing Virtuo Wall-Mounting the Virtuo SmartJuke 14. Unlock the Virtuo from the lock on the right side of the unit and then slowly swing open the Virtuo case. Lock Opening Virtuo 15. Using the figure below, identify the location of the holes for the wall bracket screws used to secure Virtuo to the wall bracket.
- Page 54 CAUTION: The Virtuo is not secure until the wall bracket screws are installed. Note: TouchTunes also offers a floor stand onto which the Virtuo can be mounted, which provides many other advantages. For instructions on how to mount the Virtuo to this floor stand, see 900579-001 Virtuo Floor Stand Guide, which is provided with the floor stand, and is also available on the Operator Dashboard.
-
Page 55: Installing The Hard Drive
4. Locate the hard drive for Virtuo. The hard drive for a TouchTunes Virtuo is contained in an enclosure. The hard drive and its enclosure are shipped separately from the main Virtuo hardware. If the hard drive has not yet arrived at the location, contact the vendor or distributor. - Page 56 Installing Virtuo Installing the Hard Drive 7. Using your fingers, push in and then tighten the thumb screw (clockwise) on the hard drive tray until the thumb screw is securely tightened. Tightening the hard drive thumb screw 8. After you have finger-tightened the thumb screw, perform the following steps in order to verify that the hard drive is properly secured: 9.
-
Page 57: Accessing The Cable Channel For Virtuo
Installing Virtuo Accessing the Cable Channel for Virtuo Accessing the Cable Channel for Virtuo The Virtuo is designed with a cable channel that lets you route outside cables (such as for telecommunications) to internal SmartJuke components. A wire-strain relief bracket provides slack for cables inside Virtuo and also covers the opening to the cable channel to keep dust out. -
Page 58: Connecting Virtuo To The Broadband Network (Internet)
Connecting Virtuo to the network The physical connection from Virtuo to the broadband network is now complete. You will later configure the communications settings for the broadband network so the Virtuo can contact the TouchTunes server using this connection. Virtuo Installation and Setup Guide... -
Page 59: Setting Up Touchtunes Wireless Broadband
Virtuo with a wireless broadband Internet connection, which will allow all the features listed above. This kit comes with its own Installation Guide (TouchTunes p/n: 900761-001) that will guide you through the proper steps for setting up a wireless broadband connection. This manual can be found on the TouchTunes Product &... -
Page 60: Connecting Audio Speakers To Virtuo
Installing Virtuo Connecting Audio Speakers to Virtuo Connecting Audio Speakers to Virtuo Virtuo does not include internally mounted speakers. To connect external speakers to Virtuo’s amplifier, you must use the 4-pin Euroblock connector (part no. 100000-001). CAUTION: Virtuo’s amplifier is specifically designed for use with 4-ohm speakers. Using speakers of a lower impedance is not recommended. -
Page 61: Connecting Power To Virtuo
Installing Virtuo Connecting Power to Virtuo 5. Using a flat-head screwdriver, tighten the screws of the slots to secure the speaker cable to the connector. 6. Attach the Euroblock connector to the connector labelled Zone A or Zone B on the amplifier. 7. -
Page 62: Tightening The Wire Strain-Relief Bracket
Installing Virtuo Tightening the Wire Strain-Relief Bracket Tightening the Wire Strain-Relief Bracket All cables are now connected to Virtuo. You tighten the wire strain-relief bracket to secure the cables before closing the Virtuo. 1. (Optional) Pull in and hold a short length (1 - 2 inches) of each cable running through the cable channel to ensure all cables in Virtuo have some slack. -
Page 63: Closing The Virtuo Case
Installing Virtuo Closing the Virtuo Case Closing the Virtuo Case After you have turned on the Virtuo, close and lock its case. 1. Close the Virtuo case by gently swinging it shut and then pressing on its front face to engage the locking mechanism. -
Page 64: Activating The Virtuo Screen
When you press this button, the touchscreen, lights and audio system for Virtuo are activated. You can now use the touchscreen to activate Virtuo and configure its settings using the system software. Power button 2. Next, go to Activating Virtuo to configure and initiate communications with the TouchTunes server and activate Virtuo. Virtuo Installation and Setup Guide... -
Page 65: Activating Virtuo
Activating Virtuo This section describes how to activate your TouchTunes Virtuo after you have completed the hardware installation. Topics Power on Virtuo Configure Virtuo • Perform an Auto-Adjust • Calibrate the Touchscreen • Select the Configuration Settings • Select the Languages •... -
Page 66: Power On Virtuo
Activating Virtuo Power on Virtuo Power on Virtuo WARNING: During these procedures, there can be periods when Virtuo appears to not be responding. Booting the system with the new hard drive can take up to ten (10) minutes, and the screen can be blank for up to 90 seconds during the installation procedure. -
Page 67: Configure Virtuo
Choose the Calling Window and Connection Type Perform an Auto-Adjust To ensure that your display is centered properly on the screen, TouchTunes recommends that you perform an auto- adjust before you calibrate the screen. Virtuo’s touch screen is equipped with on-screen display (OSD) controls that enable you to change settings. Located on the rear of the monitor are four buttons. -
Page 68: Calibrate The Touchscreen
Select the Configuration Settings On the Settings screen you select where to get Virtuo’s settings from. Settings include mixer levels, credit rules, the remote ID, and the other configurable options available from the Operator interface or from the TouchTunes Dashboard. -
Page 69: Select The Languages
Activating Virtuo Configure Virtuo Select the Languages From the Languages screen select a primary (default) language and an optional second language for the customer interface. OpenStage now provides full user interface support in English, French and Spanish. Patrons can change the language on the interface during their session. -
Page 70: Choose The Virtuo Settings
Activating Virtuo Configure Virtuo Choose the Virtuo Settings 1. Touch one of these selections. NOTE On new Virtuos, the only option available is the first one. The others are for cases where the hard drive has been replaced, such as when migrating from previous-generation software. If an option is not available, it is grayed out and cannot be selected. -
Page 71: Choose The Calling Window And Connection Type
If you chose the Keep all settings from the currently installed hard drive or Download the settings from the TouchTunes server options in the Settings screen, the BACK button is available in the C screen that appears. You can touch the BACK button to return to the Settings screen. You can do this, for example, if you decide to reset the settings to the factory defaults instead of keeping the hard drive settings. - Page 72 Configure Virtuo Use the plus (+) and minus (-) buttons to set the starting and ending times for when the SmartJuke communicates with the TouchTunes server. Time of day to begin Set this to one half hour after the location is locked up for the night, in connection other words, the time the last person leaves and locks the front door.
- Page 73 Activating Virtuo Configure Virtuo To choose a dynamic (DHCP) broadband connection 1. Select DHCP to obtain an IP address automatically from the ISP or the location’s router. 2. Touch Proceed to Validation at the upper right-hand area of the screen. To choose a static broadband connection 3.
-
Page 74: Verify The Configuration
Verify the Configuration 1. Watch the progress on the Communication screen. The Communication screen shows the progress of the SmartJuke as it communicates with the TouchTunes server. The network status LEDs display each communication step, with corresponding information in the Activity messages. - Page 75 SmartJuke functions if one of these is offline, but there can be temporary reduced functionality. For example, if there is maintenance being performed to the TouchTunes Dashboard on the TouchTunes server, data access can be offline. In this case, the SmartJuke can still receive new music, but any settings you make for it through the TouchTunes Dashboard are not registered on the SmartJuke until data access is restored.
-
Page 76: Update The Software
Activating Virtuo Update the Software Update the Software After you activate Virtuo, TouchTunes recommends that you make sure the Virtuo has the most up-to-date software. 1. Locate the Manager button on the I/O board. Manager Button Virtuo Installation and Setup Guide... - Page 77 2. Press and release the Manager button. The Operator main menu appears. 3. On the Main menu, select the Diagnostic button. 4. Press the Call now button at the bottom of the menu. Virtuo communicates with TouchTunes servers and downloads the most recent software build. Virtuo Installation and Setup Guide...
-
Page 78: Installation Errors
Corruption in the ID chip or hard drive can result in the SmartJuke being unable to play songs on the hard drive. In this case, the SmartJuke must download information from the TouchTunes server to fix the problem. When the SmartJuke is started, the Communication screen appears showing it is downloading the required file, and then boots into the Customer interface. -
Page 79: Setting Up Your Virtuo
Setting up your Virtuo This section describes how to set up and test your TouchTunes Virtuo after you complete the hardware installation and software activation. Topics Activating the Operator Interface Setting Up the Remote Control Configuring the Bill Acceptors Testing the Payment Acceptors... -
Page 80: Activating The Operator Interface
Setting up your Virtuo Activating the Operator Interface Activating the Operator Interface The Operator interface contains the screens you access through the Operator menu. To activate the Operator Interface 1. On the I/O board, press and release the Manager button to display the Operator menu. Manager buttton Virtuo Installation and Setup Guide... -
Page 81: Setting Up The Remote Control
Setting up your Virtuo Setting Up the Remote Control Setting Up the Remote Control The TouchTunes wireless remote control is a single-frequency remote that transmits a 433.92 MHz (FSK) signal. The red indicator LED flashes when the remote transmits or is being programmed. -
Page 82: Setting The Remote Control Id
Setting up your Virtuo Setting Up the Remote Control Setting the Remote Control ID By default, the remote control ID is set to 000. To change it, do the following: POWER 1. Press the keys at the same time and hold them down until the red indicator light blinks two times. Press and hold the Power and F4 buttons to set the... -
Page 83: Learning The Remote Id
Setting up your Virtuo Setting Up the Remote Control Learning the Remote ID 1. On the Operator Interface, press Hardware to display the Hardware Options screen. 2. Press the LEARN button. 3. Watch the display. When prompted, press the MIC VOL UP key on the remote control. The display shows a confirmation message and returns to the Options screen. -
Page 84: Remote Key Assignments
Setting up your Virtuo Setting Up the Remote Control Remote Key Assignments The keys on the remote are pre-programmed for these functions. Function Power Press to turn the SmartJuke monitor and audio subsystem on or off. The SmartJuke computer remains on. Equivalent to pressing the Night Mode button on the SmartJuke (not available on all models). -
Page 85: Relocating The Wireless Remote Receiver
Setting up your Virtuo Setting Up the Remote Control Relocating the Wireless Remote Receiver Virtuo’s wireless remote offers excellent range, and provides trouble-free operation in most installations. However, if the venue is exceptionally large, or there are obstructions between the remote and the Virtuo, performance can be improved by relocating the RF receiver to the exterior of the SmartJuke. -
Page 86: Configuring The Bill Acceptors
Setting up your Virtuo Configuring the Bill Acceptors Configuring the Bill Acceptors NOTE This procedure applies when a second bill acceptor is installed in Virtuo. 1. On the Operator Interface, open the Hardware Options screen. From this menu, you can configure Virtuo to use two bill acceptors or one. By default, this option is turned ON. -
Page 87: Testing The Payment Acceptors
Setting up your Virtuo Testing the Payment Acceptors Testing the Payment Acceptors You verify that the bill acceptor, coin acceptor, and credit card reader are functioning properly using the testing controls on the Money | Options screen of the Operator Interface. To display the Money | Options screen 1. -
Page 88: Testing The Bill And Coin Acceptors
Setting up your Virtuo Testing the Payment Acceptors Testing the Bill and Coin Acceptors To test the bill acceptor 1. In the COIN & BILL ACCEPTOR area, press the TEST button. The test screen appears. 2. Insert a bill into the bill acceptor. The screen refreshes, showing the denomination of the bill that was inserted and the origin of the bill (first or second bill acceptor). -
Page 89: Testing The Credit Card Reader
Setting up your Virtuo Testing the Payment Acceptors Testing the Credit Card Reader To test the credit card reader 1. In the Credit Card area, press TEST. The Test screen appears. 2. Insert a credit card into the card reader with the magnetic strip up and to the right, and then remove it. This message appears to confirm that your installation is successful. -
Page 90: Enabling Bass Boost
“double equalizing” your audio signal using Bass Boost can yield unsatisfactory results. If your external sound package is the TouchTunes PerforMax Quad sound system, which is equipped with an external EQ, turn Bass Boost off for best results. Virtuo Installation and Setup Guide... -
Page 91: Connecting An External Audio Source
Setting up your Virtuo Connecting an External Audio Source Connecting an External Audio Source Virtuo can accept input from an external audio device as long as the device has a line level stereo output (from 300mV to 1 V RMS). Most audio devices, such as tape decks, receivers, CD players, or radios have such an output. CAUTION: The maximum input signal to Virtuo must be 1 volt RMS. - Page 92 Setting up your Virtuo Connecting an External Audio Source To connect an external audio source to Virtuo To connect an external audio source to Virtuo, use a line-input DI box (part no. 700167-001). Refer to this figure when performing this procedure. 1.
-
Page 93: Connecting A Microphone
Dry contact (optional) This sends a signal to Virtuo indicating that the mic switch has been pressed. TouchTunes recommends that you use a cardioid dynamic microphone. These microphones are low impedance (150 ohms). NOTE Condenser and electret microphones will not work, as no DC (phantom) power is supplied. - Page 94 Setting up your Virtuo Connecting a Microphone To connect a microphone to Virtuo To connect a microphone to Virtuo, you must use the MIC box (part no. 700166-001) and the 4-pin Euroblock connector (part no. 100000-001) supplied with the microphone kit (sold separately). Refer to the figure below when performing this procedure.
- Page 95 Setting up your Virtuo Connecting a Microphone 3. Loosen the screws along the top of the connector using a flat-head screwdriver, if necessary. Overhead view Euroblock terminals 4. Wire the ends of the 4 microphone wires to the Euroblock connector using the legend on the DI box’s label as a guide.
- Page 96 Setting up your Virtuo Connecting a Microphone 13. Activate the Operator menu and adjust the input gain for the microphone. Mixer Input screen NOTE The Mixer Input screen includes a Microphone Boost button, which is independently controllable for the three audio zone. The default value is OFF. Adjust your microphone gain and boost settings as required.
-
Page 97: Adjusting Touch Screen Brightness And Contrast
Virtuo is shipped from the factory with touch screen brightness and contrast settings configured to values that TouchTunes has found to be suitable for most installations, and will probably not require adjustment. However, optimum picture quality is affected by the lighting conditions in the venue for your Virtuo installation, so some adjustment may be required to achieve the best results. -
Page 98: Re-Applying Filters And Credit Rules
Configure your settings as required. Setting the Lighting Colors Virtuo’s Light Rim, Wallwash and LED Array display all light up in the classic TouchTunes blue color, by default. This color can be changed to better match a location’s color scheme and lighting (or branding.) The settings associated with this functionality can be found within the Operator Menu, by navigating to Hardware | Internal Lightshow. -
Page 99: Setting Local Favorites Options
Setting up your Virtuo Setting Local Favorites Options Setting Local Favorites Options You can change the default view and sorting order of the Local Favorites from the Operator menu, on the Music > Options screen. Virtuo Installation and Setup Guide... -
Page 100: Setting Custom Music Programming (Cmp) Levels
Setting up your Virtuo Setting Custom Music Programming (CMP) Levels Setting Custom Music Programming (CMP) Levels You can adjust the input and output volume levels for Custom Music Programming (CMP), also called background music. On the Operator screen touch the Sound menu and adjust the CMP levels for the zones in and out. Changing Languages When you activated Virtuo, you selected a default language, but you can change your language selection any time. -
Page 101: Do Not Apply Stickers To The Virtuo Touch Screen
Doing so can adversely affect the Virtuo’s behavior. If you must apply stickers of a promotional nature or with contact information, TouchTunes recommends that you affix them to the left or right side of the enclosure to preserve the esthetics of the Virtuo facade. -
Page 102: Adding Your Owner Profile
Adding Your Owner Profile Adding Your Owner Profile The About TouchTunes portal now has an additional page that allows operators to publish their corporate profile and contact information onscreen rather than as a sticker affixed directly to Virtuo. The new Owner Profile page in the About TouchTunes portal. -
Page 103: Service And Maintenance
Service and maintenance This section has information to assist you with the service and maintenance of your Virtuo SmartJuke. Topics Important Safety Instructions and Warranty Information List of Available Virtuo FRU (Field-Replaceable Unit) Kits Replacing a Payment Acceptor Virtuo Installation and Setup Guide 900475-001 Rev 11... -
Page 104: Important Safety Instructions And Warranty Information
Maintenance Guide determine what is involved in the replacement procedure, and what parts are included in each FRU kit. If you need to order one or more FRU kits, please contact your TouchTunes Sales representative. Virtuo Installation and Setup Guide... -
Page 105: List Of Available Virtuo Fru (Field-Replaceable Unit) Kits
Front Door (partially pre-assembled) 900666-001 All the documents listed in this table are available for download on the TouchTunes Product & Warranty page, at http://productwarranty.touchtunes.com. You can find individual documents easily by searching for their part numbers, or by using relevant keywords. -
Page 106: Replacing A Payment Acceptor
This section assumes that you’re replacing an existing bill acceptor with a new one. If your Virtuo currently includes only one bill acceptor, with a front payment plate that doesn’t offer an opening for a second bill acceptor, you should contact TouchTunes in order to order the Virtuo Accessories Kit, which includes a replacement payment plate. - Page 107 Replacing a Payment Acceptor 11. Once the Virtuo has fully booted, go into the Operator screen, under Money > Options, and test the bill acceptor there. 12. Complete your tests on the bill acceptor to make sure it functions properly. 13.
- Page 108 Service and maintenance Virtuo Installation and Setup Guide...
-
Page 109: Bridging Virtuo's Internal Amplifier
Bridging Virtuo’s Internal Amplifier About Amplifier Bridging Amplifier bridging enables Virtuo’s internal amplifier to produce up to 475W per channel for a maximum of 950W. Topics About Amplifier Bridging Bridged Amplifier Configuration How to Bridge the Amplifier Bridging Safety Considerations and Recommendations Troubleshooting Amplifier Bridging Virtuo Installation and Setup Guide 900475-001 Rev 11... -
Page 110: Bridged Amplifier Configuration
Bridging Virtuo’s Internal Amplifier Bridged Amplifier Configuration Bridged Amplifier Configuration The following is a schematic of the wiring configuration required when bridging both Zone 1 and Zone 2: This configuration results in the following: • Output is forced to mono •... -
Page 111: How To Bridge The Amplifier
Bridging Virtuo’s Internal Amplifier How to Bridge the Amplifier How to Bridge the Amplifier 1. Pause Virtuo. 2. Unlock and open Virtuo’s front door. 3. Disconnect the euroblock connectors from the Zone(s) you will be bridging. 4. Rewire the speaker cables going into the disconnected euroblock connectors as follows: •... - Page 112 Bridging Virtuo’s Internal Amplifier How to Bridge the Amplifier 9. Turn on bridging ONLY for the zone(s) you rewired. 10. Tap the “Confirm” button to apply the change. 11. You will be prompted to confirm again, as toggling the bridging function requires a reboot: 12.
- Page 113 Bridging Virtuo’s Internal Amplifier How to Bridge the Amplifier You will notice that some of the output controls for the bridged zones are now disabled: Bridging forces a Zone to mono, so the mono/stereo and balance controls are now disabled. The bass boost control is also disabled, since the amplifier is now outputting significantly more power than previously.
-
Page 114: Bridging Safety Considerations And Recommendations
Bridging should only be used with Virtuo’s internal amplifier. Attempting this with any other amplifier (including the ones offered by TouchTunes for other jukebox models or in the Virtuo Floor Stand) could cause degraded audio quality, and damage to the amplifier or the speakers. -
Page 115: Connection Diagrams
Connection Diagrams This section contains a block wiring diagram that shows the connections within Virtuo SmartJuke components, as well as those between Virtuo and other external components such as audio amplifiers. You can refer to this diagram while setting up the Virtuo in a location, or as a post-installation check to ensure that all the components are connected correctly. - Page 116 Connection Diagrams Virtuo wiring diagram left side DOOR Rim LED Strips HDMI-DVI to LED array Camera LED Array Power DVI to monitor Monitor-serial Monitor Power Brand Bar LED Strip Squid (AUX) Payment LED Strips Door Switch ID Module Play Button Card reader Mechanical Counter...
- Page 117 Virtuo wiring diagram right side LED Array Power RS232 to monitor TO NETWORK USB to Camera Power (6-pin) Power (24-pin) USB to LED Array TO USB MODEM USB to card reader HDMI-DVI to LED array DVI to monitor Monitor Power POWER HARD DISK Squid (AUX)
-
Page 118: Usb Connection Requirements
Connection Diagrams USB Connection Requirements To ensure optimum performance and load balancing, make sure your USB devices are connected according to the wiring diagram, especially these devices: USB Port Connected Device POWER HARD DISK Reserved for future use Reserved for future use I/O Board Camera SERIAL... - Page 119 TouchTunes Interactive Networks, Inc. TouchTunes Interactive Networks, Inc. Technical Support 400 Sainte Croix Avenue, Suite 200 E 850 Third Ave, Suite 15C 847-353-1954 Montreal, Quebec, New York, NY 10022 www.touchtunes.com Canada, H4N 3L4 Copyright © 2014 TouchTunes Interactive Networks...
Need help?
Do you have a question about the Virtuo 700259-001 and is the answer not in the manual?
Questions and answers