Table of Contents
Advertisement
JURA-CAPRESSO
Automatic Coffee Centers
Feature
Comparison
Different Features
1
Price
2
Highlights
3
Heating Systems / Watts / Pump
4
Water Tank Capacity
5
Bean Container Capacity
6
LED displays, alpha-numeric
7
Beverage Buttons
8
Coffee Strength Levels
9
Temperature Settings
10 Multifunction Rotary Dial
11 Cup Size Selection
12 Frothing Systems included
13 Milk Container
14 Instant brewing after frothing
15 Frothing after coffee brewing
16 One push button Cappuccino
17 Never-run-out-of-bean-sensor
Z5 / Z6
Z5: $3,249
Z6: $3,659 (shown)
• Unique one-touch
Cappuccino
• Large capacity
• Very fast and powerful
• 2 Heating Systems
• Metal Front Housing
2 ThermoBlocks /1350W
18 bar pressure
96 oz.
10 oz.
3-Line
8 buttons:
3 single-cup buttons:
2 double-cup buttons
1 cappuccino/latte button
1 milk / hot chocolate button
1 hot water button
5
3
Y
1- 16 oz.
Infinitely Programmable or
select before/during brewing
"Never-Move-the-Cup"-
Auto-Cappuccino-System with
short and long nozzle system
Y, thermal keeps cold up to 8 hrs
Z5: vacuum glass w/plastic housing
Z6: stainless steel vacuum
Y (no purging)
immediate
Y
Y
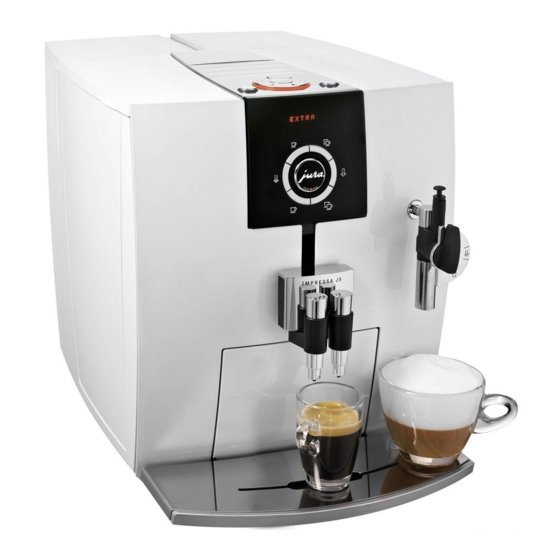
S Avantgarde Series
J5
S9A: $2,299 (shown)
J5: $1,999
S7A: $1,999
(shown w/white side panels)
• Large capacity
• Ceramic Valve Technology
• Very fast & powerful
• More Crema
• 2 Heating Systems
• Butterfly coffee spout
• Active Cup Warming
• Concealed storage
Platform
compartment
2 ThermoBlocks / 1350W
1 ThermoBlock / 1450W
18 bar pressure
18 bar pressure
96 oz.
71 oz.
10 oz.
9 oz.
2-Line
1-Line, 10-digits
7 buttons / 1 dial:
6 beverage buttons:
2 single-cup buttons
2 single-cup buttons
2 double-cup buttons
2 double-cup buttons
1 single cup A LA CARTE
1 hot water button
1 hot water dial
1 steam button
2 steam buttons
5
4
2
2 for coffee
3 for hot water
Y
Y
1 - 16 oz
1-16oz.
Programmable or select
Infinitely Programmable or
before/during brewing
select before/during brewing brewing (shown in display)
Dual Frother PLUS &
Dual Frother PLUS &
frothXpress PLUS
frothXpress
Y, plastic container with lid
-
Y (no purging)
Y (no purging)
immediate
10 to 15 sec. heat up
-
-
Y
Y
F8
E8 / E9
F8: $1,399 (shown)
E8: $899
E9: $999 (shown)
• Beautiful Design
• Great Value
• Easy Operation
• All essential IMPRESSA
• Fully Equipped
features
1 ThermoBlock / 1450W
1 ThermoBlock / 1450W
18 bar pressure
18 bar pressure
64 oz.
64 oz.
8 oz.
8 oz.
1-Line, 10-digits
1-Line 8-digits
2 buttons / 1 dial:
2 buttons / 1 dial:
1 single-cup with triple
1 single-cup with triple
strength function
strength function
1 double-cup button
1 double-cup button
1 hot water dial
1 hot water dial
1 steam button
1 steam button
3 x 2
3 x 2
2
1
Y
Y
1-16oz.
1-16oz.
Select before/during
Select before/during
brewing (shown in display)
Dual Frother PLUS &
Dual Frother PLUS
frothXpress PLUS
Separately available:
frothXpress PLUS
-
-
Y (no purging)
Y (no purging)
10 to 20 sec. heat up
10 to 20 sec. heat up
-
-
-
-
Advertisement
Table of Contents


Need help?
Do you have a question about the Impressa J5 and is the answer not in the manual?
Questions and answers