
Related Manuals for Jura Capresso 68191


Summary of Contents for Jura Capresso 68191
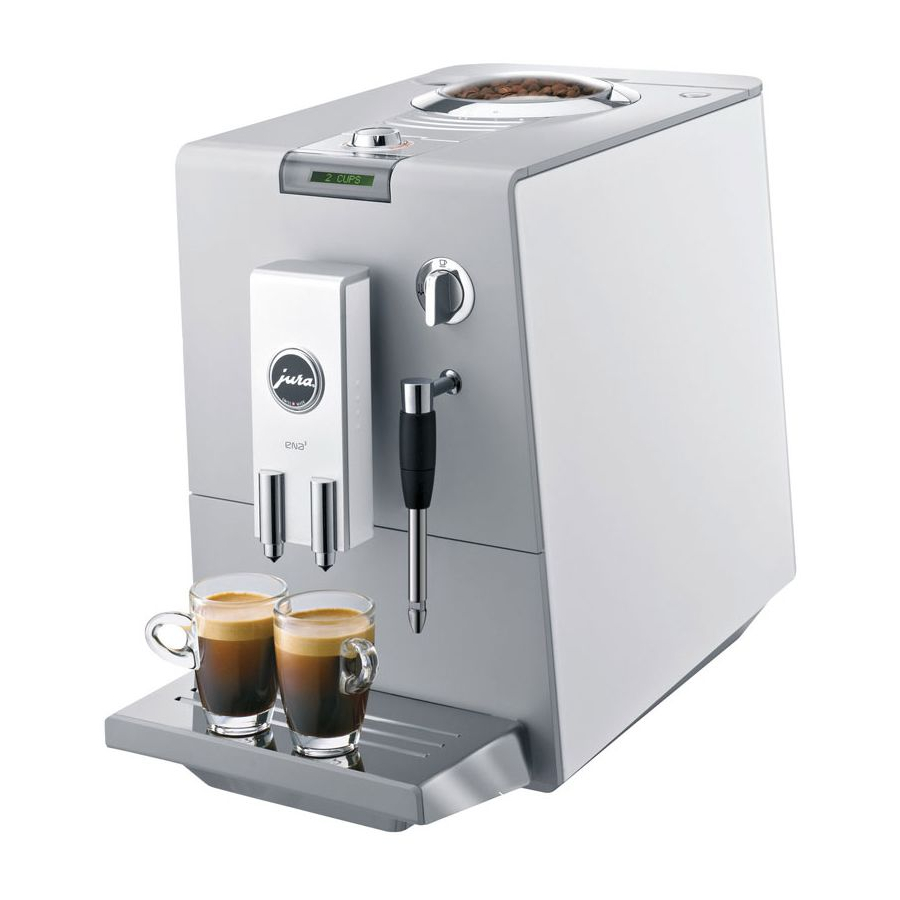
- Page 1 CAPRESSO ENA 3 ENA 5 ENA 4 Fully Automatic Coffee & Espresso Center Operating Instructions and Warranty Customer Service 1-800-220-5701...
-
Page 2: Important Safeguards
IMPORTANT SAFEGUARDS When using electrical appliances, basic safety precautions should always be followed, including the following: 1. Read all instructions. 2. Do not touch hot surfaces. Use handles or knobs. 3. To protect against fire, electric shock and personal injury, do not immerse cord, plugs or appliance in water or other liquids. -
Page 3: Customer Service Information
Notice: Your Jura ENA has a 3-prong grounded plug. To reduce the risk of electrical shock, this plug will fit in an outlet only one way. If the plug does not fit in the outlet, contact a qualified electrician. DO NOT modify the plug in any way. -
Page 4: Illustrations
Fig. 1 ENA 3 / ENA 4 (above) ENA 5 shown in Fig. 3 1. Removable water tank with lid and Clearyl filter holder (Fig. 6 & 7) 2. On/Off button 3. Removable bean container lid 4. Grinder Fineness Adjustment Ring (Fig. 12 &13) 5. - Page 5 ENA 5 with frothXpress Fig. 3 To close Clearyl filter holder Fig. 7 Coffee position P button Rinse button Rotary Dial Hot Water/ with push Steam position button Fig. 4 Fig. 5 ENA 5 1-cup position Fig. 8 Fig. 9 To open Clearyl filter holder Fig.
-
Page 6: Using/Cleaning Dual Frother Plus
Light roast: finer setting Dark roast: coarser setting Fig. 12 Steam nozzle Fig. 16 Max: 2 spoons of pre-ground coffee Fig. 13 Fig. 14 Dual Frother PLUS Fig. 17 Frothing down Fig. 15 Sleeve Fig. 18 Steaming... - Page 7 Frothing range 12 to 2 o'clock Steam only no siphoning Steaming range 4 to 6 o'clock Chrome Nozzle Fig. 19 Fig. 20 Tablet Cappuccino cleaning rinsing Lever Fig. 23 Fig. 24 Venting tip Milk Hose Fig. 21 Remove protective grinder shield with Phillips screwdriver Fig.
-
Page 8: Table Of Contents
Chapter Important Safeguards... 2 Customer Service Information ... 3 Illustrations... 4-7 Product Warranty Registrations... 10 Quick Reference Guide/Operating Inst./ DVD... 10 Welcome to the ENA... 10 Bean-to-Cup /“Crema”/High Pressure Brewing ...11 Different Coffee Drinks... 11 Coffee Facts... 11 Please Don’t / Please Do... 11 Factory Settings / 3-Color Display ... - Page 9 Chapter 14b. Visual programming of cup size ... 21 Water care... 21 Water Hardness Monitor ... 21 16.1 Changing the water hardness monitor ... 22 Clearyl Water Filter Cartridge ... 22 17.1 Installing and activating the Clearyl filter... 23 17.2 Automatic Clearyl replacement...
-
Page 10: Product Warranty Registrations
1. PRODUCT WARRANTY REGISTRATION Please remove the Product Registration from the ENA pouch, fill it out and mail or fax it to us within two weeks after purchasing your machine or register your product online through our web- site: www.capresso.com. Important: This registration is part of your warranty (chapter 32). -
Page 11: Bean-To-Cup /"Crema"/High Pressure Brewing
machine is on you can choose between energy saving and always ready stand-by mode. High-end materials, a rich platinum metallic treatment (ENA 4 and ENA 5) and tasteful chrome accents make the ENA the highlight of any kitchen. Enjoy your JURA ENA! 3.1 BEAN-TO-CUP / “CREMA COFFEE"... -
Page 12: Factory Settings / 3-Color Display
• Never fill frozen beans into the bean container. If you store beans in the freezer, let them thaw 3 to 4 hours before filling them into the bean container. • Never fill anything other than coffee beans into the bean container (no chocolate, rice, nuts, spices, etc.) •... -
Page 13: Turning The Machine On
• machine is NOT placed on a surface which is sensitive to heat, water and steam. • Plug-in machine. 6.1 TURNING THE MACHINE ON • Press the On/Off button on top of the machine (Fig 1,2). The display will illuminate. FILL WATER TANK 6.2 FILLING THE WATER TANK Please note: Only use fresh, cold water. -
Page 14: Adjusting The Grinder
7. ADJUSTING THE GRINDER The Grinder Fineness Adjustment Ring is set to a medium grind position. We recommend leaving the grinder in this position for most applications. Please note: You can only adjust the grinder during grinding. • If you have extremely dark roasted, oily beans, set the grinder to a coarser setting. -
Page 15: 9B. Brewing One Cup
9b. BREWING ONE CUP If you press the Rotary Dial, the ENA will produce a 5 oz. cup of coffee in normal strength. READY, NORMAL, ENA 5 only: If you brew one cup we recommend turning the coffee spout to the one-cup position (Fig. 9). Coffee will flow from one spout into your cup. -
Page 16: Using Hot Water
READY • Place one or two cups under the coffee spouts. • Move the small lever to the front to open the chute and insert the coffee funnel (Fig. 14). The display shows GROUND. • Add one or two scoops of pre-ground coffee, remove the funnel and close the chute. -
Page 17: 12A. Using The Dual Frother Plus
12a. USING THE DUAL FROTHER PLUS ENA 3 and 4 only: The Dual Frother Plus is already attached. ENA 5 only: Remove the frothXpress (Fig. 20), and attach the Dual Frother to the steam nozzle. Make sure it is pushed up completely against the steam nozzle (Fig. -
Page 18: Using The Frothxpress System
Selector Switch to the Hot Water/Steam position (Fig. 5). Let hot water run through the frother for about 3 seconds and then stop. This will flush out any small milk droplets. Thorough cleaning of the Dual Frother parts: • Remove the Dual Frother from the Steam Nozzle (Fig. 17) and unscrew the tip from the rod (Fig. -
Page 19: 13B. Hotter Milk With The Frothxpress
Selector Switch to the coffee position. READY. • Place the cup underneath the coffee spouts and add a shot of espresso. Push the Rotary Dial. CUP. Once the brewing starts change the volume to 1.5 or 2.0 oz. by turning the Rotary Dial. -
Page 20: Programming
• Place a cup underneath the frothXpress and place a cup with some cold water next to the machine. • Insert the milk hose into this cup (Fig. 23). • Point the frothXpress dial to the 12 o’clock position. READY. •... -
Page 21: 14B. Visual Programming Of Cup Size
1. Push and hold the P button (Fig. 4) until the display shows RINSE. 2. Turn the Rotary Dial until the display shows PRODUCT. 3. Push the Rotary Dial. The display shows WATER. 4. Push the Rotary Dial again. The display shows 5. -
Page 22: Changing The Water Hardness Monitor
strip to determine the water hardness: • Insert the strip for one second into the water you want to use. Shake off any access water and wait for one minute. One or more sections of the indicator strip will turn reddish. •... -
Page 23: Automatic Clearyl Replacement
READY 1. Open the cover behind the Rotary Dial. (Fig. 1,5) 2. Push and hold the P button (Fig. 4) until the display shows RINSE. 3. Turn the Rotary Dial until the display show 4. Push the Rotary Dial. The display shows 5. -
Page 24: Manual Clearyl Replacement
Since the Water Hardness Selector is off, the machine will not remind you when to decalcify. This could clog and damage your machine. 17.3 MANUAL CLEARYL REPLACEMENT If the filter is more than 2 months old and the display does not indicate to replace filter, replace as follows. -
Page 25: Manual Tablet Cleaning Cycle
EMPTY TRAY. 9. Remove the cup and then the drawer and tray. 10. Empty drawer and ground coffee container and replace. 11. The display shows READY. The machine will automatically remind you after the next 180 cups of coffee to repeat this cycle. 18.2 MANUAL TABLET CLEANING CYCLE It is possible that the brewing process slows down before the automatic message (chapter 18.1) appears. -
Page 26: Manual Decalcifying
4. Replace the complete assembly. 5. The display shows AGENT IN TANK. 6. Remove and empty the water tank. (The Clearyl filter should not be in the water tank!) 7. Dissolve 3 of the large square decalcifying tablets in a container with 18 oz. -
Page 27: Energy Saving Mode
READY. • Push and hold the P button (Fig. 4) until display shows RINSE. • Push the P button again. The display again shows RINSE. • Push the P button a third time. The display shows RINSING. After a few seconds the rinse cycle stops automatically. READY. ENA 5 only: turn the spout again to the 1- or 2-cup position. -
Page 28: Keeping Your Machine In Top Shape
RINSE. • Turn the Rotary Dial until the display shows • Push the Rotary Dial ENGLISH • Turn the Rotary Dial to ESPANOL • Push the Rotary Dial to confirm: OK, • Push the P button to leave the programming mode. (ready). -
Page 29: Troubleshooting
water into the drawer (Fig. 1.13). This makes sure that no warm water stays in the heating system. Each cup of coffee always starts with fresh cold water. TRAY MISSING. The drawer is not inserted or not inserted correctly. Insert drawer correctly. -
Page 30: Error Messages
bubbles than the frothXpress. Solution 1: Take the Dual Frother apart and make sure that all grooves and holes are free of milk deposits (Fig. 18). Solution 2: Check the steam nozzle (Fig.17). If the steam nozzle is blocked by hardened milk, use a needle, toothpick or paper- clip and loosen up the milk deposit. -
Page 31: This Warranty Does Not Cover
3 weeks. Always keep extra tablets available. Tip: These tablets will also remove coffee and tea discoloration and oil films in other containers (tea kettles, thermal carafes etc.) Fill container with water, add one or two tablets and let stand overnight. -
Page 32: Free Repair Service
JURA-CAPRESSO any other liability in connection with the sale of the machine. JURA-CAPRESSO expressly disclaims liability for incidental and consequential damages caused by the machine. The terms "incidental damages" refer to the loss of the original purchasers time, loss of the use of the machine or other costs relating to the care and custody of the machine.
Need help?
Do you have a question about the 68191 and is the answer not in the manual?
Questions and answers