
Related Manuals for Jura Capresso Impressa J5


Summary of Contents for Jura Capresso Impressa J5
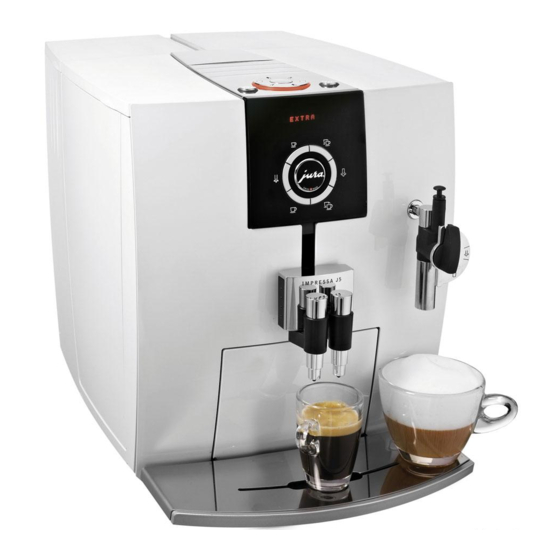
- Page 1 CAPRESSO Impressa J5 Fully Automatic Coffee & Espresso Center with Clearyl Water Care System Operating Instructions and Warranty Customer Service 1-800-220-5701...
-
Page 2: Important Safeguards
IMPORTANT SAFEGUARDS When using electrical appliances, basic safety precautions should always be followed, including the following: 1. Read all instructions. 2. Do not touch hot surfaces. Use handles or knobs. 3. To protect against fire, electric shock and personal injury, do not immerse cord, plugs or appliance in water or other liquids. -
Page 3: Customer Service Information
Notice: Your Impressa J5 has a 3-prong grounded plug. To reduce the risk of electrical shock this plug will fit in an outlet only one way. If the plug does not fit in the outlet contact a qualified electrician. DO NOT modify the plug in any way. -
Page 4: Illustrations
Fig. 1 Fig. 1a Main Power Switch and power cord located on right side of machine. If your machine comes with the cartridge installed, it is not a new machine! Call customer service 1-800-220-5701. Bean container lid Storage lid Storage compartment Control panel (see Fig. - Page 5 1 Espresso Water 1 Coffee Fig. 2 Fig. 7 Bean Container Lid Bean Aroma Lid 2 Espressi Steam ® CAPRESSO 2 Coffees Fig. 3 Fig. 4 Coffee spouts down and together Fig. 8 Fig. 9 Fig. 5 Fig. 6 Grind...
- Page 6 Frothing range 12 to 2 o'clock Steam only no siphoning DIAL Steaming range 4 to 6 o'clock Chrome Nozzle Fig. 11 Fig. 12 Fig. 16 Fig. 17 Milk Hose Fig. 13 Steam nozzle Venting tip Frothing down Fig. 18 Fig. 14 Fig.
- Page 7 Extension Sleeve Fig. 21 Fig. 22 Fig. 23 Fig. 24 Fig.25 Fig. 26 Fig. 27 Fig. 28 Fig. 29 Fig. 30...
-
Page 8: Table Of Contents
Important Safeguards... 2 Customer Service Information ... 3 Illustrations... 4-7 Product Warranty Registrations... 10 Quick Reference Guide/Operating Inst./ DVD... 10 Welcome to the Impressa J5 ... 10 Bean-to-Cup /“Crema”/High Pressure Brewing ...11 3.2. Different Coffee Drinks... 11 Coffee Facts... 11 Please Don’t / Please Do... - Page 9 20.5 Cleaning the frothXpress and Dual Frother ... 31 Display messages ... 31 Troubleshooting... 32 Error messages ... 33 Removing stones from the burr grinder... 34 Supplies... 34 Warranty ... 35 Free Repair Service... 36 Jura-Capresso address information... 36 Page...
-
Page 10: Product Warranty Registrations
– well known in commercial applications – was adapted and refined by Jura coffee specialists and is the trademark of each Jura-Capresso coffee center. This Pre-Brew Aroma-System ensures optimal coffee extraction, and the powerful 18-bar pump will finish every cup with a rich layer of "crema"... -
Page 11: Bean-To-Cup /"Crema"/High Pressure Brewing
The cup/coffee illumination lets you enjoy the coffee preparation (Fig.1.13a). Enjoy your Impressa J5! 3.1 BEAN-TO-CUP / “CREMA COFFEE" / HIGH PRESSURE BREWING According to the majority of coffee experts, grinding the beans just before brewing, tamping and brewing under high pressure is the ideal extracting process for maximum flavor and aroma. -
Page 12: Factory Settings
• Never fill anything other than coffee beans into the bean container (no chocolate, rice, nuts, spices, etc.) • Never fill anything but fresh, cold clean water into the water container, except when decalcifying (chapter 18.3). • Never use mineral or carbonated water. You can use tap water, bottled water, spring water, distilled water and reverse osmosis water. -
Page 13: Turning The Machine On
6.1 TURNING THE MACHINE ON • Press the Main Power Switch at the bottom right in front of the power cord (Fig. 1a). The On/Off button on top of the machine illuminates in red (Fig. 2), indicating that the main power switch was turned on. -
Page 14: Adjusting The Grinder
remind you via the display when to refill the beans before the bean container is completely empty. • Fill beans into the bean container. • Place a cup underneath the Dual Coffee Spout and push the 1-cup Espresso Button (Fig. 3). The machine starts grinding and brewing. -
Page 15: Brewing Coffee And Espresso
• Place one or two cups underneath Dual Coffee Spouts and push the desired button. The Impressa J5 will grind, tamp and then brew the coffee. It uses a 2-step brewing process (Pre-Brew Aroma System). First, it moistens the ground coffee (pre-brew phase), pauses for a few seconds, and then starts the brewing process. -
Page 16: Visual Programming Of Cup Size
• For the hot water button you can override the water volume. • For the steam button you can override the steam duration. Important: • You always override the coffee strength, before you push one of the single-cup buttons. • Coffee and Hot Water volume as well as steam duration you override after you push any of the beverage buttons. -
Page 17: Cappuccino And Latte
• READY Place one or two cups under the Dual Coffee Spouts. • Open the Lid for Ground Coffee (Fig. 11). Opening this lid automatically disengages the grinder. The display shows repeatedly FILL PRE-GROUND. • Add one or two level scoops of pre-ground coffee into the funnel and close the lid. -
Page 18: Hotter Milk
12.1.1 MAKING CAPPUCCINO AND LATTE • Pre-warm your cappuccino cup. • Place your cup underneath the frothXpress (Fig. 15). • Push the steam button (Fig. 3 ) HEATING. It will take a few seconds for the system to be ready for steam. •... -
Page 19: Cleaning The Frothxpress
12.1.4 CLEANING THE FROTHXPRESS After frothing, a few drops of milk are still inside the frothXpress. 12.1.5 QUICK RINSE If you don’t use the frothXpress within the next half hour there is a quick and easy way remove those milk deposits. •... -
Page 20: Cleaning The Dual Frother Plus
Tips for frothing (Cappuccino): The tip of the frother should not touch the bottom of your pitcher. Start in the steaming position – cylinder "up" (Fig. 19) – for a few seconds. Then push the cylinder "down". Milk froth will build up. This way the froth on top of your milk is also warm. -
Page 21: Clearyl Water Filter Cartridge
IMPORTANT: do not use carbonated water or any other liquid in the water tank. You have the following options to take care of the water. • Clearyl Water Filter Cartridge (chapter 15). • Decalcifying System (chapter 18.3). Your machine is pre-set in the factory to automatically remind you to decalcify based on a water hardness of Level 2. -
Page 22: Automatic Clearyl Replacement
15.2 AUTOMATIC CLEARYL REPLACEMENT Eventually the filter needs to be replaced. Over time and depending on the amount of water, the filter will cease to work. The machine cannot monitor the time aspect. It monitors the water volume. After approx. 75 liters of water use (~2,500 oz.) the display shows alternating READY FILTER button illuminates. -
Page 23: Changing The Water Hardness Monitor
• Insert the stick for one second into the water you want to use. Shake off any access water and wait for one minute. • If all five fields of the test stick turn reddish, set the hardness level to 5 squares. If four fields turn reddish, set the hardness level to 4 squares and so on. -
Page 24: Optional Cleaning Cycles
Display Function/Comment Set the water hardness level to the water you HARDNESS are using. The machine will then automatically remind you when it’s time to de-scale the machine. If the CLEARYL water filter is installed, this program will not show up. You can choose an energy savings mode. -
Page 25: Energy Saving Mode
You can also program the output visually (chapter 11.2). You can also re-program all buttons to different values. Re-pro- gramming changes the outcome of the beverage permanently. Re-programming is easy. The re-programmed values are stored in the machine’s memory until you re-program it again. Buttons Parameters Options... -
Page 26: Setting The Time
READY, • Push and hold the Rotary Dial until the display shows RINSE. • Turn the dial clockwise until the display shows • Push the rotary dial. The display shows • Turn the dial until the display shows • Push the rotary dial. For two seconds the display shows and then ENERGY •... -
Page 27: Looking Up Information
• If you use the machine all day change the setting to the largest use interval, e.g. 4 hours. This way the machine is always ready to brew coffee. Changing the AUTO-OFF setting: READY, • Push and hold the rotary dial until the display shows RINSE. •... -
Page 28: Changing The Language
17.9 CHANGING THE LANGUAGE Your J5 is set to ENGLISH. You can the display from English to French (FRANCAIS), Italian (ITALIANO), Dutch (NL) or German (DEUTSCH) READY • Push and hold the rotary dial until the display shows RINSE. • Turn the dial clockwise until the display shows LANGUAGE. •... -
Page 29: Decalcifying
beans deposit more oils into the brewing chamber. When this happens you can manually start a tablet cleaning cycle as follows: READY • Push the rotary dial, until the display shows RINSE. • Push the rotary dial again and turn it until the display shows CLEAN. -
Page 30: Manual Decalcifying
30 seconds. 5. Now turn the main power switch off (Fig. 1a) and unplug. 20. KEEPING YOUR MACHINE IN TOP SHAPE Keeping your Impressa J5 in good working condition will main- TRAY. tain the taste and aroma of your coffee beverages. -
Page 31: Automated Cleaning Programs
short coffee and discard. The next cup will taste a lot better. • Always pre-warm your cup with hot water (chapter 10). • Keep the coffee spouts as close as possible to the cups to maximize crema. 20.1 AUTOMATED CLEANING PROGRAMS The J5 has four automated programs. -
Page 32: Troubleshooting
FILL BEANS. The bean container is (almost) empty. Add beans to the bean container. FILL WATER TANK. The water tank is (almost) empty. Add water to the water tank. CLOSE COVER. The lid for the ground coffee funnel is open. Close the lid (Fig. -
Page 33: Error Messages
D. THE DISPLAY READS "FILL WATER" BUT THERE IS ENOUGH WATER IN THE WATER TANK. Reason: The “low water” floatation device is missing. Solution: Within the water tank is a small compartment (like a mouse trap). Inside is a small black floatation device. On top is a small clear see-through plastic cover. -
Page 34: Removing Stones From The Burr Grinder
Turn machine on and test the grinder without beans to see if the blockage has disappeared. 25. SUPPLIES The following supplies are necessary to keep your machine in good working order. You can purchase these supplies: • from your local Jura-Capresso retailer, ERROR 8 still persists... -
Page 35: This Warranty Does Not Cover
United States. For Hawaii and Alaska freight is not covered by this warranty. In case the machine cannot be repaired, JURA-CAPRESSO will replace your machine with the same model with the same or less usage. In case we cannot replace your machine with the same model we will replace it with a model of the same or higher retail value with the same or less usage. -
Page 36: Free Repair Service / Extra Repair Coverage
United States. For Hawaii and Alaska freight is not covered by this warranty. In case the machine cannot be repaired, JURA-CAPRESSO will replace your machine with the same model with the same or less usage. In case we cannot replace your machine with the same model we will replace it with a model of the same or higher retail value with the same or less usage.
Need help?
Do you have a question about the Impressa J5 and is the answer not in the manual?
Questions and answers