
Related Manuals for Sony PXW-X200


Summary of Contents for Sony PXW-X200
-
Page 1: Operating Instructions
4-549-307-13(1) Solid-State Memory Camcorder PXW-X200 Operating Instructions Before operating the unit, please read this manual thoroughly and retain it for future reference. © 2014 Sony Corporation... -
Page 2: Table Of Contents
Table of Contents Overview Part Identification ..............8 Camcorder ..............8 IR Remote Commander (Supplied) ......13 On-Screen Indications ............14 Direct Menu Operation ..........16 Preparations Power Supply ................18 Using a Battery Pack ............ 18 Using AC Power (DC IN Power) ......... 19 Turning the Power On/Off ........... - Page 3 Markers/Zebra Patterns ..........32 Gain ................32 Electronic Shutter ............33 Iris ................33 Zoom ................34 Focus ................34 Steady Shot ..............35 Flickers ................. 35 Time Data ..............36 Recording Audio Signals ............36 Using the Built-in Stereo Microphones ......36 Using External Inputs ...........
- Page 4 Connecting with the Wireless LAN Access Point Mode ..............60 Connecting with the Wireless LAN Station Mode ..62 Connecting to the Internet ............. 63 Connecting with a modem ........... 63 Connecting with the wireless LAN Wi-Fi station mode ............... 64 Connecting to the Internet with a LAN cable ....
- Page 5 Clip Operation Menus ..........82 Basic Operations of the Clip Operation Menus ... 83 Displaying the Detailed Information of a Clip ..... 84 Adding/Deleting a Flag (UDF and exFAT) ....85 Adding/Deleting the OK Mark (FAT HD Mode Only) ..............85 Copying Clips ...............
- Page 6 Nonlinear Editing ............130 Recording External Input Signals ......130 External Synchronization ............. 131 Appendices Important Notes on Operation ..........134 Video Format (Format) ............138 UDF HD Mode ............138 UDF SD Mode ............138 exFAT HD Mode ............139 exFAT SD Mode ............
-
Page 7: Table Of Contents
Supplied Accessories ..........174 Optional Accessories ..........174 On trademarks ............175 Index ..................176 Table of Contents... -
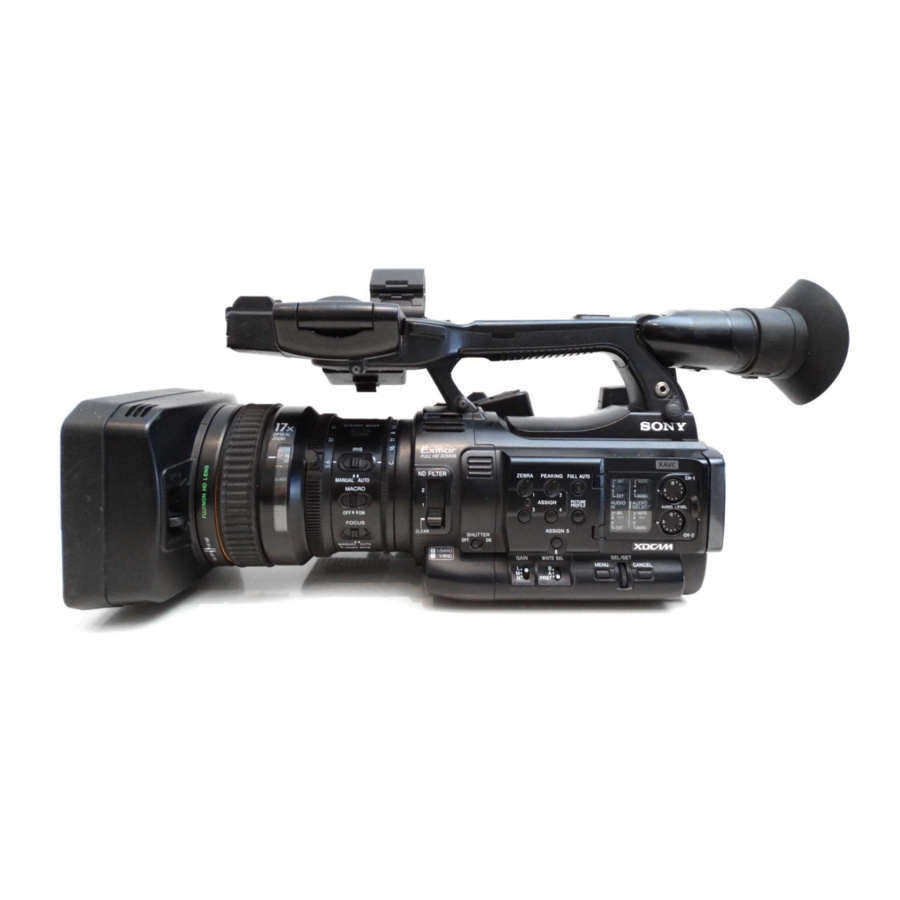
Page 8: Part Identification
Overview Part Identification For functions and usage, see the pages in parentheses. Camcorder Operation panel on the handle (page 10) Rear connector panel (page 12) Lens control block (page 11) Side operation panel (page 11) Card slot block (page 12) Lens hood Headphone connector (stereo mini jack) Attach... - Page 9 Controls on the grip (page 13) Viewfinder (page 20) Built-in stereo microphone (page 36) REC/TALLY lamp How to attach the EVF large eyecup Stretch the EVF large eyecup for attaching to Front IR remote control receptor the viewfinder and insert it aligning with the Built-in speaker (page 82) horizontal groove of the eyecup.
- Page 10 To mount the accessory shoe Operation panel on the handle Mount the accessory shoe on the accessory shoe mount as illustrated. Accessory shoe plate Accessory shoe Accessory shoe Accessory shoe plate PLAY/PAUSE button (page 81) Lift the edge of the accessory shoe plate and F REV (fast reverse) button (page 82) pull it in the direction opposite to that of the THUMBNAIL button (page 79)
- Page 11 Lens control block Side operation panel Focus ring (page 34) 11 12 13 Zoom ring (page 34) STEADY SHOT button (page 35) ASSIGN (assignable) 1/2/3/4 buttons (page IRIS switch (page 33) “Zebra” is set to ASSIGN 1 and “Peaking” is Iris ring (page 33) set to ASSIGN 2 by default.
- Page 12 Card slot block Rear connector panel The SxS memory card slots and EJECT buttons are located behind the cover. Open the cover External device connector (page 26, 60) PC connector (page 127) i.LINK (HDV/DV) connector (4-pin, S400 conforming to IEEE1394) (page 127) A/V OUT (audio/video multi output) connector (page 127) N mark...
-
Page 13: Ir Remote Commander (Supplied)
Controls on the grip IR Remote Commander (Supplied) REC REVIEW button (page 29) Power zoom lever (page 34) DATA CODE button FOCUS MAG button (page 34) This button does not work on the camcorder. LENS REMOTE (lens remote controller) TC RESET (timecode reset) button connector (page 34) SCAN/SLOW (reverse high speed REC START (start/stop recording) -
Page 14: On-Screen Indications
On-Screen Indications While recording (or standing by to record), pressing the DISPLAY button displays the statuses and settings of this unit on the LCD monitor/viewfinder screen. Remarks [M]: The indication of the items named with this suffix can be independently turned on/off with “Display On/Off”... - Page 15 Media status indication indication/Clip uploading status indication Memory card in slot A is active. The clip uploading status indication is displayed when connected via wireless LAN. The number Memory card in slot B is active. of remaining clips for uploading and uploading Time data indication [M] (page 36) rate are displayed.
-
Page 16: Direct Menu Operation
Network connection status indication The network connection status is displayed as icons. Conditions Icon NETWORK SET NETWORK SET Network menu>”NW& menu>”Network connection status Proxy”/”USB” Mode “Off” or “USB A” – – “Network&Proxy” “Off” – “Access Point” Preparing Wi-Fi Flashing Connected to Wi-Fi Wi-Fi cannot be connected “Station”... - Page 17 When the camcorder’s status or settings are displayed on the screen, press the SEL/SET button (page 10) or the jog dial (page 11). If “Direct Menu” is set to “All” or “Part,” the cursor is displayed on one of the items for which the Direct menu operation is permitted.
-
Page 18: Power Supply
You can use a battery pack or AC power via an Note AC adaptor. The AC adaptor cannot be connected to the camcorder For safety, use only the Sony battery packs and while the battery pack is inserted. AC adaptor listed below: Lithium-ion Battery Pack... -
Page 19: Using Ac Power (Dc In Power)
If the battery charge remaining becomes Turning the Power On/Off To turn the power on, set the power switch (page If the battery charge remaining decreases to a 8) to the ON position (the ? position). To turn the certain level during operation (Low BATT power off, set the power switch to the OFF status), a low-battery message, flashing of the position (the 1 position). -
Page 20: Setting The Clock
Setting the Clock Adjusting the LCD Monitor and Viewfinder When you turn the camcorder on for the first time after purchasing or replacing the backup battery (page 154), the Initial Setting display appears on Adjusting the LCD Monitor the LCD monitor/viewfinder screen. Set the date and time of the built-in clock, using The LCD monitor turns on when it is opened and this display. -
Page 21: Using The Ir Remote Commander
Turning the EVF on/off Using the IR Remote With the factory setting, the EVF is turned on Commander when the LCD monitor is in its park position or is rotated to face the subject. You can change the setting so that the EVF is always on regardless of the status in the LCD Before use monitor, using “EVF”... -
Page 22: Using Sxs Memory Cards
SxS memory card. CAUTION SxS, SxS PRO and SxS-1 are trademarks of Sony Danger of explosion if battery is incorrectly Corporation. replaced. Replace only with the same or... -
Page 23: Inserting/Removing An Sxs Memory Card
Inserting/Removing an SxS Switching Between SxS Memory Memory Card Cards When SxS memory cards are loaded in both card Inserting an SxS memory card slots A and B, press the SLOT SELECT button (page 12) to select the card you wish to use. Open the cover of the card slot block If a card becomes full during recording, switching (page 12). -
Page 24: Checking The Remaining Time Available For Recording
Notes To restore a card • Use the format function of this camcorder to format Select “Execute” by pressing the up/down/ SxS memory cards for use on this camcorder. The formats of cards formatted on other devices are not left/right buttons or turning the jog dial, recognized as valid formats, making it necessary to then push the SEL/SET button or the jog format them again on this camcorder. -
Page 25: Using Other Media
A) or “Media(B)” (slot B), then select Using Other Media “Execute.” An in-progress message and status bar (%) are displayed, and the ACCESS lamp lights in red. When formatting is completed, a completion Notes message is displayed for three seconds. •... -
Page 26: Usb Flash Drives
A format operation may fail because the USB flash drive is write protected, or because it is not The following Sony USB flash drives are the type of drive specified for use with this recommended for use with this camcorder. - Page 27 The in-progress message and status bar (%) are displayed, and restoration is started. When restoration is completed, the message “Restore USB Memory Done” is displayed. • “XQD” is a trademark of Sony Corporation. Using Other Media...
-
Page 28: Basic Operation Procedure
Recording Basic Operation Procedure Open the lens cap 7, 8 REC START/STOP REC REVIEW (on the grip) Power switch: ON (the " position) LCD monitor angle Battery pack insertion adjustment FULL AUTO SxS memory card slots Note Preparations When you hold the camcorder by the grip, support it from underneath with your left hand. - Page 29 Note Checking the last recorded clip (Rec AF (Auto Focus) is not activated by setting the Review) camcorder to Full Auto mode. For information of automatic focus adjustment, Press the REC REVIEW button. see “Focus” (page 34). The Rec Review function (page 39) is Press the REC START/STOP button.
-
Page 30: Changing Basic Settings
A long clip can be recorded crossing over two Changing Basic Settings memory cards in slot A and B. When you copy recorded clips to a hard disk, etc., via computer, it is recommended to use the You can make changes to the settings based on dedicated application software, which you need the intended usage of the recorded video or to download, to maintain the continuity of... -
Page 31: Nd Filter
balance, even in ATW mode, by pressing the Changing the format button. To change the format, use “Format” in “System” Note (page 121) of the OTHERS menu. Under some conditions of lighting or the shooting Signals from the SDI OUT, A/V OUT, and HDMI subject, adjustment by ATW may fail to provide proper OUT connectors are also output according to the colors. -
Page 32: Markers/Zebra Patterns
3 seconds. If the error message continues to be displayed after several attempts, consult your Sony (page 14). service representative. When the Direct menu is in All mode, you can... -
Page 33: Electronic Shutter
Shooting in Auto Shutter Mode Electronic Shutter The shutter speed is automatically adjusted according to the picture brightness. Recording with a fixed shutter When you set the camcorder to Full Auto mode Set the shutter speed (cache time). (page 28), Auto Shutter is forcibly selected. When you set the SHUTTER switch (page 11) to When Full Auto mode is off, you can ON, the fixed shutter is turned on in the mode and... -
Page 34: Zoom
When using a lens remote controller Zoom Zooming can also be controlled from an optional lens remote controller connected via the LENS Operating Zoom manually REMOTE connector. Setting the ZOOM switch (page 13) on the For operation, refer to the operation guide of the lens bottom of the camcorder to the MANUAL remote controller. -
Page 35: Steady Shot
Adjusting in MF Mode Steady Shot MF (Manual Focus) mode allows you to activate By activating the Steady Shot function, blurring Auto Focus momentarily when required. of images due to camera shaking can be reduced. Slide the focus ring forward (to lens hood side), then set the FOCUS switch (page 11) to MANUAL. -
Page 36: Time Data
Time Data Recording Audio Signals Setting the Timecode Four channels (CH-1/CH-2/CH-3/CH-4) of audio Specify the timecode to be recorded with can be recorded (Linear PCM recording) in “Timecode” and “TC Format” of the TC/UB SET synchronization with video recording. menu (page 112). You can use the built-in stereo microphones (omni-directional electret condenser Setting the Users Bit... -
Page 37: Adjusting The Audio Recording Levels
Attach a microphone, then return the Set “CH1 EXT Input” and “CH2 EXT external microphone holder cover to its Input” in “Audio Input” of the AUDIO original position to secure it. SET menu to “SHOE MIC” (page 104). Notes Connect the microphone cable to the •... -
Page 38: Useful Functions
Note Useful Functions The built-in speaker is disabled during recording (or when standing by to record). To adjust the audio monitoring volume Use the VOLUME buttons (page 10). Color Bars/Reference Tone By setting “Camera/Bars” in “Color Bars” (page 97) of the CAMERA SET menu to “Bars,” you can output a color-bar signal in place of the camera picture. -
Page 39: Ok/Ng/Kp Flags (Udf And Exfat)
For operations to add shot marks after recording, Adding the OK mark see “Adding Shot Marks During Playback (UDF, exFAT, and FAT HD Mode)” on page 82 and When recording of a clip ends, press the “Adding/Deleting Shot Marks (UDF, exFAT, and assignable button to which you assigned the FAT HD Mode)”... -
Page 40: Assignable Buttons
was from SP 1440×1080/23.98P to SP 1440×1080/ Mode and FAT HD Mode) or “SP 1440×1080/23.98P” 59.94i). (in FAT HD Mode). • The Setup and PICTURE PROFILE menus cannot be • Interval Recording mode cannot be used when the operated during Rec Review. items “DVCAM”... -
Page 41: Clip Continuous Recording (Udf And Exfat)
The specified number of frames are recorded • The Rec Review function cannot be used while recording in Frame Rec mode is in progress. intermittently when you press the REC START/ • You cannot change the “Number of Frames” setting STOP button. -
Page 42: Picture Cache Recording: Retroactively Record
• Clip Continuous Recording cannot be used while Recording, Simultaneous Recording in the 2 slots, or recording. Proxy Recording. When you set Picture Cache • This function cannot be used with FAT. Recording to “On,” these functions are forcefully disabled. •... -
Page 43: Slow & Quick Motion
Review, or thumbnail screen display, Picture Cache • Slow & Quick Motion cannot be set to “On” Recording of such a period cannot be made. simultaneously with Frame Recording, Interval • Although you can change the cache time setting while Recording, Picture Cache Recording, Clip Continuous recording, any new value becomes valid only after Recording, Simultaneous Recording in the 2 slots, or... -
Page 44: Freeze Mix: Image Alignment
recording, simultaneous recording or relay recording is Preparatory settings not available. • When you start recording with Simultaneous Before starting Simultaneous Recording in the 2 Recording in the 2 slots, if only one memory card is slots, set “Simul Rec” in the CAMERA SET inserted in either of slots or one of memory cards is menu to “Simul”... -
Page 45: Automatic Adjustment Of Flange Focal Length
Notes Automatic Adjustment of Flange • “Auto FB Adjust” cannot be selected when the ND Focal Length filter is set to 1 or 2. • Do not change the ND filter while “Auto FB Adjust” is in operation. When automatic adjustment of flange focal length is activated, focusing is performed both at If you press the CANCEL button during the wide-angle and telephoto ends of the zoom for... - Page 46 Use the up/down buttons or the jog dial to select “SET,” then press the SEL/ SET button or the jog dial. Make each setting (page 47). When the settings have been made, press the PICTURE PROFILE button. Selecting a registered Picture Profile Once you store a picture profile, you can recall the picture quality registered in the picture profile.
-
Page 47: Picture Profile Items
Picture Profile Items The values when “Off” is selected at “SEL” of the PICTURE PROFILE menu are shown in bold face (example: Standard PICTURE PROFILE SET Items Subitems and setting values Contents Profile Name Profile name Set the profile name in 8 characters at maximum. Standard You can use upper- and lowercase alphabetics, Changing the picture profile... - Page 48 PICTURE PROFILE SET Items Subitems and setting values Contents Multi Matrix Setting Set to “On” to enable the multi-matrix correction, On / Off which allows specific colors to be selected for Makes settings related to saturation correction in a 16-axis hue space. multi-matrix correction.
- Page 49 PICTURE PROFILE SET Items Subitems and setting values Contents White Offset White Set to “On” to shift the conversion value for auto On / Off white balance in Memory A or B mode and that for Setting the white balance auto tracing white in ATW mode to a lower color offset and the color temperature or a higher color temperature.
- Page 50 PICTURE PROFILE SET Items Subitems and setting values Contents SD Detail Setting Set to “On” to apply the details to the video signal. On / Off Adjusting the details to be applied to the picture in SD Level Adjust the detail level. Mode –99 to +99 (±0) Frequency...
- Page 51 PICTURE PROFILE SET Items Subitems and setting values Contents Width Adjust the width of the color phase of the target 0 to 90 (40) area for Skin Tone Detail control. Note When Area Detection is executed, the Width setting automatically returns to 40. Aperture Setting Set to “On”...
- Page 52 PICTURE PROFILE SET Items Subitems and setting values Contents Black –99 to +99 (±0) Adjust the master black level. Adjusting the black Black Gamma –99 to +99 (HD: ±0, SD: -16) Adjust the level of black gamma function that emphasizes only the dark areas of the picture to Adjusting the black gamma clear the tones or on the contrary de-emphasizes it level...
-
Page 53: Deleting Clips
Note Deleting Clips Values for “Clock Set” and “Hours Meter” of the OTHERS menu are not stored. While standing by to record, the Last Clip DEL function for deleting the last recorded clip and the Storing the Setup file All Clips DEL function for deleting all clips from an SxS memory card are available. -
Page 54: Planning Metadata
• English is 64 or less, all of the planning metadata files may not appear if the directory where they are located on • Chinese the USB flash drive (General/Sony/Planning) • German contains 512 or more files. • French • Italian Using the up/down/left/right buttons or •... - Page 55 User name: admin Typhoon <Title usAscii=" " Password: (your unit’s model in lowercase; Typhoon_Strikes_Tokyo xml:lang="en"> pxw-x200, as appropriate) </Title>3 Clearing the loaded planning metadata </Properties>3 </PlanningMetadata>3 To clear the planning data loaded in the camcorder’s memory, proceed as follows: Notes Select “Clear”...
-
Page 56: Obtaining Location Information (Gps)
Mode, you can select any of the following video characters. formats (page 139). <?xml version="1.0" encoding=" NTSC Area UTF-8"?>3 XAVC-I 1080/59.94i <PlanningMetadata xmlns="http:// XAVC-L50 1080/59.94P xmlns.sony.net/pro/metadata/ XAVC-L35 1080/59.94P planningmetadata" assignId=" XAVC-L50 1080/59.94i H00123" creationDate=" XAVC-L35 1080/59.94i 2011-04-15T08:00:00Z" lastUpdate=" XAVC-L25 1080/59.94i 2011-04-15T15:00:00Z"... - Page 57 XAVC-L50 720/50P Positioning Display GPS reception status status • While [SDI/HDMI/i.LINK I/O Select] is set to Positioning Weak GPS signal is [3G SDI&HD HDMI] and [HD SDI&HD being received. HDMI], positioning information is output from GPS signal is being the SDI output during positioning, even if a received.
-
Page 58: Proxy Recording
Insert the SD card into the slot with the Proxy Recording label facing right. To use media formatted with this camcorder in the slots of other devices You can record proxy data on an SD card Make a backup of the media, then format it using simultaneously while recording on an SxS the other device. -
Page 59: Changing The Proxy Recording Setting
“Content Browser Mobile” application. proxy file name, even if “Match Clip Name” is set For details about the “Content Browser Mobile” to “On.” application, contact your Sony dealer or a Sony service representative. Connecting to Other Device via Wireless LAN... -
Page 60: Attaching The Ifu-Wlm3
Compatible devices Connecting to an NFC-compatible device with one-touch operation You can use a smartphone, tablet, or computer for setting and operating the camcorder. Compatible You can connect the camcorder to an NFC- devices, operating systems, and browsers are as compatible device with one-touch operation by follows. - Page 61 For the user name and password of the access Notes authentication, check “User Name” and • Cancel the sleep or screen lock function of the “Password” in the NETWORK SET menu smartphone in advance. (page 116). • Hold the device near to the camcorder without moving the device until “Content Browser Mobile”...
-
Page 62: Connecting With The Wireless Lan Station Mode
For the user name and password of the access Set “NW&Proxy/USB” (page 114) in authentication, check “User Name” and the NETWORK SET menu to “Password” in the NETWORK SET menu “Network&Proxy.” (page 114). Note Input the user name and password, then It may take time (for about 1 minute) until the wireless LAN function is activated. -
Page 63: Connecting To The Internet
You can connect the camcorder to the Internet via a 3G/4G network by attaching an optional modem to the unit. For compatible modems, contact your Sony dealer or a Sony service representative. Attaching the modem to the camcorder Open the cover of the external device connector. -
Page 64: Connecting With The Wireless Lan Wi-Fi Station Mode
Note Computer Smartphone/ Attach/remove the modem while the camcorder is tablet turned off. Connecting Turn the camcorder on. Set “NW&Proxy/USB” (page 114) in the NETWORK SET menu to Access “Network&Proxy.” point • When an optional modem compatible to the Internet camcorder is attached, “Network Mode”... -
Page 65: Connecting To The Internet With A Lan Cable
Connecting Connecting to the Internet with a LAN cable Turn the camcorder on. You can connect the camcorder to the Internet by Set “NW&Proxy/USB” (page 114) in attaching the USB-RJ45 adaptor supplied with the NETWORK SET menu to the optional network adaptor kit CBK-NA1, via “Network&Proxy.”... -
Page 66: List Of Functions For Network Connections
Note Note If you changed the settings, make sure to select It may take a time (for 30 to 60 seconds) until the “Execute” in “Set.” camcorder is in the wired LAN mode. Wait until the If you do not select “Execute”, changed settings are “LAN icon”... -
Page 67: Uploading A File
Select the file. Uploading a File Select the file by touching the file. To cancel, touch the file again. You can check the file by double touching You can upload a proxy file or original file that is the file to play back (SD card only). recorded on the camcorder to the server on the Touch “Transfer.”... -
Page 68: Transmitting Streaming Video And Audio
Example: “SD Card” screen Transmitting streaming video and audio You can transmit the video and audio captured/ played back with the camcorder via Internet or local network. Select the file. Preparations Select the file by touching the file. To cancel, touch the file again. - Page 69 To view streaming video and audio, use a receiver that supports these methods. For details about the receiver, see the operating instructions of the receiver. Notes When “Bit Rate” (page 115) of the proxy format setting is set to “9Mbps (VBR)”: •...
-
Page 70: Starting Streaming
Starting streaming Set “Setting” to “On” in “Streaming” of the NETWORK SET menu (page 114). The streaming status is displayed on the LCD monitor/EVF screen, and streaming starts. You can assign the “Streaming” to an assignable button. For details about assigning, refer to “Assignable Buttons”... -
Page 71: Using The Wi-Fi Remote Commander
destination and starting/stopping streaming from the Web menu (page 73). Using the Wi-Fi Remote Commander When a Wi-Fi connection is established between a device such as smartphone, tablet, PC, etc., and the camcorder, the Wi-Fi remote commander appears on the device screen and the device can be used as a remote commander. - Page 72 For Tablet in the following cases. When this happens, refresh the browser on the device. —when the camcorder is restarted while the Wi-Fi connection is established —when the camcorder is controlled directly while the Wi-Fi connection is established —when the device is reconnected —when you operate forward/backward on the device’s browser.
-
Page 73: About The Web Menu
About the Web Menu The Web menu of the camcorder appears by accessing the camcorder from the browser of a device that is connected to the camcorder via a wireless LAN. You can perform the settings for the wireless function or the operation of the file transfer. “Settings”... -
Page 74: Streaming Format Settings
“1Mbps (VBR)”: 480 × 270 Streaming Format settings “0.5Mbps (VBR)”: 480 × 270 You can set the format of the stream that is Streaming settings monitored with the device. Alternatively, you can set the format/transmission destination of the stream that transmits streaming via the Internet or You can set the format or transmission local network. -
Page 75: Proxy Format Settings
Selectable bit rate differs depending on the setting “Frame Rate” Displays the frame rate of the video. of “Size.” “23.98 fps”: 23.975 fps Note “25 fps”: 25 fps When “Bit Rate” (page 115) of the proxy format setting “29.97 fps”: 29.97 fps is set to “9Mbps (VBR)”: “50 fps”: 50 fps •... -
Page 76: Upload Settings
“Upload Setting” after recording. settings by touching “Wireless LAN” > “Status.” The displayed items differ depending on the “Sony Ci” is set for the server as the default. wireless LAN mode of the camcorder. Sony Ci is “Media Cloud Services” that is provided by Sony. - Page 77 Input the server name that is displayed on the list. Note “Service” To use Sony Ci, registration is required. For more details, please visit www.SonyMCS.com/ Displays the server type. wireless “FTP”: FTP server To register “Sony Ci” “Host Name” Input the address of the server.
-
Page 78: Starting File Transferring Automatically After Recording
• “Status”: Progress of the file that is currently E04-007 Not supported media being uploaded. * Sony Ci authentication is expired, or FTP server • “Remain Time”: Estimated remaining time for authentication failed. uploading. • “Transfer data rate”: Transfer rate indication. -
Page 79: Playback
Playback Thumbnail Screens When you press the THUMBNAIL button (page 10), clips recorded on the SxS memory card are displayed as thumbnails on the screen. If no clips are recorded on the card, a no-clip message is displayed. You can start playback from the clip selected on the thumbnail screen. The playback picture can be seen on the LCD monitor/EVF and external monitors. -
Page 80: Changing The Type Of Thumbnail Screen
UDF, exFAT Lock mark (UDF, exFAT, and FAT HD Mode) The normal thumbnail screen, OK/NG/KP/None UDF and exFAT: A lock mark appears if the clip thumbnail screen, and All-Clip thumbnail selected clip is locked. screen are cyclically displayed. FAT HD Mode: A lock mark appears if the FAT HD Mode selected clip has an OK mark. -
Page 81: Playing Clips
Information displayed on the playback Playing Clips screen The following information is superimposed on the playback picture. For playback operations, use the playback control buttons on the handle (page 10). When the IR Remote Commander is enabled, you can use its playback control buttons instead (page 21). -
Page 82: Monitoring Audio
Monitoring Audio Clip Operations In Normal playback mode, you can monitor the recorded audio signals through the built-in During thumbnail screen playback, etc., you can speaker (page 9) or connected headphones. operate the clips or confirm and change the With the headphones connected to the headphone subsidiary data for clips using the Clip Operation connector (page 8), the built-in speaker is turned menus. -
Page 83: Basic Operations Of The Clip Operation Menus
Expand Clip screen (page 87) Clip Operation menu on the thumbnail CANCEL screen EXPAND (COARSE) Pressing the SEL/SET button or the jog dial with EXPAND (FINE) the thumbnail screen (page 79) displayed calls the Clip Operation menu for the clip at the cursor. PAUSE Item Function... -
Page 84: Displaying The Detailed Information Of A Clip
Displaying the Detailed Information of a Clip Select “DISP CLIP INFO” from a Clip Operation menu. 120min CL I P I NFO 0011 / 0300 JPAN0011 ( 1 ) 01 / JAN / 2009 10 : 53 HQ 1920 / 23. 9 P S&Q Mot i on 29 / 24f p s TCR 00 : 05 : 00 : 02 TCR 00 : 05 : 00 : 00 STR... -
Page 85: Adding/Deleting A Flag (Udf And Exfat)
Adding/Deleting a Flag (UDF and Copying Clips exFAT) You can copy clips on an SxS memory card to another SxS memory card. You can add an OK/NG/KP flag to clips recorded Each clip is copied with the same name to the in UDF or exFAT. -
Page 86: Deleting Clips
The EXPAND CLIP screen appears for the Deleting Clips clip that you selected on the thumbnail screen. You can delete clips from the SxS memory card. Select “DELETE CLIP” from the Clip Operation EXPAND CLIP screen in UDF, exFAT, and menu. -
Page 87: Displaying The Shot Mark Screen (Udf, Exfat, And Fat Hd Mode)
Item Function EXPAND CLIP screen in FAT SD Mode SHOT MARK1 To delete shot mark 1 from the selected frame (page 88) Current frame number SHOT MARK2 To delete shot mark 2 from the selected frame (page 88) 120min EXPAND CLIP 0000001 DIVIDE CLIP To divide the clip into two clips at... -
Page 88: Adding/Deleting Shot Marks (Udf, Exfat, And Fat Hd Mode)
The items other than the following are the same as Adding a shot mark on the EXPAND CLIP those on the EXPAND CLIP screen (page 86) in screen UDF, exFAT, and FAT HD mode: Select “SHOT MARK1 ADD” or “SHOT Timecode indication MARK2 ADD”... -
Page 89: Showing The Status Screens
Zebra: Zebra status Showing the Status Display Contents “On” is displayed and the setting of Screens “Zebra1 Level” in “Zebra” of the LCD/VF SET menu is displayed to the right when “Zebra Select” in “Zebra” of the LCD/VF Press the STATUS button (page 10) to display SET menu is set to “1”... -
Page 90: Video Status Screen
i.LINK I/O: Input and output for i.LINK stereo. With non-stereo settings, the setting of “Monitor CH” in “Audio Output” of the AUDIO The “i.LINK” setting in “SDI/HDMI/i.LINK I/O SET menu is displayed as it is. Select” of the VIDEO SET menu is displayed. CH-1/CH-2/CH-3/CH-4: Audio level meters Down Converter: SD output down-converter setting... -
Page 91: Gps Positioning Status Indication
At the right, the available time for recording if Displays “---” when there is no positioning done at the current bit rate is displayed, in information. minutes. REAL: Current data and time The time indication will be “- - min” if no SxS Displays current data and time of the camcorder. -
Page 92: Menu Configuration And Detailed Settings
Menu Configuration and Detailed Settings Overview of the Setup Menus Press the MENU button to display setup menus Setup Menu Layers on the LCD monitor/EVF screen with settings necessary for recording and playback. (You can also display setup menus on an external monitor.) MENU Set items by selecting them from the following CAMERA SET... - Page 93 LCD/VF SET Version Up Menu Scroll Peaking Marker Zebra Display On/Off TC/UB SET Timecode Users Bit TC Format NETWORK SET NW&Proxy/USB Network Mode Streaming Streaming Edit Proxy File Wi-Fi Remote SSID & Key Regenerate Key Channel IP Address Wired LAN Set User Name Password Network Reset...
-
Page 94: Basic Menu Operations
Setting the Setup menus Basic Menu Operations Rotate the jog dial or press the up/down/left/right buttons to set the cursor to the icon of the menu you wish to set, then push the jog dial or SEL/ Menu controls SET button to select that menu. •... - Page 95 Entering a character string When you select an item for which a character string, such as a time value or filename, is to be specified, the input area for the character string is highlighted, and “SET” appears at the right end. Select characters by pressing the up/ down/left/right buttons or turning the jog dial, then press the SEL/SET button...
-
Page 96: Setup Menu List
Setup Menu List The functions and available settings of menus are listed below. The default settings set at the factory are shown in bold face (example: ). The items marked with Speed [M] in the Menu items column cannot be set while displaying the thumbnail screen or during playback operations. - Page 97 CAMERA SET Menu items Subitems and setting values Contents SLS/EX SLS Setting Set the number of cached frames. OFF / 2 / 3 / 4 / 5 / 6 / 7 / 8 / Setting the Slow Notes 16 / 32 / 64 Shutter mode/ •...
- Page 98 CAMERA SET Menu items Subitems and setting values Contents Handle Zoom Off / Low / High / Vari Set the zoom operation by using the on-handle ZOOM button. Off: Zoom does not work. Setting the zoom Low: Zoom works at the speed that is set for “Low” in “Zoom operation Speed.”...
- Page 99 CAMERA SET Menu items Subitems and setting values Contents Frame Rec Setting Turn the Frame Recording function on/off. On / Off Setting the Frame Recording Number of Frames Set the number of frames to be recorded at a time in Frame function 1 / 3 / 6 / 9 or Recording.
- Page 100 CAMERA SET Menu items Subitems and setting values Contents S&Q Motion Setting Turn the Slow and Quick Motion function on/off. On / Off Setting the Slow & Quick Motion Frame Rate Set the recording frame rate for Slow & Quick Motion mode. function The setting value range varies depending on the selection Unselectable while...
- Page 101 CAMERA SET Menu items Subitems and setting values Contents 1 to 30 (NTSC) When “Format” is set to “HD422 50/1080/29.97P,” “HD422 50/1080/23.98P,” “HQ 1920×1080/29.97P,” or “HQ 1920×1080/23.98P” 1 to 60 (30) (NTSC) When “Format” is set to “XAVC-I 720/59.94P,” “XAVC-L50 720/59.94P,” “HD422 50/720/59.94P,”...
- Page 102 CAMERA SET Menu items Subitems and setting values Contents Rec Review 3 sec / 10 sec / Clip Set the time to play the last recorded clip using the Rec- Review function. Setting the 3 sec: Last 3 seconds playback time for 10 sec: Last 10 seconds Rec-Review Clip: Entire duration of the clip...
- Page 103 CAMERA SET Menu items Subitems and setting values Contents ATW Mode Natural / Pure Natural: Depending on the brightness of scenes, automatically adjusts the white balance to natural ambience. ATW mode setting Pure: Not leaving the blue color or red color, automatically adjusts the white balance closer to original colors.
-
Page 104: Audio Set Menu
AUDIO SET Menu AUDIO SET Menu items Subitems and setting values Contents Audio Input CH1 EXT Input Select the audio signal source from the XLR input connector XLR /SHOE MIC and the Multi Interface Shoe to record to CH1. Setting for audio inputs CH2 EXT Input Select the audio signal source from the XLR input connector... - Page 105 AUDIO SET Menu items Subitems and setting values Contents AGC Spec Select the audio input level AGC. –6 dB / –9 dB / –12 dB / –15 dB / –17 dB CH1&2 AGC Mode Select auto tuning for the input level of an analog audio signal Mono / Stereo recorded to CH-1/CH-2.
-
Page 106: Video Set Menu
VIDEO SET Menu VIDEO SET Menu items Setting values Contents Input Source Camera / i.LINK Select video and audio signal for the input source. Camera: Camera image Select i.LINK: HDV/DVCAM input via the i.LINK (HDV/DV) Setting the input connector source Notes •... - Page 107 VIDEO SET Menu items Setting values Contents 3G SDI OUT LevelA / LevelB Select the data mapping method for the 3G SDI output signals. Level A/B Setting the method Memo of the 3G SDI This setting is available when “SDI/HDMI/i.LINK I/O output signals Select”...
- Page 108 VIDEO SET Menu items Setting values Contents Match Clip On / Off Set whether to add the clip name information to the SDI output. Name Setup Menu List...
-
Page 109: Lcd/Vf Set Menu
LCD/VF SET Menu LCD/VF SET Menu items Subitems and setting values Contents Color Adjust the color of pictures on the LCD monitor. –99 to +99 (±0) Adjusting the LCD monitor Contrast Adjust the contrast of pictures on the LCD monitor. –99 to +99 (±0) Brightness Adjust the brightness of pictures on the LCD monitor. - Page 110 LCD/VF SET Menu items Subitems and setting values Contents Marker Setting Turn all marker indications on/off in combination. On / Off Setting the markers added to Safety Zone Turn the safety zone marker on/off. pictures on the On / Off LCD monitor/EVF Safety Area Select the size (ratio to the entire screen) of the safety zone...
- Page 111 LCD/VF SET Menu items Subitems and setting values Contents Audio Level Meter Turn the audio level meter indication on/off. On / Off Timecode Turn the time data (timecode, user bits, duration) indication On / Off on/off. Battery Remain Turn the battery remaining/DC input voltage indication on/ On / Off off.
-
Page 112: Tc/Ub Set Menu
TC/UB SET Menu TC/UB SET Menu items Subitems and setting values Contents Timecode Mode Set the timecode mode. Preset / Regen / Clock Preset: To start the timecode from the specified value Setting the Regen (regeneration): To continue the timecode during timecode recording only. - Page 113 TC/UB SET Menu items Subitems and setting values Contents TC Format DF / NDF Set the timecode format. DF: Drop frame Setting the time NDF: Non drop frame code format Note The current video format/frame frequency determines whether the mode is fixed either to DF or NDF (see below), regardless of the TC Format setting.
-
Page 114: Network Set Menu
NETWORK SET Menu NETWORK Menu items Subitems and setting values Contents NW&Proxy/ Network&Proxy / USB A / Off Activate/deactivate the network connection and external device connector. Network&Proxy: Activates the network connection and proxy Setting for the connection. network USB A: Activates the external device connector. connection and Off: Deactivates the network connection and external device external device... - Page 115 NETWORK Menu items Subitems and setting values Contents Streaming Edit Preset Edit Selects the preset for editing the connection settings for Preset1 / Preset2 / Preset3 streaming. Setting the streaming edit Type Select the video type for streaming. MPEG2-TS/UDP / MPEG2- Note TS/RTP When “Network...
- Page 116 Sets a desired user name in 1 to 31 alphanumeric characters. Note When “Network Mode” is set to “Modem,” this cannot be set. Password (pxw-x200) Sets a password in 0 to 31 alphanumeric characters. Notes • Each password character is displayed as “ * .”...
- Page 117 NETWORK Menu items Subitems and setting values Contents Network Reset Execute/Cancel Resets the network settings to the factory status. Resetting the Memo network settings to This setting is available when “NW&Proxy/USB” is set to the factory status “Network&Prxoy.” Wi-Fi Version Displays the version for the network connecting function of the camcorder.
-
Page 118: Others Menu
When you select “Execute” to store the setting values to an Execute/Cancel SxS memory card, the setup file is stored to one of the Storing/recalling following directories. the menu settings For UDF: /General/Sony/PRO/CAMERA/XDCAM/ to an SxS memory PXW_X200/ card or USB flash For exFAT: /XDROOT/General/Sony/PRO/CAMERA/ drive... - Page 119 OTHERS Menu items Subitems and setting values Contents Assign Button <1> to <5> Assign a function to the ASSIGN buttons 1/2/3/4/5. (The Off / Zebra / Peaking / Marker / selectable functions are shared.) Assigning Last Clip DEL / ATW / ATW Off: No function functions to the Zebra: For turning the zebra function on/off...
- Page 120 OTHERS Menu items Subitems and setting values Contents Tally Front Set the brightness of the tally lamp. High / Low / Off High: To brighten the lamp Setting the tally Low: To dim the lamp lamps Off: To not light the lamp Hours Meter Hours (Sys) The non-resettable accumulated time of use is displayed.
- Page 121 OTHERS Menu items Subitems and setting values Contents System Country Select the area of use and setup ON/OFF setting. NTSC Area / NTSC(J) Area / NTSC Area: Setup ON PAL Area NTSC(J) Area: Setup OFF PAL Area: Setup OFF Note The default setting is different among the sales areas.
- Page 122 OTHERS Menu items Subitems and setting values Contents Clip Auto Naming Select the method to specify clip names. C**** / Title / Plan C****: UDF, exFAT Setting for clip Title: To specify as desired by “Title Prefix” name or deletion Plan: To use a name specified in planning metadata (if no name is specified in planning metadata, the name specified by “Title Prefix”...
- Page 123 OTHERS Menu items Subitems and setting values Contents Lock All Clips Select “Execute” to protect all clips. (UDF, exFAT) Execute/Cancel Unlock All Clips Select “Execute” to remove protection from all clips. (UDF, Execute/Cancel exFAT) Index Picture Pos Set the image for viewing thumbnails. This selects the time 0sec to 10sec (0sec) difference from the start of the clip.
- Page 124 64 or less, all of the planning metadata files may not appear if the directory where they are located in the SxS memory card (General/Sony/ Planning) contains 512 or more files. • After you start loading, do not remove the SxS memory card until the completion message is displayed.
- Page 125 OTHERS Menu items Subitems and setting values Contents Fan Control Setting Sets the fan control mode. Auto / Off in Rec Auto: Controls the fan automatically in response to changes Setting the fan in temperature. control mode Off in Rec: Turn off the fan while recording. (If temperature is excessively high, the fan is turned on automatically.) Version Vx.xx...
-
Page 126: Connecting External Devices
Connecting External Devices Connecting External Monitors and Recording Devices To display recording/playback pictures on an device connected via the SDI OUT connector. To external monitor, select the output signal and use enable synchronized recording, set “SDI Rec an appropriate cable for the monitor to be Control”... -
Page 127: Operating Clips With A Computer
For support information for the driver, visit the following URL: By changing the setting of “SDI/HDMI/i.LINK http://www.sony.net/SxS-Support/ I/O Select” (page 106) of the VIDEO SET menu, With a Windows computer, check that a you can output 2-channel audio and down- Removable Disk appears in My Computer. - Page 128 To check the connection to the camcorder If the SxS memory card icon is located on Finder, click on the eject icon on its side. Connect the PC connector of the Note camcorder to the computer with the Do not select “Card Power Off” from the SxS memory supplied USB cable, then set the power card icon displayed on the menu bar.
-
Page 129: Connecting Via I.link (Fat Only)
Recording the Camcorder Picture Connecting via i.LINK on an External Device (FAT only) While recording (or standing by to record), the picture being shot with this camcorder is output as When an HDV-compatible video format (SP an HDV or DVCAM stream via the i.LINK 1440×1080/59.94i, SP 1440×1080/50i, or SP (HDV/DV) connector. -
Page 130: Nonlinear Editing
DVCAM50i, 25P SQ/EC: DVCAM stream Nonlinear Editing signal of 720×576/50i Other video formats and combination of input When the camcorder is displaying thumbnails or signals cannot be recorded. in playback mode, you can transfer an HDV stream to a nonlinear editing system connected Set “SDI/HDMI/i.LINK I/O Select”... -
Page 131: External Synchronization
Video format Valid reference External Synchronization signal XAVC-I 720/59.94P 1080/59.94i XAVC-L50 720/59.94P 720/59.94P HD422 50/720/59.94P NTSC When multiple units of the camcorder are used in HQ 1280×720/59.94P the same shooting location, recording can be HD422 50/720/29.97P made in synchronization with a specific reference HD422 50/720/23.98P signal, and the timecode can be matched among HQ 1280×720/23.98P... - Page 132 For “PAL Area” Notes • When the output format is SD Mode and you use one of the video formats below, genlock is not possible. Set Video format Valid reference the video format to HD Mode. signal MXF: XAVC-I 720/59.94P XAVC-L50 1080/50P 1080/50i XAVC-L50 720/59.94P...
- Page 133 until the timecode generator stabilizes before recording. • If the frequency of the reference video signal and the frame frequency are not the same, a lock cannot be acquired, and the camcorder will not operate properly. In such a case, the timecode will not be correctly locked to the external timecode.
-
Page 134: Appendices
The fan and battery are consumable parts that will may be damaged. In such a case, stop using it need periodic replacement. and contact your dealer or a Sony service When operating at room temperature, a normal representative. replacement cycle will be about 5 years. - Page 135 Flicker About the LCD panels If recording is made under lighting produced by The LCD panel fitted to this unit is manufactured discharge tubes, such as fluorescent, sodium, or with high precision technology, giving a mercury-vapor lamps, the screen may flicker, functioning pixel ratio of at least 99.99%.
- Page 136 Notes on security based on the orbital information (almanac data) and travel time of the signals, etc. • SONY WILL NOT BE LIABLE FOR Determining a location is called “triangulating.” DAMAGES OF ANY KIND RESULTING A GPS receiver can determine the location’s...
- Page 137 On triangulating errors • If you move to another location right after setting “GPS” to “On” in the menu, it may take a longer time for the camcorder to start triangulating, compared to when you stay in the same place. •...
-
Page 138: Video Format (Format)
Video Format (Format) The video formats that can be selected at “Format” in “System” (page 121) of the OTHERS menu are listed below. The default settings set at the factory are shown in bold face (example: HD422 50/1080/59.94i) UDF HD Mode NTSC Area/NTSC(J) Area PAL Area Country setting... -
Page 139: Exfat Hd Mode
exFAT HD Mode Country setting NTSC Area/NTSC(J) Area MXF file format XAVC MPEG2 Selectable video format XAVC-L50 1080/59.94P HD422 50/1080/59.94i XAVC-L35 1080/59.94P HQ 1920×1080/59.94i XAVC-I 1080/59.94i HQ 1440×1080/59.94i XAVC-L50 1080/59.94i HD422 50/1080/29.97P XAVC-L35 1080/59.94i HQ 1920×1080/29.97P XAVC-L25 1080/59.94i HQ 1440×1080/29.97P XAVC-I 1080/29.97P HD422 50/1080/23.98P XAVC-L50 1080/29.97P... -
Page 140: Fat Hd Mode
FAT HD Mode Country setting NTSC Area/NTSC(J) Area PAL Area Selectable video format HQ 1920×1080/59.94i HQ 1920×1080/50i HQ 1440×1080/59.94i HQ 1440×1080/50i SP 1440×1080/59.94i SP 1440×1080/50i HQ 1920×1080/29.97P HQ 1920×1080/25P HQ 1440×1080/29.97P HQ 1440×1080/25P HQ 1920×1080/23.98P HQ 1280×720/50P HQ 1440×1080/23.98P HQ 1280×720/25P SP 1440×1080/23.98P HQ 1280×720/59.94P HQ 1280×720/29.97P... -
Page 141: Formats And Limitations Of Outputs
Formats and Limitations of Outputs Video Formats and Output Signals Output formats for the SDI OUT connector Serial digital signals from the SDI OUT connector are output depending on the settings of the setup menu and format of the clip being played. The output format is converted when using the settings in the following chart. - Page 142 During clip playback Output format Setting of “SDI/HDMI/i.LINK I/O Select” of the VIDEO SET menu Format of the played clip 3G SDI & HD HDMI SD SDI & SD HDMI i HD SDI & HD HDMI 59.94P (XAVC-I/XAVC-L) 1920×1080/59.94P SD/59.94i 1920×1080/59.94i 59.94i (XAVC-I/XAVC-L/HD/ 1920×1080/59.94i...
- Page 143 When a thumbnail screen is displayed Input format Output format Setting of “SDI/HDMI/i.LINK I/O Select” of the VIDEO SET menu “Format” in “System” of 3G SDI & HD HDMI SD SDI & SD HDMI i the OTHERS menu HD SDI & HD HDMI 59.94P (XAVC-I/XAVC-L) 1920×1080/59.94i SD/59.94i...
- Page 144 Output formats from the HDMI OUT connector Serial digital signals from the HDMI OUT connector are output depending on the settings of the setup menu and format of the clip being played. The output format is converted when using the settings in the following chart. Note When the format is UDF HD Mode, exFAT HD Mode, or FAT HD Mode and “SDI/HDMI/i.LINK I/O Select”...
- Page 145 During clip playback Output format Setting of “SDI/HDMI/i.LINK I/O Select” of the VIDEO SET menu Format of the played clip 3G SDI & HD HDMI SD SDI & SD HDMI i SD HDMI P & HDV HD SDI & HD HDMI SD HDMI i &...
- Page 146 Input format Output format Setting of “SDI/HDMI/i.LINK I/O Select” of the VIDEO SET menu “Format” in “System” of 3G SDI & HD HDMI SD SDI & SD HDMI i SD HDMI P & HDV the OTHERS menu HD SDI & HD HDMI SD HDMI i &...
- Page 147 VIDEO OUT Output format Playback clip video format HD-Y Analog composite DVCAM50i SQ/EC Cannot be played Cannot be played DVCAM25P SQ/EC IMX50/50i SQ/EC IMX50/25P SQ/EC When you play clips recorded with the NTSC system while the “Country” is set to “PAL Area.” Some frames may be deleted due to frame rate conversion.
- Page 148 Output formats from the i.LINK I/O connector Serial digital signals from the i.LINK I/O connector are output in the following formats depending on the settings of the setup menu and format of the clip being played. Notes • When “F.Sys.” in the OTHERS menu is set to “UDF” or “exFAT,” signals are not output from the i.LINK I/O connector.
-
Page 149: Limitations Of Inputs/Outputs
Limitations of Inputs/Outputs The outputs from the camcorder are limited by the menu settings as follows: ×: no signal Menu setting Output Input System SDI/HDMI/ HDMI i.LINK VIDEO i.LINK i.LINK I/O F.Sys. HD/SD Select HD SDI & HD × HD-Y ×... -
Page 150: Video Format And The Recording Function
Video Format and the Recording Function The compatible recording functions for each video format are listed as below. When “Country” is set to “NTSC Area/NTSC(J) Area” (a: compatible, –: not compatible). System Normal Interval Clip Picture Slow & Proxy Simultaneous Recording Recording Continuous... - Page 151 System Normal Interval Clip Picture Slow & Proxy Simultaneous Recording Recording Continuous Cache Quick Recording Recording in Recording Recording Motion the 2 slots F.Sys. Format Frame Recording SDI/HDMI/ i.LINK I/O Select Other than right HD422 50/1080/ 59.94i HQ 1920×1080/ – –...
- Page 152 System Normal Interval Clip Picture Slow & Proxy Simultaneous Recording Recording Continuous Cache Quick Recording Recording in Recording Recording Motion the 2 slots F.Sys. Format Frame Recording SDI/HDMI/ i.LINK I/O Select Other than right – – – – – DVCAM 59.94i, 29.97P When XAVC-I is selected for “Format”...
- Page 153 System Normal Interval Clip Picture Slow & Proxy Simultaneous Recording Recording Continuous Cache Quick Recording Recording in Recording Recording Motion the 2 slots Frame Recording F.Sys. Format SDI/HDMI/ i.LINK I/O Select Other than right XAVC-L50, L35 1080/25P – XAVC-L50 720/ HD422 50/1080/ HQ 1920×1080/ –...
-
Page 154: Backup Battery Replacement
Replacing the backup battery Backup Battery Notes Replacement • Be sure to set the power switch to OFF when replacing the backup battery. • Be careful not to drop the removed screw into the This camcorder uses a backup battery to retain camcorder. -
Page 155: Troubleshooting
Troubleshooting Power Symptoms Cause Remedy The camcorder does not No battery pack is mounted and no Mount a battery pack (page 18) or connect to AC power on when you set power is supplied to the DC IN power using the BC-U1 or BC-U2 (page 19). the power switch to ON. -
Page 156: External Devices
• Check that the port number (:8080) is added to the IP address. The wireless LAN cannot be used. Your wireless LAN module may be unsupported. For details about supported wireless modules, contact your Sony dealer or a Sony service representative. The Internet connection... -
Page 157: Error/Warning Indications
Turn off the power and check the connected equipment, cables, and media. If they are not defective, turn on the power again. If the error persists, consult Sony service personnel. (If power cannot be turned off by setting the power switch to OFF, remove both the battery pack or the DC IN source.) - Page 158 Warning indication Buzzer Tally Cause and measures on LCD/EVF lamps Insufficient Voltage Continuous Rapidly The DC IN voltage is too low (stage 2). Recording cannot be flashing performed. Connect other power source. Intermittent Flashing The battery power of the connected HDD will be exhausted HDD A Battery Near soon.
- Page 159 Warning indication Buzzer Tally Cause and measures on LCD/EVF lamps Copy Protected Input The external signal input via the i.LINK connection cannot be Cannot Record recorded, as the stream is copy-protected. Check the input signal. Media Error An error occurred in reading data from the memory card, and Playback Halted playback cannot be continued.
- Page 160 Warning indication Buzzer Tally Cause and measures on LCD/EVF lamps Power supply to MI Shoe If you mount an accessory that requires power supply on the disabled Multi Interface Shoe while “NW&Proxy/USB” is set to “Network&Proxy,” no power is supplied. Cannot Record to SD When streaming is started, proxy recording to “SD Card”...
-
Page 161: Licenses
Sony Corporation (“SONY”). This EULA ADDITIONAL INFORMATION MAY BE governs your rights and obligations regarding the OBTAINED FROM MPEG LA, L.L.C. software of SONY and/or its third party licensors SEE <HTTP://WWW.MPEGLA.COM> (including SONY’s affiliates) and their respective affiliates (collectively, the “THIRD-PARTY SUPPLIERS”) contained in the camcorder,... - Page 162 “applets” incorporated into the SOFTWARE) Open Source Initiative or any substantially is owned by SONY or one or more of the THIRD- similar licenses, including but not limited to any PARTY SUPPLIERS.
- Page 163 SOFTWARE. The SOFTWARE may be provided by third parties SOFTWARE is provided “AS IS,” without over which SONY has no control. USE OF THE warranty, duty or condition of any kind. CONTENT SERVICE REQUIRES AN INTERNET CONNECTION.
- Page 164 YOU. that such services are governed by the privacy CONSENT TO USE OF NON-PERSONAL policies of SONY or such third party. By using INFORMATION, LOCATION DATA, DATA any such services, you agree that you have SECURITY...
- Page 165 SONY’s or third parties’ servers, or violate this EULA. These remedies are in addition otherwise. Such updates or modifications may to any other remedies SONY may have at law, in delete or change the nature of features or other equity or under contract.
-
Page 166: About Jquery, Sizzle.js And Jansson
NONINFRINGEMENT. IN NO EVENT SHALL Should you have any questions concerning this THE AUTHORS OR COPYRIGHT HOLDERS EULA, you may contact SONY by writing to BE LIABLE FOR ANY CLAIM, DAMAGES SONY at applicable contact address of each area OR OTHER LIABILITY, WHETHER IN AN or country. - Page 167 CONTRACT, STRICT LIABILITY, OR 3. All advertising materials mentioning TORT (INCLUDING NEGLIGENCE OR features or use of this software must OTHERWISE) display the following ARISING IN ANY WAY OUT OF THE acknowledgment: USE OF THIS SOFTWARE, EVEN IF "This product includes software ADVISED OF THE POSSIBILITY OF developed by the OpenSSL Project SUCH DAMAGE.
- Page 168 This can be in the form of a textual (INCLUDING, BUT NOT LIMITED TO, message at program startup or in PROCUREMENT OF SUBSTITUTE documentation (online or textual) GOODS OR SERVICES; LOSS OF USE, provided with the package. DATA, OR PROFITS; OR BUSINESS INTERRUPTION) Redistribution and use in source and HOWEVER CAUSED AND ON ANY...
-
Page 169: Specifications
Battery Operation Time Specifications (While recording with LCD Off, EVF On, I/O Select Off, and Network function Off) With battery pack BP-U90: approx. 4.5 General hours With battery pack BP-U60/BP-U60T: Mass approx. 3 hours Approx. 2.4 kg (5 lb 4.7 oz) (Camcorder With battery pack BP-U30: approx. - Page 170 DVCAM mode: LPCM 16-bit, 48-kHz, DVCAM mode: 4 channels 720 × 480/59.94i, 29.97PsF 720 × 576/50i, 25PsF MPEG HD422 mode: LPCM 24-bit, 48-kHz, 4 channels MPEG HD422 mode: MPEG HD420 HQ mode: LPCM 16-bit, 1920 × 1080/59.94i, 50i, 29.97P, 48-kHz, 4 channels 23.98P, 25P IMX50 mode: LPCM 24/16-bit, 1280 ×...
- Page 171 XAVC-L50 mode When using SBP-64B / SBS-64G1A When using SBP-128B (128 GB): (64 GB): Approx. 120 minutes Approx. 240 minutes When using SBS-32G1A (32 GB): When using SBP-64B / SBS-64G1A Approx. 60 minutes (64 GB): Approx. 120 minutes MPEG HD420 HQ mode When using SBS-32G1A (32 GB): When using SBP-128B (128 GB): Approx.
-
Page 172: Lens
Note Camera Section These approximate playback times depend on operating conditions, available memory, etc. Image Device (Type) 1/2-inch triple chip “Exmor” Full HD CMOS image sensor Lens Effective Picture Elements 1920 (H) × 1080 (V) Lens Mount Fixed type Optical System F1.6 prism system Zoom Ratio 17×... -
Page 173: Inputs/Outputs
-10 dBu (Reference level), 47 kΩ Slow & Quick Motion Function (common with Composite Output) XAVC Intra, XAVC Long 1080P: 1 to 30 and 60 fps in NTSC SDI Output setting, 1 to 25 and 50 fps in PAL BNC type (1), switchable with 3G/HD/ setting 720P: 1 to 60 fps in NTSC setting, 1 to SMPTE 292M/259M/424M/425M... -
Page 174: Monitoring
Asia Pacific http://pro.sony-asia.com Korea http://bp.sony.co.kr China http://pro.sony.com.cn Media India http://pro.sony.co.in Type Sony Creative Software, software download ExpressCard/34 slot (2) page: http://www.sonycreativesoftware.com/ download/software_for_sony_equipment Supplied Accessories Optional Accessories Lens hood (1) This is pre-installed to the camcorder. Battery pack EVF eyecup (1) BP-U30, BP-U60, BP-U60T, BP-U90 This is pre-installed to the camcorder. -
Page 175: On Trademarks
Multi Interface Shoe mount adaptor On trademarks SMAD-P3 Network adaptor kit • “XDCAM” is a trademark of Sony Corporation. CBK-NA1 • “XAVC” and are trademarks of Sony Corporation. * To attach accessories to the rear accessory shoe, • Microsoft and Windows are trademarks or use the cold shoe kit. -
Page 176: Index
Black Index Black Gamma built-in speaker built-in stereo microphones Numerics Button/Remote Status Screen 23.98P Output 3G SDI OUT Level A/B Camera Data CAMERA SET Menu CAMERA Status Screen A/V OUT connector Channel AC Adaptor Charge Count AC Power 29, 81, 122, 127 Clip Accessory shoe 41, 99... - Page 177 EX SLS headphone connector EXPAND (COARSE) Histogram indication EXPAND (FINE) Hours Meter 83, 86 EXPAND CLIP Screen Exposure ExpressCard slot i.LINK External Input Signals i.LINK connector External Monitors Image Alignment External Synchronization Image Inversion Eyepiece focusing knob Input Source Select Interval Rec 40, 98 Interval Recording...
- Page 178 Multi Matrix Multi Matrix mode 43, 100 S&Q Motion SD Detail SDHC Cards Network Mode SDI OUT connector Network Reset 107, 126 SDI Rec Control SDI/HDMI/i.LINK I/O Select NG Flag SDI/HDMI/Video Out Super Nonlinear Editing SEL/SET buttons NW&Proxy/USB SEL/SET dial Setting Data 92, 96 Setup Menus...
- Page 179 USB cable USB Flash Drives USB wireless LAN module User Name 36, 112 Users Bit Version Version Up Video Formats Video Light Set VIDEO OUT connector VIDEO SET Menu Video Status Screen Viewfinder VOLUME buttons Warning Indications White WHITE BAL button WHITE BAL switch White Balance White Clip...
Need help?
Do you have a question about the PXW-X200 and is the answer not in the manual?
Questions and answers