Konica Minolta Bizhub C300 Copy Manual
Hide thumbs
Also See for Bizhub C300:
- Network fax operations (388 pages) ,
- Operations (306 pages) ,
- User manual (198 pages)
Table of Contents
Advertisement
Quick Links
Advertisement
Table of Contents
Troubleshooting

Related Manuals for Konica Minolta Bizhub C300


Summary of Contents for Konica Minolta Bizhub C300
- Page 1 User’s Guide [Copy Operations]...
-
Page 2: Energy Star
Introduction Introduction Thank you for choosing this machine. This manual contains details on the operation of the various functions of the machine, precautions on its use, and basic troubleshooting procedures. In order to ensure that this machine is used correctly and efficiently, carefully read this manual before using the machine. -
Page 3: Trademarks And Registered Trademarks
Introduction Trademarks and Registered Trademarks KONICA MINOLTA, KONICA MINOLTA Logo, and The essentials of imaging are registered trademarks or trademarks of KONICA MINOLTA HOLDINGS, INC. PageScope and bizhub are registered trademarks or trademarks of KONICA MINOLTA BUSINESS TECHNOLOGIES, INC. Netscape Communications, the Netscape Communications logo, Netscape Navigator, Netscape Communicator, and Netscape are trademarks of Net- scape Communications Corporation. - Page 4 Introduction 4. The names “OpenSSL Toolkit” and “OpenSSL Project” must not be used to endorse or promote products derived from this software without prior written permission. For written permission, please contact openssl- core@openssl.org. 5. Products derived from this software may not be called “OpenSSL” nor may “OpenSSL”...
- Page 5 Introduction Redistribution and use in source and binary forms, with or without modifica- tion, are permitted provided that the following conditions are met: 1. Redistributions of source code must retain the copyright notice, this list of conditions and the following disclaimer. 2.
-
Page 6: Table Of Contents
Introduction Contents Introduction ® Energy Star ..................x-1 ® What is an ENERGY STAR Product? ..........x-1 Trademarks and Registered Trademarks ........x-2 Contents .................... x-5 Available features ................x-18 Selecting the print color ..............x-18 Automatically selecting the paper ..........x-18 Adjusting copies to the size of the paper ........x-18 Specifying separate horizontal and vertical zoom ratios ....x-18 Scanning the original in separate batches ........x-18 Center binding ................x-19... - Page 7 Introduction Enlarging the size of text in touch panel screens ......x-26 Displaying explanations of functions and settings .......x-26 Interrupting a copy job ..............x-27 Printing a sample copy ..............x-27 Adjust color parameters ..............x-28 General information about color ............x-30 Relationship between hue, brightness and saturation (color model) ..................x-31 “Red”...
- Page 8 Introduction Legal restrictions on copying ............x-54 Installation and operation precautions Safety information ................1-2 Warning and precaution symbols ..........1-2 Meaning of symbols ............... 1-2 Regulation notices ................1-9 CE Marking (Declaration of Conformity) for users of the European Union (EU) ..................
- Page 9 Introduction Adjusting the angle of the control panel ........2-23 To adjust the angle of the control panel ........2-23 Turning on the Main Power and the Sub Power ......2-25 To turn on the machine ..............2-25 To scan during warm-up ...............2-27 To turn off the machine ..............2-29 Automatically canceling the settings (automatic panel reset) ..2-30 Automatically canceling the mode screen (automatic system reset) ...............2-30...
- Page 10 Introduction Selecting the original orientation (Original Direction settings) ..3-22 To specify an original direction setting ........3-23 Selecting the position of the binding margin (Margin settings) ..3-24 To specify a margin setting ............3-25 Removing specks from the left partition glass (Despeckle) ..3-27 To change scan settings for each original ........
- Page 11 Introduction Separating copies by pages (“Group” setting) ......3-71 Stapling copies (Staple settings) ..........3-73 To bind copies with staples ............3-74 Punching holes in copies (Punch settings) ........3-76 To punch holes in copies ..............3-77 3.13 Specifying center binding ...............3-79 To bind copies at the center (“Fold & Staple”) ......3-80 3.14 Scanning the next original to be copied while a copy job is being printed (next job reservation) ..........3-82...
- Page 12 Introduction To set the “Enlarge Display Confirmation Screen” function ..4-38 Troubleshooting When the message “Malfunction detected.” appears (call technical representative) ............5-2 To call the technical representative ..........5-3 When the message “Misfeed detected.” appears ......5-5 Location of Paper misfeed ............. 5-5 Paper misfeed indications ..............
- Page 13 Introduction Specifications Specifications ..................6-2 bizhub C300 ..................6-2 ADU ....................6-4 Option specifications ..............6-4 Reverse automatic document feeder DF-608 .........6-4 Paper feed cabinet PC-103 ............6-6 Paper feed cabinet PC-203 ............6-6 Paper feed cabinet PC-403 ............6-6 Finisher FS-514 ................6-7 Punch kit PK-510 ................6-8 Saddle stitcher SD-503 ..............6-8...
- Page 14 Introduction Application functions Inserting paper between OHP (“OHP Interleave” function) ..8-2 To copy using the “OHP Interleave” function ........ 8-3 Adding cover pages (“Cover Mode” function) ....... 8-5 To copy using the “Cover Mode” function ........8-6 Inserting different paper into copies (“Insert Sheet” function) ..8-8 To copy using the “Insert Sheet”...
- Page 15 Introduction Checking the Print Result of the Adjust Color Settings (Sample Copy) ................8-57 To make sample copies ..............8-58 8.16 Adding filing margins to copies (“Page Margin” function) ..8-59 To copy using the “Page Margin” function ........8-60 8.17 Erasing specified areas of copies (“Erase” function) ....8-62 To copy using the “Erase”...
- Page 16 Introduction Paper feed roller ................10-6 Electrostatic charger wire ............10-6 Print head ..................10-7 10.2 Viewing counters (Meter Count) ............ 10-8 Viewing counters ................10-8 To view the counters ..............10-8 Viewing the coverage rate ............10-9 To view the coverage rate ............10-9 10.3 When the message “Preventive maintenance time.”...
- Page 17 Introduction Displaying the utility setting screen ..........12-25 12.4 Specifying administrator settings ..........12-27 System setting ................12-27 Administrator/machine setting ............12-35 One-Touch registration ...............12-36 User authentication/account track ..........12-37 Network setting ................12-39 Copier setting ................12-39 Printer setting ................12-40 Fax setting ..................12-40 System connection ..............12-41 Security setting ................12-42 Displaying the Administrator Setting screen .......12-47 12.5...
- Page 18 Introduction Authenticating public users ............12-82 User registration ................. 12-83 User counter ................12-88 To check the counter ..............12-89 12.12 Account track setting ..............12-91 Account track registration ............12-91 Account track counter ..............12-95 To check the counter ..............12-96 12.13 Password rules ................
-
Page 19: Available Features
Introduction Available features Selecting the print color The color used to print copies can be specified, for example, the copy can be printed in full color or in black and white. For details, refer to “Selecting a color setting” on page 3-31. Automatically selecting the paper The most appropriate paper size can automatically be selected based on the size of the loaded original and the specified zoom ratio. -
Page 20: Center Binding
Introduction Center binding Copies can be folded at their center and bound with staples. For details, refer to “To bind copies at the center (“Fold & Staple”)” on page 3-80. Sorting copies The finishing method for copies can be selected. For details, refer to “Separating copies by sets (“Sort”... -
Page 21: Copying Multiple Original Pages Onto A Single Page
Introduction Copying multiple original pages onto a single page Multiple pages of the original can be printed together on a single page. For details, refer to “Copying multiple original pages onto a single page (Combine Originals)” on page 3-66. ABC DEF Copying an original containing various page sizes An original with various page sizes can be scanned and copied together. - Page 22 Introduction Adding a cover page Cover pages can be added to copies, or copies can be made using different paper (for example, colored paper) for only the cover pages. For details, refer to “Adding cover pages (“Cover Mode” function)” on page 8-5.
- Page 23 Introduction Printing double-sided copies with the specified page on the front side Double-sided copies can be printed with the specified pages on the front side. For details, refer to “Specifying pages to be printed on the front side (“Chap- ters” function)” on page 8-16. Copying with reversed colors An original can be copied with the light- and dark-colored areas of the orig- inal image inversed.
- Page 24 Introduction Copying with a background color An original can be copied using one of the 18 colors available as the color of the background (blank areas). For details, refer to “Adding a background color to copies (“Background Color” function)” on page 8-52. Improving the copy color quality You can adjust color copies to the quality for the desired image.
- Page 25 Introduction Repeating copy images An original image can be repeatedly printed on a single sheet of paper. For details, refer to “Tiling copy images (“Image Repeat” function)” on page 8-34. Printing the enlarged image on multiple pages A single original page can be automatically split into parts with each part printed enlarged.
- Page 26 Introduction Copying with the page layout of a magazine Copies can be made with the pages arranged in a layout for center binding, such as for a magazine. For details, refer to “Copying with the page layout of a magazine (“Booklet” function)”...
-
Page 27: Enlarging The Size Of Text In Touch Panel Screens
Introduction Printing distribution numbers or copy protection text on copies Pages numbers or copy protection text (hidden text that prevents improper copying) can be printed on copies, or each copy set can be printed with dis- tribution numbers. For details, refer to “Printing the Date/Time, page number or distribution number on copies (Stamp functions)”... -
Page 28: Interrupting A Copy Job
Introduction Interrupting a copy job The copy job being printed can be interrupted in order for a different copy job to be printed. For details, refer to “Interrupting a copy job (Interrupt mode)” on page 4-8. Printing a sample copy Before printing a large number of copies, a single sample copy can be print- ed so that it can be checked. -
Page 29: Adjust Color Parameters
Introduction Adjust color parameters This section provides copy samples that are a helpful reference for setting the wide variety of parameters, functions and settings available with this full- color copier. Section Description Section Description General Information Provides informa- “Contrast” Parameter Provides informa- About Color tion on hue, bright-... - Page 30 Introduction Section Description Section Description “2 Color” Function Provides informa- “Neg-/Pos. Reverse” Provides informa- tion on copying us- Function tion on copying an ing only black and original with the one selected color light- and dark- (p. x-44) colored areas of the image inversed (p.
-
Page 31: General Information About Color
Introduction General information about color Everybody has an idea of what hue an object has, for example, an apple is red, a lemon is yellow, and the sky is blue. Hue is the tint by which the color of an object is classified as red, yellow, blue, etc. Brightness is the degree of lightness in a color, as What makes the difference between the yellow of a compared with another color, which makes it a light... -
Page 32: Relationship Between Hue, Brightness And Saturation (Color Model
Introduction Relationship between hue, brightness and saturation (color model) Hue, brightness and saturation are the elements that we call the “three at- tributes of color”. We can think of their affects using the solid object shown in figure 1, where the outer edge is the hue, the vertical axis is the brightness, and the horizontal axis from the center is the saturation. -
Page 33: Red" Parameter
Introduction “Red” parameter This parameter can be used to adjust the degree of red in the image to one of 19 levels. For details on the setting procedure, refer to page 8-54. Original – 3 Sample images x-32 C300... -
Page 34: Green" Parameter
Introduction “Green” parameter This parameter can be used to adjust the degree of green in the image to one of 19 levels. For details on the setting procedure, refer to page 8-54. Original – 3 Sample images C300 x-33... -
Page 35: Blue" Parameter
Introduction “Blue” parameter This parameter can be used to adjust the degree of blue in the image to one of 19 levels. For details on the setting procedure, refer to page 8-54. Original – 3 Sample images x-34 C300... -
Page 36: Color Balance" Parameter (Cmyk Color Adjustment
Introduction “Color Balance” parameter (CMYK color adjustment) By mixing the four toner colors (yellow, magenta, and cyan in addition to black) in a full-color copy, the colors of the original can be reproduced. Changing the amount of each color of toner enables the tints in the copy to be finely adjusted. - Page 37 Introduction Yellow Increasing the amount of yellow Increasing the red tinge Increasing the green tinge Decreasing the Decreasing the amount of cyan amount of magenta Original Increasing the Increasing the amount of magenta amount of cyan Decreasing the amount of yellow Magenta Cyan Increasing the blue tinge...
-
Page 38: Brightness" Parameter
Introduction “Brightness” parameter This parameter can be used to finely adjust the brightness of the image to one of 19 levels. For details on the setting procedure, refer to page 8-54. Original –3 Sample images C300 x-37... -
Page 39: Contrast" Parameter
Introduction “Contrast” parameter This parameter can be used to finely adjust the image to one of 19 levels be- tween soft/smooth and crisp. For details on the setting procedure, refer to page 8-54. Original – 3 Sample images x-38 C300... -
Page 40: Saturation" Parameter
Introduction “Saturation” parameter This parameter can be used to finely adjust the vividness of the image to one of 19 levels. For details on the setting procedure, refer to page 8-54. Original – 3 Sample images C300 x-39... -
Page 41: Sharpness" Parameter
Introduction “Sharpness” parameter This parameter can be used to adjust the amount of contours in text and im- ages to one of 7 levels. For details on the setting procedure, refer to page 8-54. Original – 3 Sample images x-40 C300... -
Page 42: Hue" Parameter
Introduction “Hue” parameter This parameter can be used to finely adjust the hue of the image to one of 19 levels. For details on the setting procedure, refer to page 8-54. Original – 3 Sample images C300 x-41... -
Page 43: Copy Density" Parameter
Introduction “Copy Density” parameter This parameter can be used to finely adjust the light and shading of the im- age to one of 19 levels. For details on the setting procedure, refer to page 8-54. Original – 3 Sample images x-42 C300... -
Page 44: Single Color" Function
Introduction “Single Color” function This function allows you to copy an original using only one of the 21 colors available. For details on the setting procedure, refer to page 3-31. Sepia 1 Yellow Sepia 2 Magenta Camel Cyan Brown Forest Green Green Maroon... -
Page 45: Color" Function
Introduction “2 Color” function This setting allows you to produce copies with the black areas of the original printed in black and the color areas of the original printed in one of the six colors available. For details on the setting procedure, refer to page 3-31. Cyan Green Magenta... -
Page 46: Background Color" Function
Introduction “Background Color” function This function allows you to copy an original using one of the 18 colors avail- able as the color of the background (blank areas). For details on the setting procedure, refer to page 8-52. Yellow Camel Brown Magenta Cyan... -
Page 47: Neg-/Pos. Reverse" Function
Introduction “Neg-/Pos. Reverse” function This function allows you to copy an original with the light-colored areas and the dark-colored areas of the image inversed. For details on the setting procedure, refer to page 8-46. Monotone copy Sepia 1 Yellow Sepia 2 Magenta Camel Cyan... -
Page 48: Mirror Image" Function
Introduction “Mirror Image” function This function allows you to copy a mirror image of the original. For details on the setting procedure, refer to page 8-48. Original C300 x-47... -
Page 49: Explanation Of Manual Conventions
Introduction Explanation of manual conventions Titles indicate the contents of the section. Text that appears in this manner describes the function limitations and options required to use certain functions. Application functions Producing separate copies of each page in a page spread ( Book Copy function) A page spread, such as in an open book or catalog, can be copied with the left and right pages on separate pages or both on the same page. - Page 50 Introduction Names highlighted as shown above indicate keys on the control panel, buttons in the touch panel, and the power switches. Application functions Touch [Book Copy]. Touch panel screens are shown to check the actual display. The Book Scanning screen appears. [Booklet Original] is not available if optional saddle stitcher is not in- stalled.
-
Page 51: Descriptions And Symbols For Originals And Paper
Introduction Descriptions and symbols for originals and paper The use of words and symbols in this manual are explained below. “Width” and “Length” Whenever paper dimensions are mentioned in this manual, the first value always refers to the width of the paper (shown as “Y”... - Page 52 Introduction Crosswise (v) If the width (Y) of the paper is longer than the length (X), the paper has a horizontal or land- scape orientation, indicated by v. C300 x-51...
-
Page 53: User's Guides
Introduction User’s Guides The following User’s Guides have been prepared for this machine. User’s Guide [Copy Operations] <this manual> This manual contains details on basic operations and the operating proce- dures for the various copy functions. - Refer to this User’s Guide for details on operating procedures for copy functions, including precautions on installation/use, turning the machine on/off, loading paper, and troubleshooting operations such as clearing paper misfeeds. -
Page 54: User's Guide [Print Operations
Introduction User’s Guide [Print Operations] This manual contains details on operating procedures using the standard built-in printer controller. - For details on the printing functions, refer to User’s Guide (PDF file) on User Software CD-ROM. Quick Guide [Print Operations] This manual contains details on operating procedures using the standard built-in printer controller. -
Page 55: Legal Restrictions On Copying
Introduction Legal restrictions on copying Certain types of originals must never be copied with the purpose or intent to pass copies of such originals off as the originals. The following is not a complete list, but is meant to be used as a guide to responsible copying. -
Page 56: Installation And Operation Precautions
Installation and operation precautions... -
Page 57: Safety Information
Installation and operation precautions Installation and operation precautions Safety information This section contains detailed instructions on the operation and maintenance of this machine. To achieve optimum utility of this device, all operators should carefully read and follow the instructions in this manual. Please read the following section before connecting the machine to the sup- ply. - Page 58 Installation and operation precautions Disassemble and modification WARNING • Do not attempt to remove the covers and pan- els which have been fixed to the product. Some products have a high-voltage part or a laser beam source inside that could cause an electri- cal shock or blindness.
- Page 59 Installation and operation precautions Power source WARNING • Use only the specified power source voltage. Failure to do that could result in a fire or electri- cal shock. • Connect power plug directly into wall outlet having the same configuration as the plug. Use of an adapter leads to the product connecting to inadequate power supply (voltage, current capacity, grounding), and may result in fire or...
- Page 60 Installation and operation precautions Power plug WARNING • Do not unplug and plug in the power cord with a wet hand, as an electrical shock could result. • Plug the power cord all the way into the power outlet. Failure to do this could result in a fire or electrical shock.
- Page 61 Installation and operation precautions Installation WARNING • Do not place a flower vase or other container that contains water, or metal clips or other small metallic objects on this product. Spilled water or metallic objects dropped inside the product could result in a fire, electrical shock, or breakdown.
- Page 62 Installation and operation precautions Ventilation CAUTION • Always use this product in a well ventilated lo- cation. Operating the product in a poorly venti- lated room for an extended period of time could injure your health. Ventilate the room at regular intervals.
- Page 63 Installation and operation precautions Consumables WARNING • Do not throw the toner cartridge or toner into an open flame. The hot toner may scatter and cause burns or other damage. CAUTION • Do not leave a toner unit or drum unit in a place within easy reach of children.
-
Page 64: Regulation Notices
Installation and operation precautions Regulation notices CE Marking (Declaration of Conformity) for users of the European Union (EU) This product complies with the following EU directives: 89/336/EEC, 73/23/EEC and 93/68/EEC directives. This declaration is valid for the area of the European Union. This device must be used with a shielded network (10 Base-T/100 Base-TX) cable and a shielded parallel cable. -
Page 65: For Users In Countries Not Subject To Class B Regulations
Installation and operation precautions For users in countries not subject to class B regulations WARNING This is a Class A product. In a domestic environment this product may cause radio interference in which case the user may be required to take adequate measures. -
Page 66: Cdrh Regulations
Installation and operation precautions Laser Aperture of the Print Head Unit Print Head CDRH regulations This machine is certified as a Class 1 Laser product under Radiation Per- formance Standard according to the Food, Drug and Cosmetic Act of 1990. Compliance is mandatory for Laser products marketed in the United States and is reported to the Center for Devices and Radiological Health (CDRH) of the U.S. -
Page 67: For European Users
Installation and operation precautions For European users CAUTION Use of controls, adjustments or performance of procedures other than those specified in this manual may result in hazardous radiation exposure. This is a semiconductor laser. The maximum power of the laser diode is 10 mW and the wavelength is 775-800 nm. -
Page 68: For Norway Users
Installation and operation precautions VARO! Avattaessa ja suojalukitus ohitettaessa olet alttiina näkymättömälle la- sersäteilylle. Älä katso säteeseen. VARNING! Osynlig laserstrålning när denna del är öppnad och spärren är urkopplad. Betrakta ej strålen. For Norway users ADVARSEL Dersom apparatet brukes på annen måte enn spesifisert i denne bruksan- visning, kan brukeren utsettes for unsynlig laserstråling som overskrider grensen for laser klass 1. -
Page 69: Ozone Release
Installation and operation precautions Ozone release Locate the Machine in a Well-Ventilated Room A negligible amount of ozone is generated during normal operation of this machine. An unpleasant odor may, however, be created in poorly ventilated rooms during extensive machine operations. For a comfortable, healthy and safe operating environment, it is recommended that the room be well venti- lated. -
Page 70: Caution Notations And Labels
Installation and operation precautions Caution notations and labels Safety precaution notations and labels appear on this machine at the follow- ing positions. Be very careful that an accident does not occur when operations such as re- moving paper misfeeds are performed. CAUTION It is illegal to copy certain types of... -
Page 71: Space Requirements
Installation and operation precautions Space requirements To ensure that machine operation, consumables replenishing, part replace- ment, and regular maintenance can easily be performed, adhere to the rec- ommended space requirements detailed below. (15-1/2) (29-3/4) 1212 (7-1/2) (47-3/4) (13-1/2) Unit: mm (inch) C300+DF-608+FS-514+ PC-403+SD-503+OT-601 Reminder... -
Page 72: Operation Precautions
Installation and operation precautions Operation precautions To ensure the optimum performance of this machine, observe the precau- tions described below. Power source The power source requirements are as follows. - Voltage fluctuation: Maximum ± 10% (at 110 V/120 to 127 V/220 to 240 V AC) - Frequency fluctuation: Maximum ±... - Page 73 Installation and operation precautions 1-18 C300...
-
Page 74: Before Making Copies
Before making copies... -
Page 75: Part Names And Their Functions
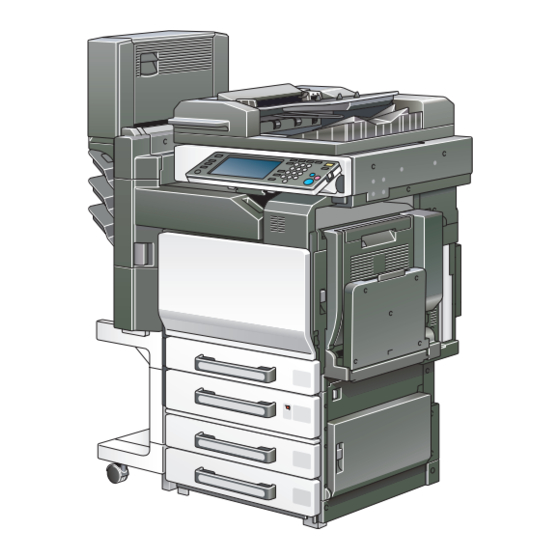
Before making copies Before making copies Part names and their functions Options Reminder In order to maintain the functionality and quality of the machine, be sure to use the paper feed cabinet when installing the machine on the floor. C300... - Page 76 Before making copies Part Name Description Reverse Automatic Document Automatically feeds one original sheet at a time for Feeder DF-608 scanning, and automatically turns over double-sid- ed originals for scanning Referred to as the “ADF” throughout the manual. Original Cover OC-501 Presses down on the loaded original to keep it in place Referred to as the “original cover”...
- Page 77 Before making copies Part Name Description Main unit The original is scanned by the scanner section, and the scanned image is printed by the printer section. Referred to as the “machine”, the “main unit”, or the “C300” throughout the manual. Dehumidifer Heater 1C* Installed in the paper feed cabinet to prevent humidity from collecting in the paper...
-
Page 78: Outside Of Machine
Before making copies Outside of machine * The illustration above shows the main unit with the optional original cover and LCT installed. C300... - Page 79 Before making copies Part Name Description Original cover pad Presses down on the loaded original to keep it in place Turns over the paper for double-sided printing Bypass tray Used when printing onto paper with a size not loaded into a paper tray or onto thick paper, OHP, postcards, envelopes or labels Holds up to 100 sheets of normal paper, 20 sheets of thick paper, OHPs, postcards or label sheets, or...
- Page 80 Before making copies * The illustration above shows the main unit with the optional ADF and double paper feed cabinet installed. C300...
- Page 81 Before making copies Part Name Description Original feed tray Loaded with originals facing up (See p. 3-7.) Original exit tray Collects originals that have been scanned. Open the paper output tray when clearing a misfeed in the ADF. Sub power switch Pressed to turn on/off machine operations, for ex- ample, for copying, printing or scanning When turned off, the machine enters a state where...
- Page 82 Before making copies 35 34 * The illustration above shows the main unit with the optional ADF, LCT, fax multi line and dehumidifier heater installed. C300...
- Page 83 Before making copies Part Name Description ADF connector Used for connecting the ADF hookup cord Filter 1 Collects the toner dust generated in the machine Power connector Used for connecting the power cord Power connector for the external Used for connecting the power cord for the external controller controller Dehumidifier heater power switch...
-
Page 84: Inside Of Machine
Before making copies Inside of machine C300 2-11... - Page 85 Before making copies Part Name Description Original glass Place an original on the glass so that it can be scanned. (See p. 3-9.) Fusing unit cover Opened when clearing paper misfeeds in the fusing unit Release levers Used when clearing paper misfeeds in the fusing unit.
-
Page 86: Saddle Stitcher Sd-503/Mailbin Kit Mt-501
Before making copies Saddle stitcher SD-503/mailbin kit MT-501 Saddle stitcher SD-503 Part name Description Copy output tray Collects copies Misfeed-clearing door Opened when clearing paper misfeeds within the finisher Mailbin kit MT-501 Part name Description Mailbins Collects printed pages Misfeed-clearing door Opened when clearing paper misfeeds Lever [FN7] Opened when clearing paper misfeeds... -
Page 87: Finisher Fs-514/Output Tray Ot-601/Punch Kit Pk-510
Before making copies Finisher FS-514/output tray OT-601/punch kit PK-510 2-14 C300... - Page 88 Before making copies Finisher FS-514 Part name Description Output tray 1 Collects copies that are fed out Output tray 2 Collects copies that are fed out Dial [FN6] Turned when clearing paper misfeeds within the finisher Dial [FN5] Turned when clearing paper misfeeds within the finisher Dial [FN4] Turned when clearing paper misfeeds within the...
- Page 89 Before making copies Precautions for using the finisher: - Do not place objects on top of the saddle stitcher or mailbin kit. - Do not place objects below the output trays of the finisher. 2-16 C300...
-
Page 90: Control Panel
Before making copies Control panel Reset Scan Copy Power Save Access Interrupt Help Power Proof Copy Mode Memory Accessibility PQRS WXYZ Stop Utility/ Enlarge Display Start Counter Contrast Mode Check Data Main Power 18 17 15 14 Part Name Description [Power Save] key Press to enter Low Power mode. - Page 91 Before making copies Part Name Description [Copy] key Press to enter Copy mode. (As a default, the machine is in Copy mode.) While the machine is in Copy mode, the indicator on the [Copy] key lights up in green. [Reset] key Press to clear all settings (except programmed settings) entered in the control panel and touch panel.
- Page 92 Before making copies Part Name Description [Accessibility] key Press to display the screen for specifying user accessibility functions. [Help] key Press to display the Main Help Menu screen, where descriptions of the various functions and details of operations can be displayed. (See p. 4-17.) Reminder Do not apply extreme pressure to the touch panel, otherwise it may be scratched or damaged.
-
Page 93: Basic Screen
Before making copies Basic screen When the machine is ready to begin making copies after being turned on, the Basic screen appears. To activate a function or to select a setting, lightly touch the desired button in the touch panel. TYPE 1 TYPE 2 Item Name... - Page 94 Before making copies Item Name Description [Job List] button Jobs currently being performed or waiting to be performed are displayed. Various commands for checking and managing jobs are available. (See p. 11-2.) Message display area The status of the machine and details on operations that must be performed are displayed here.
-
Page 95: Icons That Appear In The Screen
Before making copies Icons That Appear in the Screen Icon Description Indicates that data is being sent from the machine, regardless of the cur- rent mode Indicates that this machine is receiving data, regardless of the current mode Indicates that an error occurred during an image stabilization operation, a print operation or a scan operation Touch this icon to view a screen containing a warning code. -
Page 96: Adjusting The Angle Of The Control Panel
Before making copies Adjusting the angle of the control panel The control panel can be adjusted to any of three angles. Adjust the control panel to the angle that allows for easy operation. Œ Upper position (base position) Middle position Ž... - Page 97 Before making copies The control panel stops at the middle position. To adjust the control panel to an even steeper angle, pull the control panel release lever to- ward you, and then push down on the control panel. The control panel stops at the lower position.
-
Page 98: Turning On The Main Power And The Sub Power
Before making copies Turning on the Main Power and the Sub Power This machine has two power controls: the main power switch and the sub power switch. To turn on the machine The main power switch turns on/off all functions of the machine. Normally, the main power switch is turned on. - Page 99 Before making copies Detail When the control panel is turned on by pressing the sub power switch, the indicator on the [Start] key lights up in orange, and a screen indicating that the machine is starting up appears. After a few seconds, the message “Now warming up. Ready to scan.” ap- pears on the touch panel, and the indicator on the [Start] key lights up in green, indicating that a job can now be queued.
-
Page 100: To Scan During Warm-Up
Before making copies To scan during warm-up Press the sub power switch. – For details on turning on the machine, refer to “To turn on the ma- chine” on page 2-25. The indicator on the [Start] key lights up in orange. After the warm-up message is displayed, the Basic screen appears. - Page 101 Before making copies % Press the [Stop] key. For details, refer to “Stopping scanning/print- ing” on page 3-84. Detail While the machine is warming up to begin printing after it is turned on us- ing the sub power switch, copy settings can be specified and an original can be scanned to reserve a copy job.
-
Page 102: To Turn Off The Machine
Before making copies To turn off the machine Press the sub power switch. – Check that the touch panel is turned off. Open the machine’s front door. Set the main power switch to [o]. Close the front door. Reminder When the main power switch is turned off, then on again, wait at least 10 seconds to turn it on after turning it off. -
Page 103: Automatically Canceling The Settings (Automatic Panel Reset)
Before making copies Detail The following are cleared when the main power switch and sub power switch are turned off. Settings that have not been programmed Jobs queued to be printed Automatically canceling the settings (automatic panel reset) If the [Reset] key is not pressed and no operation is performed for a specified length of time, settings that have not been programmed, such as the number of copies, are cleared and return to their default settings. -
Page 104: Automatically Conserving Energy (Low Power Mode)
Before making copies Automatically conserving energy (Low Power mode) If no operation is performed for a specified length of time, the touch panel goes off and the machine automatically enters a mode where it conserves energy. This is the Low Power mode. The machine can receive jobs even while it is in Low Power mode. -
Page 105: Automatically Conserving Energy (Sleep Mode)
Before making copies Automatically conserving energy (Sleep mode) If no operation is performed for a specified length of time, the machine auto- matically enters a mode where it conserves energy. Although the machine conserves more energy in Sleep mode than in Low Power mode, the machine must warm up when Sleep mode is canceled to begin printing again, therefore taking more preparation time than Low Power mode. -
Page 106: Manually Conserving Energy
Before making copies Manually conserving energy The machine can be manually set to an energy conservation mode. Press the [Power Save] key (or press the sub power switch). Power Save – As the factory de- fault, the machine enters Low Power mode. -
Page 107: Automatically Turning The Machine On/Off (Weekly Timer)
Before making copies Automatically turning the machine on/off (weekly timer) The machine can be set to automatically enter Sleep mode according to a usage schedule determined by the administrator or limitations on the use of the machine can be specified. This is the weekly timer. - Page 108 Before making copies Using the keypad, type in the length of time until the machine enters Sleep mode again. Specify a length of time between 5 minutes and 9 hours and 59 min- utes. How can a single digit be input? % First, type in “0”.
-
Page 109: Controlling Each User's Use Of This Machine (User Authentication)
Before making copies Controlling each user’s use of this machine (user authentication) If user authentication settings have been specified by the administrator, only users that have been registered can use this machine. 0 When user authentication has been set, only users that enter passwords for specified accounts can use this machine. - Page 110 Before making copies – If “Active Directory” was selected for external server authentication, [Domain Name] appears with the name of the default server. Touch [Domain Name] to display the names of servers registered with “Ac- tive Directory”, and then select the desired server. For details on specifying settings for an external server, refer to “To select an au- thentication method”...
- Page 111 Before making copies Type in the password, and then touch [OK]. Press the [Access] key. The Basic screen ap- Access pears. If account track settings have been applied, the ac- count track screen ap- pears. However, if “Synchronize User Au- thentication &...
- Page 112 Before making copies Detail For details on specifying user authentication settings, refer to “User au- thentication/account track” on page 12-37. Note The user authentication settings can be used together with the account track settings. If the “Synchronize User Authentication & Account Track” parameter is set to “Synchronize”, complete user authentication, and then log on by using the account track input screen.
-
Page 113: Controlling Each Account's Use Of This Machine (Account Track)
Before making copies Controlling each account’s use of this machine (account track) If account track has been set by the administrator, only users of registered accounts can use this machine. In addition, the number of prints produced with each account can be controlled. This is account track. - Page 114 Before making copies Type in the account name, and then touch [OK]. Touch [Password]. Type in the password, and then touch [OK]. C300 2-41...
- Page 115 Before making copies Press the [Access] key. The Basic screen ap- Access pears. Make copies using the desired copy settings. When you are finished printing, press the [Access] key. A message appears, requesting confirmation to log off. Touch [Yes]. The account track screen appears again. Detail If “Account Track Input Method”...
-
Page 116: Loading Paper Into The Tray 1
Before making copies Loading paper into the tray 1 To load paper (tray 1) Pull out the tray 1. Press down on the pa- per-lifting plate until it locks into place. Paper-lifting plate Paper feed roller Slide the lateral guides to fit the size of paper to Lateral guide be loaded. - Page 117 Before making copies For paper exceeding 11 × 17 size, adjust the trail- ing-edge guides as shown in the illustration. Trailing-edge guide Trailing-edge guide Load the paper into the tray so that the side of , mark the paper to be printed on (the side facing up when the package was unwrapped) faces up.
- Page 118 Before making copies Detail When loading paper exceeding 11 × 17 size into the tray 1, the paper can have a width up to 12-1/4 inch and a length up to 18 inch. For details on specifying the paper size for the tray 1, refer to “To specify a paper size (Set Size settings)”...
- Page 119 Before making copies When loading OHP, load them in the v orientation, as shown in the illus- tration. Do not load OHP in the w orientation. When loading postcards, load them in the w orientation, as shown in the illustration. Do not load postcards in the v orientation. Be sure to load letterhead paper so that the side to be printed on faces down.
-
Page 120: Loading Paper Into The Tray 2, 3 Or 4
Before making copies Loading paper into the tray 2, 3 or 4 To load paper (tray 2, 3 or 4) Pull out the paper tray. Slide the lateral guides to fit the size of paper to be loaded. Lateral guide Film Load the paper into the tray so that the side of... - Page 121 Before making copies – Load letterhead paper so that the side to be printed on faces down. How is curled paper loaded? % Flatten the paper before loading it. How many sheets of paper can be loaded? % No more than 500 sheets of normal paper can be loaded. In addi- tion, no more than150 sheets of thick paper can be loaded.
-
Page 122: Loading Paper Into The Lct
Before making copies Loading paper into the LCT To load paper (LCT) 0 If the sub power switch is turned off, even while the main power switch is on, the LCT cannot be pulled out, even after the tray release button is pressed. - Page 123 Before making copies Load the paper into the right side of the LCT so , mark that the side of the paper to be printed on (the side facing up when the package was un- wrapped) faces up. How is curled paper loaded? % Flatten the paper be- Film...
- Page 124 Before making copies Reminder Be careful not to touch the film. Do not load so many sheets of paper that the top of the stack is higher than the , mark. For details on the paper that can be loaded into the LCT, refer to “Copy paper/originals”...
-
Page 125: Loading Paper Into The Bypass Tray
Before making copies Loading paper into the bypass tray Paper can be fed manually through the bypass tray if you wish to copy onto paper that is not loaded into a paper tray, or if you wish to copy onto thick paper, postcards, envelopes, OHP or labels. - Page 126 Before making copies Select the paper type. – To print on colored paper, envelopes or letterheads, touch [ and then select the paper type. – If “A6 Card w” is selected, the paper type is automatically set to “Thick 2”. –...
- Page 127 Before making copies Reminder Do not load so many sheets that the top of the stack is higher than the + mark. Push the paper guides firmly up against the edges of the paper. When loading postcards, load them in the w orientation, as shown in the illustration.
- Page 128 Before making copies Before loading envelopes, press them down to make sure that all air is removed, and make sure that the folds of the flaps are firmly pressed, otherwise the envelopes may become wrinkled or a paper misfeed may occur.
- Page 129 Before making copies A maximum of 20 labels can be loaded into the bypass tray. Side to be printed on Be sure to load letterhead paper so that the side to be printed on faces Note The image will be printed on the surface of the paper facing down when the paper is loaded into the bypass tray.
-
Page 130: Basic Copy Operations
Basic copy operations... -
Page 131: General Copy Operation
Basic copy operations Basic copy operations General copy operation This section contains information on the general operation for making cop- ies. The following procedure describes how to copy a single-sided original using basic copy operations. Note Some settings cannot be used together. For details on the settings that cannot be combined, refer to “Operations that cannot be combined”... - Page 132 Basic copy operations Specify the necessary copy settings. – The default settings when this machine is purchased are listed be- low. [Color]: Auto Color [Paper]: Auto Paper Select [Zoom]: Full size (× 1.000) [Simplex/Duplex]: 1→1 [Quality/Density]: Text/Photo – For details on specifying Original settings, refer to “Specifying orig- inal settings”...
- Page 133 Basic copy operations Using the keypad, type in the desired number of copies. – If the number of cop- ies was incorrectly entered, press the [C] (clear) key in the keypad, and then specify the correct number of copies. Press the [Start] key. –...
-
Page 134: Operations That Cannot Be Combined
Basic copy operations Operations that cannot be combined Certain copy settings cannot be used together. Specifying settings that cannot be combined will result in one of the following occurring. - The setting specified last is given priority. (The setting specified first is canceled.) - The setting specified first is given priority. -
Page 135: Operations Where The Setting Specified First Is Given Priority
Basic copy operations The “2 Position” Staple setting is automatically cancelled, and the “Booklet” function is set. To select the “2 Position” Staple setting, cancel the “Booklet” function, and then select the “2 Position” setting. Operations where the setting specified first is given priority If a warning message appears, indicating that settings cannot be combined, those settings cannot be specified together. -
Page 136: Feeding The Original
Basic copy operations Feeding the original The original can be fed in either of the following two ways. Be sure to position the original correctly according to the type of original being copied. Original Feed Method Features Using the ADF By using the ADF, a multi-page original can be fed automatically. - Page 137 Basic copy operations Load the original face up in the original feed tray. – Load the original pages so that the top of the original is to- ward the back or the right side of the ma- chine. Adjust the lateral guides to the size of the original.
-
Page 138: To Place The Original On The Original Glass
Basic copy operations To place the original on the original glass 0 For details on the types of originals that can be placed on the original glass, refer to “Originals” on page 7-26. 0 When placing the original on the original glass, be sure to lift open the ADF or the original cover at least 20°. - Page 139 Basic copy operations Align the original with mark in the back- left corner of the original scales. – For details on select- ing the original orien- tation, refer to “Selecting the origi- Original scales nal orientation (Origi- nal Direction settings)” on page 3-22.
-
Page 140: Scanning The Original In Separate Batches ("Separate Scan" Setting)
Basic copy operations Scanning the original in separate batches (“Separate Scan” setting) A large original can be divided and scanned in a number of batches. A maximum of 100 original pages can be loaded into the ADF at one time. However, by copying with the “Separate Scan”... - Page 141 Basic copy operations Press the [Start] key. After the original has been scanned, the following message appears. – If the “Print Setting for Separate Scan” parameter is set to “Batch Print”, touch [Finish] in the following screen, which appears while the original is scanned with the ADF, to continue to step 5.
- Page 142 Basic copy operations – The buttons that appear in the Change Setting screen differ de- pending on the specified settings. Settings for the following can be changed. Simplex/Duplex, Bind, Zoom, Frame Erase, Center Erase, Original Size – The amount of memory available can be checked beside “Memory” in the upper-right corner of the Basic screen.
- Page 143 Basic copy operations Press the [Start] key. – If the “Print Setting for Separate Scan” parameter is set to “Batch Print”, touch [Print] or press the [Start] key. – If the “Print Setting for Separate Scan” parameter is set to “Batch Print”, the copy settings can be changed.
-
Page 144: Scanning A Multi-Page Original From The Original Glass
Basic copy operations Scanning a multi-page original from the original glass When making double-sided or combined copies using the original glass, place each page of a multi-page original on the original glass to scan it. The following procedure describes how to place single-sided original pages on the original glass to make double-sided copies. - Page 145 Basic copy operations Touch [1→2]. Touch [Binding Direction], select the binding position for the copies, and then touch [OK]. – For details on specifying the binding position, refer to “To select double-sided copies” on page 3-52. Touch [Original Direction], select the orientation of the loaded original, and then touch [OK].
- Page 146 Basic copy operations Load the next batch of the original, and then press the [Start] key. – Repeat this step until all pages of the original have been scanned. – To change the scanning settings, touch [Change Setting]. For de- tails on changing the scanning settings, refer to “To change scan settings for each original”...
- Page 147 Basic copy operations Press the [Start] key. – If the “Print Setting for Separate Scan” parameter is set to “Batch Print”, touch [Print] or press the [Start] key. – If the “Print Setting for Separate Scan” parameter is set to “Batch Print”, the copy settings can be changed.
-
Page 148: Specifying Original Settings
Basic copy operations Specifying original settings The following procedure describes how to specify the type of original to be copied. Copying originals of mixed sizes (“Mixed Original” setting) Originals of different sizes can be loaded together into the ADF to be fed and scanned one by one automatically. - Page 149 Basic copy operations Load the original face up in the original feed tray. Slide the lateral guides against the edges of the original. – Load the original pages into the ADF so that the top of the Lateral guide pages is toward the back or the left side of the machine.
-
Page 150: Positioning Folded (Z-Folded) Original
Basic copy operations Positioning folded (Z-Folded) original If folded original are loaded into the ADF to be copied, the original size is cor- rectly detected. 0 Load the original into the ADF. 0 The length of the first page of the original is detected, and all pages of the original are scanned at that size. -
Page 151: Selecting The Original Orientation (Original Direction Settings)
Basic copy operations Selecting the original orientation (Original Direction settings) When copying double-sided originals, making double-sided copies, or using a Combine Originals setting, specify the original orientation, otherwise the copies may not be printed in the correct page order or correct front and back page arrangement. -
Page 152: To Specify An Original Direction Setting
Basic copy operations To specify an original direction setting Position the original to be copied. – For details on positioning the original, refer to “Feeding the original” on page 3-7. In the Basic screen, touch [Combine Originals]. The Combine Originals and Original settings screen appears. Touch [Original Direction]. -
Page 153: Selecting The Position Of The Binding Margin (Margin Settings)
Basic copy operations Selecting the position of the binding margin (Margin settings) If a double-sided original is loaded into the ADF, specify the position of the top of the back side of the original by specifying the binding margin position for the original. -
Page 154: To Specify A Margin Setting
Basic copy operations Margin Setting Icon Description When the original length is 11- Select this setting to automatically select 11/16 inch or less: the position of the binding margin. If the original length is 11-11/16 inch or less, a binding position along the long side of the paper is selected. - Page 155 Basic copy operations Touch [Margin]. The Page Margin screen appears. Touch the button for the desired margin position, and then touch [OK]. – To cancel changes to the settings, touch [Cancel]. 3-26 C300...
-
Page 156: Removing Specks From The Left Partition Glass (Despeckle)
Basic copy operations Removing specks from the left partition glass (Despeckle) If the “Despeckle” setting is selected, specks from the left partition glass are removed when scanning of an original loaded into the ADF begins. Load the original into the ADF. –... -
Page 157: To Change Scan Settings For Each Original
Basic copy operations To change scan settings for each original When scanning an original while using the “Separate Scan” setting or when multi-page originals are scanned from the original glass, the scan settings can be changed for each original. The following procedure describes how to change the settings when the “Separate Scan”... - Page 158 Basic copy operations – To cancel changes to the settings, touch [Cancel Change]. Simplex/Duplex screen Original Bind Position screen Center Eraser screen C300 3-29...
- Page 159 Basic copy operations Original Size Setting screen – For details on specifying the Zoom setting, refer to “Specifying a zoom setting” on page 3-37. For details on specifying a zoom ratio, refer to “Erasing specified areas of copies (“Erase” function)” on page 8-62.
-
Page 160: Selecting A Color Setting
Basic copy operations Selecting a color setting The following five Color settings are available. Note The default setting is “Auto Color”. Color Setting Description Auto Color Select this setting to automatically detect whether the scanned original is in color or in black and white, and then select the appropriate Color setting (“Full Color”... -
Page 161: To Select A Color Setting
Basic copy operations To select a color setting The following procedure describes how to select a Color setting. In the Basic screen, touch [Color]. The Color screen appears. Touch the button for the desired Color setting. – If the “2 Color” setting was selected, touch the button for the de- sired color, and then touch [OK]. - Page 162 Basic copy operations – If the “Single Color” setting was selected, touch the button for the desired color, and then touch [OK]. Touch [← Back] or [Fwd. →], and then select the desired color. If – desired, touch [Solid]. – To use the average brightness method for reproducing gradations in monocolor originals, touch [Solid].
-
Page 163: Selecting A Paper Setting
Basic copy operations Selecting a paper setting The paper size can be selected automatically according to the original size or it can be specified manually. Specify the paper size according to the cor- responding procedure, depending on the desired copy settings. Note If a setting for special paper is selected for a paper drawer, that drawer is not selected automatically with the “Auto Paper Select”... - Page 164 Basic copy operations Touch [Auto Paper Select]. Touch [OK]. The Basic screen appears again. C300 3-35...
-
Page 165: Manually Selecting The Desired Paper Size
Basic copy operations Manually selecting the desired paper size 0 By also selecting the “Auto Zoom” setting, the most appropriate zoom ra- tio is selected based on the size of the loaded original and the specified paper size. For details on the “Auto Zoom” setting, refer to “Automatically Selecting the Paper Size (“Auto Paper Select”... -
Page 166: Specifying A Zoom Setting
Basic copy operations Specifying a zoom setting The zoom ratio can be set in order to make a copy on paper with a size dif- ferent than the original or to enlarge or reduce the size of the copy image. The following procedure describes how to specify the Zoom setting. -
Page 167: Specifying The Same Zoom Ratio As The Original ("×1.0" Setting)
Basic copy operations Specifying the same zoom ratio as the original (“×1.0” setting) A copy that is the same size as the original (×1.000) is produced. 0 The default setting is “×1.0”. 0 Touch [+] to enlarge the zoom ratio, and touch [–] to reduce the zoom ra- tio in ×0.001 intervals. -
Page 168: Slightly Reducing The Copy ("Minimal" Setting)
Basic copy operations Slightly reducing the copy (“Minimal” setting) A document image can be printed slightly smaller (×0.930) than the original document size. 0 The default setting is “×1.0”. 0 Touch [+] to enlarge the zoom ratio, and touch [–] to reduce the zoom ra- tio in ×... -
Page 169: Selecting A Preset Zoom Ratio (Enlarge And Reduce Settings)
Basic copy operations Selecting a preset zoom ratio (enlarge and reduce settings) The most appropriate zoom ratio can be selected for copying from a com- mon standard original size to a standard paper size. 0 The default setting is “×1.0”. 0 Touch [+] to enlarge the zoom ratio, and touch [–] to reduce the zoom ra- tio in ×0.001 increments. -
Page 170: Typing In The Zoom Ratio (Xy Zoom Setting)
Basic copy operations Typing In the zoom ratio (XY Zoom setting) By using the keypad, a zoom ratio between ×0.250 and ×4.000 can be typed in directly without changing the height-to-width ratio. 0 If a value outside of the allowable range is specified, the message “Input Error”... - Page 171 Basic copy operations Use the keypad to type in the desired zoom ratio (between ×0.250 and ×4.000). – To cancel changes to the settings, touch [Cancel]. Touch [OK], and then touch [OK] in the next screen that appears. The Basic screen appears again. 3-42 C300...
-
Page 172: Typing In Separate X And Y Zoom Ratios (Independent Zoom Settings)
Basic copy operations Typing In separate X and Y zoom ratios (independent zoom settings) By using the keypad, separate zoom ratios can be typed in directly for the horizontal direction (between ×0.250 and × 4.000) and for the vertical direc- tion (between ×0.250 and ×4.000). - Page 173 Basic copy operations Touch [XY Zoom]. Touch [X] under “Set Individual Zoom”, and then use the keypad to type in the desired zoom ratio (between ×0.250 and ×4.000) for the X direction. Touch [Y] under “Set Individual Zoom”, and then use the keypad to type in the desired zoom ratio (between ×0.250 and ×4.000) for the Y direction.
-
Page 174: Selecting A Stored Zoom Ratio
Basic copy operations Selecting a stored zoom ratio Copy zoom ratios that have been stored can be recalled to be used when de- sired. In addition, stored copy zoom ratios can be changed. 0 The default setting is “×1.0”. 0 Touch [+] to enlarge the zoom ratio, and touch [–] to reduce the zoom ra- tio in ×... -
Page 175: Storing The Desired Zoom Ratio
Basic copy operations Storing the desired zoom ratio Three frequently used zoom ratios and the zoom ratio for the “Minimal” set- ting can be stored. 0 If a value outside of the allowable range is specified, the message “Input Error” appears. Type in a value within the allowable range. If the value was incorrectly entered, press the [C] (clear) key to erase the value, and then specify the correct value. - Page 176 Basic copy operations Use the keypad to type in the desired zoom ratio (between ×0.250 and ×4.000). – To cancel changes to the settings, touch [Cancel]. Touch [Set Zoom]. Touch the button or [Minimal] where the new zoom ratio is to be stored. –...
-
Page 177: Selecting The Original And Copy Type Settings (Simplex/Duplex Settings)
Basic copy operations Selecting the original and copy type settings (Sim- plex/Duplex settings) The type of original and copy can be specified. The following four Simplex/Duplex settings are available. Simplex/Duplex Description 1→1 Select this setting to produce single-sided copies from single-sided originals. 1→2 Select this setting to produce one double-sided copy from two single-sided originals. - Page 178 Basic copy operations Simplex/Duplex Description 2→2 Select this setting to produce double-sided copies from double-sided originals. The following procedures describe how to select a Simplex/Duplex setting. C300 3-49...
-
Page 179: To Select Single-Sided Copies
Basic copy operations To select single-sided copies 0 The default setting is “1→1”. 0 For details on using the original glass to scan multiple original pages, re- fer to “Scanning a multi-page original from the original glass” on page 3-15. In the Basic screen, touch [Simplex/Duplex]. - Page 180 Basic copy operations – For a double-sided original, touch [Binding Direction], select the binding position for the original, and then touch [OK]. Touch [Original Direction], select the orientation of the loaded original, and then touch [OK]. – For details on specifying the original orientation, refer to “Selecting the original orientation (Original Direction settings)”...
-
Page 181: To Select Double-Sided Copies
Basic copy operations To select double-sided copies 0 The default setting is “1→1”. 0 For details on using the original glass to scan multiple original pages, re- fer to “Scanning a multi-page original from the original glass” on page 3-15. In the Basic screen, touch [Simplex/Duplex]. - Page 182 Basic copy operations – If the binding position for the copy is set to “Auto”, the binding po- sition is automatically determined according to the orientation of the loaded original. If the original length is 11-3/4 inch or less, a binding position along the long side of the paper is selected.
-
Page 183: Selecting The Quality Of The Original
Basic copy operations Selecting the quality of the original Loading originals with small print or photos (Original Type settings) Select the setting for the text and image type of the original to better adjust the copy quality. The Original Type settings are available. Note The default setting is “Printed Photo”... -
Page 184: To Specify An Original Type Setting
Basic copy operations Icon Description Select this setting when copying originals with a background color or originals containing pencil markings or fine colored lines. A sharp copy image is produced. Special Quality Select this setting when copying originals consisting only of text that appears faint (such as that written with a pencil). - Page 185 Basic copy operations Touch the button for the quality setting most appropriate for the loaded original. – For an original that contains only text, touch [Text]. – For an original that contains both text and photos, touch [Text/Pho- to] to display the Photo Type screen. Touch the button for the ap- propriate setting, and then touch [OK].
- Page 186 Basic copy operations – For an original that contains maps or faint text, touch [Special Qual- ity] to display the Special Quality screen. Touch the button for the appropriate setting, and then touch [OK]. The Quality/Density screen appears again. C300 3-57...
-
Page 187: Specifying The Density Settings
Basic copy operations 3.10 Specifying the density settings The density can be adjusted to print a copy that is darker or lighter than the current print result. The following three density adjustments are available. Density Settings Description Density The density of the print image can be adjusted to one of nine levels. -
Page 188: Adjusting The Print Density (Density Settings)
Basic copy operations Adjusting the print density (Density settings) In the Basic screen, touch [Quality/Density]. The Quality/Density screen appears. Touch [Change] under “Density”. The Density screen appears. Select the desired Density setting. – Each time [Light] or [Dark] is touched, the density is lightened or darkened by one level. -
Page 189: Adjusting The Background Density (Background Removal Settings)
Basic copy operations Adjusting the background density (Background Removal settings) In the Basic screen, touch [Quality/Density]. The Quality/Density screen appears. Touch [Change] under “Background Removal”. The Background Removal screen appears. Select the desired background density setting. – Each time [Light] or [Dark] is touched, the density is lightened or darkened by one level. -
Page 190: Printing With A Glossy Finish ("Glossy" Setting)
Basic copy operations – Touch [Auto] to automatically adjust the level of the background density according to the original being copied. – To cancel changes to the settings, touch [Cancel]. Touch [OK]. Printing with a glossy finish (“Glossy” setting) In the Basic screen, touch [Quality/Density]. The Quality/Density screen appears. -
Page 191: Adjusting The Reproduction Quality Of Text
Basic copy operations Adjusting the reproduction quality of text 0 The default setting is “0”. In the Basic screen, touch [Quality/Density]. The Quality/Density screen appears. Touch [Text Enhancement]. The Text Enhancement screen appears. Select the desired text density setting. – Each time [Lighter Text] or [Darker Text] is touched, the density is lightened or darkened by one level. - Page 192 Basic copy operations Touch [OK]. C300 3-63...
-
Page 193: Selecting A Combine Originals Setting
Basic copy operations 3.11 Selecting a combine originals setting Original images of multiple pages (2, 4 or 8 pages) can be combined and printed on a single page, reducing paper use. Detail When a Combine Originals setting is selected, the auto display zoom ra- tio is selected, and the original image is copied at a reduced size. - Page 194 Basic copy operations The following three Combine Originals settings are available. Combine Originals Setting Description 2 in 1 Select this setting to print two original pages on one page. 4 in 1 Select this setting to print four original pages on one page. The page arrangement (Numbering Direction settings) can be specified.
-
Page 195: Copying Multiple Original Pages Onto A Single Page (Combine Originals)
Basic copy operations Copying multiple original pages onto a single page (Combine Originals) If a Combine Originals setting is selected, specify the position of the binding margin and the loading orientation for the original, otherwise the copies may not be printed in the desired arrangement. For details on specifying the position of the binding margin, refer to “Select- ing the position of the binding margin (Margin settings)”... - Page 196 Basic copy operations – If “4 in 1” or “8 in 1” was selected, touch [Horizontal] or [Vertical] to specify the page arrangement. – To cancel the setting, touch the button again to deselect it. C300 3-67...
-
Page 197: Selecting Finishing Settings
Basic copy operations 3.12 Selecting finishing settings Various settings are available for sorting and finishing copies when they are fed into the finishing tray. Note The factory default setting is “Group”. Detail If no finisher is installed and the following conditions are met, printed copies can be fed out and sorted in an alternating crisscross pattern. - Page 198 Basic copy operations The following five Finishing settings are available. Finishing Setting Description Sort Select this setting to separate each set of a multi-page original (collated). Group Select this setting to separate the copies of each page in a multi-page original (uncollated). Offset <If no finisher is installed>...
-
Page 199: Separating Copies By Sets ("Sort" Setting)
Basic copy operations Finishing Setting Description Staple Select one of these settings to bind the copies with a staple in the corner or with two staples. Punch Select this setting to punch holes (2 or 3 holes) in the copies for filing them. -
Page 200: Separating Copies By Pages ("Group" Setting)
Basic copy operations In the Basic screen, touch [Finishing]. The Finishing screen appears. Touch [Sort]. – To separate each set of copies, touch [Offset]. – To specify the output tray, touch the button for the desired tray un- der “Output Tray”. Touch [OK]. - Page 201 Basic copy operations 0 If “Offset” is selected while a finisher is installed, printed copies are fed out and stacked on top of each other with each set shifted to separate it. In the Basic screen, touch [Finishing]. The Finishing screen appears. Touch [Group].
-
Page 202: Stapling Copies (Staple Settings)
Basic copy operations Stapling copies (Staple settings) Detail In order for the copies to be stapled, all of the following conditions must be met. - The paper width must be between 7-1/4 inch and 11-3/4 inch. - The paper length must be between 5-3/4 inch and 17 inch. If the “Mixed Original”... -
Page 203: To Bind Copies With Staples
Basic copy operations To bind copies with staples In the Basic screen, touch [Finishing]. The Finishing screen appears. Under “Staple”, touch either [Corner] or [2 Position]. – To cancel the Staple settings, touch [Corner] or [2 Position] again to deselect it. –... - Page 204 Basic copy operations is 11-3/4 inch or less, the long side of the paper is stapled. If the original length is more than 11-3/4 inch, the short side of the paper is stapled. – If “Auto” is selected, the stapling position is set at the top or at the left.
-
Page 205: Punching Holes In Copies (Punch Settings)
Basic copy operations Punching holes in copies (Punch settings) Detail In order for holes to be punched in the copies, all of the following condi- tions must be met. - The paper width must be 8-1/2 inch or between 11 inch and 11-3/4 inch (with the “2-Hole”... -
Page 206: To Punch Holes In Copies
Basic copy operations To punch holes in copies In the Basic screen, touch [Finishing]. The Finishing screen appears. Touch [2-Hole] or [3-Hole]. – To cancel the Punch setting, touch [2-Hole] or [3-Hole] again to deselect it. – To cancel changes to the settings, touch [Cancel]. Touch [Position]. - Page 207 Basic copy operations the original length is 11-11/16 inch or less, the holes are punched along the long side of the paper. If the original length is more than 11-11/16 inch, the holes are punched along the short side of the pa- per.
-
Page 208: Specifying Center Binding
Basic copy operations 3.13 Specifying center binding The paper that is fed out can be folded in half and stapled at two places along the vertical center. “Center Staple” + “Fold” settings (folded in half and stapled at the center in two places) “Fold”... -
Page 209: To Bind Copies At The Center ("Fold & Staple")
Basic copy operations Paper Weight Paper Size Loading Capacity (detected in either measurement) 13-1/4 lb to 24 lb 8-1/2 × 11 w, 11 × 17 w 200 sheets or 20 sets 24-1/4 lb to 55-1/2 lb — Number of Bound Pages Examples of the possible number of bound pages are listed below. - Page 210 Basic copy operations – To fold copies in half and staple them at the center in two places, touch [Center Staple] and [Fold]. – To cancel the “Fold & Staple” setting, touch [OFF]. – To cancel changes to the settings, touch [Cancel]. Touch [OK].
-
Page 211: Scanning The Next Original To Be Copied While A Copy Job Is Being Printed (Next Job Reservation)
Basic copy operations 3.14 Scanning the next original to be copied while a copy job is being printed (next job reservation) The settings for the next copy job can be specified and the original can be scanned while a copy operation is being performed so that it can be printed once the current copy operation is finished. - Page 212 Basic copy operations – For details on positioning the original, refer to “Feeding the original” on page 3-7. Press the [Start] key. After the current copy job is finished, the next copy job begins. C300 3-83...
-
Page 213: Stopping Scanning/Printing
Basic copy operations 3.15 Stopping scanning/printing The following procedure describes how to stop scanning the original and stop the printing operation. To stop scanning/printing 0 If an original is being scanned for a job, pressing the [Stop] key stops scanning. 0 For details on deleting a stopped job, refer to “Deleting a stopped job”... -
Page 214: Deleting A Stopped Job
Basic copy operations 3.16 Deleting a stopped job The following procedure describes how to delete a stopped job. To delete a stopped job 0 For details on stopping a job being printed, refer to “Stopping scanning/ printing” on page 3-84. 0 Select only one job at a time to be deleted. - Page 215 Basic copy operations 3-86 C300...
-
Page 216: Additional Copy Operations
Additional copy operations... -
Page 217: Checking The Copy Settings (Mode Check)
Additional copy operations Additional copy operations Checking the copy settings (Mode Check) From the Mode Check screens, the current copy settings can be checked and changed if desired. To check the settings Press the [Mode Check] key. Mode Check C300... - Page 218 Additional copy operations The Mode Check screen appears. C300...
-
Page 219: To Change The Settings
Additional copy operations After checking the settings, touch [Job End] or press the [Mode Check] key. The Basic screen appears again. Detail There are four Mode Check screens. The number of the currently dis- played screen appears to the right of the screen title. ←... -
Page 220: Printing A Proof Copy To Be Checked (Proof Copy)
Additional copy operations Printing a proof copy to be checked (Proof Copy) Before printing a large number of copies, a single proof copy can first be printed to be checked. This prevents copy errors from occurring. To make test prints Position the original to be copied. - Page 221 Additional copy operations – The number under “Number of Pages” in the screen that appeared when a sample copy is printed indicates the number of copies that are sample copies/the number of pages in the sample copy. In the Change Setting screen, change the copy settings as desired, and then touch [OK].
- Page 222 Additional copy operations Press the [Proof Copy] key to print another sample copy. – To stop the proof copy while scanning or printing, perform the op- eration described in “Stopping scanning/printing” on page 3-84. Touch [Print]. The remaining copies are queued as a copy job. C300...
-
Page 223: Interrupting A Copy Job (Interrupt Mode)
Additional copy operations Interrupting a copy job (Interrupt mode) The current jobs can be temporarily interrupted so an original can be copied with different copy settings. This is convenient for quickly making a copy. Detail For details on making a copy after printing of the current job is finished, refer to “To increase priority for printing”... - Page 224 Additional copy operations After the interrupting job is finished printing, press the [Interrupt] key. The indicator on the [Interrupt] key goes off, and Interrupt mode is can- celed. The settings return to those specified before printing was interrupted. Note If the interrupting job is cancelled, printing for the interrupted job auto- matically restarts.
-
Page 225: Registering Copy Programs (Mode Memory)
Additional copy operations Registering copy programs (Mode Memory) Up to 15 copy programs can be registered. A name of up to 16 characters can be specified for the registered copy pro- grams. To store a copy program Using the touch panel buttons and control panel keys, specify the copy settings to be registered in the copy program. - Page 226 Additional copy operations Why is [Program Registration] not available? % If 15 copy programs have been registered, delete an unnecessary copy program. For details on deleting copy programs, refer to “To delete a copy program” on page 4-13. Use the control panel keypad and the keyboard that appears in the touch panel to type in the name of the copy program.
- Page 227 Additional copy operations Can the specified settings for a copy program be checked? % To check the programmed copy settings, touch the button for the desired copy program, and then touch [Check Job]. For details, re- fer to “Copying with programmed copy settings (Mode Memory)” on page 4-14.
-
Page 228: To Delete A Copy Program
Additional copy operations To delete a copy program In the Recall Copy Program screen, touch the button for the copy pro- gram to be deleted. Touch [Del.]. A message appears, requesting confirmation to delete the copy pro- gram. Touch [Yes]. The Recall Copy Program screen appears again. -
Page 229: Copying With Programmed Copy Settings (Mode Memory)
Additional copy operations Copying with programmed copy settings (Mode Memory) To recall a stored job Programmed copy settings can be recalled to be used again for copying. Position the original to be copied. (For details, refer to page 3-7.) Press the [Mode Memo- ry] key. - Page 230 Additional copy operations Touch [Check Job]. The Mode Check screens for the copy job appear. There are five Mode Check screens. The number of the currently displayed screen appears to the right of the screen title. The buttons for functions where the setting has been changed from the default appear selected.
- Page 231 Additional copy operations Press the [Start] key. Copying begins with the recalled copy settings. Note To stop recalling the copy program, press the [Reset] key or the [Mode Memory] key, or touch [Cancel]. The copy settings cannot be changed from the Mode Check screens. 4-16 C300...
-
Page 232: Displaying Function Descriptions (Help)
Additional copy operations Displaying function descriptions (Help) Descriptions of the various functions and details of operations can be viewed. There are two methods for displaying the Help screens. - Main Help Menu screen (from the Basic screen) - Setting Help screens (from screens other than the Basic screen) Overview of Help Screens The Help feature provides of the following menus. - Page 233 Additional copy operations Help Menu screen (2nd level) (Example: [Copy]) Item Description [Basic], [Combine Originals], Displays the first Help screen for each description [Quality/Density], [Application] [Functionality Map] Displays the Function Map screen, which contains a chart of the available functions and settings Help screens (3rd level) (Example: [Copy], then [Basic]) Detail The numbers to the right of the screen title (“1/4”...
- Page 234 Additional copy operations Function maps (Example: [Copy]) A chart of the available functions and settings are displayed in the function maps. Select an item from the chart for the Help screen that you wish to view. Detail There are seven Function Map screens for Copy mode. The top number indicates the number of the seven screens that is currently displayed.
-
Page 235: To Display The Main Help Menu Screen
Additional copy operations To display the Main Help Menu screen When a Help screen can be displayed, appears in the upper-left corner of the screen. 0 The Help screens cannot be displayed when the following operations are being performed. While scanning, while printing, while printing a proof copy, during Enlarge Display mode, during Accessibility mode 0 While the Help screens are displayed, the following keys are not availa- ble. - Page 236 Additional copy operations The Help Menu [Copy] screen appears. Is there more infor- mation about the buttons of the Help screens? % Refer to “Overview of Help Screens” on page 4-17. Touch the button for the desired information or press the key in the keypad for the number to the left of the desired information to display the corresponding Help screen.
-
Page 237: To Display The Help Screen While Specifying A Setting
Additional copy operations To display the Help screen while specifying a setting Help can be displayed for the copy settings that are being specified. Display the setting screen for the desired copy setting, and then Help press the [Help] key. A Help screen containing details of the functions and operations. -
Page 238: Specifying Control Panel Settings (Accessibility Mode)
Additional copy operations Specifying control panel settings (Accessibility mode) This section contains details on the procedures for specifying control panel settings and adjusting the touch panel. Displaying the Accessibility Setting Screen Press the [Accessibility] key. The Accessibility Setting Accessibility screen appears. Detail To exit the Accessibility Setting screen and return to the Basic screen, press the [Accessibility] key or the [Reset] key. - Page 239 Additional copy operations Touch [Key Repeat Start/Interval Time] or press the [1] key in the key- pad. The Key Repeat Start/In- terval Time screen ap- pears. Touch [+] and [–] to specify the starting time and the interval for the key repeat feature.
- Page 240 Additional copy operations Touch [Close] or press the [Accessibility] key. The Basic screen appears again. Note The Enlarge Display mode is compatible with basic copy, scanning and fax functions. With the Enlarge Display mode, text and illustrations are displayed at a larger size so that they can be seen more easily. For de- tails, refer to the [Enlarge Display Operations of the User’s Guide].
-
Page 241: To Set The "Enlarge Display Timer Setting" Function
Additional copy operations To set the “Enlarge Display Timer Setting” function When the automatic panel reset operation is performed, a message request- ing confirmation to cancel Enlarge Display mode can be displayed. In addition, it is possible to specify the length of time that the message re- questing confirmation to cancel Enlarge Display mode is displayed. - Page 242 Additional copy operations Select the desired setting. – To not display the message requesting confirmation to cancel En- large Display mode, touch [OFF]. – To display the message requesting confirmation to cancel Enlarge Display mode, touch the button ([30 sec.], [60 sec.], [90 sec.] or [120 sec.]) for the length of time that the message is to be displayed.
-
Page 243: To Set The "Message Display Time" Function
Additional copy operations To set the “Message Display Time” function It is possible to specify the length of time for displaying warning messages, which appear, for example, when an incorrect operation is performed. The factory default setting is “3 sec.”. Display the Accessibility Setting screen. - Page 244 Additional copy operations Select setting for the desired amount of time that messages are dis- played. – Select whether messages are displayed for 3 seconds or for 5 sec- onds. – To cancel changes to the settings, touch [Cancel]. Touch [OK]. The Accessibility Setting screen appears again.
-
Page 245: To Set The "Sound Setting" Function
Additional copy operations To set the “Sound Setting” function Specify the sound that is produced when a key is pressed. In addition, you can set whether or not a sound is produced when a control panel key is pressed or a touch panel button is touched. The factory default setting for “Accept Sound Setting”... - Page 246 Additional copy operations Touch [Key Accept Sound/Key Refuse Sound] or press the [1] key in the keypad. The Key Accept Sound/ Key Refuse Sound screen appears. Specify the setting for “Accept Sound Setting”. – To produce a sound, touch [ON]. To not produce a sound, touch [OFF].
- Page 247 Additional copy operations Touch [Close]. The Accessibility Setting screen appears again. Touch [Close] or press the [Accessibility] key. The Basic screen appears again. 4-32 C300...
-
Page 248: To Set The "Touch Panel Adj." Function
Additional copy operations To set the “Touch Panel Adj.” function If the touch panel buttons do not respond correctly, the position of buttons in the touch panel may not be correctly aligned with the position of the actual touch sensor and may need to be adjusted. Display the Accessibility Setting screen. - Page 249 Additional copy operations Touch the four check points ( ), making sure that a sound is pro- duced with each. – The check points ( ) can be touched in any order. – To reset the adjustment, press the [C] (clear) key, and then touch the four check points ( If the check points have been touched correctly, the indicator on the [Start] key lights up in green.
-
Page 250: To Set The "Auto Reset Notification" Function
Additional copy operations To set the “Auto Reset Notification” function When the automatic panel reset operation is performed, a message can be displayed, requesting confirmation to reset the settings in Enlarge Display mode. In addition, it is possible to specify when the message is displayed, request- ing confirmation to reset the settings in Enlarge Display mode. - Page 251 Additional copy operations The Auto Reset Notifica- tion screen appears. Touch the button for the desired display time. – To not display the message requesting confirmation to reset the settings in Enlarge Display mode, touch [OFF]. – To display the message requesting confirmation to reset the set- tings in Enlarge Display mode, touch the button ([30 sec.], [60 sec.], [90 sec.] or [120 sec.]) for the length of time that the message is to be displayed.
- Page 252 Additional copy operations Note The Enlarge Display mode is compatible with basic copy, scanning and fax functions. With the Enlarge Display mode, text and illustrations are displayed at a larger size so that they can be seen more easily. For details on the Enlarge Display mode, refer to the [Enlarge Display Operations of the User’s Guide].
-
Page 253: To Set The "Enlarge Display Confirmation Screen" Function
Additional copy operations To set the “Enlarge Display Confirmation Screen” function When the [Enlarge Display] key is pressed to change the display of the screen, a message can be displayed, requesting confirmation to reset the settings to their defaults. The factory default setting is “No”. Display the Accessibility Setting screen. - Page 254 Additional copy operations Select whether or not the message is displayed. – To cancel changes to the settings, touch [Cancel]. Touch [OK]. The Accessibility Setting screen appears again. Touch [Close], or press the [Accessibility] key. The Basic screen appears again. Note The Enlarge Display mode is compatible with basic copy, scanning and fax functions.
- Page 255 Additional copy operations 4-40 C300...
-
Page 256: Troubleshooting
Troubleshooting... -
Page 257: When The Message "Malfunction Detected." Appears (Call Technical Representative)
Troubleshooting Troubleshooting When the message “Malfunction detected.” appears (call technical representative) If a malfunction that cannot be corrected by the user occurred, the message “Malfunction detected. Please call your Technical Representative.” appears. (call technical representative screen) The phone number and fax number for the usual technical representative ap- pears in the center of the call technical representative screen. -
Page 258: To Call The Technical Representative
Troubleshooting Touch to display the message shown in the following illustration. To call the technical representative Write down the malfunction code (for example, C-0001) in the call tech- nical representative screen. Press the sub power switch to turn off the control panel. - Page 259 Troubleshooting Unplug the machine. Contact the technical representative, and inform them of the malfunc- tion code. Reminder Since the machine may be damaged, contact the technical representa- tive according to the procedure described above as soon as the call tech- nical representative screen appears.
-
Page 260: When The Message "Misfeed Detected." Appears
Troubleshooting When the message “Misfeed detected.” appears If a misfeed occurs during copying or printing, the message “Misfeed detect- ed.” appears and the location of the misfeed is indicated in the screen. (mis- feed screen) At this time, copying and printing cannot continue until the misfeed is ade- quately cleared. - Page 261 Troubleshooting Display in Enlarge Display mode If a paper misfeed occurs, the screen shown below appears. Touch to display the message shown in the following illustration. C300...
-
Page 262: Paper Misfeed Indications
Troubleshooting Paper misfeed indications Description A paper misfeed in the ADF (transport section) (p. 5-37) A paper misfeed in the ADF (scanning section) (p. 5-41) A paper misfeed in the ADF (feed section) (p. 5-33) A paper misfeed in the ADF (output section) (p. 5-46) A paper misfeed in the ADF (turnover section) (p. -
Page 263: To Clear A Paper Misfeed In The Bypass Tray
Troubleshooting Description A paper misfeed in the ADU (p. 5-11) A paper misfeed in the tray 1 (p. 5-12) A paper misfeed in the tray 2 (p. 5-15) A paper misfeed in the tray 3 or 4 (p. 5-16) A paper misfeed in the mailbin (p. 5-56) A paper misfeed in finisher (p. - Page 264 Troubleshooting Open inside cover M1. Slowly pull out the pa- per. Close the upper right-side door. C300...
- Page 265 Troubleshooting 7 CAUTION The area around the fusing unit is extremely hot. %Touching anything other than the indicated levers and di- als may result in burns. If you get burnt, immediately cool the skin under cold water, and then seek professional med- ical attention.
-
Page 266: To Clear A Paper Misfeed In The Adu
Troubleshooting Detail For details on the positions of paper misfeeds, refer to “Paper misfeed in- dications” on page 5-7. To clear a paper misfeed in the ADU Open the ADU door. Carefully pull out any misfed paper. Close the ADU door. Detail For details on the positions of paper misfeeds, refer to “Paper misfeed in- dications”... -
Page 267: To Clear A Paper Misfeed In The Tray 1
Troubleshooting To clear a paper misfeed in the tray 1 Pull up the upper right- side door release lever, and then open the upper right-side door. Open inside cover M1. Slowly pull out the pa- per. 5-12 C300... - Page 268 Troubleshooting Close the upper right-side door. Pull out the tray 1, and then remove any misfed paper. Close the tray 1. 7 CAUTION The area around the fusing unit is extremely hot. %Touching anything other than the indicated levers and di- als may result in burns.
- Page 269 Troubleshooting Reminder Be careful not to touch the surface of the paper feed roller with your hands. Decreased copy/print image quality may result if the surface of the image transfer belt or image transfer roller is touched. Be careful not to touch the surface of the image transfer belt or the image transfer roller.
-
Page 270: To Clear A Paper Misfeed In The Tray 2
Troubleshooting To clear a paper misfeed in the tray 2 Pull up the center right- side door release lever, and then open the center right-side door. Carefully pull out any misfed paper. Close the center right-side door. Pull out the tray 2, and then remove any misfed paper. Close the tray 2. -
Page 271: To Clear A Paper Misfeed In A Paper Tray (Tray 3 Or 4)
Troubleshooting To clear a paper misfeed in a paper tray (tray 3 or 4) Pull up the lower right- side door release lever, and then open the lower right-side door. Carefully pull out any misfed paper. Close the lower right-side door. Pull out the paper tray, and then remove any misfed paper. -
Page 272: To Clear A Paper Misfeed In The Lct
Troubleshooting To clear a paper misfeed in the LCT Pull up the lower right- side door release lever, and then open the lower right-side door. Carefully pull out any misfed paper. Close the lower right-side door. Press the tray release button, pull out the LCT, and then remove any misfed paper. - Page 273 Troubleshooting Reminder Be careful not to touch the film. Detail For details on the positions of paper misfeeds, refer to “Paper misfeed in- dications” on page 5-7. 5-18 C300...
-
Page 274: To Clear A Paper Misfeed In The Right-Side Door
Troubleshooting To clear a paper misfeed in the right-side door Pull up the upper right- side door release lever, and then open the upper right-side door. Slowly pull out the pa- per. If the end of the paper is caught in the timing roll- Timing roller er section, open inside... - Page 275 Troubleshooting Slowly pull out any paper caught in the timing roll- er section. Pull out the paper tray Paper being used, and then re- feed roller move any paper remain- ing in the tray. Load the paper into the paper tray again, and then close the tray. 5-20 C300...
- Page 276 Troubleshooting 7 CAUTION The area around the fusing unit is extremely hot. %Touching anything other than the indicated levers and di- als may result in burns. If you get burnt, immediately cool the skin under cold water, and then seek professional med- ical attention.
- Page 277 Troubleshooting Reminder If the paper is misfed as described below, contact your technical repre- sentative. The paper is wrapped around the timing roller. The paper is folded or shredded by the timing roller. Be careful not to touch the surface of the paper feed roller (in the tray 1) or the film (in the tray 2, 3 and 4 and in the LCT) with your hands.
-
Page 278: To Clear A Paper Misfeed In The Fusing Unit
Troubleshooting To clear a paper misfeed in the fusing unit Pull up the upper right- side door release lever, and then open the upper right-side door. Push up the fusing unit cover, and then slowly pull out any misfed pa- per. - Page 279 Troubleshooting Slowly pull out any mis- fed paper. Raise the fusing unit cover lever M3, and then close the fusing unit cov- 5-24 C300...
- Page 280 Troubleshooting Close the fusing unit cover. Close the upper right- side door. C300 5-25...
- Page 281 Troubleshooting 7 CAUTION The area around the fusing unit is extremely hot. %Touching anything other than the indicated levers and di- als may result in burns. If you get burnt, immediately cool the skin under cold water, and then seek professional med- ical attention.
- Page 282 Troubleshooting Reminder If the paper is misfed as described below, contact your technical repre- sentative. The paper is wrapped around the roller in the fusing unit. The paper is folded or shredded by the roller in the fusing unit. The paper that was removed tore and partly remains in the fusing unit. Decreased copy quality may result if the surface of the image transfer belt or the transfer roller is touched.
-
Page 283: To Clear A Banner Paper Misfeed
Troubleshooting To clear a banner paper misfeed Pull up the upper right- side door release lever, and then open the upper right-side door. – If the end of the pa- per cannot be seen or cannot be grabbed, pull out the paper in the direction of the arrow. - Page 284 Troubleshooting Pull out any paper caught in the timing roll- er section. Timing roller Push up the fusing unit cover, and then pull out any misfed paper. Press fusing unit cover release button M2, and then open the fusing unit cover.
- Page 285 Troubleshooting Pull out any misfed pa- per. Pull out any paper caught in the fusing unit. Raise fusing unit cover lever M3, and then close the fusing unit cover. 5-30 C300...
- Page 286 Troubleshooting Close the fusing unit cover. Close the upper right- side door. C300 5-31...
- Page 287 Troubleshooting 7 CAUTION The area around the fusing unit is extremely hot. %Touching anything other than the indicated levers and di- als may result in burns. If you get burnt, immediately cool the skin under cold water, and then seek professional med- ical attention.
-
Page 288: To Clear A Paper Misfeed In The Adf (Feed Section)
Troubleshooting Reminder Decreased copy quality may result if the surface of the image transfer belt or the image transfer roller is touched. Be careful not to touch the surface of the image transfer belt or the image transfer roller. Image transfer belt Image... - Page 289 Troubleshooting Open the left-side cover. Raise the original feed tray as far as possible. 5-34 C300...
- Page 290 Troubleshooting Slowly pull out any misfed original pages. – Since the original pages may be dam- aged, lift up the orig- inal feed tray before pulling out any mis- fed pages. – When pulling out misfed paper, be sure to pull it in the feed direction.
- Page 291 Troubleshooting Return the original feed tray to its original posi- tion. Close the left-side cover. Load the original into the original feed tray according to the instructions that appear on the screen. Detail For details on the positions of paper misfeeds, refer to “Paper misfeed in- dications”...
-
Page 292: To Clear A Paper Misfeed In The Adf (Transport Section)
Troubleshooting To clear a paper misfeed in the ADF (transport section) Remove all original pag- es from the original feed tray. Open the left-side cover. C300 5-37... - Page 293 Troubleshooting Raise the original feed tray as far as possible. Slowly pull out any mis- fed original pages. – Since the original pages may be dam- aged, lift up the orig- inal feed tray before pulling out any mis- fed pages. 5-38 C300...
- Page 294 Troubleshooting – If the misfeed oc- curred with the sec- ond side of a double- sided original, open the transparent guide in the left-side cover, and then turn mis- feed-clearing dial 2 in the direction of the arrow to feed out the page.
- Page 295 Troubleshooting Return the original feed tray to its original posi- tion. Close the left-side cover. Load the original into the original feed tray according to the instructions that appear on the screen. Detail For details on the positions of paper misfeeds, refer to “Paper misfeed in- dications”...
-
Page 296: To Clear A Paper Misfeed In The Adf (Scanning Section)
Troubleshooting To clear a paper misfeed in the ADF (scanning section) Remove all original pag- es from the original feed tray. Open the left-side cover. C300 5-41... - Page 297 Troubleshooting Raise the original feed tray as far as possible. Lift open the ADF. 5-42 C300...
- Page 298 Troubleshooting Turn misfeed-clearing Misfeed-clearing dial 1 dial 1 in the direction of the arrow to feed out the original page. – If the edge of the pa- per is not visible in the original exit tray, open the guide and pull out the edge of the paper, and then turn misfeed-clearing...
- Page 299 Troubleshooting Close the ADF. Return the original feed tray to its original posi- tion. 5-44 C300...
- Page 300 Troubleshooting Close the left-side cover. Load the original into the original feed tray according to the instructions that appear on the screen. Detail For details on the positions of paper misfeeds, refer to “Paper misfeed in- dications” on page 5-7. C300 5-45...
-
Page 301: To Clear A Paper Misfeed In The Adf (Output Section)
Troubleshooting To clear a paper misfeed in the ADF (output section) Remove all original pag- es from the original feed tray. Lift the original feed tray up as much as possible, and then slowly pull out any misfed original pag- 5-46 C300... - Page 302 Troubleshooting If the misfed paper could not be removed, open the ADF. Turn misfeed-clearing Misfeed-clearing dial 1 dial 1 in the direction of the arrow to feed the original page into the original exit tray. C300 5-47...
- Page 303 Troubleshooting Close the ADF. Return the original feed tray to its original posi- tion. Load the original into the original feed tray according to the instructions that appear on the screen. Detail For details on the positions of paper misfeeds, refer to “Paper misfeed in- dications”...
-
Page 304: To Clear A Paper Misfeed In The Adf (Turnover Section)
Troubleshooting To clear a paper misfeed in the ADF (turnover section) Remove all original pag- es from the original feed tray. Raise the original feed tray up as far as possi- ble, and then remove all original pages from the original exit tray. - Page 305 Troubleshooting Raise the original exit tray up as far as possi- ble, and then remove any misfed original pag- – Lift the original feed tray up as much as possible, and then lift the original exit tray as much as possible. Do not lift the original feed tray with the original exit tray.
- Page 306 Troubleshooting Return the original exit tray to its original posi- tion. Return the original feed tray to its original posi- tion. Load the original into the original feed tray according to the instructions that appear on the screen. Detail For details on the positions of paper misfeeds, refer to “Paper misfeed in- dications”...
-
Page 307: To Clear A Paper Misfeed In The Finisher
Troubleshooting To clear a paper misfeed in the finisher Pull the finisher release lever 1 to unlock the fin- isher. Grab the finisher at “2”, and then slide the finish- er away from the main unit. – To move the finisher away from the main unit, be sure to grab it at “2”. - Page 308 Troubleshooting Open the front door. Raise lever FN1, turn dial FN2, and then pull out any paper. Lower guide FN3, and then pull out any paper. C300 5-53...
- Page 309 Troubleshooting – If the punch kit is in- stalled, pull out the hole-punch waste FN3.1 container FN3.1. Return guide FN3 to its original position. – If the punch kit is installed, insert the hole-punch waste container FN3.1 into its original position. Turn dial FN4 to feed the paper, open the trans- port unit cover, and then...
- Page 310 Troubleshooting Return the finisher to its original position. – When returning the finisher to its original position, do not grab the handle on the front door, the con- trol panel, the mail- bins, or the saddle stitcher. Detail For details on the positions of paper misfeeds, refer to “Paper misfeed in- dications”...
-
Page 311: To Clear A Paper Misfeed In The Mailbin
Troubleshooting To clear a paper misfeed in the mailbin Open the front door. Turn dial FN5 or dial FN6 to feed out the paper. While pressing down le- ver FN7, pull out any pa- per. 5-56 C300... - Page 312 Troubleshooting Pull handle FN8 to open the misfeed-clearing door. Pull out any paper in the mailbin. Close the misfeed-clearing door. Close the front door. Detail For details on the positions of paper misfeeds, refer to “Paper misfeed in- dications” on page 5-7. C300 5-57...
-
Page 313: To Clear A Paper Misfeed In The Saddle Stitcher
Troubleshooting To clear a paper misfeed in the saddle stitcher Open the front door. Turn dial FN5 or dial FN6 to feed out the paper. Remove all paper from the finishing tray. 5-58 C300... - Page 314 Troubleshooting Open the misfeed-clear- ing door, and then pull out any paper. Close the misfeed-clearing door. Close the front door. Detail For details on the positions of paper misfeeds, refer to “Paper misfeed in- dications” on page 5-7. C300 5-59...
-
Page 315: When The Message "Replenish Paper." Appears
Troubleshooting When the message “Replenish paper.” appears If a tray has run out of paper while copying or after printing, the message “Replenish paper.” appears. To replenish paper Check which paper tray appears highlighted in the touch panel, and then load it with paper. Detail For details on loading paper into the paper trays, refer to “Loading paper into the tray 1”... -
Page 316: When The Message
Troubleshooting When the message “... Not enough remaining memo- ry.” appears This machine uses the memory to produce copies. When the amount of memory available is limited, it may become full while copying, and the message “Not enough memory to continue the job.” or “The job has been deleted. -
Page 317: Memory Becomes Full While Queuing A Job
Troubleshooting Memory becomes full while queuing a job This message appears when the memory becomes full and the scanned job was deleted while scanning an original for a job to be queued. Check the number of pages counted for the original, and then adjust the number of pages in the job to be queued. -
Page 318: When "Please Replace Following Unit(S)." Appears
Troubleshooting When “Please replace following unit(s).” appears When it is almost time to replace supplies or a part within this copier, a mes- sage similar to the one shown below appears, warning about the replace- ment period. Display in Enlarge Display mode Detail When the message appears, replace the specified consumables or part according to your maintenance agreement. -
Page 319: When The Message "Need To Replace Xxxx." Appears
Troubleshooting When the message “Need to replace XXXX.” appears When it is time to replace supplies or a part within this machine, a message similar to the one shown below appears, indicating that the part or supplies should be replaced, and the machine stops operating. Display in Enlarge Display mode Touch to display the message shown in the following illustration. - Page 320 Troubleshooting Note When the message appears, replace the specified consumables or part according to your maintenance agreement. Reminder Do not throw away used consumables or parts. Instead, keep them in their boxes to be collected by your technical representative. C300 5-65...
-
Page 321: Simple Troubleshooting
Troubleshooting Simple troubleshooting Main unit Symptom Possible Cause Remedy The machine does not Is no power supplied from the Correctly insert the power supply start up when the main electrical outlet? plug into the electrical outlet. power switch is turned Has the sub power switch Turn on the sub power switch. - Page 322 Troubleshooting Symptom Possible Cause Remedy There are dark specks or Is the original glass dirty? Wipe the glass with a soft, dry cloth. spots throughout the (See p. 10-3.) printed output. Is the left partition glass dirty? Clean the left partition glass with the There are streaks in the left partition glass cleaner.
-
Page 323: Adf
Troubleshooting Symptom Possible Cause Remedy The edge of the printed Is the original cover pad Clean the original cover pad with a output is dirty. dirty? soft cloth dampened with a mild de- tergent. (See p. 10-5.) Was the selected paper size Select a paper size that is the same larger than the original (with a size as the original. -
Page 324: Finisher
Troubleshooting Finisher Symptom Possible Cause Remedy The finisher cannot be Is no power supplied to the Check that the cord is correctly in- used. connector? serted into the connector. The pages cannot be Have the staples run out? Replace the staple cartridge. (See stapled. -
Page 325: Main Messages And Their Remedies
Troubleshooting Main messages and their remedies Message Cause Remedy Original left on glass. The original was left on the Remove the original from the origi- original glass. nal glass. Matching paper size is Paper of a suitable size is not Either select a different copy size or not available. - Page 326 Troubleshooting Message Cause Remedy Please insert Fusing Unit The fusing unit is not installed Reinstall the consumables or parts, and close all doors. correctly. or contact your technical represent- ative. Please install toner car- The indicated toner cartridge tridge, and close all is not installed correctly.
- Page 327 Troubleshooting Message Cause Remedy The Administrator Pass- The administrator password Turn the machine off, then on again. word is not valid due to has become invalid since the Turn off the main power switch, and unauthorized access. authentication attempts have then wait about 10 seconds before failed the specified number of turning it on again.
-
Page 328: Specifications
Specifications... -
Page 329: Bizhub C300
Specifications Specifications Specifications bizhub C300 Specifications Type Desktop/freestanding scanner/printer Original holder Stationary (mirror scanning) Photoconductor Luminous source White inert gas fluorescent lamp Copying system Laser electrostatic copy method Developing system Dry-type dual-component HMT developing method Fusing system Belt-fixing Resolution Scanning: 600 dpi × 600 dpi; Printing: 1800 dpi × 600 dpi... - Page 330 Specifications Specifications Finishing tray capacity Normal paper: 350 sheets Warm-up time Less than 72 seconds (at room temperature (73.4 °F)) (when the main power switch is turned on, then the sub power switch is turned on) Image loss width Leading edge: 3/16; Trailing edge: 1/8; Right edge: 1/8;...
-
Page 331: Adu
Specifications Specifications Paper types Normal paper (17 to 24 lb), thick paper 1 (24-1/4 lb to 40 lb), thick paper 2 (40-1/4 to 55-1/2 lb), thick paper 3 (55-3/4 to 68 lb) Paper sizes 11 × 17 w to 5-1/2 × 8-1/2 w, A3 w to A5 w/v, 12 × 18 w (A3 Wide), 8 ×... - Page 332 Specifications Table 1: Possible combinations for mixed original sizes Maximum Original 11 × 17 8-1/2 × 8-1/2 × 8-1/2 × 5-1/2 × 5-1/2 × Width → 11 v 14 w 11 w 8-1/2 v 8-1/2 w ↓ Original Size 11 × 17 w —...
-
Page 333: Paper Feed Cabinet Pc
Specifications Paper feed cabinet PC-103 Specifications Paper types Plain paper (16 to 24 lb) Paper sizes 11 × 17 w to 5-1/2 × 8-1/2 w, A3 w to B5 w/v Tray paper capacity Tray 3: 500 sheets (21-1/4 lb) Power requirements Supplied from main unit Power consumption Less than 15 W... -
Page 334: Finisher Fs-514
Specifications Finisher FS-514 Specifications Finishing trays Finishing tray 1, finishing tray 2 Feed settings “Sort”, “Group”, “Sort”/“Offset”, “Group”/“Offset”, and “Sort” and Staple Paper types Finishing tray 1, finishing tray 2: Normal paper (13-1/4 to 24 lb) Thick paper (24-1/4 to 68 lb), OHP, postcards, enve- lopes, label sheets, letterheads Punch settings: Normal paper (13-1/4 to 55-1/2 lb) Staple settings: Normal paper (13-1/4 to 24 lb), thick... -
Page 335: Punch Kit Pk
Specifications Punch kit PK-510 Specifications Punched holes 2, 3 Paper types Normal paper (13-1/4 to 55-1/2 lb) Paper sizes 2-hole: 11 × 17 w to 8-1/2 × 11 w/v 3-hole: 11 × 17 w, 8-1/2 × 11 v Power requirements Supplied from finisher Dimensions 4-1/2 (W) ×... - Page 336 Specifications Mailbin kit MT-501 Specifications Number of bins 4 bins Paper types Normal paper (13-1/4 to 24 lb) Paper sizes 8-1/2 × 11 v, 5-1/2 × 8-1/2 w Paper capacity Maximum 125 sheets per bin Dimensions 13-1/2 (W) × 20 (D) × 15-1/4 (H) Weight Approx.
- Page 337 Specifications 6-10 C300...
- Page 338 Copy paper/originals...
-
Page 339: Copy Paper
Copy paper/originals Copy paper/originals Copy paper Use paper that meets the following specifications. Possible paper sizes Non-standard-sized paper: Paper Source Paper Width Paper Length Bypass tray* 3-1/2 to 12-1/4 5-1/2 to 47-1/4 Tray 1 3-1/2 to 12-1/4 5-1/2 to 18 Tray 2 —... - Page 340 Copy paper/originals Loaded equipment Paper sizes that can be loaded Finisher (FS-514) Finishing tray 1, 2 and optional Output Tray 11 × 17 w, 8-1/2 × 11 w/v, 5-1/2 × 8-1/2 w/v, 12-1/4 × 18 w (A3 Output Tray (OT-601) wide w) “Group”/“Sort”...
-
Page 341: Paper Types And Paper Capacities
Copy paper/originals Paper types and paper capacities Paper Type Normal Thick Thick Thick Paper Paper 1 Paper 2 Paper 3 Weight (lb) 16 lb 24-1/4 lb 40-1/4 lb 55-3/4 lb 24 lb 40 lb 55-1/2 lb 68 lb Paper Source, Etc. Bypass tray 100 sheets 20 sheets... -
Page 342: Special Paper
Copy paper/originals Special paper Paper other than normal paper, such as OHP and colored paper, is called special paper. Be sure to select a special paper setting for paper trays load- ed with media such as OHP and colored paper in order to prevent operating errors. - Page 343 Copy paper/originals Paper Type Icon Description Thick 3 Select this setting when the thick paper that is loaded has a weight of 55-3/4 lb to 68 lb. A paper tray with this setting is not automatically se- lected when the “Auto Paper Select” setting is spec- ified or when the paper trays are switched automatically.
-
Page 344: Precautions For Paper
Copy paper/originals Precautions for paper The following types of paper should not be used, otherwise decreased print quality, paper misfeeds or damage to the machine may occur. - OHP that have already been fed through the machine (even if the trans- parency is still blank) - Paper that has been printed on by a heat-transfer printer or an inkjet printer... -
Page 345: Auto Tray Switch Feature
Copy paper/originals Auto tray switch feature If the selected paper tray runs out of paper while a job is being printed and a different paper tray is loaded with paper meeting the following conditions, the other paper tray is automatically selected so printing can continue. If the optional LCT is installed, a maximum of 3,400 copies (with 8-1/2 ×... -
Page 346: Selecting The Paper Settings
Copy paper/originals Selecting the paper settings This section describes the procedures for specifying the size and type of pa- per loaded in each paper tray. Detail For details on loading the paper into the tray 1, refer to “Loading paper into the tray 1”... - Page 347 Copy paper/originals Touch [Change Tray Settings]. Touch [Auto Detect]. As a default, “Auto Detect” is selected. Touch [OK], and then touch [OK] in the next screen that appears. The Basic screen appears again. 7-10 C300...
-
Page 348: To Specify A Paper Size (Set Size Settings)
Copy paper/originals To specify a paper size (Set Size settings) The paper size for the tray 1 and the bypass tray can be set so that the paper tray can be used with the specified paper size. This is useful, for example, when the size of the paper that is loaded cannot be automatically detected (such as with postcards or paper in inch sizes). - Page 349 Copy paper/originals Touch [Standard Size]. The Standard Size screen appears. Touch [ ] twice, and then touch [4 × 6 w]. – Touch [ ] and [ ] until the button for the desired paper size is displayed. – If “4 × 6 w” is selected, “Thick 2” is automatically selected. If paper other than postcards is loaded, change the paper type setting.
-
Page 350: To Specify A Non-Standard Paper Size (Custom Size Settings)
Copy paper/originals To specify a non-standard paper size (Custom Size settings) Non-standard-sized paper can be loaded into the tray 1 or the bypass tray. If non-standard-sized paper is loaded, it will be necessary to enter the paper size. The following procedure describes how to specify the size of non-standard paper loaded into the tray 1. - Page 351 Copy paper/originals Touch [Custom Size]. The Custom Size screen appears. Type in the length (X) and width (Y) of the paper. – Make sure that [X] is selected, touch [↔] to switch between the in- teger and the fraction, and then touch [–] and [+] to type in the length of side X.
- Page 352 Copy paper/originals Can paper sizes be stored? % Five non-standard paper sizes can be stored. % To recall a stored paper size, touch the corresponding memory key. % The names “memory1” through “memory5” can be changed. For details on changing the names, refer to “To store a non-standard paper size (Custom Size settings)”...
-
Page 353: To Store A Non-Standard Paper Size (Custom Size Settings)
Copy paper/originals To store a non-standard paper size (Custom Size settings) Five non-standard paper sizes can be stored. Storing paper sizes that are used often allows the paper size to be quickly selected, without having to re-enter the setting. The following procedure describes how to store a non-standard paper size for the tray 1. - Page 354 Copy paper/originals Touch [Custom Size]. The Custom Size screen appears. Specify the X and Y sides of the paper, and then touch [Store]. – Make sure that [X] is selected, touch [↔] to switch between the in- teger and the fraction, and then touch [–] and [+] to type in the length of side X.
- Page 355 Copy paper/originals Touch the memory key where the paper size is to be stored. – To change the name of a memory key, touch [Custom Name], and then touch the key to be renamed. Using the keyboard that appears, type in the name of the key, touch [OK], and then touch [OK] again.
-
Page 356: To Specify A Setting For Oversized Paper (Oversized Paper Settings)
Copy paper/originals To specify a setting for oversized paper (Oversized Paper settings) Oversized paper can be loaded into the tray 1 or the bypass tray. Oversized paper is a size larger than the standard size and allows copies of standard-sized originals to be printed so that there is no loss at the edges. For example, if 11 ×... - Page 357 Copy paper/originals Touch [Oversized Paper]. The Oversized Paper screen appears. Select the size of the paper to be loaded. – To select a paper size in centimeters, touch [Metric]. The list of pa- per sizes in centimeters appears. To change the size, touch [Change Size]. The Change Size screen for oversized paper appears.
- Page 358 Copy paper/originals – If a decimal value is displayed in the screen and the specified value is outside the allowable range, the message “Input Error” appears. Type a value within the allowable range. If the value was incorrectly entered, press the [C] (clear) key to erase the value, and then spec- ify the correct value.
-
Page 359: To Specify A Setting For Special Paper
Copy paper/originals To specify a setting for special paper If a setting for special paper, such as OHP and other special paper, is select- ed for a paper tray, that tray is not selected automatically with the “Auto Pa- per Select” setting or the ATS feature. However, a paper tray set to “Single Side Only”... - Page 360 Copy paper/originals Specify the appropriate setting for the type of special paper loaded. – Touch the button for the desired special paper. What types of paper can be loaded in the paper tray? % There are limits on the types of paper that can be loaded in a paper tray.
-
Page 361: To Print Double-Sided Copies Manually
Copy paper/originals To print double-sided copies manually If the document to be copied cannot be fed through the ADU, touch [Duplex 2nd-Side] to print double-sided copies. The following procedure describes how to specify the setting for paper al- ready printed on one side and loaded into the tray 1. In the Basic screen, touch [Paper]. - Page 362 Copy paper/originals Touch [Duplex 2nd-Side]. Select the setting for the type of used paper that is loaded. Touch [OK], and then touch [OK] in the next two screens that appear. The Basic screen appears again. C300 7-25...
-
Page 363: Originals
Copy paper/originals Originals When making copies, load the original into the ADF or position it on the orig- inal glass. To copy originals that cannot be loaded into the ADF, position them on the original glass. Originals that can be loaded into the ADF There are three methods for using the ADF. - Page 364 Copy paper/originals Mixed originals paper sizes The following chart shows the possible combinations of standard-sized pa- per that can be used with the “Mixed Original” setting. Maximum Original 11 × 17 8-1/2 × 8-1/2 × 8-1/2 × 5-1/2 × 5-1/2 × Width →...
-
Page 365: Precautions For Loading Originals Into The Adf
Copy paper/originals Precautions for loading originals into the ADF The following types of originals should not be loaded into the ADF, otherwise paper misfeeds or damage to the original may occur. - Wrinkled, folded, curled, or torn originals - Highly translucent or transparent originals, such as OHP or diazo photo- sensitive paper - Coated originals such as carbon-backed paper - Originals printed on paper thicker than 56-1/4 lb... -
Page 366: Originals That Can Be Placed On The Original Glass
Copy paper/originals Originals that can be placed on the original glass To copy originals that cannot be loaded into the ADF, position them on the original glass. Original Glass Originals Original type Sheets, books (spreads), three-dimensional objects Original size 11 × 17 w to 8-1/2 × 11 w/v, 5-1/2 × 8-1/2 w, A3 w to A5 w, 8 ×... - Page 367 Copy paper/originals 7-30 C300...
-
Page 368: Application Functions
Application functions... -
Page 369: Inserting Paper Between Copies Of Ohp
Application functions Application functions Inserting paper between OHP (“OHP Interleave” func- tion) In order to prevent copies printed onto OHP from sticking together as a result of the heat that is produced during copying, paper (interleaf) can be inserted between the transparencies E F G H E F G H E F G H... -
Page 370: To Copy Using The "Ohp Interleave" Function
Application functions To copy using the “OHP Interleave” function 0 The Finishing setting cannot be changed. 0 The number of copies is set to “1” and cannot be changed. Position the original to be copied. – For details on positioning the original, refer to “Feeding the original” on page 3-7. - Page 371 Application functions Touch [OHP Interleave]. The OHP Interleave screen appears. Select the paper tray loaded with the interleaf paper. – To cancel changes to the settings, touch [Cancel]. – To cancel the “OHP Interleave” function, touch [OFF]. Touch [OK]. If necessary, specify any other copy settings. Press the [Start] key.
-
Page 372: Adding A Cover Page
Application functions Adding cover pages (“Cover Mode” function) Copies can be made using paper different from the cover pages and main body of the original (excluding the cover pages) and cover pages can be add- ed using paper different from the copy. The following types of cover pages and front and back cover page settings are available. -
Page 373: To Copy Using The "Cover Mode" Function
Application functions To copy using the “Cover Mode” function Position the original to be copied. – For details on positioning the original, refer to “Feeding the original” on page 3-7. – For an original that exceeds 100 pages, refer to “Scanning the orig- inal in separate batches (“Separate Scan”... - Page 374 Application functions Select the desired cover sheet format. – The default setting for the paper tray loaded with cover pages can be specified from the Utility mode. For details, refer to “Copier set- ting” on page 12-22. – To cancel changes to the copy settings, touch [Cancel]. –...
-
Page 375: Inserting Different Paper Into Copies
Application functions Inserting different paper into copies (“Insert Sheet” function) Different paper (such as colored paper) can be inserted for specified pages in the copies. There are settings (“Copy” and “Blank”) for selecting whether or not the in- serted pages are printed. When the settings are combined with single-sided copying or double-sided copying, the copies are printed as shown below. -
Page 376: To Copy Using The "Insert Sheet" Function
Application functions REPORT REPORT REPORT To copy using the “Insert Sheet” function Position the original to be copied. – For details on positioning the original, refer to “Feeding the original” on page 3-7. – For an original that exceeds 100 pages, refer to “Scanning the orig- inal in separate batches (“Separate Scan”... - Page 377 Application functions – To cancel all settings for the Application functions, touch [Reset]. The Sheet/Cover/Chapter Insert screen appears. Touch [Insert Sheet]. The Insert Sheet screen appears. Using the keypad, specify the pages where the paper is to be inserted. – When [Select] is touched, the entered page is specified.
- Page 378 Application functions Touch [Insert Paper]. – To cancel changes to the settings, touch [Cancel]. – To cancel the “Insert Sheet” function, touch [OFF]. The Insert Paper screen appears. Select the paper tray loaded with the paper for the insertion sheets, and then touch [OK].
-
Page 379: Inserting Copies Of A Different Original For A Specified Page ("Insert Image" Function)
Application functions Inserting copies of a different original for a specified page (“Insert Image” function) A multi-page original later scanned from the original glass can be inserted at the specified location in a original first scanned with the ADF. The inserted original is added after the specified pages. - Page 380 Application functions Touch [Application], and then touch [Sheet/Cover/Chapter Insert]. – To cancel all settings for the Application functions, touch [Reset]. The Sheet/Cover/Chapter Insert screen appears. Touch [Insert Image]. The Insert Image screen appears. Using the keypad, specify the pages where the image is to be inserted. –...
- Page 381 Application functions – To remove a page number that has been specified, touch [Edit], touch the button for the page to be removed, and then press the [C] (clear) key. – If the total number of pages in the original to be inserted is greater than the number of pages that are specified, the remaining pages of the insertion original are added at the end of the original.
- Page 382 Application functions Place the original to be inserted on the original glass. – For details on positioning the original, refer to “Feeding the original” on page 3-7. Press the [Start] key. Scanning begins. Touch [Finish]. – To insert a multi-page original, repeat steps 9 and 10 until all pages of the insertion original are scanned in the order that they are to be inserted.
-
Page 383: Specifying Pages To Be Printed On The Front Side ("Chapters" Function)
Application functions Specifying pages to be printed on the front side (“Chapters” function) When making double-sided copies, the pages specified as the first page of a chapter can be printed on the front side of the paper. If the original was ar- ranged so that the specified page would be printed on the back side of a page, the page is left blank and the specified page is printed on the front side of the next page. -
Page 384: To Copy Using The "Chapters" Function
Application functions To copy using the “Chapters” function Make sure that the paper loaded for the first page of the chapter and for the copy have the same size and orientation. Position the original to be copied. – For details on positioning the original, refer to “Feeding the original” on page 3-7. - Page 385 Application functions – To remove a page number that has been specified, touch [Edit], touch the button for the page to be removed, and then press the [C] (clear) key. Set “Simplex/Duplex” to “1 → 2”. – – If the same page number is entered twice, the same page number is specified, and there is no change to the print result.
-
Page 386: Scanning Originals With Different Settings And Printing Copies All Together ("Program Job" Function)
Application functions Scanning originals with different settings and printing copies all together (“Program Job” function) Loaded original pages can be scanned with different settings and their cop- ies can be printed together. Different Zoom or Paper settings can be speci- fied for a part of the original or Finishing settings or the “Set Numbering”... - Page 387 Application functions Touch [Application], and then touch [Sheet/Cover/Chapter Insert]. – To cancel all settings for the Application functions, touch [Reset]. The Sheet/Cover/Chapter Insert screen appears. Touch [Program Job], and then touch [OK]. Select the desired copy settings, and then press the [Start] key. –...
- Page 388 Application functions – If the original is placed on the original glass, touch [Finish] in the screen that appears, requesting confirmation that scanning of the original is finished. Position the next original batch, and then touch [Change Setting]. Select the desired copy settings, and then press the [Start] key. –...
- Page 389 Application functions After all original pages have been scanned, touch [Finish]. A message appears, requesting confirmation that scanning is finished. Select [Yes], and then touch [OK]. – To change the copy settings, select [No], and then touch [Change Setting]. Specify any other desired copy settings. –...
- Page 390 Application functions Touch [Execute] or press the [Start] key. – If [Cancel] is touched, a message appears, requesting confirmation to delete the data. To stop printing, select [Yes], and then touch [OK]. C300 8-23...
-
Page 391: Producing Separate Copies Of Each Page In A Page Spread ("Book Copy" Function)
Application functions Producing separate copies of each page in a page spread (“Book Copy” function) An open book or catalog can be copied with the left and right pages on sep- arate pieces of paper. The following copy methods are available, and there are settings for adding just a front cover or both front and back covers. -
Page 392: To Copy Using The "Book Copy" Function
Application functions To copy using the “Book Copy” function 0 Place the original on the original glass. Place the pages on the original glass, starting with the first page. – For details on positioning the original, refer to “Feeding the original” on page 3-7. - Page 393 Application functions Touch [Book Copy]. The Book Scanning screen appears. [Booklet Original] is not available if optional saddle stitcher is not in- stalled. Touch the button for the desired setting. – If [Separation], [Front Cover] or [Front and Back Cover] is selected, “Position”...
- Page 394 Application functions – If a decimal value is displayed in the Center Erase screen and the specified value is outside the allowable range, the message “Input Error” appears. Type a value within the allowable range. If the value was incorrectly entered, press the [C] (clear) key to erase the value, and then specify the correct value.
- Page 395 Application functions Press the [Start] key. – For details on scanning the original, refer to “Scanning a multi-page original from the original glass” on page 3-15. Scanning begins. If “Book Spread” or “Separation” was selected, the copies begin to be printed.
- Page 396 Application functions – If “Front Cover” was selected, all page spreads are scanned in or- der after the front cover. SURVEYOR’S REPORT Press the [Start] key. C300 8-29...
-
Page 397: Copying Pamphlets ("Booklet Original" Function)
Application functions Copying pamphlets (“Booklet Original” function) This function is available only if optional saddle stitcher is installed. A pam- phlet with its staples removed can be copied and bound with staples at the center to create copies of the original pamphlet. Setting Description Center Erase ON... -
Page 398: To Copy Using The "Booklet Original" Function
Application functions To copy using the “Booklet Original” function 0 This function is available only if the optional finisher and saddle stitcher are installed. Position the original to be copied. – Load a booklet with the staples removed. – For details on positioning the original, refer to “Feeding the original” on page 3-7. - Page 399 Application functions Touch [Application], and then touch [Book Copy/Repeat]. – To cancel all settings for the Application functions, touch [Reset]. The Book Copy/Repeat screen appears. Touch [Booklet Original]. The Booklet Original screen appears. Touch either [Center Erase ON] or [Center Erase OFF]. –...
- Page 400 Application functions Using the keypad, type in the desired number of copies. Press the [Start] key. – If the original is placed on the original glass, scanning begins. Touch [Finish], and then press the [Start] key to begin printing. – For details on scanning the original from the original glass, refer to “Scanning a multi-page original from the original glass”...
-
Page 401: Tiling Copy Images ("Image Repeat" Function)
Application functions Tiling copy images (“Image Repeat” function) A single original image can be copied repeatedly onto a single sheet of pa- per. The copies are produced with the number of repeats automatically ad- justed according to the original and paper sizes and the zoom ratio. The following repeating formats and settings are available. -
Page 402: To Copy Using The "Image Repeat" Function
Application functions To copy using the “Image Repeat” function Position the original to be copied. – For details on positioning the original, refer to “Feeding the original” on page 3-7. Load the paper to be used into the desired paper tray. Touch [Application], and then touch [Book Copy/Repeat]. - Page 403 Application functions Select the layout method. Check the scanning size under “Scan Range”, touch [OK], and then touch [OK] in the next screen that appears. – If the original size does not appear under “Scan Range”or to specify the scanning area, touch [Set Range], and then specify the area to be scanned from any of the screens.
- Page 404 Application functions Photo Size screen Can sizes in metrics be displayed? % Touch [ ] or [ ] to display a different list of sizes. If [Custom Size] is touched, the Custom Size screen appears. If [Photo Size] is touched, the Photo Size screen appears. Can any size be specified? % Any size can be specified from the Custom Size screen.
- Page 405 Application functions Using the keypad, type in the desired number of copies. Press the [Start] key. 8-38 C300...
-
Page 406: Copying An Enlarged Image On Multiple Pages ("Poster Mode" Function)
Application functions 8.10 Copying an enlarged image on multiple pages (“Post- er Mode” function) An original image can be divided, and each section of the image can be print- ed enlarged. The finished size can be specified by the image size, zoom ratio or paper size. - Page 407 Application functions Touch [Poster Mode]. The Poster Mode screen appears. [Booklet Original] does not appear if optional saddle stitcher is not in- stalled. Touch [Image Size], [Zoom] or [Paper Size] under “Finished Size”. – The factory default setting for the finished size is “17 × 22”. –...
- Page 408 Application functions – If a decimal value is displayed in the screen and the specified value is outside the allowable range, the message “Input Error” appears. Type a value within the allowable range. If the value was incorrectly entered, press the [C] (clear) key to erase the value, and then spec- ify the correct value.
- Page 409 Application functions Check the original size under “Original Size” and then touch [OK] – If the original size does not appear or to specify the original size, touch [Standard Size] and then specify the original size from any of the screens. –...
- Page 410 Application functions Can sizes in metrics be displayed? % Touch [ ] or [ ] to display a different list of sizes. If [Custom Size] is touched, the Custom Size screen appears. If [Photo Size] is touched, the Photo Size screen appears. Can any size be specified? % Any size can be specified from the Custom Size screen.
-
Page 411: Copying With The Page Layout Of A Magazine
Application functions 8.11 Copying with the page layout of a magazine (“Book- let” function) The page order of the scanned original is automatically arranged to produce double-sided copies in a page layout for center binding, such as for a mag- azine. -
Page 412: To Copy Using The "Booklet" Function
Application functions To copy using the “Booklet” function Position the original to be copied. – For details on positioning the original, refer to “Feeding the original” on page 3-7. Touch [Application], and then touch [Booklet]. – To cancel all settings for the Application functions, touch [Reset]. Touch either [Left Bind] or [Right Bind]. -
Page 413: Copying With Image Colors Inversed ("Neg-/Pos. Reverse" Function)
Application functions 8.12 Copying with image colors inversed (“Neg-/Pos. Re- verse” function) An original can be copied with the light- and dark-colored areas or the colors (gradations) of the image inversed. Detail If the “Single Color” function is set, the colors are inversed with the se- lected color. -
Page 414: To Copy Using The "Neg-/Pos. Reverse" Function
Application functions To copy using the “Neg-/Pos. Reverse” function Position the original to be copied. – For details on positioning the original, refer to “Feeding the original” on page 3-7. Touch [Application], and then touch [Edit Color]. – To cancel all settings for the Application functions, touch [Reset]. The Edit Color screen appears. -
Page 415: Copying In A Mirror Image ("Mirror Image" Function)
Application functions 8.13 Copying in a mirror image (“Mirror Image” function) A copy can be printed in the mirror image of the original. To copy using the “Mirror Image” function Position the original to be copied. – For details on positioning the original, refer to “Feeding the original” on page 3-7. - Page 416 Application functions Touch [Mirror Image]. The Mirror Image screen appears. Check the original size under “Original Size”, and then touch [OK]. – If the original size does not appear or to specify the original size, touch [Standard Size], and then specify the original size from any of the screens.
- Page 417 Application functions – To cancel the “Mirror Image” function, touch [OFF]. Standard Size screen Custom Size screen Photo Size screen Can sizes in inches be displayed? % Touch[ ] or [ ] to display a different list of sizes. If [Custom Size] is touched, the Custom Size screen appears.
- Page 418 Application functions Can any size be specified? % Any size can be specified from the Custom Size screen. Touch [X] or [Y], touch [↔] to switch between the integer and the fraction, and then touch [–] and [+] to specify the size of the document. If a decimal value is displayed in the screen, press the [C] (clear) key, and then use the keypad to type in the setting.
-
Page 419: Adding A Background Color To Copies ("Background Color" Function)
Application functions 8.14 Adding a background color to copies (“Background Color” function) This function allows you to copy an original using one of the 18 colors avail- able as the color of the background (blank areas). Detail For sample images of the “Background Color” function, refer to ““Back- ground Color”... - Page 420 Application functions Select the desired background color. – To cancel changes to the settings, touch [Cancel]. – To cancel the “Background Color” function, touch [OFF]. Can other background colors displayed? % Touch [←Back] or [Fwd.→] to display a different list of colors. Touch [OK].
-
Page 421: Adjusting The Copy Color Quality (Adjust Color Parameters)
Application functions 8.15 Adjusting the copy color quality (Adjust Color param- eters) You can adjust the quality of color copies as desired. There are 10 Adjust Color parameters that can be used in any combination. In addition, you can check the specified settings by printing a sample copy. Setting Description Brightness... -
Page 422: To Adjust The Adjust Color Parameters
Application functions To adjust the Adjust Color parameters As an example, the procedure for adjusting the Brightness parameter is de- scribed below. Touch [Application], and then touch [Edit Color]. – To cancel all settings for the Application functions, touch [Reset]. The Edit Color screen appears. - Page 423 Application functions Touch [ ], [ ], [ ], and [ ] to change the setting. – To cancel changes to the settings, touch [Cancel]. – To cancel the “Brightness” parameter, touch [OFF]. – The “Sharpness” parameter can only be specified in single incre- ments.
-
Page 424: Checking The Print Result Of The Adjust Color Settings (Sample Copy)
Application functions Checking the Print Result of the Adjust Color Settings (Sample Copy) You can make a sample copy of your original to see how it will appear with the currently specified color adjustment settings. As an example, the procedure for the Brightness parameter is described be- low. -
Page 425: To Make Sample Copies
Application functions To make sample copies Touch [Sample Copy] in the Darker ↔ Lighter (Brightness) screen. The Sample Copy screen appears. Load paper of a size listed under “Paper that can be used” into the pa- per tray. Place the original within the sample area of the original glass. Press the [Start] key. -
Page 426: Adding Filing Margins To Copies ("Page Margin" Function)
Application functions 8.16 Adding filing margins to copies (“Page Margin” func- tion) Copies can be printed with a filing margin so that the pages can easily be filed. When making double-sided copies, the image orientation can adjusted by specifying the position of the filing margin. In addition, the image orienta- tion can adjusted without creating a filing margin. -
Page 427: To Copy Using The "Page Margin" Function
Application functions To copy using the “Page Margin” function Position the original to be copied. – For details on positioning the original, refer to “Feeding the original” on page 3-7. Touch [Application], and then touch [Page Margin]. – To cancel all settings for the Application functions, touch [Reset]. The Page Margin screen appears. - Page 428 Application functions Touch [–] or [+] to specify the margin width. – If “None” is selected, the margin width is set to 0 inch. When mak- ing double-sided copies, the image orientation can adjusted with- out creating a filing margin. –...
-
Page 429: Erasing Specified Areas Of Copies ("Erase" Function)
Application functions 8.17 Erasing specified areas of copies (“Erase” function) Copies can be produced by erasing unwanted areas around the original, such as the transmission information on received faxes and the shadows of punched holes. With frame erasing, the same width can be erased along all four sides of the original or a different width can be erased along each side of the original. - Page 430 Application functions Specify the area to be erased. – To cancel changes to the settings, touch [Cancel]. – To cancel the “Erase” function, touch [OFF]. What happens when [Frame] is specified? % The same width is erased on all four sides of the original. The fac- tory default setting is “Frame”.
-
Page 431: Adjusting The Image To Fit The Paper (Image Adjustment Settings)
Application functions 8.18 Adjusting the image to fit the paper (Image Adjust- ment settings) When the copy paper is larger than the original, copies can be made with the original image centered and enlarged to fill the paper. The image can be adjusted in any of the following ways. Setting Description Full Size... -
Page 432: To Copy Using The Image Adjustment Settings
Application functions To copy using the Image Adjustment settings Position the original to be copied. – For details on positioning the original, refer to “Feeding the original” on page 3-7. – If “Full Size” or “Center Zoom” is to be set, position the original on the original glass. - Page 433 Application functions Check the original size under “Original Size”, and then touch [OK]. – If the original size does not appear or to specify the original size, touch [Standard Size], and then specify the original size from any of the screens. –...
- Page 434 Application functions Can sizes in metrics be displayed? % Touch [ ] or [ ] to display a different list of sizes. If [Custom Size] is touched, the Custom Size screen appears. If [Photo Size] is touched, the Photo Size screen appears. Can any size be specified? % Any size can be specified from the Custom Size screen.
-
Page 435: Printing The Date/Time, Page Number Or Distribution Number On Copies (Stamp Functions)
Application functions 8.19 Printing the Date/Time, page number or distribution number on copies (Stamp functions) The date/time or page number can be added to copies at the specified loca- tion, or a distribution number can be added when multiple copies are made. The following Stamp functions are available and can be combined. -
Page 436: To Copy Using The "Date/Time" Function
Application functions To copy using the “Date/Time” function Position the original to be copied. – For details on positioning the original, refer to “Feeding the original” on page 3-7. Touch [Application], and then touch [Stamp]. – To cancel all settings for the Application functions, touch [Reset]. The Stamp screen appears. - Page 437 Application functions Touch the buttons for the desired settings under “Date Type”, “Time Type” and “Pages”. – To cancel changes to the settings, touch [Cancel]. – To cancel the “Date/Time” function, touch [OFF]. – To print the stamp only on the front cover page, touch [Cover Only]. –...
- Page 438 Application functions – If a decimal value is displayed in the screen and the specified value is outside the allowable range, the message “Input Error” appears. Type a value within the allowable range. If the value was incorrectly entered, press the [C] (clear) key to erase the value, and then spec- ify the correct value.
-
Page 439: To Copy Using The "Page #" Function
Application functions To copy using the “Page #” function Position the original to be copied. – For details on positioning the original, refer to “Feeding the original” on page 3-7. Touch [Application], and then touch [Stamp]. – To cancel all settings for the Application functions, touch [Reset]. The Stamp screen appears. - Page 440 Application functions – If necessary, touch [Chapter], and then use the keypad to type in the chapter number. – The setting for “Page #” can be set to a number between –99999 and 99999, and the setting for “Chapter” can be set to a number between –100 and 100.
- Page 441 Application functions – If a decimal value is displayed in the screen and the specified value is outside the allowable range, the message “Input Error” appears. Type a value within the allowable range. If the value was incorrectly entered, press the [C] (clear) key to erase the value, and then spec- ify the correct value.
- Page 442 Application functions If necessary, specify any other copy settings. Using the keypad, type in the desired number of copies. Press the [Start] key. C300 8-75...
-
Page 443: To Copy Using The "Set Numbering" Function
Application functions To copy using the “Set Numbering” function Position the original to be copied. – For details on positioning the original, refer to “Feeding the original” on page 3-7. Touch [Application], and then touch [Stamp]. – To cancel all settings for the Application functions, touch [Reset]. The Stamp screen appears. - Page 444 Application functions – The stamp will not be printed on blank pages inserted using the “Cover Mode”, “Insert Sheet” and “Chapters” functions. – To cancel changes to the settings, touch [Cancel]. – To cancel the “Set Numbering” function, touch [OFF]. Touch a button under “Text Color”...
-
Page 445: Printing Copy Protection Text ("Copy Protect" Function)
Application functions Printing copy protection text (“Copy Protect” function) REPORT REPORT REPORT Detail If the “Copy Protect” function is set, hidden text is printed in order to pre- vent improper copying. When an original printed with copy protection text is copied, the hidden text appears clearly repeated in the copies so that the reader knows that it is a copy. - Page 446 Application functions Touch [Copy Protect]. The Copy Protect screen appears. Select the format for the copy protection text. – To cancel the “Copy Protect” function, touch [OFF]. Touching [OFF] in the settings screen for the format of copy protection text only cancels the settings in that screen.
- Page 447 Application functions – Multiple registered stamps or preset stamps cannot be selected. – If [Date/Time] was touched, the Copy Protect>Date/Time screen appears. Select the desired settings under “Date Type” and “Time Type”, and then touch [OK]. – The copy protection date and time that is printed is the date and time when the original is scanned.
- Page 448 Application functions – The factory default settings are listed below. [Color]: Black, [Density]: Standard, [Pattern]: Embossed (Pattern Contrast 0), [Size]: Normal, [Pattern Overwrite]: Front Color screen Density screen C300 8-81...
- Page 449 Application functions – The settings under “Pattern Contrast” in the Pattern screen can only be specified in single increments between –2 and +2. Pattern screen Pattern Size screen Pattern Overwrite screen 8-82 C300...
- Page 450 Application functions – If necessary, touch [Position], and then change the printing angle in the Position screen. Select desired angle, and then touch [OK]. – If necessary, touch [Change Position/Delete] in the Position screen, and then change the arrangement of the text in the Position Change/Delete screen.
- Page 451 Application functions – To delete the copy protection text, touch [Delete], and then touch the button for the copy protection text to be deleted. Touch [OK]. If necessary, specify any other copy settings. Using the keypad, type in the desired number of copies. Press the [Start] key.
-
Page 452: Replacing Toner Cartridges And Staples And Emptying Waste Containers
Replacing toner cartridges and staples and emptying waste containers... -
Page 453: Replacing The Toner Cartridge
Replacing toner cartridges and staples and emptying waste containers Replacing toner cartridges and staples and emptying waste containers Replacing the toner cartridge When the toner is about to run out, an advanced warning message similar to the one shown below appears. Detail About 1000 (8-1/2 ×... - Page 454 Replacing toner cartridges and staples and emptying waste containers When the toner is empty, a message similar to the one shown below ap- pears, warning that the toner cartridge should be replaced, and copies can no longer be made. Note When the message appears, replace the toner cartridge according to your maintenance agreement.
- Page 455 Replacing toner cartridges and staples and emptying waste containers Display in Enlarge Display mode When the toner is empty, the screen shown below appears. Touch to display the message shown below. 7 CAUTION Handling toner and the toner cartridges Do not throw toner or the toner cartridge into a fire. Toner expelled from the fire may cause burns.
- Page 456 Replacing toner cartridges and staples and emptying waste containers 7 CAUTION Precautions for toner spills Be careful not to spill toner inside the machine or get toner on your clothes or hands. If your hands become soiled with toner, immediately wash them with soap and water.
-
Page 457: To Replace The Toner Cartridge
Replacing toner cartridges and staples and emptying waste containers To replace the toner cartridge The procedure for replacing any of the toner cartridges (yellow (Y), magenta (M), cyan (C) or black (K)) is the same. Example: Replacing the black toner cartridge 0 When replacing the black toner cartridge, be sure to replace filter 2. - Page 458 Replacing toner cartridges and staples and emptying waste containers Pull up the locking tab of the empty toner car- tridge to unlock it. Pull out the toner cartridge as far as possible, and then pull it up to remove How are used toner cartridge disposed % Do not throw away used toner cartridg-...
- Page 459 Replacing toner cartridges and staples and emptying waste containers Remove the new toner cartridge from its pack- aging, and then shake the cartridge up and down 5 to 10 times. – The toner within the toner cartridge may have become com- pacted.
- Page 460 Replacing toner cartridges and staples and emptying waste containers Note Check that a toner cartridge of the same color as the one to be replaced has been prepared. Reminder Be careful about the installation location of the toner cartridges, since it is different for other colors.
-
Page 461: Replacing The Staples
Replacing toner cartridges and staples and emptying waste containers Replacing the staples When there are no more staples, the message “Stapler empty.” appears. Replace the staple cartridge. Display in Enlarge Display Mode Detail Be sure to replace the staple cartridge only after the message appears, otherwise the machine may be damaged. -
Page 462: To Replace The Staple Cartridge In The Finisher
Replacing toner cartridges and staples and emptying waste containers To replace the staple cartridge in the finisher Open the front door. Remove the staple car- tridge holder. – Pull the staple car- tridge holder toward you to remove it. – Only touch the blue parts of the staple cartridge. - Page 463 Replacing toner cartridges and staples and emptying waste containers Load the new staple car- tridge into the staple car- tridge holder. – Do not remove the remaining staples, otherwise the ma- chine will not be able to staple after the cartridge is replaced.
-
Page 464: To Replace The Staple Cartridge In Saddle Stitcher
Replacing toner cartridges and staples and emptying waste containers To replace the staple cartridge in saddle stitcher Raise the copy output tray, and then push down the staple car- tridge holder and re- move it. Press in the area marked “PUSH”... - Page 465 Replacing toner cartridges and staples and emptying waste containers Remove the empty sta- ple cartridge from the staple cartridge holder. Load the new staple car- tridge into the staple car- tridge holder. 9-14 C300...
- Page 466 Replacing toner cartridges and staples and emptying waste containers Slowly pull off the seal. Insert the staple car- tridge holder, and then push it up until it locks into place. – When inserting the staple cartridge holder, be sure to in- sert it so that it faces the correct direction.
-
Page 467: Clearing A Staple Jam
Replacing toner cartridges and staples and emptying waste containers Clearing a staple jam If a staple jam occurs in the finisher, the message shown below appears. Reminder Be careful when clearing jammed staples since injuries may result. If the staples become jammed, follow the procedure described below. If the paper is pulled out with too much force, the stapler may be damaged. -
Page 468: To Clear Jammed Staples In The Finisher
Replacing toner cartridges and staples and emptying waste containers To clear jammed staples in the finisher Remove all paper from the finisher. Open the front door. Raise lever FN1, turn le- ver FN2, and then pull out any paper. C300 9-17... - Page 469 Replacing toner cartridges and staples and emptying waste containers Lower guide FN3, and then pull out any paper. – If the punch kit is in- stalled, pull out the hole-punch waste FN3.1 container FN3.1. Return guide FN3 to its original position. –...
- Page 470 Replacing toner cartridges and staples and emptying waste containers Turn dial FN5 or dial FN6, and then pull out any paper. Turn the dial to the left to move the stapler toward the front. C300 9-19...
- Page 471 Replacing toner cartridges and staples and emptying waste containers Remove the staple car- tridge holder. – Pull the staple car- tridge holder toward you to remove it. – Only touch the blue parts of the staple cartridge. Swing open the shutter of the staple cartridge holder, and then pull out one sheet of staples.
- Page 472 Replacing toner cartridges and staples and emptying waste containers Insert the staple car- tridge holder, making sure the tabs on the holder slide along the rails in the compartment. – Check that the staple cartridge holder is securely installed. Close the front door. Reminder If stapling still cannot be resumed, even after performing the above pro- cedure, contact your technical representative.
-
Page 473: To Clear Jammed Staples In The Saddle Stitcher
Replacing toner cartridges and staples and emptying waste containers To clear jammed staples in the saddle stitcher Open the front door. Raise lever FN1, turn le- ver FN2, and then pull out any paper. Lower guide FN3, and then pull out any paper. 9-22 C300... - Page 474 Replacing toner cartridges and staples and emptying waste containers – If the punch kit is in- stalled, pull out the hole-punch waste FN3.1 container FN3.1. Return guide FN3 to its original position. – If the punch kit is installed, insert the hole-punch waste container FN3.1 into its original position.
- Page 475 Replacing toner cartridges and staples and emptying waste containers Turn dial FN5 or dial FN6, and then pull out any paper. Open the misfeed-clear- ing door, and then pull out any paper. Close the misfeed-clearing door. Raise the finishing tray, and then push down the staple cartridge holder and remove it.
- Page 476 Replacing toner cartridges and staples and emptying waste containers Swing open the shutter of the staple cartridge holder, and then pull out one sheet of staples. Return the shutter of the staple cartridge holder to its original position. Insert the staple car- tridge holder, and then push it down until it locks into place.
-
Page 477: Emptying The Waste Containers
Replacing toner cartridges and staples and emptying waste containers Emptying the waste containers If the hole-punch waste container in punch kit installed on finisher becomes full, the message shown below appears (if it can be emptied by the user). Note The setting for emptying the hole-punch waste container should be spec- ified by the technical representative. - Page 478 Replacing toner cartridges and staples and emptying waste containers Display while a job is being performed Detail When performed by user If the hole-punch waste container has become full while a job is being performed, the job being performed is paused. To continue the job with- out canceling the Punch setting, empty the hole-punch waste container.
-
Page 479: To Empty The Hole-Punch Waste Container
Replacing toner cartridges and staples and emptying waste containers To empty the hole-punch waste container Follow the procedure described below to empty the hole-punch waste con- tainer. Open the front door. Pull out the hole-punch waste container FN3.1. FN3.1 9-28 C300... - Page 480 Replacing toner cartridges and staples and emptying waste containers Empty the hole-punch waste container. Insert the hole-punch waste container at its original position. Close the front door. C300 9-29...
-
Page 481: Replacing The Waste Toner Box
Replacing toner cartridges and staples and emptying waste containers Replacing the waste toner box When it is almost time to replace the waste toner box (and if it is replaceable by the user), the message shown in the following illustration appears, warn- ing about the replacement period. - Page 482 Replacing toner cartridges and staples and emptying waste containers Display in Enlarge Display mode When the time to replace the part is reached, the following screen appears. Touch to display the message shown below. C300 9-31...
-
Page 483: To Replace The Waste Toner Box
Replacing toner cartridges and staples and emptying waste containers To replace the waste toner box Follow the procedure described below to replace the waste toner box. Open the machine’s front door. Pull the waste toner re- lease lever. Remove the waste toner box. - Page 484 Replacing toner cartridges and staples and emptying waste containers Install the new waste toner box. Remove filter 1, and then install the new filter 1. Close the front door. C300 9-33...
- Page 485 Replacing toner cartridges and staples and emptying waste containers 7 CAUTION Handling toner and the toner cartridges Do not throw toner or the waste toner box into a fire. Toner expelled from the fire may cause burns. 7 CAUTION Precautions for toner spills Be careful not to spill toner inside the machine or get toner on your clothes or hands.
-
Page 486: Care Of The Machine
Care of the machine... -
Page 487: Cleaning
Care of the machine Care of the machine 10.1 Cleaning This section describes the procedures for cleaning each part. Housing Clean the surface of the housing by wiping it with a soft cloth dampened with a mild household detergent. Reminder Be sure to turn off the machine (set the power switch to “o”) before cleaning it. -
Page 488: Original Glass
Care of the machine Original glass Clean the surface of the original glass by wiping it with a soft, dry cloth. Reminder Never use solvents, such as benzene or thinner, to clean the original glass. Slit glass Clean the left partition glass with the left parti- tion glass cleaner. -
Page 489: Control Panel
Care of the machine Control panel Clean the control panel by wiping it with a soft, dry cloth. Reminder Pressing too hard on the control panel or the touch panel may damage them. In addition, never use a mild household detergent, glass cleaner, benzene or thinner to clean the control panel or touch panel. -
Page 490: Original Cover Pad
Care of the machine Original cover pad Clean the surface of the pad by wiping it with a soft cloth dampened with a mild household detergent. Reminder Never use solvents, such as benzene or thinner, to clean the original cov- er pad. -
Page 491: Paper Feed Roller
Care of the machine Paper feed roller Clean the paper feed rollers by wiping them with a soft, dry cloth. Reminder Never use solvents, such as benzene or thinner, to clean the paper feed roller. Electrostatic charger wire If the electrostatic charger wire is dirty, streaks will appear though the printed images. -
Page 492: Print Head
Care of the machine Print head If the print head becomes dirty, decreased print quality may result. If this oc- curs, clean the print head according to the following procedure. Open the machine’s front door. Remove the cleaning tool from the machine’s front door. -
Page 493: Viewing Counters (Meter Count)
Care of the machine 10.2 Viewing counters (Meter Count) Viewing counters The Meter Count screen can be displayed so that the total number of prints since counting started can be viewed. In addition, the list of counters can be printed. To view the counters Press the [Utility/Counter] key. -
Page 494: Viewing The Coverage Rate
Care of the machine Touch [Close], and then touch [Close] in the next screen that appears. The Basic screen appears again. Note The list of counters can be displayed even while the machine is copying or printing. Viewing the coverage rate The amount of toner that was used can be viewed in the Toner Coverage screen. -
Page 495: When The Message "Preventive Maintenance Time." Appears
Care of the machine 10.3 When the message “Preventive maintenance time.” appears If the message “Preventive maintenance time.” appears, contact your tech- nical representative and request a periodic maintenance inspection. 10-10 C300... -
Page 496: Managing Jobs (Job List)
Managing jobs (Job List) -
Page 497: Overview Of The Job List Screen
Managing jobs (Job List) Managing jobs (Job List) 11.1 Overview of the Job List screen Jobs Specifying the desired copy settings, then pressing the [Start] key queues the copy operation in this machine. This queued operation is called a job. In the same way, operations for making scans and computer printouts are also queued as jobs. -
Page 498: Job List Screens
Managing jobs (Job List) – Total: 251 - When one job is finished being printed, the next queued print job auto- matically begins. Note Up to 251 jobs, including print jobs, scanner transmission jobs, fax trans- mission jobs and received fax/saved jobs, can be queued. Job List screens An overview of the Job List screens is provided below. - Page 499 Managing jobs (Job List) - The function of each button in the Job List screens is described below. Name Description [Print] A selected Displays the Print tab of the Job List screen button [Scan] Displays the Scan tab of the Job List screen indicates For details, refer to the Network Scanner Operations of which job...
- Page 500 Managing jobs (Job List) Name Description [Detail] Displays screens for checking the status, results, error details, user name, queued time, completed time and number of copies for jobs in the job lists. For details, refer to “Displayed information” on page 11-9. ] arrows When there are more jobs than the five that can be displayed at one time, touch these arrows to display...
-
Page 501: Performing Operations On Jobs
Managing jobs (Job List) 11.2 Performing operations on jobs To delete a job A queued job or job being printed (job in the Active Jobs list) can be deleted. In the Basic screen, touch [Job List]. The Job List screen appears. In the Print tab, display the job to be deleted. - Page 502 Managing jobs (Job List) Check the information that is displayed, and then touch [Yes] if the cor- rect job is indicated. – To quit deleting the job, touch [No]. The screen displayed before [Delete] was touched appears again, and the job is deleted from the Current Jobs list. Touch [Exit] or press the [Reset] key.
-
Page 503: To Check The Job Settings
Managing jobs (Job List) To check the job settings Job settings for stored jobs, jobs being printed, jobs queued to be printed and held jobs can be checked. In the Basic screen, touch [Job List]. The Job List screen appears. Display the list containing the job whose settings are to be checked. -
Page 504: Displayed Information
Managing jobs (Job List) Displayed information The following information can be checked from the Job List screen. - Print tab Status (Receiving, Waiting, Printing, Printing Stopped, Print Error, Job Stored) , Result (Job complete, Error cleared, Deleted by User, Deleted Due To Error) , Error Detail , Document Name, User Name, Start Time,... -
Page 505: To Check The Job Details
Managing jobs (Job List) To check the job details In the Basic screen, touch [Job List]. The Job List screen appears. Display the list containing the job whose details are to be checked. Select the job whose details are to be checked, and then touch [Detail]. –... -
Page 506: To Display Current Jobs (Held Jobs And Active Jobs Lists)
Managing jobs (Job List) To display current jobs (held jobs and active jobs lists) The lists of received print jobs for Copy mode and Fax mode and for compu- ter printing is displayed. In the Basic screen, touch [Job List]. The Job List screen appears. -
Page 507: To Display Job History
Managing jobs (Job List) To display Job History In the Basic screen, touch [Job List]. The Job List screen appears. Touch [Job History]. The Job History screen appears. Touch the button for the desired list. – Deleted Jobs: Displays only jobs that were deleted before they were finished –... -
Page 508: To Print A Sample Copy Of A Stored Job
Managing jobs (Job List) To print a sample copy of a stored job A single copy of a stored job can be printed in order to be checked. The Held Jobs list contains jobs such as those for which a proof copy was being printed when the automatic system reset operation was performed and proof print jobs for data in the boxes. - Page 509 Managing jobs (Job List) Detail To change the settings, touch [Change setting] in the Release Held Job screen. For details, refer to “To print a stored job” below. 11-14 C300...
-
Page 510: To Print A Stored Job
Managing jobs (Job List) To print a stored job A job is removed from the Held Jobs list and printed. Display the Held Jobs list in the Current Jobs list of the Print tab. Touch [Release Held Job]. The Release Held Job screen appears. Select the job to be removed from the Held Jobs list. - Page 511 Managing jobs (Job List) – To cancel changes to the settings, touch [Cancel]. Is there more information about the settings? % Refer to the appropriate section. Can a sample copy be printed? % For details on printing a sample copy, refer to “To print a sample copy of a stored job”...
-
Page 512: To Increase Priority For Printing
Managing jobs (Job List) To increase priority for printing The next job to be printed after the current job being printed can be selected. If an Administrator mode function was set so that the output priority of jobs cannot be changed, [Increase Priority] does not appear and the output prior- ity of the jobs cannot be specified. - Page 513 Managing jobs (Job List) The selected job moves to the top of the list and printing of the job be- gins. How is the changing of the output priority stopped? % Touch [Cancel]. 11-18 C300...
-
Page 514: Utility
Utility... -
Page 515: Overview Of Utility Mode Parameters
Utility Utility 12.1 Overview of utility mode parameters List of registration information and parameters This section describes the buttons available when the [Utility/Counter] key is pressed. Note The buttons that appear in the screens differ depending on the specified settings. Utility/Counter One-Touch Registra- [1] Scan... - Page 516 Utility [3] Relay User User Setting [1] System Set- [1] Language p. 12-17 p. 12-17 ting ( Selection [2] Measurement Unit Setting [3] Paper Tray [1] Auto Tray Setting Select Setting [2] Auto Tray Switch ON/OFF [3] No Match- ing Paper in Tray Setting [4] Print Lists [4] Auto Color...
- Page 517 Utility [6] Copy Initial RX Display Screen Setting [3] Initial Setting [7] Job List De- p. 12-21 fault [4] Copier Set- Auto Paper Select p. 12-22 ting ( for Small Original Auto Booklet ON when Fold & Staple Auto Zoom for Combine/Booklet Sort/Group Auto Change...
- Page 518 Utility Bind Direction Staple Hole-Punch Banner Paper Tray [3] PCL Setting [1] Font Setting Internal Disk Soft [2] Symbol Set [3] Font Size [4] Line/Page [5] CR/LF Mapping [4] PS Setting PS Error Print [5] Print Reports Configuration Page Demo Page PCL Font List PS Font List Administrator Setting...
- Page 519 Utility [3] Date Setting [4] Select Time for Power Save [5] Password for Non-Business Hours [6] Restrict User [1] Restrict Access to Access Saved Program Jobs [2] Delete Saved Program Jobs [3] Restrict Access Changing Job to Job Settings Priority Deleting Other User’s Jobs Registering and...
- Page 520 Utility Black Image Density [6] Pre-Detec- [1] Detect Lines tion of Lines Prior to Job [2] Detect & Re- move During Job [7] Color Reg- [1] Color Registra- istration Adjust tion Adjust (Yellow) [2] Color Registra- tion Adjust (Magenta) [3] Color Registra- tion Adjust (Cyan) [8] Gradation [1] Copy...
- Page 521 Utility [1] Standard Original Glass Orig- Size Setting inal Size Detect Foolscap Size Setting [2] Administrator/ [1] Administra- Machine Setting tor Registration p. 12-35 [2] Input Ma- chine Address [3] One-Touch [1] Scan [1] Address [1] E-Mail Registration Book p. 12-36 [2] FTP [2] Group [3] SMB...
- Page 522 Utility [4] User Authenti- [1] General Set- cation/Account tings Track p. 12-37 [2] User Authen- [1] Administra- User Name List tication Setting tive Setting [2] User Default Function Registration Permission [3] User Public User Key Counter [3] Account [1] Account Track Track Setting Registration [4] Print without...
- Page 523 Utility [8] Prefix/Suffix [1] ON/OFF Setting Setting [9] Action for [2] Prefix/Suffix Invalid Certificate Setting [3] Network Fax [1] Network Fax IP Address Fax Setting Function Settings [2] SMTP TX SIP-Fax Setting [3] SMTP RX Internet Fax Setting [6] Copier Set- Auto Zoom p.
- Page 524 Utility Inch Paper Prior- ity Over A4 Print Paper Selection Print Paper Size Incorrect User Box No. Entry Tray Selection for RX Print Min. Reduction for RX Print Print Separate Fax Pages File After Poll- ing TX No. of Sets (RX) [5] Function [1] Function ON/...
- Page 525 Utility TX Result Report Check Network Fax RX Error Report MDN Message DSN Message [8] Job Settings Receipt Mail List Text [9] Multi Lines [1] Telephone Dialing Method Setting Line Settings Number of RX Call Rings Line Monitor Sound [2] Function PC-FAX TX Setting Setting...
- Page 526 Utility [6] HDD Setting [1] Check HDD Capacity [2] Temporary Data Overwrite Setting [3] Overwrite All Data [4] HDD Lock Password [5] HDD For- matting [8] HDD Encryp- tion Setting [7] Management [1] Function Function Setting Settings Check Consumable [8] Delete Reg- [2] Max.
-
Page 527: Selecting A Destination Register
Utility 12.2 Selecting a destination register This section describes the main parameters and operations that can be per- formed after pressing the [Utility/Counter] key, then touching [1 One-Touch Registration]. Scan Parameter Description Address Book Register recipients for scanning. For details, refer to the Network Scanner Operations of the User’s Guide. -
Page 528: Displaying The Destination Register Screen
Utility Note [2 Bulletin Board User Box] and [3 Relay User Box] appear only when fax kit FK-502 is installed or when Internet fax functions are available. Displaying the destination register screen The following procedure describes how to display the One-Touch Registra- tion Screen. - Page 529 Utility The One-Touch Registration screen appears. Note To quit specifying the Utility mode setting, touch [Exit] in the sub display area or press the [Utility/Counter] key. Otherwise, cancel the Utility mode by touching [Close] in each screen until the screen for the Copy, Fax, Scan or Box mode appears.
-
Page 530: Specifying User Settings
Utility 12.3 Specifying user settings This section describes the main parameters and operations that can be per- formed after pressing the [Utility/Counter] key, then touching [2 User Set- ting]. System setting Language Selection Description Default Setting Select the language of the Touch Panel messages. English Measurement Unit Setting Description... - Page 531 Utility Auto Color Level Adjustment Description Default Setting Adjust the reference level for detecting a color or black-and-white 3 (standard) original when the “Auto Color” setting is selected. The reference lev- el can be set to one of 5 settings. Power Save Setting Parameter Description...
-
Page 532: Display Setting
Utility Note If the “Administrator Security Level” parameter in Administrator mode was set to “Level 2”, [Output Setting], and [AE Level Adjustment] also ap- pear. [Bin Setting] only appears if the mailbin kit is installed. “Tray 2” appears for the “Bin Setting” parameter only if the output tray is installed. -
Page 533: Fax Basic Screen Default Setting
Utility Fax Basic Screen Default Setting Parameter Description Default Tab Specify settings for faxing. For details, refer to the Facsimile Opera- tions and the Network Facsimile Operations of the User’s Guide. Default Program Address Book Default In- Address Type Symbol Display No. -
Page 534: Initial Setting
Utility Job List Default Description Default Setting Select the job list displayed as the default in the Job List screen. Current Print Jobs • Current Print Jobs: The Current Jobs list appears on the Print tab. • Print Job History: The Job History list appears on the Print tab. -
Page 535: Copier Setting
Utility Copier setting Parameter Description Default Setting Auto Paper Select for Select whether copying is permitted Prohibit Copy Small Original when the “Auto Paper Select” setting is selected and either no original is placed on the original glass or the original placed on the original glass is too small for its size to be detected. - Page 536 Utility Parameter Description Default Setting When AMS Direction is Select whether or not printing continues Print Incorrect when the paper and document orienta- tions are different with the “Auto Paper Select” setting selected. • Print: The Zoom setting is automatically set and the copy is printed on paper of the specified size in the specified ori- entation.
- Page 537 Utility Note If the “Administrator Security Level” parameter in Administrator mode was set, [Auto Zoom (Platen)], [Auto Zoom (ADF)], [Select Tray when APS OFF], and [Select Tray for Insert Sheet] do not appear. If the “Administrator Security Level” parameter in Administrator mode was set to “Level 2”, [Print Jobs During Copy Operation] does not ap- pear.
-
Page 538: Scanner Setting
Utility Scanner setting Parameter Description JPEG Compression Specify settings for scanning. For details, refer to the Network Scan- Level ner Operations of the User’s Guide. Black Compression Level TWAIN Lock Time Printer setting Parameter Description Basic Setting Specify settings for printing. For details, refer to the Print Operations of the User’s Guide. - Page 539 Utility Touch [2 User Setting]. – An item can also be selected by pressing the key in the keypad for the number beside the desired button. For “2 User Setting”, press the [2] key in the keypad. The User Setting screen appears. Note To quit specifying the User mode setting, touch [Exit] in the sub display area or press the [Utility/Counter] key.
-
Page 540: Specifying Administrator Settings
Utility 12.4 Specifying administrator settings This section describes the main parameters and operations that can be per- formed after pressing the [Utility/Counter] key, then touching [3 Administra- tor Setting]. System setting Power Save Setting Parameter Description Default Setting Low Power Mode Set- Specify the desired length of time (be- 15 minutes ting... -
Page 541: Daylight Saving Time Setting
Utility Parameter Description Default Setting Offset by Each Job Set- Select whether or not printed copies are ting fed out shifted when “Offset” is selected while a finisher is installed. Pages are fed out shifted. OFF: Pages are fed out without being shifted. Reminder The “Output Tray Setting”... - Page 542 Utility Detail If the weekly timer is set, the machine will be turned on/off at the specified time. Settings can be specified to require a password in order to turn the machine on or to allow fax and print jobs to be received after the machine has been turned off by the timer.
-
Page 543: Expert Adjustment
Utility Expert Adjustment Parameter Description Default Setting AE Level Adjustment Set the initial value for auto exposure be- 2 (standard) tween 0 and 4. The higher the setting, the more that the original background is emphasized. Printer Ad- Leading Adjust the starting print position be- 0.0 mm justment Edge... - Page 544 Utility Parameter Description Default Setting Density Thick Pa- Adjust the image density for printing on Adjust- per Image thick paper, OHP, or envelopes. The ment Density– density can be adjusted separately for Yellow each color (yellow, magenta, cyan and black for a color image and the black im- Thick Pa- age density).
- Page 545 Utility Parameter Description Default Setting Gradation Copy Adjust the gradation if there are changes – Adjust- in the color gradations of the print image. ment The adjustment is made with stress on increasing the number of images stored in the memory. Printer Adjust the gradation if there are changes –...
- Page 546 Utility Detail For the procedure on adjusting the printer, refer to “Adjusting the printer” on page 12-50. For the procedure on adjusting the finisher, refer to “Adjusting the finish- er” on page 12-58. For the procedure on adjusting the color registration, refer to “Adjusting the color registration for yellow, magenta and cyan”...
- Page 547 Utility Parameter Description Default Setting When ac- Select whether or not the settings are re- Reset Reset count is set when the user has changed. changed This machine detects that the user has changed when the optional key counter has been removed or when the [Access] key is pressed after entering user au- thentication and account track informa- tion.
-
Page 548: Administrator/Machine Setting
Utility User Box Setting Parameter Description Default Setting Delete Unused User Box Specify settings for using boxes. For details, refer to the [Box Oper- ations of the User’s Guide]. Delete Secure Print Doc- uments Auto Delete Secure Doc- Specify settings for using boxes. For details, re- 1 day ument fer to the [Box Operations of the User’s Guide]. -
Page 549: One-Touch Registration
Utility One-Touch registration Parameter Description Scan Specify settings for scanning, faxing and using the boxes. For de- tails, refer to the Network Scanner Operations, Facsimile Opera- tions, Network Facsimile Operations and Box Operations of the User’s Guide. User Box One-Touch Registration The lists of abbreviated destinations, group destinations, program List destinations and titles/text can be printed to be checked. -
Page 550: General Settings
Utility User authentication/account track General Settings Description Default Setting Specify settings for user authentication and account track for con- User Authentication: trolling the use of this machine. OFF; Account Track: • User Authentication: Select either “ON (External Server)” or “ON (MFP)” as the user au- thentication method. - Page 551 Utility User Authentication Setting Parameter Description Default Setting Adminis- User Name Select whether or not a list of user trative Set- List names is displayed in the user authenti- ting cation screen. Default Operations that are possible with this Copy: Allow Function machine can be limited when authenti- Scan: Allow...
-
Page 552: Counter List
Utility Counter List Description Default Setting The use for each user or account can be checked. Tray 1 Network setting Parameter Description TCP/IP Setting Specify settings for using the network. For details, refer to the Net- work Scanner Operations of the User’s Guide. NetWare Setting http Server Setting FTP Setting... -
Page 553: Printer Setting
Utility Parameter Description Default Setting Select Tray when APS Select which paper tray is selected when Tray Before APS ON the “Auto Paper Select” setting is can- celed. • Tray Before APS ON: The paper tray that was being used before the “Auto Paper Select”... -
Page 554: System Connection
Utility Note [8 Fax Setting] appears only when fax kit FK-502 is installed or when In- ternet fax functions are available. System connection Parameter Description OpenAPI Setting Specify settings for using the network. For details, refer to the Net- work Scanner Operations of the User’s Guide. Call Remote Center Used by the administrator to call the center when CS Remote Care is connected. -
Page 555: Security Setting
Utility Security setting Administrator Password Description Default Setting The administrator password used to specify the Administrator mode 12345678 settings can be specified or changed. The administrator password can contain between 0 and 8 digits (characters). If the “Password Rules” parameter is set to “ON”, only an administrator password with 8 digits can be specified. -
Page 556: Security Details
Utility Security Details Parameter Description Default Setting Password Rules Select whether or not passwords are applied. Prohibit Functions when Select the operations that are prohibited if Mode 1 Auth. Error user authentication failed. • [Mode 1]: Operations cannot be performed for a fixed length of time. - Page 557 Utility Detail The operation of the “Prohibit Functions when Auth. Error” parameter is performed with the following passwords. User authentication passwords, account track passwords, box pass- words, passwords for confidential documents, and the administrator password If the control panel cannot be operated even after touching [Release] from the “Prohibit Functions when Auth.
- Page 558 Utility Parameter Description Default Setting Overwrite All Data Select this parameter to overwrite all data on Mode 1 the entire hard disk when returning or dispos- ing of this machine in order to prevent disclo- sure of the data. For details on the settings, refer to the [Box Operations of the User’s Guide].
- Page 559 Utility Detail When “Network Function Setting” is set to “Disable”, the following oper- ations cannot be performed. · PC-FAX transmission · Using the HDD TWAIN driver to view and retrieve documents in boxes · Using the PageScope Box Operator to view and retrieve documents in boxes ·...
-
Page 560: Displaying The Administrator Setting Screen
Utility Displaying the Administrator Setting screen The following procedure describes how to display the Administrator Setting Screen. Press the [Utility/Coun- ter] key. Utility/ Counter Touch [3 Administrator Setting]. – An item can also be selected by pressing the key in the keypad for the number beside the desired button. - Page 561 Utility Type in the administrator password, and then touch [OK]. For details on typing in text, refer to “Entering text” on page 13-2. The Administrator Setting screen appears. Note To quit specifying the Utility mode setting, touch [Exit] in the sub display area or press the [Utility/Counter] key.
-
Page 562: Overview Of Weekly Timer Settings
Utility 12.5 Overview of weekly timer settings Various weekly timer settings in the Weekly Timer Setting screen can be combined. A general procedure is described below. Requisite 0 If the weekly timer has been set, leave the machine plugged into the elec- trical outlet even if the machine has been turned off. -
Page 563: Adjusting The Printer
Utility 12.6 Adjusting the printer Adjusting the starting print position at the leading edge position The starting print position at the leading edge of each type of paper (with re- spect to the paper feed direction) can be adjusted. Adjustments can be specified for each paper type. 0 The starting print position is adjusted during manufacturing of the ma- chine. - Page 564 Utility Check that the distance from the starting print position of the test pat- tern to the edge of the paper (a) is 4.2 mm. a: 4.2 mm – If the distance is less than 4 mm, touch [+] to increase the ad- justment (between 0.2 mm and 3.0 mm).
-
Page 565: Adjusting The Starting Print Position At The Left Edge
Utility Adjusting the starting print position at the left edge The starting print position at the left edge of the paper (with respect to the paper feed direction) for each paper tray can be adjusted. Adjustments can be specified for each paper tray. 0 The starting print position is adjusted during manufacturing of the ma- chine. - Page 566 Utility Check that the distance from the starting print position of the test pat- tern to the edge of the paper (b) is 3 mm (± 0.5 mm). – If the distance is less than 2.5 mm, touch [+] to increase the adjust- ment (between 0.2 mm and 3.0 mm).
-
Page 567: Adjusting The Starting Print Position For The Second Side
Utility Adjusting the starting print position for the second side The starting print position at the left edge of the paper for the second side during automatic double-sided copying for each paper tray can be adjusted. 0 The starting print position is adjusted during manufacturing of the ma- chine. - Page 568 Utility Check that the distance from the starting print position of the test pat- tern to the left edge of the paper (c) is 3 mm c: 3.0 mm ± 0.5 mm (± 0.5 mm). – If the distance is less than 2.5 mm, touch [+] to increase the adjustment (between...
-
Page 569: Adjusting Printing According To The Media
Utility Adjusting printing according to the media The print image can be adjusted for each type of paper that is used. Display the Administrator Setting screen. – For details on displaying the Administrator Setting screen, refer to “Displaying the Administrator Setting screen” on page 12-47. Touch [1 System Setting]. - Page 570 Utility Touch [+] or [–] to adjust the setting between –5 and +5. An adjustment is possible if the size of the white areas in missing print or the white spots is 0.5 mm or less. – For missing print or white spots in the print image, touch [–] to reduce the adjust-...
-
Page 571: Adjusting The Finisher
Utility 12.7 Adjusting the finisher Detail For details on the “Fold & Staple” setting, refer to “To bind copies at the center (“Fold & Staple”)” on page 3-80. For details on specifying Punch settings, refer to “Punching holes in cop- ies (Punch settings)”... - Page 572 Utility Touch the buttons for the paper size and paper type to be adjusted. Compare the width of the left pages of the copy sample with the width of the right pages to check for the center of the paper. –...
-
Page 573: Adjusting The Center Stapling Position
Utility Note If the angle of the center folding position must be adjusted, contact your technical representative. Note Enter the value by mm using the keypad. Refer to the conversion rate below. 1 in. = 25.4 mm Adjusting the center stapling position The stapling position when printing with the “Center Staple”... - Page 574 Utility Touch [1 Center Staple Position]. The Center Staple Position screen appears. Touch the buttons for the paper size and paper type to be adjusted. Compare the width of the left pages of the copy sample with the width of the right pages to check for the center of the paper.
-
Page 575: Adjusting The Horizontal Punch Position
Utility The center stapling position is adjusted. If the stapling position was at the center of the paper in step 7, this completes the procedure. Use the “Fold & Staple” function to print a another sample copy. Check the print result. –... - Page 576 Utility Touch [3 Finisher Adjustment]. The Finisher Adjustment screen appears. Touch [3 Punch Horizontal Position]. The Punch Horizontal Position screen appears. Touch the button for the paper type to be adjusted. Check the horizontal po- sition of the punched holes. –...
-
Page 577: Adjusting The Angle Of Punched Holes
Utility Touch [OK]. – To cancel changes to the settings, touch [Cancel]. The punch horizontal position is adjusted. If no adjustment of the horizontal position of the punched holes was necessary in step 7, this completes the procedure. Use the “Punch” function to print a another sample copy. Check the print result. - Page 578 Utility Touch [4 Punch Resist Loop Size]. The Punch Resist Loop Size screen appears. Check the angle of the punched holes. – If the punched holes are angled, touch [+] to change the adjust- ment. If the angle cannot be adjusted by touching [+] or if the paper is wrinkled, touch [–] to change the adjustment.
-
Page 579: Adjusting The Color Registration
Utility 12.8 Adjusting the color registration Adjusting the color registration for yellow, magenta and cyan Adjust the color registration if color shifts can be seen in the print result. Color shifts can be adjusted with normal paper, thick paper 1 or thick paper 2. - Page 580 Utility Check the distance from the reference black lines to the cyan lines in the test pattern along the X and Y directions. – If the lines are shifted in the X direction as shown below, touch [–] under “X” to re- duce the adjustment (between –1 dot and –6 dots).
- Page 581 Utility – If the lines are shifted in the Y direction as shown below, touch [–] under “Y” to re- duce the adjustment (between –1 dot and –6 dots). – If the lines are shifted in the Y direction as shown below, touch [+] under “Y”...
-
Page 582: Adjusting The Gradation Levels
Utility 12.9 Adjusting the gradation levels Adjust the gradation levels if there are changes in the color gradations of the print image. The following color gradation adjustments can be performed. - [Copy]: The adjustment is made with stress on increasing the number of images stored in the memory. - Page 583 Utility Touch the button for the mode to be adjusted. Press the [Start] key. A test pattern is printed. 12-70 C300...
- Page 584 Utility Place the printed test pattern on the original glass. – Be sure to load the paper in the orientation shown on the screen. Place on top of the test pattern 10 or more sheets of blank paper of the same size as the printed test pattern page.
-
Page 585: 12.10 Authentication Method
Utility 12.10 Authentication method User authentication and account track settings can be specified to limit the use of this machine. User authentication settings are specified to manage in- dividuals, and account track settings are specified to manage groups and multiple users. By specifying both user authentication and account track settings, the number of prints made by each group can be managed for each individual user. -
Page 586: When User Authentication And Account Track Are Synchronized
Utility When user authentication and account track are synchronized User 1 Account Group A User 2 Group B This setup is used when the machine is used by multiple departments and the use by each employee is managed by each department. With this setup, totals can be maintained on each employee (each user) and on each depart- ment (each account). -
Page 587: When User Authentication And Account Track Are Used Separately
Utility When user authentication and account track are used separately User 1 Account Group A Group B User 2 Group C This setup is used when the machine is used by multiple employees with each employee performing multiple duties, which are to be totaled separate- ly. -
Page 588: To Select An Authentication Method
Utility To select an authentication method Display the Administrator Setting screen. – For details on displaying the Administrator Setting screen, refer to “Displaying the Administrator Setting screen” on page 12-47. Touch [4 User Authentication/Account Track]. The User Authentication/Account Track screen appears. Touch [1 General Settings]. - Page 589 Utility Beside “Account Track Input Method”, touch the button for the desired setting. – To allow this machine to be used after the account name and pass- word are entered in the account track screen, touch [Account Name & Password]. –...
- Page 590 Utility Beside “# of Counters Assigned for Users”, specify the desired setting. – Press the [C] (clear) key to erase the value, and then use the keypad to specify the desired value (between 1 and 999). – If user authentication and account track settings have been ap- plied, counters can be assigned to both accounts and users, and counts for both can be totaled.
- Page 591 Utility Detail For details on external server authentication, refer to the [Network Scan- ner Operations of the User’s Guide]. If both user authentication and account track settings have been applied, “Account Track Input Method” is set to “Account Name & Password”. A public user can be set to provide temporary access to this machine.
-
Page 592: 12.11 User Authentication Setting
Utility 12.11 User authentication setting User authentication settings can be specified. Administrative setting—user name list User authentication settings can be specified to display [List] in the user au- thentication screen and the User Name screen. Touch [List] to display a list of registered user names from which the desired user name can simply be selected. -
Page 593: Default Function Permission
Utility Note To limit machine use by authorized users, specify settings in the User Registration screen. Default function permission If external server authentication was selected, limitations can be placed on the machine functions that can be used by an authorized user. (The default setting is “Allow”.) The following operations can be limited. - Page 594 Utility Touch the buttons for the desired settings. Touch [OK]. The default function permissions are set. Note To limit machine use by authorized users, specify settings in the User Registration screen. If “Print Scan / Fax From Box” setting is used to scan or fax a document saved in a box, printing of the document can be prevented.
-
Page 595: Authenticating Public Users
Utility Authenticating public users If user authentication settings have been specified and public user access is permitted, the authentication screen does not appear when logging on if “Public User Key” is set to “Do Not Display”. (The default setting is “Do Not Display”.) Display the Administrator Setting screen. -
Page 596: User Registration
Utility User registration The password, printing permissions, number of prints allowed, and function permissions can be specified for each user of this machine. As an example, the following procedure describes how to register a user with authentication performed by the machine. 0 A total of 1,000 users and accounts can be registered on this machine. - Page 597 Utility Type in the user name (up to 64 characters), and then touch [OK]. – For details on typing in text, refer to “Entering text” on page 13-2. – Once a user name is registered, it cannot be changed. – A user name that has already been registered cannot be used again.
- Page 598 Utility Touch the button for the desired account, and then touch [OK]. The account is set. – Before an account name can be selected, accounts must have been registered. For details on registering accounts, refer to “Ac- count track registration” on page 12-91. Touch [Output Permission].
- Page 599 Utility Touch [Total Allowance] or [Individual Allowance]. – To specify the maximum number of combined color and black prints allowed, touch [Total Allowance]. – To separately specify the maximum number of color and black prints allowed, touch [Individual Allowance]. Touch [No Limit] or [Limit]. Using the keypad, type in the maximum number allowed.
- Page 600 Utility Touch the button for the desired setting for each operation. – To permit the operation to be performed, touch [Allow]. – To prohibit the operation to be performed, touch [Restrict]. – Touch [All Users] to apply the settings in the current screen to all registered users.
-
Page 601: User Counter
Utility User counter This function is used to check the following data for each user. Copy + Print This count shows the total number of copies and printouts made. - Total: Shows the total number of copies and printouts made using all Color settings, the “Black”... -
Page 602: To Check The Counter
Utility Note Counting automatically continues with user counters for external server authentication. If “Public User Access” on the General Settings screen was set to “Al- low”, “public” is added to the list of counters. If “User Box Admin.” was set to “Allow”, “Box Admin” is added to the list of counters. - Page 603 Utility – To clear the counters for the current user, touch [Clear Counter] in the User Counter screen for the current user. A confirmation mes- sage appears, asking whether the counter should be cleared. To clear the counters for the current user, touch [Yes]. The maximum number allowed is not cleared.
-
Page 604: 12.12 Account Track Setting
Utility 12.12 Account track setting Note A total of 1,000 users and accounts can be registered on this machine. Account track registration The password, printing permissions, and number of prints allowed can be specified for each account using this machine. The following procedure describes how to specify accounts when “Account Track Input Method”... - Page 605 Utility Touch the button for the desired account. The Account Track Registration screen appears. If “Account Name & Password” was selected: If “Password Only” was selected: Touch [Account Name]. The Account Name screen appears. Type in the account name (up to 8 characters), and then touch [OK]. –...
- Page 606 Utility Touch [Password]. – If “Account Track Input Method” was set to “Password Only”, the same password cannot be registered more than once. The Password screen appears. Type in the password (up to 8 characters), and then touch [OK]. A screen for retyping the password appears. Retype the password specified in step 9, and then touch [OK].
- Page 607 Utility Touch [OK]. The output permissions are set. Touch [Max. Allowance Set]. The Max. Allowance Set screen appears. Touch [Total Allowance] or [Individual Allowance]. – To specify the maximum number of combined color and black prints allowed, touch [Total Allowance]. –...
-
Page 608: Account Track Counter
Utility Account track counter This function is used to check the following data for each account. Copy + Print This count shows the total number of copies and printouts made. - Total: Shows the total number of copies and printouts made using all Color settings, the “Black”... -
Page 609: To Check The Counter
Utility Note If “User Box Admin.” was set to “Allow” and only account track settings have been specified, “Box Admin” appears at the end of the list of counters. To check the counter Display the Administrator Setting screen. – For details on displaying the Administrator Setting screen, refer to “Displaying the Administrator Setting screen”... - Page 610 Utility – To clear the counters for all accounts, touch [Reset All Counters] in the Account Track Counter screen containing a list of all accounts. A confirmation message appears, asking whether the counters should be cleared. To clear the counters for all accounts, touch [Yes].
-
Page 611: 12.13 Password Rules
Utility 12.13 Password rules If password rules are applied and already specified passwords do not meet the password rules, those passwords are not accepted when they are en- tered. In that case, the administrator should temporarily turn off the pass- word rules, then specify the passwords according to the following conditions. - Page 612 Utility Note Use the administrator password when specifying settings on the Admin- istrative Setting screen. Use the user password/account password when user authentication/ac- count track settings have been applied. For details on the “User Box Password” and “Password for the confiden- tial document”, refer to the Box Operations of the User’s Guide.
-
Page 613: 12.14 Enhanced Security Settings
Utility 12.14 Enhanced security settings When enhanced security setting is applied on this machine, various security settings are also changed in order to increase security when managing scan data. Restrictions are applied to user operations, public user access is pro- hibited, and box operations and print jobs are limited. - Page 614 Utility Detail If “Account Track” is set to “ON” in the General Settings screen, set “Ac- count Track Input Method” to “Account Name & Password”. If “Password Only” is selected, the setting for “Prohibit Functions When Auth. Error” is not changed, even when “Enhanced Security Mode” is set to “ON”. [SSL] appears when a certificate is issued from PageScope Web Con- nection.
- Page 615 Utility Note The number of times for checking for “Prohibit Functions When Auth. Er- ror” can be changed to between 1 and 3. A changed setting cannot be changed when “Enhanced Security Mode” is set to “OFF”. When “Password Rules” is set to “ON”, a password that does not meet the password rules is considered a failed attempt during authentication.
-
Page 616: 12.15 Viewing The Status Of The Consumables
Utility 12.15 Viewing the status of the consumables This section describes the information that can be viewed after pressing the [Utility/Counter] key, then touching [4 Check Consumable Life]. From the Unit Life Indicator screen, the status (usage level) of the following consumables can be viewed. - Page 617 Utility Touch [4 Check Consumable Life]. – An item can also be selected by pressing the key in the keypad for the number beside the desired button. For “Check Consumable Life”, press the [4] key in the keypad. The Unit Life Indicator screen appears. –...
-
Page 618: Appendix
Appendix... -
Page 619: Entering Text
Appendix Appendix 13.1 Entering text The following procedure describes how to use the keyboard that appears in the touch panel for typing in the names of registered accounts and custom paper sizes. The keypad can also be used to type in numbers. Any of the following keyboards may appear. - Page 620 Appendix Touching [Shift] switches the keyboard display between lowercase letters (numbers) and uppercase letters (symbols). C300 13-3...
-
Page 621: To Type Text
Appendix To type text Touch the button for the desired character from the keyboard that ap- peared. – To type in uppercase letters or symbols, touch [Shift]. – Numbers can also be typed in with the keypad. The entered characters appear in the text box. Note To cancel changes to the settings, touch [Cancel]. -
Page 622: Glossary
Appendix 13.2 Glossary The words used in Copy mode are described below. Abbreviation Automatic document feeder; Can be used to automatically scan the original AE Level Adjustment Set this parameter to adjust the background of the original. The higher the setting, the more that the original background is emphasized. - Page 623 Appendix Change Tray Settings Touch this button to specify a paper size not loaded in a paper tray or to copy on paper other than normal paper. Chapters Set this function to specify chapter title pages that must be printed on the front side of the paper when printing double-sided copies.
- Page 624 Appendix Fold & Staple Set this function to fold the copies in half and staple them together at the center. Finishing Select from the settings that are available for sorting and finishing copies when they are fed into the finishing tray. Glossy Select this setting for an improved glossy finish of images.
- Page 625 Appendix Minimal Select this setting to produce a copy with the original image slightly reduced. Mirror Image Set this function to produce a copy in the mirror image of the original. Mixed Original Select this setting to detect the size of each original page and print a copy on paper of the appropriate size when an original with different page sizes is loaded together into the ADF.
- Page 626 Appendix Saturation Set this parameter to adjust the degree of vividness of the colors in the im- age. Save in User Box Temporarily saves the job on the hard disk so that it can later be recalled and used again Sharpness Set this parameter to emphasize the edges of text so that they can be read more easily.
-
Page 627: Index
Appendix 13.3 Index Numerics Chapters ........8-16 Checking jobs ........ 11-2 1-sided/2-sided print ..... 3-48 Cleaning ......... 10-2 Clearing a paper misfeed in a paper/media tray ......5-12 Accessibility mode ......4-23 Account track ....2-40 12-37 Clearing a paper misfeed in the ADU .......... - Page 628 Appendix Date/time stamp ......8-68 Held jobs ........11-11 Default settings ......12-21 Help menu ......4-17 4-20 Deleting a printing/reserved job ..11-6 Help screens ......4-17 4-22 Deleting a stopped/reserved job ... 3-85 Hole-punch waste ......9-26 Density settings ....3-58 3-59 Hole-punching .......
- Page 629 Appendix Managing jobs ....... 11-2 Paper misfeed ..5-5 5-11 5-12 5-16 5-17 5-19 5-23 Margin setting ...... 3-24 8-59 Paper misfeed location ....5-7 Memory full ........5-61 Paper settings ......3-34 Message display time ....4-28 Paper size setting ....3-36 7-11 Messages ........
- Page 630 Appendix Toner cartridge ........ 9-2 Touch panel adjustment ....4-33 Saddle stitcher SD-503 ....2-13 Tray 1 ......2-5 2-43 5-12 Safety information ......1-2 Tray 2 ......2-5 2-47 5-15 Sample copy ........4-5 Tray 3 ......2-5 2-47 5-16 Saturation ....x-30 x-39 8-54 Tray 4 ......2-5...
- Page 631 Appendix 13-14 C300...
- Page 632 G This manual was printed using 100% post-consumer recycled paper. G This manual was printed with soy ink. http://konicaminolta.com Printed in China Copyright 9J06-9968-22 2006. 7 2006...