Table of Contents
Advertisement
Quick Links
Advertisement
Table of Contents

Related Manuals for Juniper 200 Series


Summary of Contents for Juniper 200 Series
- Page 1 -200 S CREEN ERIES User’s Guide Version 5.0 P/N 093-1253-000 Rev. C...
-
Page 2: Copyright Notice
NetScreen-Global PRO, NetScreen-Global PRO Express, NetScreen-Remote Security Client, NetScreen-Remote VPN Client, NetScreen-IDP 10, NetScreen-IDP 100, NetScreen-IDP 500, GigaScreen ASIC, GigaScreen-II ASIC, and NetScreen ScreenOS are trademarks of Juniper Networks, Inc. All other trademarks and registered trademarks are the property of their respective companies. -
Page 3: Table Of Contents
Chapter 3 Configuring the Device ... 15 Operational Modes ...16 Transparent Mode ... 16 Route Mode... 16 The NetScreen-200 Series Device Interfaces ...17 Connecting the Device as a Single Security Gateway ...18 Connectivity Examples ... 18 Performing Device Connection ... 19 Establishing an HA Connection Between Devices ...20... - Page 4 Contents Establishing a Terminal Emulator Connection... 22 Changing Your Admin Name and Password ... 23 Setting Port and Interface IP Addresses ... 23 Configuring the Device for Telnet and WebUI Sessions ...25 Starting a Console Session Using Telnet ... 25 Starting a Console Session Using Dialup ...
-
Page 5: Preface
400 Mbps • The NetScreen-208, which has eight 10/100 Base-T interface ports and performs firewall functions at 550 Mbps All NetScreen-200 Series 10/100 Base-T ports perform auto-speed sensing and auto- polarity correction. UIDE RGANIZATION This manual has three chapters and one appendix. -
Page 6: Command Line Interface (Cli) Conventions
Although you can use this shortcut when entering commands, all the commands documented here are presented in their entirety. UNIPER ETWORKS To obtain technical documentation for any Juniper Networks NetScreen product, visit www.juniper.net/techpubs/. For technical support, open a support case using the Case Manager link at www.juniper.net/support/ 9500 (outside the United States). -
Page 7: Chapter 1 Overview
Chapter 1 Overview This chapter provides detailed descriptions of the NetScreen-200 Series system devices and their components. Topics in this chapter include: • “NetScreen-200 Systems” on page 2 – “NetScreen-204 Device” on page 2 – “NetScreen-208 Device” on page 2 •... -
Page 8: Netscreen-200 Systems
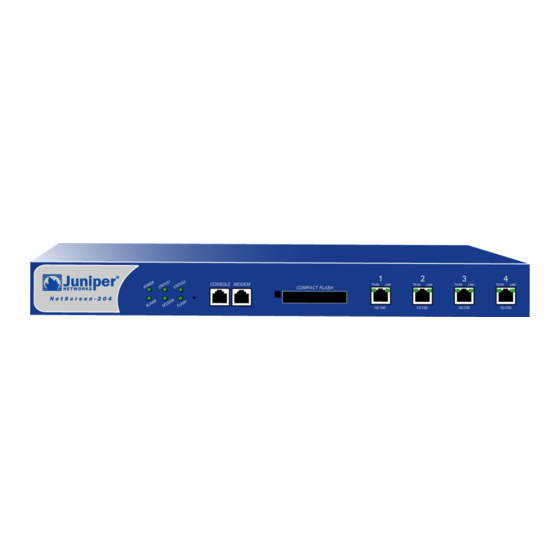
Chapter 1 Overview -200 S CREEN This NetScreen-200 Series currently includes the NetScreen-204 device and the NetScreen-208 device. NetScreen-204 Device The NetScreen-204 is a chassis-based, rack-mountable network security device with four ethernet 10/100 Base-T interface ports. The figure below shows a NetScreen-204 device. -
Page 9: The Front Panel
A Compact Flash Card Slot • Ethernet interfaces System Status LED Display The front panel of each NetScreen-200 Series device has a System Status display, which contains six LEDs. Power LED Alarm LED The information revealed by each LED is as follows:... -
Page 10: Asset Recovery Pinhole
Chapter 1 Overview Alarm System Alarm Status Session Utilization Flash Memory Card Status Asset Recovery Pinhole The Asset Recovery Pinhole is a button that resets the device to its original default settings. To use this button, insert a stiff wire (such as a straightened paper clip) into the pinhole. -
Page 11: Console And Modem Ports
Clear To Send Ring Indicator Compact Flash Card Slot The NetScreen-200 Series supports CompactFlash capacities. NetScreen has tested SanDisk 96MB and 512MB cards. The NetScreen device automatically detects the presence of a flash card and records the system log to it. -
Page 12: Ethernet Interfaces
LED indicates an active network link. Network Traffic: Blinking = link activity ANEL The figure below shows the rear panel of a NetScreen-200 Series device (with an AC power supply). Note: Certain export restrictions may apply to international customers. Check with your sales representative. -
Page 13: Power Fuse
Power Fuse Each NetScreen-200 Series device uses a 2.5 Amp, slow-blow power fuse rated for 250 Volts. To replace a fuse on a NetScreen-200 Series device: Take the device off-line by turning the power switch OFF and disconnecting the power cable. - Page 14 Chapter 1 Overview User’s Guide...
-
Page 15: Chapter 2 Installing The Device
For safety warnings and instructions, please refer to the NetScreen Safety Guide. The instructions in this guide warn you about situations that could cause bodily injury. Before working on any equipment, be aware of the hazards involved with electrical circuitry and be familiar with standard practices for preventing accidents. NetScreen-200 Series... -
Page 16: General Installation Guidelines
NetScreen device in a locked-room environment. ERFORMING QUIPMENT Although you can install a NetScreen-200 Series device on a desktop, it is advisable to install the device in an equipment rack if possible. Equipment Rack Installation Guidelines The location of the chassis and the layout of your equipment rack or wiring room are crucial for proper system operation. -
Page 17: Front Mount
Front mount • Mid-mount Front Mount To front mount the NetScreen-200 Series device on your equipment rack: Screw the front mount bracket to the side of the chassis. Screw the front mount bracket to the rack, as shown below. Mid-Mount To mid-mount the NetScreen-200 Series device on your equipment rack: Screw the mid-mount bracket to the side of the chassis. -
Page 18: Wiring Adc Power Supply
Connect the other end of the grounding lug wire to a grounding point at your site. NetScreen-200 Series devices can operate on one or two feeds. To connect DC power feeds to the terminal blocks: Strip the ends of the power cables. -
Page 19: Connecting The Netscreen-200 Device To Other Devices
The default IP address of each ethernet interface is 0.0.0.0/0. For information on interfaces and security zones, see Interfaces” on page NetScreen-200 Series Connecting the NetScreen-200 Device to Other Devices -200 D CREEN EVICE TO “The NetScreen-200 Series Device THER... - Page 20 Chapter 2 Installing the Device User’s Guide...
-
Page 21: Chapter 3 Configuring The Device
Chapter 3 Configuring the Device This chapter describes how to perform initial configuration on a NetScreen-200 Series device once you have mounted it in a rack or desktop, plugged in the necessary cables, then turn the power ON. Topics in this chapter include: •... -
Page 22: Operational Modes
Chapter 3 Configuring the Device PERATIONAL ODES The NetScreen-200 Series device supports two device modes: Transparent mode and Route mode. The default mode is Route. Transparent Mode In Transparent mode, the NetScreen-200 device operates as a Layer-2 bridge. Because the device cannot translate packet IP addresses, it cannot perform Network Address Translation (NAT). -
Page 23: The Netscreen-200 Series Device Interfaces
Each NetScreen-200 device provides ethernet interfaces for access and connectivity. In addition, there are logical (non-physical) interfaces that perform special Layer-2 or management functions. Console Port Console Port The configurable interfaces available on a NetScreen-200 Series device are as follows: Interface Type Description Ethernet interfaces Layer-2 interfaces... -
Page 24: Connecting The Device As A Single Security Gateway
Chapter 3 Configuring the Device ONNECTING THE There are many ways to connect a NetScreen-200 Series device to your network system. In most cases, the device serves as a single security gateway that protects at least one LAN (usually connected to the device from a switch or a hub). -
Page 25: Performing Device Connection
The default vlan1 IP address and subnet mask of these interfaces is 192.168.1.1/24. Note: If you have multiple NetScreen-200 Series devices, install and configure them one at a time. Because they all share the same default vlan1 IP address and subnet mask (192.168.1.1/24), you might encounter IP address conflicts. -
Page 26: Establishing An Ha Connection Between Devices
For the NetScreen-204, the default HA interface is ethernet4. For the NetScreen-208, the default HA interface is ethernet8. (Each is bound to the HA security zone.) The following diagram shows a typical HA setup for NetScreen-208 devices. Router Layer-3 Switch 1 Device 1 To ethernet1 Switch 3 ONNECTION... - Page 27 If you have changed the port and interface configurations, the instructions below might not work properly. To cable two NetScreen-200 Series devices together for HA and connect them to the network: (Optional) Install the NetScreen-200 Series devices in an equipment rack (see “Equipment Rack Installation Guidelines”...
-
Page 28: Performing Initial Connection And Configuration
(Be sure that the DB-9 is seated properly by screwing in the thumbscrews.) Plug the RJ-45 end of the cable into the Console port of the NetScreen-200 Series device. (Be sure that the RJ-45 clip snaps into the port and is seated properly.) -
Page 29: Changing Your Admin Name And Password
To begin the configuration process, it is advisable to view existing port settings by executing the following command: get interface This command displays current port names, IP addresses, Zones, MAC addresses, and other useful information. NetScreen-200 Series Performing Initial Connection and Configuration... -
Page 30: Setting The Ip Address Of The Management Interface
Setting the IP Address for the Untrust Zone Interface The NetScreen-200 Series device usually communicates with external devices through an interface bound to the Untrust zone (such as ethernet3). To allow an interface to communicate with external devices, you must assign it a public IP address. -
Page 31: Allowing Outbound Traffic
Allowing Outbound Traffic By default, the NetScreen-200 Series device does not allow inbound or outbound traffic, nor does it allow traffic to or from the DMZ. To permit (or deny) traffic, you must create access policies. The following CLI command creates an access policy that permits all kinds of outbound traffic, from any host in your trusted LAN to any device on the untrusted network. -
Page 32: Starting A Console Session Using Dialup
To prevent any automatic termination, specify a value of 0. Starting a Console Session Using Dialup Each NetScreen-200 Series device provides a modem port that allows you to establish a remote console session using a dialup connection through a 9600 bps modem cabled to the modem port. - Page 33 The NetScreen WebUI application window appears. Note: NetScreen-Security Manager 2004 (NSM) and NetScreen Rapid Deployment (RD): If you are using NSM, you can optionally configure NetScreen appliances with RD. Refer to the Rapid Deployment Getting Started Guide for more information. NetScreen-200 Series...
-
Page 34: Asset Recovery
Chapter 3 Configuring the Device SSET ECOVERY If you lose the admin password, you can use one of the following procedures to reset the NetScreen device to its default settings. This destroys any existing configurations, but restores access to the device. Warning: Resetting the device will delete all existing configuration settings, and the firewall and VPN service will be rendered inoperative. -
Page 35: Using The Asset Recovery Pinhole To Reset The Device
“Configuration Erasure Process aborted.” The status LED returns to blinking green. If the unit did not reset, an SNMP alert is sent to confirm the failure. NetScreen-200 Series Asset Recovery “The Front Panel” on... - Page 36 Chapter 3 Configuring the Device User’s Guide...
- Page 37 Appendix A Specifications This appendix provides general system specifications for the NetScreen-200 Series devices. • “NetScreen-200 Attributes” on page A-II • “Electrical Specification” on page A-II • “Environmental” on page A-II • “Safety Certifications” on page A-II • “EMI Certifications” on page A-II...
-
Page 38: Appendix A Specifications
-200 A CREEN Height:1.73 inches (4.4 cm) Depth:10.8 inches (27.4 cm) Width:17.5 inches (44.5 cm) Weight: 8 pounds (36 hg) LECTRICAL PECIFICATION AC voltage:100-240 VAC +/- 10% DC voltage:-36 to -60 VDC AC Watts:45 Watts DC Watts:50 Watts Fuse Rating:2.5Amps / 250Volts NVIRONMENTAL Temperature Normal altitude... -
Page 39: Index
5, 22, 23, DC power supply, wiring dialup connection guide organization high availability, establishing an HA connection installation guidelines NetScreen-200 Series IP address, conflicts LEDs link lights 6, logging on login, changing management port, setting an IP address... - Page 40 session establishing using a dialup connection IX-II transparent mode ventilation viewing port settings Index User’s Guide...