Table of Contents
Advertisement
Quick Start Guide
EX4650 Switch Quick Start Guide
IN THIS GUIDE
System Overview | 1
System Overview
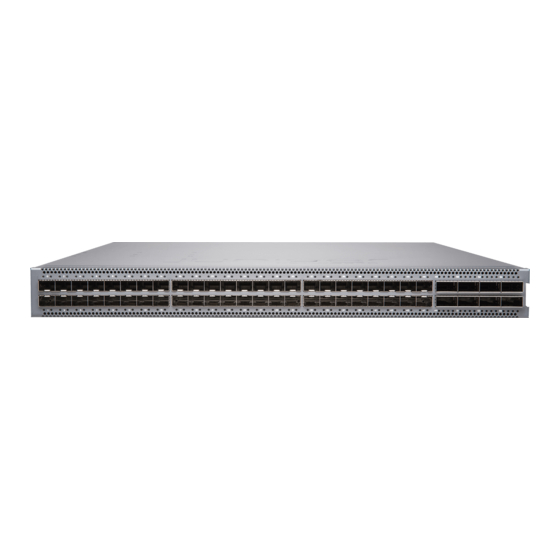
The EX4650 line of Ethernet switches delivers high scale, high availability, and high performance for campus distribution
deployments. Featuring 48 wire-speed 10-Gigabit Ethernet/25 Gigabit Ethernet small form-factor pluggable and pluggable
plus transceiver (SFP/SFP+/SFP28) ports and 8 wire-speed 40 Gigabit Ethernet/100 Gigabit Ethernet quad SFP+ transceiver
(QSFP+/QSP28) ports in a compact platform, the EX4650 provides the flexibility to support mixed environments. The
EX4650 switches run standard Junos operating system (OS). QFX5120-48Y switches also support virtual chassis technology.
You can interconnect up to two EX4650-48Y switches in a EX4650-48Y virtual chassis.
The EX4650-48Y switch offers 48 small-form factor pluggable (SFP+) ports that operate at 1-Gbps, 10-Gbps, and
25-Gbps speeds along with 8 quad small form-factor pluggable (QSFP28) ports that operate at 40-Gbps (with QSFP+
transceivers) and 100-Gbps speeds (with QSFP28 transceivers).
Advertisement
Table of Contents

Related Manuals for Juniper EX4650


Summary of Contents for Juniper EX4650
-
Page 1: Table Of Contents
Contacting Juniper Networks | 13 System Overview The EX4650 line of Ethernet switches delivers high scale, high availability, and high performance for campus distribution deployments. Featuring 48 wire-speed 10-Gigabit Ethernet/25 Gigabit Ethernet small form-factor pluggable and pluggable plus transceiver (SFP/SFP+/SFP28) ports and 8 wire-speed 40 Gigabit Ethernet/100 Gigabit Ethernet quad SFP+ transceiver (QSFP+/QSP28) ports in a compact platform, the EX4650 provides the flexibility to support mixed environments. -
Page 2: Tools And Parts Required For Installation
NOTE: By default, the EX4650-48Y switch offers 10-Gbps speed. You need to configure to set 1-Gbps and 25-Gbps speeds. Eight 100-Gigabit Ethernet ports that can operate at 40-Gbps or 100-Gbps speed and support QSFP+ or QSFP28 transceivers. When these ports operate at 40-Gbps speed, you can configure four 10-Gbps interfaces and connect breakout cables, increasing the total number of supported 10-Gbps ports to 80. -
Page 3: Part 1: Install A Power Supply
Register product serial numbers on the Juniper Networks website and update the installation base data if there is any addition or change to the installation base or if the installation base is moved. Juniper Networks will not be held accountable for not meeting the hardware replacement service-level agreement for products that do not have registered serial numbers or accurate installation base data. -
Page 4: Part 2: Install A Fan Module
Figure 1 Figure Figure 1: Installing an AC Power Supply in the EX4650 Switch Figure 2: Installing a DC Power Supply in the EX4650 Switch 1. If the power supply slot has a cover panel on it, loosen the captive screws on the cover panel by using your fingers or the screwdriver. -
Page 5: Part 3: Mount The Switch On Four Posts Of A Rack
Part 3: Mount the Switch on Four Posts of a Rack You can mount an EX4650 switch on four posts of a 19-in. rack or an ETSI rack. This guide describes the procedure to mount the switch on a 19-in. rack. - Page 6 4. Attach the brackets to the chassis by using the mounting screws. Tighten the screws (see Figure Figure 4: Attaching Front-Mounting Brackets to the EX4650-48Y Chassis 5. Position the mounting brackets along the side panels of the chassis aligning them with the front panel side.
-
Page 7: Part 4: Connect Power To The Switch
Figure 6: Connecting the Rear-Mounting Brackets to the EX4650 Switch 9. Secure the rear-mounting brackets to the rear posts by using the screws appropriate for your rack. 10. Ensure that the chassis is level by verifying that all the screws on the front posts of the rack are aligned with the screws on the rear posts of the rack. - Page 8 To connect power to an AC-powered switch (see Figure Figure 7: Connecting Power to a EX4650 Switch Powered by AC Power Supply 1. Push the end of the retainer strip into the hole next to the inlet on the power supply faceplate until it snaps into place.
- Page 9 To connect power to a DC-powered EX4650-48Y switch (see Figure Figure 8: Connecting Power to a EX4650 Switch Powered by DC Power Supply The DC power supply has terminals labeled V-, V–, V+, and V+ for connecting DC power source cables labeled positive (+) and negative (–).
-
Page 10: Part 5: Perform Initial Configuration
Figure 9: Connecting Power to a DC-Powered QFX5120-48Y Switch Part 5: Perform Initial Configuration 1. Before you begin, set the following parameter values in the console server or PC: Baud rate—9600 Flow control—none Data—8 Parity—none Stop bits—1 DCD state—disregard 2. Connect the console port on the rear panel of the switch to a laptop or PC by using the RJ-45 to DB-9 serial port adapter. - Page 11 0 family inet address address/prefix-length NOTE: The management ports em0 (C0) and em1 (C1) are located on the rear panel of the EX4650-48Y switch. 9. (Optional) Configure the static routes to remote prefixes with access to the management port.
-
Page 12: Guidelines For Using Ex4650 Rma Replacement Chassis
Junos OS for EX Series software image in the /var/tmp directory. You must change the personality of the device to EX4650 beore performing the initial configuration. Use the console port to connect to the switch to change the personality of the switch. -
Page 13: Contacting Juniper Networks
Metal objects heat up when connected to power and ground and can cause serious burns or become welded to the terminals. Power Cable Warning (Japanese) The attached power cable is only for this product. Do not use this cable for another product. Contacting Juniper Networks For technical support, see http://www.juniper.net/support/requesting-support.html. - Page 14 Juniper Networks, the Juniper Networks logo, Juniper, and Junos are registered trademarks of Juniper Networks, Inc. in the United States and other countries. All other trademarks, service marks, registered marks, or registered service marks are the property of their respective owners. Juniper Networks assumes no responsibility for any inaccuracies in this document. Juniper Networks reserves the right to change, modify, transfer, or otherwise revise this publication without notice.