Table of Contents
Advertisement
Quick Links
Download this manual
See also:
User Manual
Advertisement
Table of Contents

Related Manuals for Draytek VigorFly 210


Summary of Contents for Draytek VigorFly 210
- Page 2 VigorFly 210 Wi-Fi Router User’s Guide Version: 1.0 Firmware Version :V1.XXXX Date: 12/10/2011 VigorFly 210 Series User’s Guide...
-
Page 3: Copyright Information
Web registration is preferred. You can register your Vigor router via Owner http://www.draytek.com. Firmware & Tools Due to the continuous evolution of DrayTek technology, all routers will be regularly Updates upgraded. Please consult the DrayTek web site for more information on newest firmware, tools and documents. -
Page 4: European Community Declarations
Product: VigorFly 210 Series Router DrayTek Corp. declares that VigorFly 210 is in compliance with the following essential requirements and other relevant provisions of R&TTE Directive 1999/5/EEC. The product conforms to the requirements of Electro-Magnetic Compatibility (EMC) Directive 2004/108/EC by complying with the requirements set forth in EN55022/Class B and EN55024/Class B. -
Page 5: Table Of Contents
3.3 NAT ............................56 3.3.1 Port Redirection ......................57 3.3.2 DMZ Host........................60 3.3.3 Session Limit ........................61 3.4 Firewall ..........................61 3.4.1 DoS Defense ........................62 3.4.2 MAC/IP/Port Filtering ...................... 63 3.4.3 System Security......................64 VigorFly 210 Series User’s Guide... - Page 6 3.11 Support Area ........................127 Trouble Shooting ..................129 4.1 Checking If the Hardware Status Is OK or Not..............129 4.2 Checking If the Network Connection Settings on Your Computer Is OK or Not ....130 VigorFly 210 Series User’s Guide...
- Page 7 4.4 Checking If the ISP Settings are OK or Not ................ 133 4.5 Forcing Vigor Router into TFTP Mode for Performing the Firmware Upgrade ....133 4.6 Backing to Factory Default Setting If Necessary ..............136 4.7 Contacting Your Dealer ....................... 136 VigorFly 210 Series User’s Guide...
-
Page 9: Preface
VigorFly 210 is a compact broadband router with 802.11n WLAN network. Its Ethernet WAN port can connect to VDSL/VDSL2/GPON/G.SHDSL /ADSL2+/ADSL/cable modem while you have fixed line. The NAT throughput can easily manage time-critical multimedia streaming. It's easy for family or friends to hook up PCs via embedded 10/100 Ethernet LAN switch to enjoy multimedia applications. -
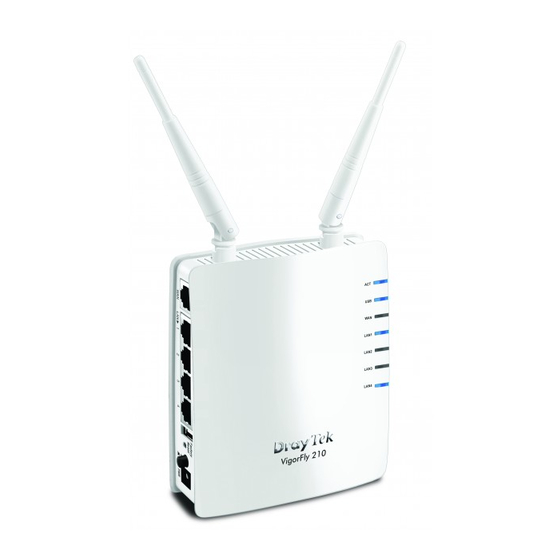
Page 10: Led Indicators And Connectors
Restore the default settings. Usage: Turn on the router. Press the button and keep for more than 10 seconds. Then the router will restart with the factory default configuration. ON/OFF: Power switch. PWR: Connecter for a power adapter. VigorFly 210 Series User’s Guide... -
Page 11: Hardware Installation
(For the detailed information of LED status, please refer to section 1.1.) Note: To get a better WiMAX signal, please use a USB extension cable to connect USB WiMAX dongle to Vigor router for increasing the distance between Vigor router and the dongle. VigorFly 210 Series User’s Guide... -
Page 12: Printer Installation
You can install a printer onto the router for sharing printing. All the PCs connected this router can print documents via the router. The example provided here is made based on Windows XP/2000. For Windows 98/SE/Vista, please visit www.draytek.com. Before using it, please follow the steps below to configure settings for connected computers (or wireless clients). - Page 13 Open File->Add a New Computer. A welcome dialog will appear. Please click Next. Click Local printer attached to this computer and click Next. In this dialog, choose Create a new port Type of port and use the drop down list to select Standard TCP/IP Port. Click Next. VigorFly 210 Series User’s Guide...
- Page 14 In the following dialog, type 192.168.1.1 (router’s LAN IP) in the field of Printer Name or IP Address and type IP_192.168.1.1 as the port name. Then, click Next. Click Standard and choose Generic Network Card. Then, in the following dialog, click Finish. VigorFly 210 Series User’s Guide...
- Page 15 11. Select "LPR" on Protocol, type p1 (number 1) as Queue Name. Then click OK. Next please refer to the red rectangle for choosing the correct protocol and UPR name. VigorFly 210 Series User’s Guide...
- Page 16 Note 1: Some printers with the fax/scanning or other additional functions are not supported. If you do not know whether your printer is supported or not, please visit www.draytek.com to find out the printer list. Open Support >FAQ; find out the link of Printer Server and click it;...
-
Page 17: Basic Settings
The web page can be logged out according to the chosen condition. The default setting is Auto Logout, which means the web configuration system will logout after 5 minutes without any operation. Change the setting for your necessity. VigorFly 210 Series User’s Guide... -
Page 18: Changing Password
Type new user name in the field of Account and new password in the field of Password. Then click OK to continue. Now, the password has been changed. Next time, use the new username / password to access the Web Configurator of this router. VigorFly 210 Series User’s Guide... -
Page 19: Quick Start Wizard
The first screen of Quick Start Wizard is welcome page, please click Next. The first screen of Quick Start Wizard is entering login account and password. After typing a new password, please click Next. VigorFly 210 Series User’s Guide... -
Page 20: Setting Up The Time And Date
On the next page as shown below, please select the appropriate connection type according to the information from your ISP. There are several types offered in this page. Each connection type will bring out different web page. VigorFly 210 Series User’s Guide... - Page 21 USB Modem (LTE/WiMAX) installed. For example, you live in Taiwan and have a WiMAX modem inserted onto VigorFly 210. You can choose Taiwan (Global Mobile) to configure necessary settings and then surf the Internet easily.
- Page 22 After finishing the settings here, please click Next. If you want to access Internet by 3G USB modem, choose this mode as the protocol and type the required information in this web page. Available parameters are listed below: Item Description VigorFly 210 Series User’s Guide...
- Page 23 If you have a public subnet, you could assign an IP address or many IP address to the WAN interface. Available parameters are listed below: Item Description IP Address Type the IP address. Subnet Mask Type the subnet mask. VigorFly 210 Series User’s Guide...
- Page 24 It is not necessary for you to type any IP address manually. Simply choose this type and the system will obtain the IP address automatically from DHCP server. Available parameters are listed below: Item Description Router Name Default setting is VigorFly210. After finishing the settings here, please click Next. VigorFly 210 Series User’s Guide...
- Page 25 Connect On Demand - If the connection has been idled over the value, the router will drop the connection. Idle Time - Set the timeout for breaking down the Internet after passing through the time without any action. The unit is VigorFly 210 Series User’s Guide...
- Page 26 Idle Time - Set the timeout for breaking down the Internet after passing through the time without any action. The unit is seconds. The range is XX ~ XX. VigorFly 210 Series User’s Guide...
-
Page 27: Setting Up The Internet Connection For Wan2
Cipher Suite respectively. Contact your dealer/service provide to obtain the correct information. Later, click Next. Available parameters are listed below: Item Description Access Mode Choose a suitable mode for WAN2 interface. Service Provider Choose the possible option according to the location of the router installed. VigorFly 210 Series User’s Guide... -
Page 28: Setting Up The Wireless Connection
Keep the default setting will be better. Such item is required for WiMAX USB Modem. After finishing the settings here, please click Next. Now, you have to set up the wireless connection. Available parameters are listed below: VigorFly 210 Series User’s Guide... - Page 29 SSID It means the identification of the wireless LAN. SSID can be any text numbers or various special characters. The default SSID is "DrayTek". We suggest you to change it. Mode Choose the wireless mode for this router. Each encryption mode will bring out different web page and ask you to offer additional configuration.
- Page 30 This randomly generated key that is periodically replaced. Enter the renewal security time (seconds) in the column. Smaller interval leads to greater security but lower performance. Default is 3600 seconds. Set 0 to disable re-key. VigorFly 210 Series User’s Guide...
- Page 31 Set to zero to perform another authentication immediately after the first authentication has successfully completed. (The unit is second.) Idle Timeout Set the maximum time that a wireless device may remain idle. (The unit is second.) VigorFly 210 Series User’s Guide...
- Page 32 Set to zero to perform another authentication immediately after the first authentication has successfully completed. (The unit is second.) Set the maximum time that a wireless device may remain Idle Timeout idle. (The unit is second.) VigorFly 210 Series User’s Guide...
- Page 33 IEEE 802.11i specification, the pre-four-way-handshake can reduce handoff delay perceivable by a mobile node. It makes roaming faster and more secure. (Only valid in WPA2) Enable - Enable IEEE 802.1X Pre-Authentication. Disable - Disable IEEE 802.1X Pre-Authentication. VigorFly 210 Series User’s Guide...
- Page 34 Select TKIP, AES or TKIP/AES as the algorithm for WPA. Key Renewal Interval WPA uses shared key for authentication to the network. However, normal network operations use a different encryption key that is randomly generated. This randomly VigorFly 210 Series User’s Guide...
-
Page 35: Saving The Wizard Configuration
After finishing the settings here, please click Next. Now you can see the following screen. It indicates that the setup is complete. Different types of connection modes will have different summary. Click Finish and then restart the router. VigorFly 210 Series User’s Guide... -
Page 36: Online Status
WAN Status - Displays the IP address of the WAN interface. GW IP - Displays the IP address of the default gateway. Mode - Displays the type of WAN connection (e.g., PPPoE). Up Time VigorFly 210 Series User’s Guide... -
Page 37: Saving Configuration
Each time you click OK on the web page for saving the configuration, you can find messages showing the system interaction with you. Ready indicates the system is ready for you to input settings. Settings Saved means your settings are saved once you click Finish or OK button. VigorFly 210 Series User’s Guide... -
Page 38: Registering Vigor Router
User Name / Password. Click Support Area>>Production Registration from the home page. A Login page will be shown on the screen. Please type the account and password that you created previously. And click Login. VigorFly 210 Series User’s Guide... - Page 39 (it appears when you click on the box of Registration Date). After adding the basic information for the router, please click Submit. When the following page appears, your router information has been added to MyVigor database. VigorFly 210 Series User’s Guide...
- Page 40 Click OK. Now, you have finished the product registration. VigorFly 210 Series User’s Guide...
-
Page 41: Advanced Web Configuration
Hence, the NIC has reserved certain addresses that will never be registered publicly. These are known as private IP addresses, and are listed in the following ranges: VigorFly 210 Series User’s Guide... - Page 42 3G USB Modem can be used as backup device. Therefore, when WAN is not available, the router will use 3G USB Modem for supporting automatically. The supported 3G USB Modem will be listed on DrayTek web site. Please visit www.draytek.com for more detailed information.
-
Page 43: Internet Access
To meet the request in bandwidth / rate for data transmission via wireless connection, VigorFly 210 offers 4G USB Modem to satisfy requirements for different countries. Also, it can be used as a backup device by configured with WAN2, and will be invoked instead whenever WAN1 connection is not available due to unexpected error. - Page 44 IP Address: Type the IP address. Subnet Mask: Type the subnet mask. Gateway IP Address: Type the gateway IP address. DNS Server IP Address Primary DNS Server - You must specify a DNS server IP VigorFly 210 Series User’s Guide...
- Page 45 MAC Address Clone checked. The router will detect the MAC address automatically. The result will be displayed in the field of MAC Address. After finishing all the settings here, please click OK to activate them. VigorFly 210 Series User’s Guide...
- Page 46 When you choose Connect on Demand, you have to type value here. IPTV WAN VigorFly 210 supports IPTV application (traditional television channel, movie or VoD service) through the second WAN IP under PPPoE connection mode.
- Page 47 MAC Address Clone checked. The router will detect the MAC address automatically. The result will be displayed in the field of MAC Address. After finishing all the settings here, please click OK to activate them. VigorFly 210 Series User’s Guide...
- Page 48 WAN IP Network obtain the IP address automatically. Settings Specify an IP address – Click this radio button to specify some data. IP Address – Type the IP address. Subnet Mask – Type the subnet mask. VigorFly 210 Series User’s Guide...
- Page 49 If your router connects to a 3G modem and you want to access Internet via 3G modem, choose 3G as connection type and type the required information in this web page. Available parameters are listed below: Item Description VigorFly 210 Series User’s Guide...
- Page 50 After finishing all the settings here, please click OK to activate them. If your router connects to a 4G modem and you want to access Internet via 4G modem, choose 4G as connection type and type the required information in this web page. VigorFly 210 Series User’s Guide...
- Page 51 Such item is required for WiMAX USB Modem. Cipher Suite –There are two encryption methods offered for you to choose as cipher suite. Keep the default setting will be better. Such item is required for WiMAX USB Modem. VigorFly 210 Series User’s Guide...
- Page 52 IP address in this field for pinging. TTL (Time to Live) – Displays value for your reference. TTL value is set by telnet command. After finishing all the settings here, please click OK to activate them. VigorFly 210 Series User’s Guide...
- Page 53 IP address in this field for pinging. TTL (Time to Live) – Displays value for your reference. TTL value is set by telnet command. After finishing all the settings here, please click OK to activate them. VigorFly 210 Series User’s Guide...
- Page 54 PPP Username - Type the PPP username (optional). PPP Password - Type the PPP password (optional). It means Max Transmit Unit for packet. The default setting is 1442. After finishing all the settings here, please click OK to activate them. VigorFly 210 Series User’s Guide...
- Page 55 Username Type the user name acquired from the service provider. Such item is required for WiMAX USB Modem. Password Type the password acquired from the service provider. Such item is required for WiMAX USB Modem. VigorFly 210 Series User’s Guide...
- Page 56 ISPs. Such item is required for LTE USB Modem. It means Max Transmit Unit for packet. The default setting is 1360. After finishing all the settings here, please click OK to activate them. VigorFly 210 Series User’s Guide...
-
Page 57: Multi-Vlan
Add Tag To identify the usage of VLAN, check this box to invoke this setting. And type the number for VLAN ID (number). After finishing all the settings here, please click OK to save the configuration. VigorFly 210 Series User’s Guide... - Page 58 LAN port for channel 2 to 7. Check the box to designate the SSID for channel 2 to 7. SSID1 to SSID3 When you finish the configuration, please click OK to save and exit this page. VigorFly 210 Series User’s Guide...
-
Page 59: Lan
IP address. As a part of the public subnet, the Vigor router will serve for IP routing to help hosts in the public subnet to communicate with other public hosts or servers outside. Therefore, the router should be set as the gateway for public hosts. VigorFly 210 Series User’s Guide... -
Page 60: General Setup
RIP. This page provides you the general settings for LAN. Click LAN to open the LAN settings page and choose General Setup. VigorFly 210 Series User’s Guide... - Page 61 Primary DNS Address - You must specify a DNS server IP address here because your ISP should provide you with usually more than one DNS Server. If your ISP does not provide it, the router will automatically apply default DNS VigorFly 210 Series User’s Guide...
-
Page 62: Static Route
Netmask - Type the netmask for such routing rule if you choose Net as Range setting. Gateway - Type the gateway address for such routing rule. Interface - Choose WAN or LAN as the interface for such route. VigorFly 210 Series User’s Guide... -
Page 63: Bind Ip To Mac
Click this radio button to disable this function. All the settings on this page will be invalid. Strict Bind Click this radio button to block the connection of the IP/MAC which is not listed in IP Bind List. VigorFly 210 Series User’s Guide... -
Page 64: Nat
Enhance security of the internal network by obscuring the IP address. There are many attacks aiming victims based on the IP address. Since the attacker cannot be aware of any private IP addresses, the NAT function can protect the internal network. VigorFly 210 Series User’s Guide... -
Page 65: Port Redirection
Display the private IP address of the internal host. Display the private port of the internal host. Local Port Comment Display the brief description for such profile. Status Display if the profile is enabled (v) or not (x). VigorFly 210 Series User’s Guide... - Page 66 Press any number under Index to access into next page for configuring port redirection. Available settings are explained as follows: Item Description Enable Check this box to enable such Port Redirection profile. VigorFly 210 Series User’s Guide...
- Page 67 Specify the private port number of the service offered by the internal host. Comment Type a brief description for such profile if required. The Maximum length is 23–character long. After finishing all the settings here, please click OK to save the configuration. VigorFly 210 Series User’s Guide...
-
Page 68: Dmz Host
DMZ Settings Check this box to enable the DMZ Host function. DMZ IP Address Enter the private IP address of the DMZ host. After finishing all the settings here, please click OK to save the configuration. VigorFly 210 Series User’s Guide... -
Page 69: Session Limit
Also the Vigor router monitors the traffic. Any abnormal traffic flow violating the pre-defined parameter, such as the number of thresholds, is identified as an attack and the Vigor router will activate its defense mechanism to mitigate in a real-time manner. Below shows the menu items for Firewall. VigorFly 210 Series User’s Guide... -
Page 70: Dos Defense
Check the box to activate the Port Scan detection. Whenever detecting this malicious exploration behavior, the Vigor router will send out a warning. VigorFly 210 Series User’s Guide... -
Page 71: Mac/Ip/Port Filtering
MAC Address - Type the MAC address for the router. Settings Dest IP Address - Type the destination IP address for applying such rule. Source IP Address - Type the source IP address for applying such rule. VigorFly 210 Series User’s Guide... -
Page 72: System Security
With Web filtering service of the Vigor router, you can protect your business from common primary threats, such as productivity, legal liability, network and security threats. For parents, you can protect your children from viewing adult websites or chat rooms. VigorFly 210 Series User’s Guide... - Page 73 Open Firewall>>Content Filtering to access into the following page. Available parameters are listed below: Item Description Web Content Filter At present, there are three content filters offered here for VigorFly 210 Series User’s Guide...
-
Page 74: Csm
With Web filtering service of the Vigor router, you can protect your business from common primary threats, such as productivity, legal liability, network and security threats. For parents, you can protect your children from viewing adult websites or chat rooms. VigorFly 210 Series User’s Guide... - Page 75 192.168.1.10/255.255.255.255 to indicate a single IP) to be filtered by WCF mechanism. Display the license information for current used. License Information If the WCF mechanism has been activated successfully, a green light will be shown on the screen. VigorFly 210 Series User’s Guide...
- Page 76 1. Click the Activate link from Web-Filter License to activate WCF service. 2. A Login page will be shown on the screen. Please type the account and password that you created previously. And click Login. VigorFly 210 Series User’s Guide...
- Page 77 It allows you to transfer the Vigor device together with applied license to someone who has already registered another account in myvigor.draytek.com. Be sure to press this button to transfer the product to whom you want to give. Otherwise he/she might not be able to maintain the license hooked up to the Vigor device.
- Page 78 5. When this page appears, click Register. 6. Next, when the registration is completed. You will get the following screen. 7. Return to web configuration of VigorFly 210. 8. Refresh the page of CSM>>Web Content Filter. A green circle appears next to the link of License Information. It means the WCF license is valid.
-
Page 79: Applications
If you choose None, such function will be disabled. Domain name Type in one domain name that you applied previously. Use the drop down list to choose the desired domain. Username Type in the login name that you set for applying domain. VigorFly 210 Series User’s Guide... -
Page 80: Spanning Tree
The UPnP (Universal Plug and Play) protocol is supported to bring to network connected devices the ease of installation and configuration which is already available for directly connected PC peripherals with the existing Windows 'Plug and Play' system. For NAT routers, VigorFly 210 Series User’s Guide... - Page 81 NAT router. The application will also learn the external IP address and configure port mappings on the router. Subsequently, such a facility forwards packets from the external ports of the router to the internal ports used by the application. VigorFly 210 Series User’s Guide...
-
Page 82: Schedule
The clock will reset once if you power down or reset the router. There is another way to set up time. You can inquiry an NTP server (a time server) on the Internet to synchronize the router’s clock. This method can only be applied when the WAN connection has been built up. VigorFly 210 Series User’s Guide... - Page 83 Auto Reboot – The vigor system will reboot automatically according to such schedule profile. Acts Specify the duration (or period) for the schedule. Once -The schedule will be applied just once. Routine -Specify which days in one week should perform the schedule. VigorFly 210 Series User’s Guide...
-
Page 84: Wireless Lan
Complete Security Standard Selection: To ensure the security and privacy of your wireless communication, we provide several prevailing standards on market. VigorFly 210 Series User’s Guide... - Page 85 /or privacy on your wireless network. The Vigor wireless router is very flexible and can support multiple secure connections with both WEP and WPA at the same time. Below shows the menu items for Wireless LAN. VigorFly 210 Series User’s Guide...
-
Page 86: General Setup
Enable Wireless LAN Check the box to enable wireless function. Mode At present, the router can connect to, 11g Only, 11b Only, 11n Only, Mixed (11g+11n), Mixed (11b+11g), Mixed (11b+11g+11n) stations simultaneously. Simply choose Mixed (11b+11g+11n) mode. VigorFly 210 Series User’s Guide... - Page 87 This feature can enhance the performance in data transmission about 40%* more (by checking Tx Burst). It is active only when both sides of Access Point and Station (in wireless client) invoke this function at the same time. VigorFly 210 Series User’s Guide...
-
Page 88: Security
This page allows you to set security with different modes for SSID 1, 2 and 3 respectively. After configuring the correct settings, please click OK to save and invoke it. By clicking the Security Settings, a new web page will appear so that you could configure the settings. VigorFly 210 Series User’s Guide... - Page 89 Available settings are explained as follows: Item Description There are several modes provided for you to choose. Mode Disable The encryption mechanism is turned off. Accepts only WEP clients and the encryption key should be entered in WEP Key. VigorFly 210 Series User’s Guide...
- Page 90 ASCII characters or 10 hexadecimal values in 64-bit encryption level, or restricted to 13 ASCII characters or 26 hexadecimal values in 128-bit encryption level. The allowed content is the ASCII characters from 33(!) to 126(~) except '#' and ','. VigorFly 210 Series User’s Guide...
- Page 91 The built-in RADIUS client feature enables the router to assist the remote dial-in user or a wireless station and the RADIUS server in performing mutual authentication. It enables centralized remote access authentication for network management. VigorFly 210 Series User’s Guide...
- Page 92 RADIUS server settings. Click the link of RADIUS Server to access into the following page for more settings. Available settings are explained as follows: Item Description IP Address Enter the IP address of RADIUS server. VigorFly 210 Series User’s Guide...
- Page 93 This randomly generated key that is periodically replaced. Enter the renewal security time (seconds) in the column. Smaller interval leads to greater security but lower performance. Default is 3600 seconds. Set 0 to disable re-key. VigorFly 210 Series User’s Guide...
- Page 94 Session Timeout Set the maximum time of service provided before re-authentication. Set to zero to perform another authentication immediately after the first authentication has successfully completed. (The unit is second.) VigorFly 210 Series User’s Guide...
- Page 95 With the pre-authentication procedure defined in IEEE 802.11i specification, the pre-four-way-handshake can reduce handoff delay perceivable by a mobile node. It makes roaming faster and more secure. (Only valid in WPA2) Enable - Enable IEEE 802.1X Pre-Authentication. VigorFly 210 Series User’s Guide...
- Page 96 Session Timeout Set the maximum time of service provided before re-authentication. Set to zero to perform another authentication immediately after the first authentication has successfully completed. (The unit is second.) VigorFly 210 Series User’s Guide...
- Page 97 (seconds) in the column. Smaller interval leads to greater security but lower performance. Default is 3600 seconds. Set 0 to disable re-key.? RADIUS Server Guide you to access into next pop-up window to configure RADIUS server settings. VigorFly 210 Series User’s Guide...
-
Page 98: Access Control
MAC address that has been configured can access the wireless LAN interface. By clicking the Access Control, a new web page will appear, as depicted below, so that you could edit the clients' MAC addresses to control their access rights (deny or allow). VigorFly 210 Series User’s Guide... -
Page 99: Wps
Start PBC button or using PIN Code. On the side of VigorFly 210 series which served as an AP, press WPS button once on the front panel of the router or click Start PBC on web configuration interface. On the side of a... - Page 100 If you want to use PIN code, you have to know the PIN code specified in wireless client. Then provide the PIN code of the wireless client you wish to connect to the vigor router. Available settings are explained as follows: Item Description Enable WPS Check this box to enable WPS setting. VigorFly 210 Series User’s Guide...
-
Page 101: Wds
Provide bridge traffic between two LANs through the air. Extend the coverage range of a WLAN. To meet the above requirement, two WDS modes are implemented in Vigor router. One is Bridge, the other is Repeater. Below shows the function of WDS-bridge interface: VigorFly 210 Series User’s Guide... - Page 102 In the following examples, hosts connected to Bridge 1 or 3 can communicate with hosts connected to Bridge 2 through WDS links. However, hosts connected to Bridge 1 CANNOT communicate with hosts connected to Bridge 3 through Bridge 2. VigorFly 210 Series User’s Guide...
- Page 103 Choose the mode for WDS setting. Disable mode will not invoke any WDS setting. Bridge Mode is designed to fulfill the first type of application. Repeater Mode is for the second one. Security There are several types for security, Disabled, WEP, VigorFly 210 Series User’s Guide...
- Page 104 Phy Mode There are three types of transmission rates developed by different techniques for Phy Mode. Data will be transmitted via communication channel. After finishing all the settings here, please click OK to save the configuration. VigorFly 210 Series User’s Guide...
-
Page 105: Universal Repeater
Type the MAC address of the Access Point that VigorFly 210 wants to connect to. Security Mode There are several modes provided for you to choose. Each mode will bring up different parameters (e.g., WEP keys, Pass Phrase) for you to configure. VigorFly 210 Series User’s Guide... - Page 106 128-bit encryption level. The allowed content is the ASCII characters from 33(!) to 126(~) except '#' and ','. Available settings are explained as follows: Item Description Encryption Type Select TKIP or AES as the algorithm for WPA. VigorFly 210 Series User’s Guide...
-
Page 107: Ap Discovery
It displays the statistics for the channels used by APs. Channel Statistics AP’s MAC Address If you want the found AP applying the WDS settings, please type in the AP’s MAC address. VigorFly 210 Series User’s Guide... - Page 108 Click Bridge or Repeater for the specified AP. Next, click Add. Later, the MAC address of the AP will be added and be shown on WDS settings page. After finishing all the settings here, please click OK to save the configuration. VigorFly 210 Series User’s Guide...
-
Page 109: Wmm Configuration
CWMin or equals to CWMin value. Both values will influence the time delay for WMM accessing categories. The difference between AC_VI and AC_VO categories must be smaller; however, the difference between AC_BE and AC_BK categories must be greater. VigorFly 210 Series User’s Guide... -
Page 110: Station List
AP. Encrypt Display the encryption mode used by the wireless client. Refresh Click this button to refresh the status of station list. Add to Access Control Client’s MAC Address - For additional security of VigorFly 210 Series User’s Guide... -
Page 111: Ipv6
Link Local address is used for communicating with neighbouring nodes on the same link. It is defined by the address prefix fe80::/10. You don't need to setup Link-Local address manually for it is generated automatically according to your MAC Address. VigorFly 210 Series User’s Guide... - Page 112 Type your IPv6 address prefix length here. Gateway IPv6 Server Type your IPv6 gateway address here. Primary DNS Server Type your IPv6 primary DNS Server address here. Secondary DNS Server Type your IPv6 secondary DNS Server address here. VigorFly 210 Series User’s Guide...
- Page 113 IPv6-in-IPv4 Tunnel- Let the broker chose the tunnel mode appropriate for the client. IPv6-in-IPv4 (Native) - Request an IPv6 in IPv4 tunnel. IPv6-in-IPv4 (NAT Traversal - Request an IPv6 in UDP of IPv4 tunnel (for clients behind a NAT). VigorFly 210 Series User’s Guide...
-
Page 114: Ipv6 Lan Setup
RADVD - The router advertisement daemon (radvd) sends Router Advertisement messages, specified by RFC 2461, to a local Ethernet LAN periodically and when requested by a node sending a Router Solicitation message. These messages are required for IPv6 stateless auto-configuration. VigorFly 210 Series User’s Guide... -
Page 115: Ipv6 Routing
Display the routing status. Interface Display the interface name (eth0, eth1, fp, etc..) that used to transfer packets with addresses matching the prefix. After finishing all the settings here, please click OK to save the configuration. VigorFly 210 Series User’s Guide... -
Page 116: Tspc Status
When the router detects all the information, the screen will be shown as follows. One set of TSPC prefix and prefix length will be obtained after the connection between TSPC and Tunnel broker built. VigorFly 210 Series User’s Guide... - Page 117 When the router connects to the tunnel broker, the router will use RADVD to transmit the prefix to the PC on LAN. Next, the PC will generate one set of IPv6 public IP (see the figure below). Users can use such IP for connecting to IPv6 network. VigorFly 210 Series User’s Guide...
- Page 118 When your PC obtains the IPv6 address, please connect to http://www.ipv6.org. If your PC access Internet via IPv6 connection, your IPv6 address will be shown on the web page immediately. Refer to the following figure. VigorFly 210 Series User’s Guide...
-
Page 119: System Maintenance
Each item is explained as follows: Item Description Model Display the model name of the router. Firmware Version Display the firmware version of the router. Build Date/Time Display the date and time of the current firmware build. VigorFly 210 Series User’s Guide... - Page 120 Default Gateway - Display the gateway address of the WAN interface. Primary DNS - Display the specified primary DNS setting. Secondary DNS - Display the specified secondary DNS setting. IPv6 Address - Display the IPv6 address of the WAN1. VigorFly 210 Series User’s Guide...
-
Page 121: 113
VigorACS}:8080/ACSServer/services/UnAuthACSSer vlet Username/Password - Type username and password for ACS Server for authentication. For example, if you want to use such CPE with VigorACS, you can type as the following: Username: acs VigorFly 210 Series User’s Guide... -
Page 122: Administration Password
Password Type in new password in this filed. When you click OK, the login window will appear. Please use the new login name and password to access into the web configurator for admin operation again. VigorFly 210 Series User’s Guide... -
Page 123: User Password
1. Open System Maintenance>>User Password. 2. Check the box of Enable User Mode for simple web configuration to enable user mode operation. Type a new password in the field of New Password and click OK. VigorFly 210 Series User’s Guide... - Page 124 4. The following window will be open to ask for username and password. Type the new user password in the filed of Password and click Login. 5. The main screen with User Mode will be shown as follows. VigorFly 210 Series User’s Guide...
-
Page 125: Configuration Backup
Click Backup button to get into the following dialog. Click Save button to open another dialog for saving configuration as a file. In Save As dialog, the default filename is config.cfg. You could give it another name by yourself. VigorFly 210 Series User’s Guide... - Page 126 Click Restore button and wait for few seconds, the following picture will tell you that the restoration procedure is successful. Note: If the file you want to restore has been encrypted, you will be asked to type the encrypted key before clicking Restore. VigorFly 210 Series User’s Guide...
-
Page 127: Syslog/Mail Alert
Password - Type the password for authentication. Enable E-mail Alert - Check the box of User Login to send alert message to the e-mail box while the router detecting the item(s) you specify here. Click OK to save these settings. VigorFly 210 Series User’s Guide... -
Page 128: Time And Date
Network Information, select the network adapter used to connect to the router. Otherwise, you won’t succeed in retrieving information from the router. It allows you to specify where the time of the router should be inquired from. VigorFly 210 Series User’s Guide... -
Page 129: Management
List IP - Indicate an IP address allowed to login to the router. Subnet Mask - Represent a subnet mask allowed to login to the router. Management Port Setting Specify user-defined port numbers for the Telnet and HTTP VigorFly 210 Series User’s Guide... -
Page 130: Reboot System
Note that this example is running over Windows OS (Operating System). Download the newest firmware from DrayTek's web site or FTP site. The DrayTek web site is www.draytek.com (or local DrayTek's web site) and FTP site is ftp.draytek.com. -
Page 131: Diagnostics
Display the gateway IP address of the routing. Display the routing status. Flags Interface Display the interface name (eth0, eth1, fp, etc..) that used to transfer packets with addresses matching the prefix. Comment Display the brief explanation for the routing. VigorFly 210 Series User’s Guide... -
Page 132: System Log
Display the IP address assigned by this router for specified MAC Address Display the MAC address for the specified PC that DHCP assigned IP address for it. Display the leased time of the specified PC. Expire Time Refresh Click it to reload the page. VigorFly 210 Series User’s Guide... -
Page 133: Connection Graph
Click Diagnostics and click Data Flow Monitor to open the web page. You can click IP Address, TX rate, RX rate or Session link for arranging the data display. Each item is explained as follows: Item Description VigorFly 210 Series User’s Guide... -
Page 134: Ping Diagnosis
Type in the IP address of the Host/IP that you want to ping. Click this button to start the ping work. The result will be displayed on the screen. Clear Click this link to remove the result on the window. VigorFly 210 Series User’s Guide... -
Page 135: Support Area
When you click the menu item under Support Area, you will be guided to visit www.draytek.com and open the corresponding pages directly. Click Support Area>>Application Note, the following web page will be displayed. Click Support Area>>FAQ, the following web page will be displayed. - Page 136 Click Support Area>>Product Registration, the following web page will be displayed. Refer to section 2.6 Registering Vigor Router for detailed information. VigorFly 210 Series User’s Guide...
-
Page 137: Trouble Shooting
Turn on the router. Make sure the ACT LED blink once per second and the correspondent LAN LED is bright. If not, it means that there is something wrong with the hardware status. Simply back to “1.3 Hardware Installation” to execute the hardware installation again. And then, try again. VigorFly 210 Series User’s Guide... - Page 138 Go to Control Panel and then double-click on Network Connections. Right-click on Local Area Connection and click on Properties. Select Internet Protocol (TCP/IP) and then click Properties. VigorFly 210 Series User’s Guide...
- Page 139 Double click on the current used Mac OS on the desktop. Open the Application folder and get into Network. On the Network screen, select Using DHCP from the drop down list of Configure IPv4. VigorFly 210 Series User’s Guide...
-
Page 140: Pinging The Router From Your Computer
Open the Application folder and get into Utilities. Double click Terminal. The Terminal window will appear. Type ping 192.168.1.1 and press [Enter]. If the link is OK, the line of “64 bytes from 192.168.1.1: icmp_seq=0 ttl=255 time=xxxx ms” will appear. VigorFly 210 Series User’s Guide... -
Page 141: Checking If The Isp Settings Are Ok Or Not
Make sure the computer can ping Vigor's LAN IP. ( Default IP is 192.168.1.1 ) Run Router Tools >> Firmware Upgrade Utility. Input Vigor's LAN IP manually or use the . . .button to select. Indicate the firmware location. VigorFly 210 Series User’s Guide... - Page 142 10. Input the Password if you have set one, then click Send. 11. There is a bar showing the upgrading process. 12. When the firmware upgrade is successful, the following window will pop up. VigorFly 210 Series User’s Guide...
- Page 143 Transfer Abort ! appears, please check if the firmware you download is correct for your Vigor router. Note: Please turn off the Firewall protection while upgrading the firmware with Windows Vista. The Firewall function can be turned off via Control Panel >> Security Center >> Firewall. VigorFly 210 Series User’s Guide...
-
Page 144: Backing To Factory Default Setting If Necessary
If the router still cannot work correctly after trying many efforts, please contact your dealer for further help right away. For any questions, please feel free to send e-mail to support@draytek.com. VigorFly 210 Series User’s Guide...