Table of Contents
Advertisement
Quick Links
Advertisement
Table of Contents

Related Manuals for DigiTech GNX2


Summary of Contents for DigiTech GNX2
- Page 1 UITAR ROCESSOR ’ UIDE...
- Page 2 Warning For your protection, please read the following: Water and Moisture: Appliances should not be used near water (e.g. near a bathtub, washbowl, kitchen sink, laundry tub, in a wet basement, or near a swimming pool, etc.) Care should be taken so that objects do not fall and liquids are not spilled into the enclosure through openings.
- Page 3 7.The foregoing is in lieu of all other warranties, expressed or implied, and DigiTech neither assumes nor authorizes any per- son to assume any obligation or liability in connection with the sale of this product. In no event shall DigiTech or its dealers be liable for special or consequential damages or from any delay in the performance of this warranty due to causes beyond their control.
-
Page 5: Table Of Contents
Adjust the Red Channel Parameters ..30 About the GNX2 ......9 Tune the Cabinets (optional) . -
Page 7: Introduction
All of this power lets you create a sound that is your own. In addition to designing models, the GNX2 has a library full of studio quality effects. -
Page 8: Quick Start
Turn the OUTPUT knob on the rear panel of the GNX2 all the way down (fully counter clockwise). Connect the plug of the PSS3 power supply to the POWER jack on the GNX2. Connect the other end of the PSS3 power supply to an AC outlet and turn the GNX2 POWER switch on. Turn your amplifier(s) on, and adjust the volume(s) to a normal playing level. -
Page 9: A Guided Tour Of The Gnx2
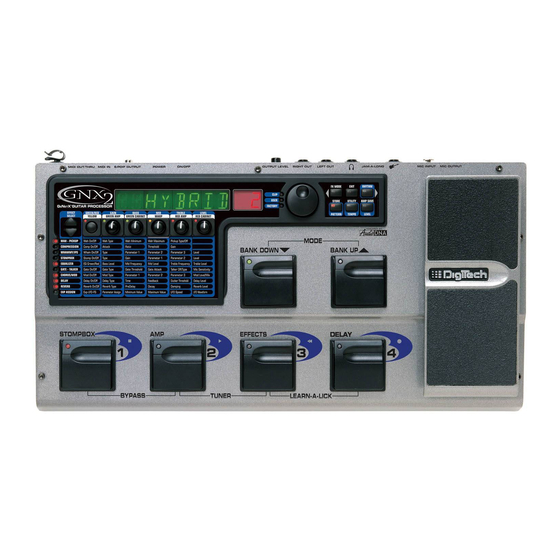
Introduction A Guided Tour of the GNX2 The Front Panel 1. Footswitches 1- 4 Depending on the selected mode, these 4 footswitches select presets, change amp channels, and turn individual effects on and off. Bypass, accesses the Tuner, or controls Learn-A-Lick functions. - Page 10 8. Mode Buttons These 6 buttons select GNX2 modes of operation. The Exit button is only used to exit a function, while the other 5 buttons perform dual functions dependent on the selected mode of operation. The buttons are labeled as follows: FX MODE - The FX Mode button assigns footswitches 1-4 to presets within a selected Bank, or tog- gles individual effects in a selected preset on and off.
- Page 11 10. Expression Pedal The Expression Pedal controls effect parameters in real time. Most GNX2 parameters can be assigned to the Expression Pedal. Applying extra pressure to the toe of the Expression Pedal switches...
-
Page 12: The Rear Panel
Connect only the provided DigiTech PSS3 power supply to this jack. 11. S/PDIF Output This is the GNX2’s digital output . The signal at this output is in a stereo digital format, and is to be connected to a digital S/PDIF input such as those found on digital recording devices. -
Page 13: Getting Started
Mono Operation 1. Connect your guitar to the input of the GNX2. 2. Connect the GNX2’s left output to the instrument input on your amplifier, or to the line input of a power amp. 3. Select Mono as the Output mode from the Utility menu. See page 40 for more on selecting the Output mode. -
Page 14: Direct To A Mixing Console
2. Connect the GNX2’s outputs to the channel inputs of the mixing console. 3. If the GNX2 is to be used in Stereo mode, set the pan controls of the mixer hard left and right, and select Stereo as the output mode from the Utility menu. See page 40 for more information on the Output mode. -
Page 15: About The Gnx2
Pressing and holding a MODE footwitches scrolls through the User Banks. Once a Bank has been select- ed, a preset within that bank needs to be selected. If a preset is not selected within 5 seconds, the GNX2 returns to the previous bank and preset. -
Page 16: The Footswitches
Exit tuner mode by pressing any of the Footswitches. Jam-A-Long The Jam-A-Long feature lets you connect a Tape, CD, or MP3 player to the GNX2. The tape, CD, or MP3 player’s signal is output through the GNX2’s left, right, and headphone outputs. To use the Jam-A-Long feature, connect the headphone output of your player to the JAM-A-LONG INPUT on the rear panel of the GNX2. -
Page 17: Learn-A-Lick Mode
Rhythm Trainer The Rhythm Trainer in the GNX2 is a tool that can be used to develop a great sense of timing, rehearse different musical styles, or just to jam with. The Rhythm Trainer plays sampled drum patterns in an infinite loop. - Page 18 Introduction Pattern Press the STORE (Pattern) button to adjust the drum pattern. The selected drum pattern is shown in the display. Use the DATA WHEEL to select a new pattern. There are 30 different Patterns and a metronome available including: ROCK 1 POP 2 DANCE 2...
-
Page 19: Editing Functions
Editing Functions Editing/Creating a Preset The GNX2 was designed to make the process of sound creation easy and intuitive. Because the GNX2 pro- vides both Amp Modeling and Effects Processing, the editing functions have been divided into two sections: the Amp/Cabinet Modeling section and the Effects section. The GeNetX™ technology contained in the GNX2 allows you to go much further than mere Amp Modeling. -
Page 20: Selecting Amp/Cabinet Models
Amp and Cabinet types for the Green and Red Amp channels in your preset. To do this, the GNX2 must be in the Performance mode, indicated by the Status button’s LED lighting yellow. EXIT returns you to Performance mode regardless of the selected mode. The procedure for selecting an Amp Model or Cabinet Type for the Green or Red Amp Channels is as follows: 1. -
Page 21: Creating Hypermodels
Preset Editing the Effects The GNX2 contains a comprehensive library of fully programmable, studio quality Effects. The Effects section is accessed with the Effect Select Up/Down buttons.The Matrix LEDs light one at a time to identify the selected row of effects . -
Page 22: Storing/Copying A Preset
Editing Functions Rotating the parameter knobs increases or decreases the value of the parameter and you hear the change in real time. When parameter values have changed, the Store LED lights indicating the preset has been modified and needs to be stored (see page 16 for more on the store procedure). Changing presets, or turning the power off before storing any changes will erase your changes and revert to the stored values. - Page 23 Editing Functions 7. Press the STORE button again to finish. To copy one preset to another preset location, begin by selecting the preset you want to copy, then fol- low the steps listed above. Press EXIT at any time during the procedure to aborts the process.
-
Page 24: Effects And Parameters
Whether the stomp boxes are placed before the amp, or in the amp’s effects loop will also make a difference. The GNX2 has the effects connected in the most logical, and best sounding order. The following diagram shows the signal path through the processing contained in the GNX2. -
Page 25: Whammy/Ips
Effects and Parameters For instance, a Ratio of 4 to 1 means that a signal exceeding the Threshold by 4 dB will only be allowed 1 dB of increased output. Higher settings yield a tighter, sound and increase sustain. Lower settings allow better dynamics. Ranges include: ¡2-1 (1.2:1), ¡5-1 (1.5:1), ¡8-1 (1.8:1), ™0-1 ™5-1 £0-1... -
Page 26: Detuning
Ranges from Stomp Box Modeling The GNX2 Stomp Box Modeling emulates the tones of the most popular distortion boxes ever used including the DOD OD250, Boss DS-1, Arbiter Fuzz Face, Electro Harmonix Big Muff, ProCo RAT, DOD Grunge, Boss Metal Zone, Ibanez TS-9,Voodoo Labs Sparkle Drive, and the Guyatone OD-2*. -
Page 27: Noise Gate
Level - Controls the output level of the Stompbox model. Range is 0-99 Equalization helps shape the tonal response of your guitar signal. The EQ in the GNX2 is similar to the tone knobs on an amplifier with the exception that the GNX2 lets you choose the center frequency for the Mid Range and Treble adjustments. -
Page 28: Talker
The Talker™ is an effect designed exclusively by DigiTech, that lets your instrument speak. The Talker™ requires a microphone be connected to the Mic Input on the rear panel of the GNX2. As you speak into the microphone, your instrument mimics what you say. The Talker™ effect is output only at the 1/4” left and right outputs. -
Page 29: Flange
Effects and Parameters Depth Parameter 2 - The Number 3 knob adjusts the intensity ( ) of the modulation. Ranges from 1 to 99. PREDeLaY Parameter 3 - The Number 4 knob adjusts the PreDelay ( ) or length of time before the Chorus effect is applied to the input signal. -
Page 30: Triggered Flanger
Effects and Parameters (TRiGFLnG) TRIGGERED FLANGER A Triggered Flanger is the same sound as a regular Flanger but it lets you choose the starting point of the Flanger sweep. With a regular Flanger, the low frequency oscillator (LFO) is continually sweeping up and down. -
Page 31: Panner
Effects and Parameters ( Panner) PANNER An Auto Panner modulates the sound from left to right at an even rate. Speed Parameter 1 - The Number 2 knob adjusts the rate ( ) at which the signal pans from side to side. -
Page 32: Yaya
(yaya) YAYA™ The YaYa™ is an effect exclusive to DigiTech products. The YaYa™ is controlled by the Expression Pedal and combines the characteristics of a wah and a flanger together providing a unique talk box type of effect. As the Expression Pedal is rocked back and forth, the guitar appears to say “Yah.” The YaYa™... -
Page 33: Detune
(that turns off the input to the Delay and lets you play over the top of a passage in the Delay loop). The Delay in the GNX2 also includes a Ducker Threshold that lets you set the signal strength required before the Delay records. -
Page 34: Reverb
Reverb On/Off - The Status button turns the Reverb ( ) on and off. Reverb Type - The Number 1 knob selects the type of Reverb or acoustic environment.The GNX2 provides ten different environments to choose from including: STUDIO = Studio... -
Page 35: Tutorial
For this example, we are going to use a vintage Tweed amp with an American 2x12 Cabinet, and warp it with a Recitified Amp using a British 4x12 cabinet. Select Preset 40, and the GNX2 is ready to select the Amp Models (indicated by the Status button’s yellow LED). -
Page 36: Adjust The Green Channel Parameters
Tutorial Adjust the Green Channel Parameters The Tweed amp that we selected for our Green Channel assignment uses the factory default settings for the Gain, EQ, and Level Parameters.Therefore, you may want to change the settings. To access the Green Channel Parameters, press the STATUS button. -
Page 37: Tune The Cabinets (Optional)
When the Amps and Cabinets in our Green and Red Channels are dialed in to suit our taste, we can Warp their characteristics together to create a new HyperModel™. Make sure your GNX2 is in yellow mode (indicated by the yellow lit Status LED). If it is not in yellow mode, press the Status button until the Status LED turns yellow. -
Page 38: Select Models For The Preset's Channels
Tutorial Select Models for the Preset’s Channels In the previous steps, we selected a Tweed for the Green Channel and a Rectified Model for the Red Channel.Then we Warped the two together to create our HyperModel™.This HyperModel™ is saved as an amp type that we named Rectweed, but it is not currently part of our preset. -
Page 39: Turn The Compressor Off
The EQ for both the Acoustic Model (Green Channel) and the Rectweed HyperModel™ ( Red Channel) can be adjusted individually. To adjust the EQ, press the EFFECT SELECT DOWN but- ton, and the Equalizer LED lights. The GNX2 defaults to the Green Channel EQ adjustments. EQ green Therefore, the display briefly reads . -
Page 40: Adjust The Noise Gate
Tutorial Adjust the Noise Gate For our example, we want our Noise Gate to open quickly with a relatively weak signal.This type of gate uses the Silencer™ with a low Threshold and short Attack Time. Press the AMP FOOTSWITCH to select the Red Amp Channel. Press the EFFECT SELECT DOWN button and the Noise Gate’s LED lights. -
Page 41: Turn The Delay Off
Store the Preset The last step, is to store our changes to a User Preset. If we changed presets or turned the GNX2 off without storing these settings, it would forget what we had done and revert back to the original preset.To store the preset, press STORE. - Page 42 Tutorial Once the Display reads exampLE , press STORE again.The numbers in the red numeric display are flashing. Using the Data Wheel, select 64 as the destination. Press STORE once more to save the preset. Congratulations! You have successfully created a Preset.
-
Page 43: Other Functions
Other Functions Expression Pedal The Expression Pedal on the GNX2 can control up to 3 parameters in real time including the Volume, Whammy™, and Ya Ya™. When a parameter has been assigned to the Expression Pedal, the parameter’s min- imum and maximum values can also be programmed.The GNX2’s Expression Pedal includes DigiTech’s exclu- sive V-Switch.The V-Switch allows you to switch the Expression Pedal assignment on the fly. -
Page 44: Amp Footswitch
Amp Footswitch From the factory, the Amp Footswitch switches between the Green and the Red Amp Channels. However, the GNX2 allows you to select the Amp Footswitch function.The procedure for assigning the function of the Amp Footswitch is as follows: 1. -
Page 45: Utilities
(LFO 2 Speed) - Controls the modulation speed of Expression LFO 2. Utilities The Utility section contains all of the menus for assigning global functions to the GNX2. Global functions affect the GNX2 in its entirety rather than on a per preset basis.The Utility menus include: Mono/Stereo... -
Page 46: Mono/Stereo Output
Other Functions Mono/Stereo Output The GNX2 needs to be set to stereo or mono mode. In Stereo mode, the GNX2 produces a wide stereo image when the Right and Left Outputs are connected to two different amplifiers. In Mono mode, the same signal appears at the Left and Right Outputs.The procedure for selecting the output mode is as... -
Page 47: Expression Pedal Calibration
4. Press EXIT to return to the GNX2 presets. Expression Pedal Calibration The Expression Pedal on the GNX2 needs to be recalibrated for use after a factory reset has been per- formed. This calibration procedure is automatically activated after a factory reset procedure. In the event the pedal’s calibration fails, or if the pedal does not function properly, it can be re-calibrated using the... -
Page 48: Midi Channel
This is useful for making a backup copy of customized presets, or loading your presets into another GNX2. The procedure for performing a Sysex Preset Dump is as follows: 1. Connect a MIDI cable from the GNX2 MIDI Out to the the MIDI In of a MIDI recording device or the MIDI in of another GNX2. -
Page 49: User Amp Dump
HyperModels™ into another GNX2.The procedure for performing a User Amp Dump is as follows: 1. Connect a MIDI cable from the GNX2 MIDI Out to the the MIDI In of a MIDI recording device or the MIDI in of another GNX2. -
Page 50: Digital Level
If there are cases where your recorder is not receiving enough level from the GNX2’s digital output, you can boost it using the Digital Level option in the Utility menu. The procedure for adjusting the Digital Level is as follows: 1. -
Page 51: Genedit™ Editor/Librarian
Before installing G ™ on your Mac or PC, connect the computer’s MIDI output to the GNX2 MIDI input, and the GNX2 MIDI output to the computer’s MIDI input.Then insert the G ™ CD ROM into the CD ROM drive on your computer, and follow the install instructions that appear on the screen. -
Page 52: Appendix
Appendix Appendix Preset List Bank 1 (SHOwCASe) Bank 9 (metal) 1. HYBRID 33. RECTIFY 2. CLNCHORS 34. SOLO 3. 2CHUNK 35.WHAMMY 4. BAD BASS 36.THE ZONE Bank 2 (GENETX) Bank 10 (studio) 5.WARP ME 37. STACKED 6. BLAKBASS 38.VOLSWELL 7. MEAT X 2 39. -
Page 53: Midi Cc List
Appendix MIDI CC List Parameter Parameter Pickup Type/Off CC 1 Amp Morph CC 79 Cabinet Morph CC 80 Wah On/Off CC 2 Amp/Cabinet Morph CC 81 Wah Type CC 3 Wah Minimum CC 4 Gate On/Off CC 50 Wah Maximum CC 5 Gate Type CC 51... -
Page 54: Midi Implementation
Appendix MIDI Implementation Specifications A/D Converter: 24 bit D/A Converter: 24 bit Sampling Frequency: 44.1 kHz DSP Section: Dual Audio DNA™ DSP architecture Connections: Guitar Input and Outputs: 1/4" TS Jam-A-Long/Learn-A-Lick: 1/8" Stereo TRS Mic Input and Output Balanced XLR Headphone: 1/4"... - Page 55 Appendix Block Diagram...
- Page 56 (801) 566-8800 F (801) 566-7005 DIGITECH GNX2 UDIO , AND ARE TRADE MARKS OF THE ARMAN USIC ROUP OPYRIGHT ARMAN USIC ROUP USA 06/2001 RINTED IN ANUFACTURED IN GNX2 U 18-6384-A SER’S UIDE DIGITECH LEASE ISIT ON THE ORLD EB AT: http://www.digitech.com...