
Related Manuals for DigiTech GeNetX GNX2


Summary of Contents for DigiTech GeNetX GNX2
- Page 1 UITAR ROCESSOR ROCESADOR DE UITARRA ’ UIDE ANUAL DE NSTRUCCION...
- Page 2 Los simbolos de aqui arriba están reconocidos internacionalmente como de advertencia de los riesgos potenciales con aparatos eléctricos. El rayo dentro de un triángulo equilátero implica que dentro de la unidad existen voltajes These symbols are internationally accepted symbols that warn of potential peligrosos.
-
Page 3: Declaration Of Conformity
Sandy, Utah 84070, USA Sandy, Utah 84070, USA Date: May 25, 2001 Fecha: 25 de mayo de 2001 European Contact:Your local DigiTech / Johnson Contacto en Europa: Su distribuidor y servicio técni- Sales and Service Office or co oficial DigiTech/ Johnson o... -
Page 5: Table Of Contents
Table of Contents / Indice Introduction YaYa™ Introducción AutoYa™ SynthTalk™ YaYa™ Quick Start Arranque rápido Envelope Filter SynthTalk™ Making Connections Conexiones Detune Envolvente de filtro Apply Power Encendido Pitch Shift Desafinación Select an Output Mode Selección de un modo de salida 2 Delay Modulación de tono Select The Target System Setup . -
Page 7: Introduction
Introduction / Introducción Introduction Introducción The DigiTech GNX2, is the most advanced guitar processor of its kind. Thanks El DigiTech GNX2 es el procesador de guitarra más avanzado de su clase. to the highly advanced technology provided by GeNetX™, and the extreme Gracias a la avanzada tecnología ofrecida por GeNetX™... -
Page 8: Quick Start
Introduction / Introducción Quick Start Arranque rápido The Quick Start section is included for those of you who would rather play Hemos incluido esta guía de arranque rápido para aquellos que prefieran now and read later. empezar a crear primero y leer después. Making Connections Conexiones Connect your instrument to the INPUT jack on the rear panel. -
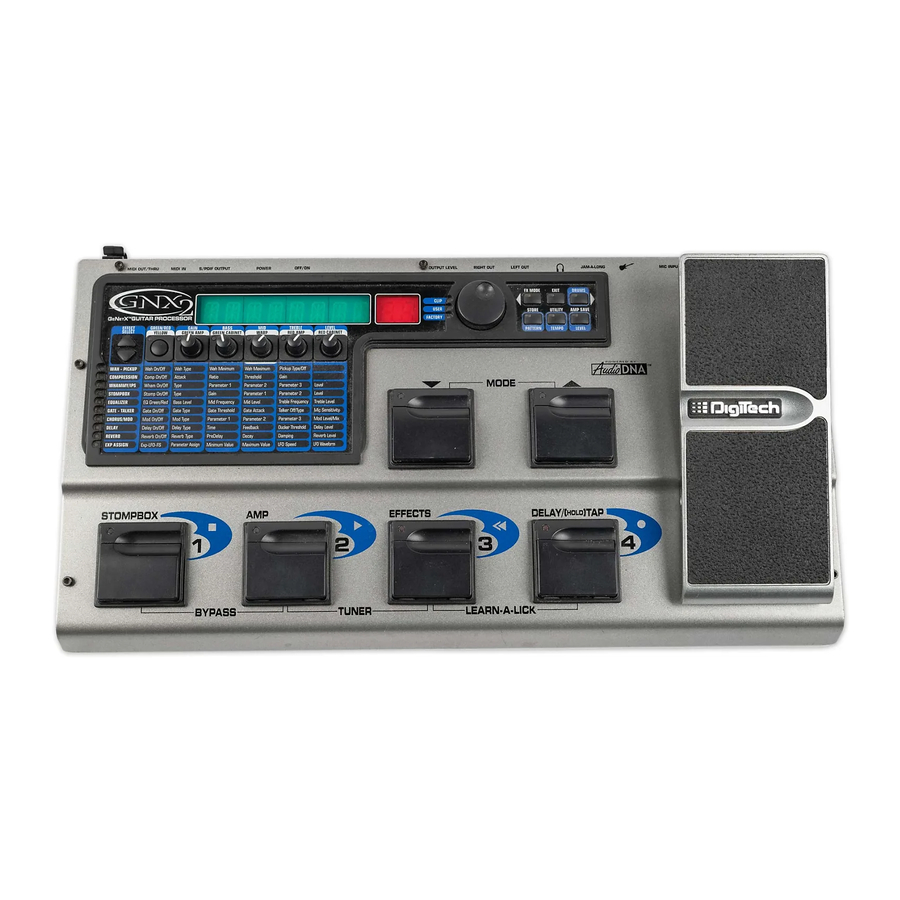
Page 9: A Guided Tour Of The Gnx2
Introduction / Introducción A Guided Tour of the GNX2 Recorrido guiado por el GNX1 The Front Panel El panel frontal 1. Footswitches 1- 4 1. Pedales de disparo 1 - 4 Depending on the selected mode, these 4 footswitches select Dependiendo del modo elegido, estos 4 pedales de disparo se usan presets, change amp channels, and turn individual effects on and off. - Page 10 Introduction / Introducción 6. Display 6. Pantalla The display consists of eight green alpha-numeric characters, and two red La pantalla consta de seis caracteres verdes alfanuméricos, y dos dígitos numeric digits. The display provides information for several different func- numéricos rojos. Le ofrece información de diversas funciones dependiendo tions depending on the selected mode.
-
Page 11: Expression Pedal
Introduction / Introducción STORE - The Store button is used to save your custom edits to the User STORE - Este botón se usa para almacenar sus ediciones personales en los presets.The function of this button changes to select Pattern in presets de usuario. -
Page 12: The Rear Panel
10. Power Input 10. Entrada Power Connect only the provided DigiTech PSS3 power supply to this jack. Conecte a esta toma solo la fuente de alimentación DigiTech PSS3 incluida. 11. S/PDIF Output 11. Salida S/PDIF This is the GNX2’s digital output. The signal at this output is in a stereo digital format, and is to be connected to a digital S/PDIF input such as those found on Esta es la salida digital del GNX2. -
Page 13: Getting Started
Introduction / Introducción 12. MIDI In 12. MIDI In This jack receives all incoming MIDI data. Connect this jack to the MIDI out of Este conector recibe todos los datos MIDI entrantes. Conecte esta entrada a la a computer, sequencer, MIDI controller, or MIDI storage device. toma MIDI out de un ordenador, secuenciador, controlador MIDI o unidad de almacenamiento MIDI. -
Page 14: S/Pdif Digital Output
Introduction / Introducción Left Output Guitar Input/Effect Return Salida izquierda Entrada de guitarra/retorno de efectos Guitar Input/Effect Return Right Output Entrada de guitarra/retorno de efectos Input Salida derecha Entrada Direct to a Mixing Console Directo a una mesa de mezclas The GNX2 can be connected directly to the inputs of a house PA system, or a Puede conectar el GNX2 directamente a las entradas de un sistema PA, o a una recording console. -
Page 15: About The Gnx2
Editing Functions / Funciones de edición About the GNX2 Acerca del GNX2 The Presets Los Presets A preset is a named and numbered location of a programmed sound that Los Presets son posiciones con nombres y números de sonidos programados que resides in the GNX2. -
Page 16: The Footswitches
Editing Functions / Funciones de edición The Footswitches Los pedales de disparo The GNX2 1-4 footswitches are primarily used to select presets or turn on and Los pedales de disparo 1-4 del GNX2 se usan principalmente para elegir los presets off effects, depending on which mode is selected. -
Page 17: Learn-A-Lick Mode
Editing Functions / Funciones de edición Learn-A-Lick Mode Modo Learn-A-Lick The Learn-A-Lick function allows you to record a 9 second passage of music La función Learn-A-Lick le permite grabar un pasaje de hasta 9 segundos de and play it back as slowly as 1/4 the original speed with no change in pitch. This música y reproducirla hasta a 1/4 de la velocidad normal sin cambio en el tono. - Page 18 Editing Functions / Funciones de edición Pattern Patrón Press the STORE (Pattern) button to adjust the drum pattern. The selected Pulse el botón STORE (Pattern) para ajustar el patrón de batería. El patrón acti- drum pattern is shown in the display. Use the DATA WHEEL to select a new vo en ese momento aparecerá...
-
Page 19: Editing Functions
Korg UK. Fender, Matchless, HiWatt, and Mesa Boogie, are trade- sus respectivas compañÌas y no están asociadas en forma alguna con DigiTech. marks of their respective companies and are in no way associated with DigiTech. Cabinet Types... -
Page 20: Selecting Amp/Cabinet Models
Editing Functions / Funciones de edición Selecting Amp/Cabinet Models Selección de modelos de amplificador/recinto acústico The first step to editing an Amp Model, Cabinet Type, or creating your own HyperModel™ is to select the Amp and Cabinet types for the Green and Red El primer paso en la edición del modelo de amplificador, recinto acústico, o para la Amp channels in your preset. -
Page 21: Creating Hypermodels
Editing Functions / Funciones de edición Creating HyperModels™ Creación del HyperModels™ Creating new, unique HyperModels™ is what GeNetX™ is all about. Once the La creación de nuevos y únicos HyperModels™ es el verdadero fin del Green and Red Amp Models and Cabinet types are selected, and the Amp GeNetX™. -
Page 22: Storing/Copying A Preset
Editing Functions / Funciones de edición Parameter Name and Value are Shown in Display En la pantalla aparecen el nombre y el valor del parámetro Use Effect Select Buttons to Select Effect Row Use los botones Effect Select para elegir la fila de efectos LEDs Indicate the Selected Row Los pilotos indican... - Page 23 Editing Functions / Funciones de edición 5 Press Store Again 5 Pulse Store de nuevo 6 Select a User Preset Using Data Wheel 6 Elija un preset de usuario con la rueda Data button again to finish. 7. Press the STORE 7.
-
Page 24: Effects And Parameters
Effects and Parameters / Efectos y Parámetros Effects and Parameters Efectos y Parámetros The GNX2 can be thought of as several different “virtual” amplifiers, and indi- Puede pensar en el GNX2 como si fuese varios amplificadores “virtuales” y pedales vidual, hi-tech stomp boxes. With stomp boxes, the order in which they are de efectos individuales de alta tecnología distintos. -
Page 25: Whammy/Ips
Effects and Parameters / Efectos y Parámetros For instance, a Ratio of 4 to 1 means that a signal exceeding the Threshold Por ejemplo, un valor de 4 a 1 implica que a una señal que sobrepase el by 4 dB will only be allowed 1 dB of increased output. Higher settings yield umbral en 4 dB solo se le permitirá... -
Page 26: Detuning
Guyatone, DS-1, Fuzz Face, Big Muff, RAT, Metal Zone,TS-9, Sparkle Drive y OD-2 son marcas registradas de sus respectivas empresas y no están asociadas con Digitech en forma alguna. Stomp Box On/Off - The Status button turns the Stomp Box Stompbox ) Modeling on and off. -
Page 27: Noise Gate
Effects and Parameters / Efectos y Parámetros Screamer Big MP - Based on an / Basado en un Ibanez TS-9 - Based on the / Basado en el Electro Harmonix Big Muff Pi. Fuzzy Guy OD - Based on an / Basado en un Arbiter Fuzz Face - Based on a / Basado en un GuyaTone OD-2 DOD 250 Rodent... -
Page 28: Talker
El mando número 5 no tiene ninguna función con la puerta de ruidos. Talker™ Talker™ The Talker™ is an effect designed exclusively by DigiTech, that lets your Este es un efecto diseñado exclusivamente por Digitech, que permite que instrument speak. The Talker™ requires a microphone be connected to su instrumento "hable". -
Page 29: Flange
Effects and Parameters / Efectos y Parámetros Depth Depth Parameter 2 - The Number 3 knob adjusts the intensity ( Parámetro 2 - El mando 3 ajusta la intensidad ( ) de la of the modulation. Ranges from 1 to 99. modulación. -
Page 30: Triggered Flanger
Effects and Parameters / Efectos y Parámetros ( TRiGFLnG ) ( TRiGFLnG ) TRIGGERED FLANGER FLANGER POR DISPARO A Triggered Flanger is the same sound as a regular Flanger but it lets Un Flanger por disparo es casi lo mismo que un efecto Flanger nor- you choose the starting point of the Flanger sweep. -
Page 31: Panner
Effects and Parameters / Efectos y Parámetros ( Panner ) ( Panner ) PANNER PANORAMA An Auto Panner modulates the sound from left to right at an even Un Auto Panorama modula el sonido y lo hace pasar de izquierda a rate. -
Page 32: Yaya
( yaya ) YAYA™ YAYA™ The YaYa™ is an effect exclusive to DigiTech products. The YaYa™ is El YaYa™ es otro efecto exclusivo de los aparatos DigiTech. El YaYa™ controlled by the Expression Pedal and combines the characteristics es controlado por el pedal de expresión y combina las características... -
Page 33: Detune
Effects and Parameters / Efectos y Parámetros Parameter 3 - The Number 4 knob adjusts the left/right balance Parámetro 3 - El mando 4 ajusta el balance izquierda/derecha ) of the Wah signal. Ranges from left -99 ( ) to right 99 ) de la señal Wah. -
Page 34: Reverb
Effects and Parameters / Efectos y Parámetros Time - The Number 2 knob adjusts the length of time between Tiempo - El mando 2 ajusta el tiempo entre las repeticiones. El repeats. Ranges from 10MS through 2000MS (10 through 2000 rango va de 10MS a 2000MS (10 a 2000 milisegundos) en milliseconds) in 10ms increments. -
Page 35: Tutorial
Tutorial / Tutorial Tutorial Tutorial Suppose you wanted to create your own HyperModel™ that incorporated the Supongamos que quiere crear su propio HyperModel™ incorporando los sweet tones of a vintage Tweed using an American 2x12 cabinet, and the ripping suaves y dulces sonidos de un Tweed tradicional con un recinto American 2x12, distortion of a Rectified Amp with a British 4x12 cabinet. -
Page 36: Adjust The Green Channel Parameters
Tutorial / Tutorial Rotate Number 4 Knob Until Display Reads Gire el mando número 4 hasta que en la pantalla aparezca Rotate Number 5 Knob Until Display Reads Gire el mando número 5 Red Channel Amp/Cabinet Selection Indicated by Red LEDs hasta que en la pantalla aparezca Selección de amplificador/recinto de canal rojo indicada por pilotos en rojo Adjust the Green Channel Parameters... -
Page 37: Tune The Cabinets (Optional)
Tutorial / Tutorial Tune the Cabinets (optional) Afinación de los recintos acústicos (opcional) You may also want to adjust the resonance for the American 2x12 and the También puede que quiera ajustar la resonancia de los recintos acústicos British 4x12 Cabinets. To access the Cabinet tuning for both Red and American 2x12 y British 4x12. -
Page 38: Select Models For The Preset's Channels
Tutorial / Tutorial Press Amp Save Again Pulse Amp Save de nuevo Use Data Buttons to Select User Amp Location Use la rueda Data para elegir posiciones de amplificadores de usuario Select Models for the Preset’s Channels Elección de modelos a los Presets de canal In the previous steps, we selected a Tweed for the Green Channel and a En los pasos anteriores hemos asignado un Tweed al canal verde y un modelo Rectified Model for the Red Channel.Then we Warped the two together... -
Page 39: Turn The Stompbox Modeling Off
Tutorial / Tutorial Rotate Number 4 Knob Until Display Reads Gire el mando número 4 hasta que en la pantalla aparezca Turn the Compressor Off Desactivación del compresor We don’t want to use compression in our preset so, we need to turn En nuestro Preset no queremos usar compresión, por lo que tenemos que the compressor off. -
Page 40: Adjust The Noise Gate
Tutorial / Tutorial Status Button Selects EQ for Green or Red Channels El botón Status elige la ecualización para los canales verde o rojo Press Effect Select Down Again Until the EQ LED Lights Pulse de nuevo el botón Effect Select abajo hasta que se ilumine el piloto EQ Adjusts... -
Page 41: Turn The Delay Off
Tutorial / Tutorial Use Status Button to Effect Module On Use el botón Status para activar el módulo de efectos Press Effect Select Down Again Until the Chorus/Mod LED Lights Pulse Effect Select abajo de nuevo hasta que se ilumine el piloto Chorus/Mod Set Chorus Level to 50... - Page 42 Tutorial / Tutorial 3 Use FX Mode and Rhythm Buttons to Select Character Locations 3 Use los botones FX Mode y Rhythm para elegir las posiciones de los caracteres 1 Press Store 1 Pulse Store 2 Use Datat Wheel to Change Characters 2 Use la rueda Data para cambiar los caracteres exampLE exampLE...
-
Page 43: Other Functions
El pedal de expresión del GNX2 incluye el exclusivo V-Switch de exclusive V-Switch.The V-Switch allows you to switch the Expression Pedal DigiTech. Este interruptor V-Switch permite que la asignación del pedal de expresión assignment on the fly. Applying extra pressure to the toe of the Expression sea modificada sobre la marcha. -
Page 44: Amp Footswitch
Other Functions / Otras Funciones triangle triangle (Triangle) - a smooth rise and fall, but abrupt turn (Triangular) - un suave aumento y caída, pero con un giro around in oscillation. algo brusco en las oscilaciones. SINE SINE (Sine) - smooth rise, fall, and turn around in oscillation. (Sinusoidal) - una oscilación suave en todas sus fases. -
Page 45: Utilities
Other Functions / Otras Funciones Grn GAIN Grn GAIN (Green Gain) - Controls the Amp Gain for the Green (Ganancia verde) - Controla la ganancia de amplificación Channel. para el canal verde. Gnr LEVL Gnr LEVL (Green Level) - Controls the Volume of the Green Channel. (Nivel verde) - Controla el volumen para el canal verde. -
Page 46: Mono/Stereo Output
Other Functions / Otras Funciones Mono/Stereo Output Salida Mono/Stereo The GNX2 needs to be set to stereo or mono mode. In Stereo mode, the Debe indicarle al GNX2 si quiere usarlo en un modo mono o stereo. En el GNX2 produces a wide stereo image when the Right and Left Outputs modo stereo, el GNX2 produce una amplia imagen stereo cuando las sali- are connected to two different amplifiers. -
Page 47: Expression Pedal Calibration
Other Functions / Otras Funciones 1. Press the UTILITY button.The Utility button’s LED lights indicating 1.Pulse una vez el botón UTILITY. El LED de este botón se encenderá you are in the Utility section. para indicarle que está en la sección de utilidades. 2. -
Page 48: Midi Channel
Other Functions / Otras Funciones MIDI Channel Canal MIDI The GNX2 MIDI channel is only used for receiving incoming MIDI data. El canal MIDI del GNX2 se usa solo para recibir los datos MIDI entrantes. The GNX2 does not send MIDI program change commands or CC data. El GNX2 no envía ninguna orden de cambio de programa MIDI ni The procedure for selecting the MIDI channel is as follows: datos CC. -
Page 49: User Amp Dump
Other Functions / Otras Funciones User Amp Dump Volcado de amplificador de usuario User Amp Dump uploads the GNX2 Amp HyperModels™ to a sysex El volcado de amplificador de usuario permite la descarga de solo los librarian, or MIDI recording device.This is useful for making a backup copy HyperModels™... -
Page 50: Digital Level
Other Functions / Otras Funciones Digital Level Nivel digital When plugging the GNX2’s digital output into a recording device, it is Cuando conecte la salida digital del GNX2 a una unidad de grabación, es important that the recording device gets as much signal as possible with- importante que dicha unidad de grabación reciba tanta señal como sea out being pushed into digital clipping. - Page 51 Other Functions / Otras Funciones ™ Editor/Librarian Editor/Biblioteca genedit™ The possibilities are endless when you install the G ™ Las posibilidades de esta unidad se convierten en infinitas cuando instala el Editor/Librarian software on your home computer. Before installing programa editor/biblioteca GeNedit™ en su ordenador. Antes de instalar ™...
-
Page 52: Appendix
Appendix / Apéndice Appendix / Apéndice Preset List / Listado de presets Bank / Banco 1 ( SHOwCASe ) Bank / Banco 9 ( metal ) 1. HYBRID 33. RECTIFY 2. CLNCHORS 34. SOLO 3. 2CHUNK 35.WHAMMY 4. BAD BASS 36.THE ZONE Bank / Banco 2 ( GENETX ) Bank / Banco 10 ( studio ) -
Page 53: Midi Cc List
Appendix / Apéndice MIDI CC List Listado de CC MIDI Parameter Parámetro Pickup Type/Off CC 1 Tipo pastilla/Off CC 1 Wah On/Off CC 2 Wah activado/desac. CC 2 Wah Type CC 3 Tipo Wah CC 3 Wah Minimum CC 4 Mínimo Wah CC 4 Wah Maximum... -
Page 54: Midi Implementation
Appendix / Apéndice MIDI Implementation Implementación MIDI Received/ Remarks/ Transmitted/ Function/Función Reconocida Transmitida Observaciones MIDI Channel/Canal MIDI Mode/Modo Note Number/ Número de nota Velocity/Velocidad After Touch/After Touch Pitchbend/Inflexión tonal See MIDI CC List/ Control Change/ Vea listado CC MIDI Cambio de control Program Change/ Cambio de programa System Exclusive/... -
Page 55: Block Diagram
ROJO Warranty Garantía We at DigiTech are very proud of our products and back-up each one we sell Todos los aparatos DigiTech son fabricados con el máximo cuidado. Las condiciones with the following warranty: de la garantía varían desde el momento en que los distribuidores son distintos en cada país. - Page 56 PRINTED IN THE USA 06/2001 IMPRESO EN EE.UU. 06/2001 MANUFACTURED IN THE USA FABRICADO EN EE.UU. GNX2 USER’S GUIDE 18-6384-A MANUAL DE INSTRUCCIONES DEL GNX2 PLEASE VISIT DIGITECH ON THE WORLD 18-6384-A WIDE WEB AT: http://www.digitech.com VISITE LA PAGINA WEB DE DIGITECH EN: HTTP://WWW.DIGITECH.COM...