Table of Contents
Advertisement
Quick Links
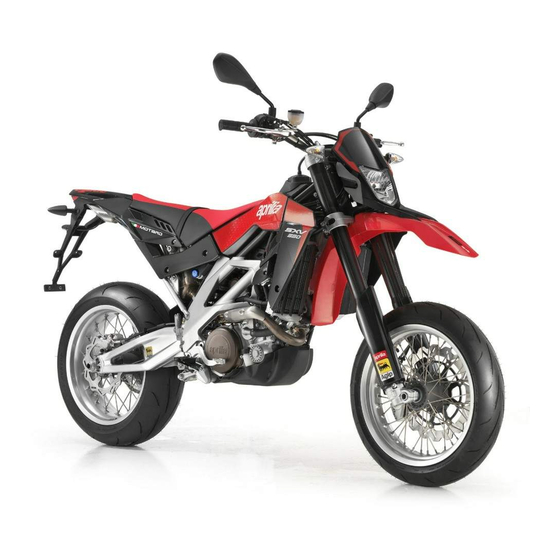
Congratulations on your new SXV.
This innovative motorcycle is designed to provide high performance and great fun under all usage conditions - in other words, with an intent to
revolutionise the concept of supermotard motorcycles. aprilia's first and foremost commitment is to build motorcycles with high technological content,
that are extremely safe to ride and will retain their value over time.
IMPORTANT NOTICE ON VEHICLE USE AND LEGAL WARRANTY
aprilia SXV motorcycles have been conceived and designed for race-track and off-road competitions. As a result, they meet the rules and class
requirements currently adopted by major international motorcycling associations.
Having the motorcycle serviced at the recommended intervals as specified in the maintenance charts provided in this manual is critical to avoiding
premature wear and severe failures. To preserve motorcycle performance and avoid severe damage, have the recommended maintenance procedures
performed by Authorised aprilia Dealers or Service Centres or - at the track - by a qualified mechanic.
The SXV come in a derated version which can be legally used on public roads and is covered by a legal warranty. In order to maintain the warranty,
the recommended maintenance must be performed at the specified intervals by Authorised aprilia Dealers or Service Centres and each service must
be recorded in the warranty booklet.
Please note that these motorcycles are not suitable for road use. Gear ratios, cooling system, suspension set-up, braking system and engine power
delivery are designed and tuned up for racing, and the operating conditions encountered in competitions differ greatly from those experienced when
riding on public roads. Below is a short non-exhaustive list of typical operating conditions that may lead to severe engine damage: long stops at traffic
lights, motorway trips with the engine steadily running at maximum rpm, or drafting vehicles.
Any changes or modifications to the motorcycle, especially performance enhancing modifications, will make the motorcycle illegal to ride on public roads
and void the legal warranty. A modified motorcycle may be used for racing in organised races approved by competent authorities.
For your own safety, use only genuine aprilia parts and accessories. aprilia disclaims all liabilities for the event non-genuine parts are used and for
resulting damage.
APRILIA WOULD LIKE TO THANK YOU
for having chosen one of its products. We have compiled this booklet to provide a comprehensive overview of your vehicle's quality features. Please
read it carefully before riding the vehicle for the first time. It contains information, tips and precautions for using your vehicle. It also describes features,
details and devices to assure you that you have made the right choice. We believe that if you follow our suggestions, you will soon find yourself in
harmony with your new vehicle, and ride it fully satisfied for a long time. This booklet forms an integral part of the vehicle; should the vehicle be sold, it
must be transferred to the new owner.
SXV 450-550
Ed. 03 2008
Advertisement
Table of Contents

Related Manuals for APRILIA SXV 450 2008


Summary of Contents for APRILIA SXV 450 2008
- Page 1 A modified motorcycle may be used for racing in organised races approved by competent authorities. For your own safety, use only genuine aprilia parts and accessories. aprilia disclaims all liabilities for the event non-genuine parts are used and for resulting damage.
- Page 2 Ed. 03 2008...
- Page 3 The instructions given in this manual are intended to provide a clear, simple guide to using your vehicle; it also describes routine maintenance procedures and regular checks that should be carried out on the vehicle at an Aprilia Dealer or Authorised Workshop. The booklet also contains instructions for simple repairs.
- Page 4 Personal safety Failure to completely observe these instructions will result in serious risk of personal injury. Safeguarding the environment Sections marked with this symbol indicate the correct use of the vehicle to prevent dam- aging the environment. Vehicle intactness The incomplete or non-observance of these regulations leads to the risk of serious damage to the vehicle and sometimes even the invalidity of the guarantee The symbols illustrated above are very important.
-
Page 5: Table Of Contents
INDEX GENERAL RULES............... Stand..................47 Carbon monoxide..............Safe driving................48 Fuel..................Load..................52 Hot components..............MAINTENANCE................53 Coolant.................. Engine oil level................54 Used engine oil and gearbox oil..........10 Engine oil change..............56 Brake and clutch fluid............10 Gearbox oil level............... 57 Battery hydrogen gas and electrolyte........ -
Page 7: General Rules
SXV 450-550 Chap. 01 General rules... -
Page 8: Carbon Monoxide
Carbon monoxide If you need to keep the engine running while working on the vehicle, please ensure that you do so in an open or very well ventilated area. Never run the engine in an enclosed area. If you do work in an enclosed area, make sure to use a fume extraction system. -
Page 9: Hot Components
TACT WITH NAKED FLAME, SPARKS OR OTHER HEAT SOURCES WHICH MAY CAUSE IGNITION OR EXPLOSION. DO NOT ALLOW FUEL TO DISPERSE INTO THE ENVIRONMENT. KEEP OUT OF THE REACH OF CHILDREN. Hot components The engine and the exhaust system components get very hot and remain in this con- dition for a certain time interval after the engine has been switched off. -
Page 10: Used Engine Oil And Gearbox Oil
Used engine oil and gearbox oil CAUTION WHEN CARRYING OUT MAINTENANCE OPERATIONS, IT IS ADVISABLE TO WEAR PROTECTIVE IMPERMEABLE GLOVES. THE ENGINE OR GEARBOX OIL MAY CAUSE SERIOUS INJURIES TO THE SKIN IF HANDLED FOR PROLONGED PERIODS OF TIME AND ON A REGULAR BA- SIS. -
Page 11: Battery Hydrogen Gas And Electrolyte
Battery hydrogen gas and electrolyte CAUTION THE BATTERY ELECTROLYTE IS TOXIC, CORROSIVE AND, AS IT CONTAINS SULPHURIC ACID, MAY CAUSE BURNING IF IT COMES INTO CONTACT WITH THE SKIN. WHEN HANDLING BATTERY ELECTROLYTE, WEAR TIGHT-FITTING GLOVES AND PROTECTIVE APPAREL. IN THE EVENT OF SKIN CONTACT WITH THE ELECTROLYTIC FLUID, RINSE WELL WITH PLENTY OF CLEAN WATER. - Page 12 CAUTION THE BEARING MUST ROTATE FREELY, WITHOUT JAMMING AND/OR NOISE, OTHERWISE THEY MUST BE REPLACED. • Use only aprilia ORIGINAL SPARE PARTS. • Always use the recommended lubricants and consumable material. • Lubricate the parts (when possible) before reassembling them.
- Page 13 • After a repair or periodic maintenance operation, carry out the preliminary checks and test the vehicle on private property or in an area with light traffic. • Clean all coupling surfaces, oil seal rims and gaskets before refitting them. Smear a light layer of lithium-based grease on the oil seal rims.
- Page 14 PENSION COMPONENTS PLAY A FUNDAMENTAL ROLE IN GUARANTEEING THE SAFETY OF THE VEHICLE AND MUST BE KEPT AT THE PRESCRIBED VALUES. REGULARLY CHECK THE TIGHTENING TORQUE OF THE FIXING EL- EMENTS AND ALWAYS USE A TORQUE WRENCH WHEN REFITTING. IF THESE WARNINGS ARE NOT OBSERVED, ONE OF THESE COMPONENTS COULD LOOSEN AND COME OFF, BLOCKING A WHEEL OR CAUSING OTHER PROB- LEMS THAT WOULD COMPROMISE MANOEUVRABILITY, LEADING TO A...
-
Page 15: Vehicle
SXV 450-550 Chap. 02 Vehicle... -
Page 16: Arrangement Of The Main Components
02_01 Arrangement of the main components (02_01) LEGEND Ieft side 1. Left coolant radiator 2. Left rear-view mirror 3. Fuel tank cap 4. Fuel tank 5. Battery 6. Saddle 7. Rear light... - Page 17 8. Rear fork 9. Transmission chain 10. Rear left side 11. Side stand 12. Driver's left footrest 13. Gear control lever 14. Main fuse holder (30A) 15. Left front side 02_02...
- Page 18 Right side KEY 1. Right front side 2. Right coolant radiator 3. Coolant expansion tank cap 4. Right rear-view mirror 5. Air filter housing 6. Secondary fuse holder 7. Right rear side 8. Pump with rear brake fluid reservoir 9. Driver's right footrest 10.
-
Page 19: Dashboard
Dashboard (02_03) 1. Left rear-view mirror 2. Clutch control lever 3. Instruments and gauges 4. Ignition switch - steering lock (ON - OFF - LOCK) 5. Front brake lever 6. Right rear-view mirror 7. Throttle grip 02_04 Analog instrument panel (02_04) 1. -
Page 20: Light Unit
It comes on when the ignition switch is set to ON and the engine has not been started, thus performing the warning light activation test. If the warning light does not come on at this stage, contact an Official aprilia Dealer. CAUTION... - Page 21 It comes on when the ignition switch is set to ON and the engine in not switched on and performs the warning light activation test. If the warning light does not come on at this stage, contact an Official aprilia Dealer. CAUTION...
-
Page 22: Digital Lcd Display
Speedometer (km/h - MPH) Displays driving speed in three digits and in real time. Odometer km/mi Displays the partial or total number of kilometres/miles covered Rpm indicator (rpm) Displays the number of engine's rpms. CAUTION DO NOT EXCEED THE ENGINE'S MAXIMUM SPEED, (SEE RUNNING IN) Clock Displays hours and minutes, depending on the setting. - Page 23 2 SCROLL button; Visualise and adjust all functions except time. By turning the ignition key in the «ON» position, the following indicators are lit on the instrument panel for 3 seconds: • All warning lights; • Backlighting; • All segments on the multifunctional digital display. 02_06 Immediately after the initial check is performed, the multifunctional display shows the current battery charge status, then the last values displayed on the active screen be-...
- Page 24 By pressing the MODE button again when the vehicle is at a standstill or the SCROLL button when it is in motion, the PARTIAL ODOMETER indication is substituted by the AVERAGE SPEED (AVS) recorded for the journey. 02_09 To reset the PARTIAL ODOMETER and the relevant AVERAGE SPEED value (AVS), press the MODE or the SCROLL buttons for more than six seconds when the vehicle is at a standstill.
- Page 25 SETTING • Press MODE until the time digits blink; • Each time the MODE button is pressed, the time increases by one unit. Hold down the button to increase time units automatically; • If you do not touch the control for two seconds, the hour is set and the clock switches to minute setting;...
- Page 26 OVERREVVING SETTING Standard overrevving values are normally already set in the multifunctional display. If you wish to set a lower value, follow the steps outlined below when the vehicle and the engine are at a standstill: • Press the MODE and SCROLL buttons at the same time for more than 5 seconds.
-
Page 27: Key Switch
Key switch (02_17) The ignition switch is located on the headstock upper plate. The vehicle is supplied with two keys (one is the spare key). The lights go off when the ignition switch is set to «OFF». NOTE THE KEY ACTIVATES THE IGNITION SWITCH AND OPERATES THE STEERING LOCK. -
Page 28: Locking The Steering Wheel
Locking the steering wheel (02_18) To lock the steering: • Turn the handlebar fully to the left. • Turn the key to «OFF». • Push in the key and turn it anticlockwise (to the left), steer the handlebar slowly until the key is set to «LOCK». •... -
Page 29: Switch Direction Indicators
Switch direction indicators (02_20) To indicate left turn, turn the switch «4» to the left; to indicate right turn, turn the switch «4» to the right. To deactivate the turn indicator, press the «4» switch. NOTE THE ELECTRICAL COMPONENTS FUNCTION ONLY WHEN THE IGNITION KEY IS SET TO "ON"... -
Page 30: Start-Up Button
Start-up button (02_22) By pressing the starter button «2», the starter motor makes the engine rotate. 02_22 Engine stop switch (02_23) It acts as an engine cut-off or emergency stop switch. With switch «1» set to «ON» is possible to start the engine; by pressing it into the «OFF» position, the engine stops. CAUTION DO NOT OPERATE THE ENGINE STOP SWITCH WHILE RIDING THE VEHICLE. -
Page 31: Manual Starter Control
CAUTION WHEN THE VEHICLE IS NOT MOVING, AFTER THE ENGINE HAS BEEN STOP- PED, SET THE IGNITION SWITCH TO «OFF» Manual starter control (02_24) If the engine is started without being warmed up, the ECU cannot keep it running autonomously. In this case, use the cold start «3» control. 02_24 Opening the saddle (02_25, 02_26) •... - Page 32 • Remove the saddle. 02_26...
-
Page 33: Use
SXV 450-550 Chap. 03... -
Page 34: Checks
VEHICLE, FOR CORRECT AND SAFE OPERATION. FAILURE TO DO SO MAY LEAD TO SEVERE PERSONAL INJURY OR VEHICLE DAMAGE. CONTACT AN Authorised Aprilia Dealer IMMEDIATELY IF IN ANY DOUBT ABOUT THE FUNC- TIONS OF ANY CONTROLS OR IF ANY MALFUNCTIONS ARE FOUND OR SUS- PECTED. - Page 35 pressure, tyre wear and potential damage. Remove any possible strange body that might be stuck in the tread design. Brake levers Check they function smoothly. Lubricate the joints and adjust the travel if necessary. Clutch Check for proper operation. Check clutch lever free play and fluid level.
-
Page 36: Refuelling
Fuel tank Check level and refill if necessary. Check the circuit for leaks or obstructions. Check that the tank cap closes correctly. Coolant The coolant level in the radiator must be such as to cover the grids. Engine stop switch (RUN - OFF) Check function. - Page 37 TACT WITH NAKED FLAME, SPARKS OR OTHER HEAT SOURCES WHICH MAY CAUSE IGNITION OR EXPLOSION. DO NOT ALLOW FUEL TO DISPERSE INTO THE ENVIRONMENT. KEEP OUT OF THE REACH OF CHILDREN. CAUTION AVOID SPILLING FUEL FROM THE FILLER OR IT MAY IGNITE IF IT COMES INTO CONTACT WITH HOT ENGINE PARTS.
-
Page 38: Rear Shock Absorbers Adjustment
Rear shock absorbers adjustment (03_02, 03_03, 03_04, 03_05) The rear suspension consists of a spring and shock-absorber group, linked to the frame via silent-block and the rear fork levers. To adjust the setting, the shock absorber has one set screw to adjust rebound damping, one set screw «2» to adjust compres- sion damping, a ring nut for preloading adjustment of spring «3»... - Page 39 NEED TO INCREASE REBOUND DAMPING, IN ORDER TO AVOID SUDDEN JERKS WHEN RIDING. SHOULD YOU NEED ANY ASSISTANCE, CONTACT AN Official aprilia Dealer. TO AVOID COMPROMISING THE SHOCK ABSORBER'S OPERATION, DO NOT LOOSEN SCREW «5» AND DO NOT TAMPER WITH THE SEAL UNDERNEATH IT, AS NITROGEN MAY COME OUT, WITH RESULTING RISK OF AN ACCIDENT.
-
Page 40: Front Fork Adjustment
STANDARD ADJUSTMENT OF SXV REAR SUSPENSION Shock absorber centre-to-centre 457 ± 1.5 mm (18 ± 0.06 in) distance (A) (preloaded) Spring (B) length 245 mm (9.6 in) Rebound adjustment, screw (1) 13 clicks Compression adjustment, screw 16 click By-pass adjustment knob (6) Fully open (-) Front fork adjustment (03_06, 03_07) FRONT SUSPENSION... -
Page 41: Running In
Stem «A» protrusion (***) from top plate (excluding cover): to the rim. 03_07 (*)= Clockwise (**)= Anticlockwise (***)= Only use an Official aprilia Dealer for this type of adjustment CAUTION TO COUNT THE NUMBER OF CLICKS AND/OR TURNS FOR ADJUSTER SCREWS (1 -2) ALWAYS START FROM THE STIFFEST SETTING (ADJUSTER SCREW TURNED FULLY CLOCKWISE). -
Page 42: Starting Up The Engine
tively. Vary your driving speed during the run-in. In this way, you allow for the work of components to be "loaded" and then "unloaded", thus cooling the engine parts. Even if it is important to "stretch" engine components during the running-in, make sure not to strain them. - Page 43 CAUTION BEFORE STARTING THE ENGINE, READ THE ''SAFE RIDING'' SECTION CARE- FULLY. • Get onto the bike in riding position. • Make sure that the stand has been retracted completely. • Make sure that the light switch «1» is set to •...
- Page 44 At this stage: • the ignition screen is displayed on the dashboard for tree seconds. • All instrument panel lights come on for three seconds. 03_10 • Pull a brake lever to block at least one of the wheels. • Fully action the clutch and engage neutral [green (N) warning light on].
-
Page 45: Difficult Start Up
AVOID PRESSING THE «ON» STARTER BUTTON WHEN THE ENGINE HAS AL- READY STARTED, AS THIS COULD DAMAGE THE STARTER MOTOR. IF THE ENGINE OIL PRESSURE WARNING LIGHT COMES ON, THIS MEANS THAT OIL PRESSURE IN THE CIRCUIT IS TOO LOW. STOP THE ENGINE IMMEDIATELY AND CONTACT AN APRILIA OFFICIAL DEALER. -
Page 46: Stopping The Engine
Engage at least a break lever and do not accelerate until you set off. CAUTION DUE TO THE ENGINE'S TIGHT MANUFACTURING TOLERANCES AND THE FACT THAT OIL DUCTS ARE SIZED FOR SPORTS USAGE, THE ENGINE MAY NOT START AT TEMPERATURES LOWER THAN 0 °C (32 °F). DO NOT ATTEMPT TO START THE ENGINE TIME AND TIME AGAIN TO AVOID DAMAGING THE STARTER MOTOR. -
Page 47: Stand
To park the vehicle: • Select an appropriate parking spot. • Stop the vehicle. • Set the engine stop switch «1» to «OFF». • Turn the key and set the ignition switch «2» to «OFF». • Get off the vehicle. •... -
Page 48: Safe Driving
Safe driving (03_16, 03_17, 03_18, 03_19, 03_20, 03_21, 03_22, 03_23, 03_24, 03_25, 03_26, 03_27) MAIN SAFETY RULES To ride the motorcycle it is necessary to comply with all legal requirements (driving license, minimum driving age, psychophysical performance, insurance, taxes and fees, registration, license plate, etc.). - Page 49 03_19 If necessary, take the motorcycle to an Official Aprilia Dealer to check especially the frame, handlebar, suspensions, safety components and any device the user cannot assess without the aid of a specialist.
- Page 50 CLOTHING Before riding off, remember to put on the helmet and fasten it correctly. Make sure it is a homologated model, that it is undamaged, of the right size and that the visor is clean. Wear appropriate protective clothes, preferably light-coloured and/or in reflective ma- terial.
- Page 51 Do not add or modify electrical equipment that exceed the vehicle capacity as this may result in a sudden stop or a dangerous lack of power required to keep the sound and light alarm devices operative. aprilia advises using original accessories (aprilia genuine accessories). 03_25 03_26...
-
Page 52: Load
Load NOTE THE VEHICLE IS NOT SUITABLE FOR TRANSPORTING LOADS OR LUGGAGE. -
Page 53: Maintenance
SXV 450-550 Chap. 04 Maintenance... -
Page 54: Engine Oil Level
DO NOT SPILL OIL! AVOID SPILLING OIL OVER COMPONENTS, THE AREA YOUR ARE WORKING IN AND ITS SURROUNDS. REMOVE ANY TRACE OF OIL CAREFULLY. IN THE EVENT OF A LEAK OR MALFUNCTION, CONTACT AN OFFICIAL APRILIA DEALER. To check: CAUTION THIS TYPE OF VEHICLE HAS SEPARATE LUBRICATION CIRCUITS FOR EN- GINE AND TRANSMISSION/CLUTCH. - Page 55 NOTE IN ORDER TO WARM-UP THE ENGINE AND BRING THE OIL TO THE RIGHT TEMPERATURE, RIDE THE VEHICLE FOR A SHORT PERIOD OF TIME (10 - 15 MIN), KEEP THE ENGINE RUNNING AT IDLE FOR AT LEAST 30 SECONDS AF- TER YOU HAVE COME TO A HALT, THEN CUT OFF THE ENGINE.
-
Page 56: Engine Oil Change
• Unscrew and remove the filler plug «2». • Top up the oil in the tank until you reach the correct level. CAUTION DO NOT ADD ADDITIVES OR ANY OTHER SUBSTANCES TO THE OIL. WHEN USING A FUNNEL OR ANY OTHER ELEMENT, MAKE SURE IT IS PERFECTLY CLEAN. -
Page 57: Gearbox Oil Level
• Unscrew and remove the oil drainage plug from the reservoir (4) and drain all the engine oil. 04_05 • Unscrew the engine oil filter cover (2). Remove it with its gasket, collect the • Remove the engine oil filter. •... - Page 58 • Stop the engine. • Wait some minutes for the oil to flow from the transmission to the clutch. • Keep the vehicle upright with the two wheels on the ground. • Remove the rear brake lever by undoing the screw (1); collect the washer. 04_07 •...
- Page 59 WHEN USING A FUNNEL OR ANY OTHER ELEMENT, MAKE SURE IT IS PER- FECTLY CLEAN. • Wait several minutes to allow the oil to flow from the clutch to the transmis- sion. Then check the oil level again. REPLACEMENT NOTE USE OIL RECOMMENDED IN THE PRODUCTS TABLE.
-
Page 60: Tyres
CAUTION OIL FLOWING FROM THE CLUTCH TO THE TRANSMISSION AND FROM THE TRANSMISSION TO THE CLUTCH CAN BE PARTICULARLY SLOW WHEN THE OIL OR ENGINE TEMPERATURE IS LOW. • Reassemble the rear brake lever, remembering to insert the washer between the lever and the crankcase, screwing the screw «1»... - Page 61 THERE ARE SEVERAL TYPES OF WEAR INDICATORS. CONSULT YOUR DEAL- ER ON METHODS TO CHECK FOR WEAR. CARRY OUT A VISUAL INSPECTION FOR TYRE WEAR AND TEAR, REPLACE TYRES WHEN WORN. WHEN TYRES ARE OLD, THE MATERIAL MAY HARDEN AND NOT PROVIDE ADEQUATE ROAD HOLDING, EVEN IF TYRES ARE STILL WITHIN THE WEAR LIMIT.
-
Page 62: Spark Plug Dismantlement
Spark plug dismantlement (04_11, 04_12, 04_13) Periodically remove the spark plugs, clean them of carbon deposits and, if necessary, replace them. CAUTION EVEN IF A SINGLE SPARK PLUG REQUIRES REPLACING, ALWAYS REPLACE 04_11 BOTH SPARK PLUGS. 04_12 In order to reach the spark plugs: CAUTION BEFORE CARRYING OUT THE FOLLOWING OPERATIONS AND IN ORDER TO AVOID BURNS, LEAVE ENGINE AND EXHAUST TO COOL OFF TO AMBIENT... - Page 63 • Rest the vehicle on its stand. NOTE THE VEHICLE HAS A SPARK PLUG (2) FOR EACH CYLINDER. THE FOLLOWING STEPS RELATE TO JUST ONE SPARK PLUG BUT APPLY TO BOTH. • Remove the tube (1) of the spark plug (2). •...
- Page 64 • Check that the electrodes and the insulator of the spark plug (2) do not show signs of carbon deposits and corrosion. If necessary, clean them using a compressed air jet. Replace the spark (2) if its insulator is cracked, the electrodes show signs of corrosion or excessive deposits, or the top of the central electrode gets rounded (6).
-
Page 65: Removing The Air Filter
Installation: • Once the washer is fitted, screw the spark plug (2) manually to avoid dam- aging the thread. • Tighten using the spanner supplied in the tool kit. Make each spark plug (2) complete 1/2 of a turn to compress the washer. CAUTION IT IS ESSENTIAL TO TIGHTEN THE SPARK PLUG (2) PROPERLY. -
Page 66: Cooling Fluid Level
CAUTION MAKE SURE THAT THE RESERVOIR RETAINING EDGE NEVER COMES INTO CONTACT WITH THE BATTERY POSITIVE LEAD. CAUTION 04_15 IN THE EVENT OF A FALL, CLEAN THE AIR FILTER AND ITS BOX CAREFULLY, REMOVING ANY TRACES OF OIL WHICH MAY HAVE ENTERED FROM THE OIL RESERVOIR THROUGH THE OIL VAPOUR BREATHER PIPES. - Page 67 ADVICE. IF SWALLOWED, INDUCE VOMITING, RINSE MOUTH AND THROAT WITH PLENTY OF WATER AND SEEK MEDICAL ADVICE IMMEDIATELY. Coolant solution is 50% water and 50% antifreeze fluid. This mixture is suitable for the majority of operating temperatures and offers adequate corrosion protection.
- Page 68 CAUTION WAIT FOR THE ENGINE TO COOL DOWN BEFORE CHECKING OR TOPPING- UP THE COOLANT LEVEL. • Stop the engine and wait for it to cool down. • Place the vehicle on firm and level ground. • Keep the vehicle upright, with both wheels on the ground. •...
-
Page 69: Checking The Brake Oil Level
UNEXPECTED CLEARANCE VARIATIONS OR ELASTIC RESISTANCE IN THE BRAKE LEVER ARE DUE TO FAILURE IN THE HYDRAULIC CIRCUIT. CONTACT AN Official Aprilia Dealer IN CASE OF DOUBTS ON THE CORRECT OPERATION OF THE BRAKING SYSTEM OR WHEN UNABLE TO CARRY OUT ROUTINE... - Page 70 CAUTION MAKE ESPECIALLY SURE THAT BRAKE DISCS ARE NOT SMEARED OR LU- BRICATED, PARTICULARLY AFTER MAINTENANCE AND CHECK PROCE- DURES HAVE BEEN CARRIED OUT. CHECK THAT BRAKE WIRES ARE NOT TWISTED OR WORN. PAY UTMOST ATTENTION THAT NO WATER OR DUST INADVERTENTLY GETS INTO THE CIRCUIT.
- Page 71 CAUTION WHEN YOU USE THE BRAKE FLUID, MAKE SURE NOT TO SPILL IT ONTO PLASTIC OR PAINTED COMPONENTS AS IT WILL DAMAGE THEM BEYOND REPAIR. Disc brake CAUTION BRAKES ARE THE MOST IMPORTANT COMPONENTS TO ENSURE SAFETY AND THEREFORE THEY HAVE TO BE ALWAYS IN PERFECT CONDITIONS; CHECK THE BRAKES BEFORE EACH RIDE.
- Page 72 Check the brake fluid level in the reservoirs before setting off. CAUTION DO NOT USE YOUR MOTORCYCLE IF A FLUID LEAK IN THE BRAKING CIRCUIT IS DETECTED. Front brake Checking • Place the vehicle upright and keep the handlebar right. •...
- Page 73 • Using a short Phillips screwdriver remove the screws «3» of the brake fluid reservoir. CAUTION AVOID PROLONGED AIR EXPOSURE OF THE BRAKE FLUID. THE BRAKE FLU- ID IS HYGROSCOPIC AND ABSORBS MOISTURE WHEN IS IN CONTACT WITH THE AIR. LEAVE THE BRAKE FLUID RESERVOIR «1» OPEN ONLY FOR THE TIME NEEDED TO COMPLETE THE TOPPING UP PROCEDURE.
- Page 74 CHECK BRAKING EFFICIENCY. WHEN THE BRAKE LEVER HAS EXCEEDING TRAVEL OR IF YOU NOTICE A LOSS OF BREAKING, CONTACT AN APRILIA OFFICIAL DEALER. THE BRAK- ING SYSTEM MAY NEED BLEEDING. Rear brake Checking • Keep the vehicle upright. • Check that the liquid contained in the reservoir is higher than the MIN. mark.
- Page 75 CAUTION AVOID PROLONGED AIR EXPOSURE OF THE BRAKE FLUID. THE BRAKE FLU- ID IS HYGROSCOPIC AND ABSORBS MOISTURE WHEN IS IN CONTACT WITH THE AIR. LEAVE THE BRAKE FLUID RESERVOIR «2» OPEN ONLY FOR THE TIME NEEDED TO COMPLETE THE TOPPING UP PROCEDURE. •...
-
Page 76: Battery
WHEN THE BRAKE LEVER HAS EXCEEDING TRAVEL OR IF YOU NOTICE A LOSS OF BREAKING, CONTACT AN APRILIA OFFICIAL DEALER. THE BRAK- ING SYSTEM MAY NEED BLEEDING. Battery (04_22, 04_23, 04_24) • Remove the saddle. • Unscrew and remove the negative wire fastening screw, keeping the washer. -
Page 77: Fuses
ING OTHER THAN SPECIFIED. THIS COULD DAMAGE THE ELECTRICAL SYS- TEM OR CAUSE A SHORT CIRCUIT, WITH THE RISK OF FIRE. CAUTION IF A FUSE BLOWS OUT FREQUENTLY, THAT MAY BE DUE TO A SHORT CIR- CUIT OR OVERLOAD. IF THIS OCCURS, CONTACT AN Official Aprilia Dealer. - Page 78 Checking the fuses is necessary whenever an electrical component fails to operate or is malfunctioning or when the engine does not start. Check the secondary fuses first and then the main 30A fuse. To check: • Set the ignition switch to (OFF) to avoid an accidental short circuit. •...
- Page 79 • Remove the left side fairing by following the same procedure for the right side fairing. • To check the main fuses, carry out the same operations described above for secondary fuses. 04_27 SECONDARY FUSES DISTRIBUTION (1) 15A fuse ECU relay energising (2) 15A fuse Taillights, indicators, horn, instrument panel, stop light...
- Page 80 NOTE THERE ARE THREE SPARE FUSES «8». 04_28 MAIN FUSES - DISTRIBUTION 30A fuse Battery recharge (there is just one fuse, the second one is spare). 04_29...
-
Page 81: Lamps
Lamps NOTE BEFORE REPLACING A BULB, CHECK THE FUSES. Front light group (04_30, 04_31, 04_32, 04_33, 04_34) In the front headlight there are: • Two tail light bulbs «1». • One low-beam / high-beam light bulb «2». 04_30 To replace: •... - Page 82 • Connect the bulb electrical connector «3». 04_32 04_33 04_34...
-
Page 83: Headlight Adjustment
Headlight adjustment (04_35, 04_36) NOTE IN COMPLIANCE WITH LOCAL LEGAL REQUIREMENTS, SPECIFIC PROCE- DURES MUST BE FOLLOWED WHEN CHECKING LIGHT BEAM ADJUSTMENT. 04_35 For a quick check of the correct direction of the front light beam: • Place the vehicle 10m away from a vertical wall and make sure the ground is level. -
Page 84: Front And Rear Disc Brake
04_37 AS A DIRTY BRAKE DISC MAY BE CLEANED WITH A HIGH-QUALITY DE- GREASING PRODUCT. HAVE THE BRAKE FLUID CHANGED AT AN Official aprilia Dealer ONCE A YEAR. USE THE BRAKE FLUID SPECIFIED IN THE REC- OMMENDED PRODUCT TABLE. NOTE THIS VEHICLE IS EQUIPPED WITH FRONT AND REAR DISC BRAKES, EACH OPERATED BY AN INDEPENDENT HYDRAULIC CIRCUIT. - Page 85 Checking brake pads for wear Disc brake pad wear depend on the use, the riding style and the roads. CAUTION WEAR IS GREATER WHEN RIDING ON DIRTY AND WET ROADS OR OFFERED. 04_39 04_40 To carry out a quick pad check: •...
-
Page 86: Periods Of Inactivity
When the lining material of even just one of the brake pads is worn down to nearly 1.5 mm (0.06 in) (or even if one of the wear indicators is no longer visible), replace both brake pads. CAUTION TAKE YOUR MOTORCYCLE TO AN Official Aprilia Dealer TO HAVE DISCS RE- PLACED. Periods of inactivity (04_41) CAUTION WHEN THE VEHICLE IS LEFT UNUSED FOR OVER TWENTY DAYS, DISCON- NECT THE 30 A FUSE TO PREVENT BATTERY DEGRADATION. - Page 87 Take some measures to avoid the side effects of not using the vehicle. Besides, it is necessary to carry out general repairs and checks before garaging the vehicle as one can forget to do so afterwards. Proceed as follows: • Remove the battery.
-
Page 88: Cleaning The Vehicle
CAUTION AS A TEST, RIDE THE MOTORCYCLE FOR A FEW KILOMETRES AT A MODER- ATE SPEED AND AWAY FROM TRAFFIC AREAS. Cleaning the vehicle Clean the motorcycle frequently if exposed to adverse conditions, such as: • Air pollution (cities and industrial areas). •... - Page 89 CAUTION IN CASE OF DISCOLOURATION OF THE SILENCER, APPLY FINISHING POLISH WITH A SOFT CLOTH. CAUTION AFTER CLEANING YOUR MOTORCYCLE, BRAKING EFFICIENCY MAY BE TEM- PORARILY AFFECTED DUE TO THE PRESENCE OF WATER ON THE FRICTION SURFACES OF THE BRAKING CIRCUIT. ALLOW LONGER BRAKING DISTAN- CES TO PREVENT ACCIDENTS.
- Page 90 nents. Using aggressive detergents may damage the surface treatment of these components. TO CLEAN THE LIGHT ASSEMBLIES, USE A SPONGE SOAKED IN WATER AND MILD DETERGENT, GENTLY RUBBING THE SURFACE AND RINSING FRE- QUENTLY WITH PLENTY OF WATER. DO NOT CLEAN THE FRONT LIGHT ASSEMBLY WITH DETERGENTS CONTAIN- ING TENSIOACTIVE AGENTS AND/OR ALCOHOL.
-
Page 91: Transport
Transport During transport the vehicle must be well secured in an upright position and first gear must be engaged, to avoid fuel, oil and coolant leaks. IN CASE OF FAILURE, DO NOT HAVE THE VEHICLE TOWED. ASK FOR ROAD ASSISTANCE SERVICE. Chain backlash check (04_42) To check clearance: •... -
Page 92: Chain Backlash Adjustment
Chain backlash adjustment (04_43, 04_44) If you need to adjust chain tension after the check: • Rest the vehicle on its stand. • Loosen the nut (1) completely. • Loosen both lock nuts (4). • Actuate on the set screws (5) and adjust the chain backlash checking that the references (2 - 3) match on both sides of the vehicle. -
Page 93: Chain Lubrication And Cleaning
LUBRICATE THE CHAIN AT FREQUENT INTERVALS, ESPECIALLY IF ANY DRY OR CORRODED PARTS ARE NOTED. CRUSHED OR SEIZED LINKS MUST BE LUBRICATED AND RESTORED TO PROPER WORKING ORDER. IF THIS IS NOT POSSIBLE, HAVE THE CHAIN REPLACED BY AN Authorised Aprilia Dealer. 04_45 Chain lubrication and cleaning Lubricate the chain whenever necessary. -
Page 95: Technical Data
SXV 450-550 Chap. 05 Technical data... - Page 96 TECHNICAL DATA SXV 450 - SXV 550 (VEHICLE) Max. length 2165 mm (85.23 in) Max. width 815 mm (32.08 in) Max. height (to windshield) 1170 mm (46.06 in) Saddle height 880 mm (34.64 in) Wheelbase 1470 mm (57.87 in) Minimum ground clearance 270 mm (10.63 in) Dry weight (of each liquid) 121,5 kg (267.86 lb)
- Page 97 Front suspension travel 275 mm (10.83 in) Rear suspensions oscillating swingarm and adjustable hydraulic single shock absorber Rear wheel travel 252 mm (9.92 in) (usable) Front brake disc - Ø 320 mm (Ø 12.60 in), with hydraulic transmission Rear brake Ø...
- Page 98 Bore/stroke 76 mm / 49.5 mm (2.99 in / 1.95 in) Compression ratio 13 ± 0.5 Ignition starter Idle speed 1800 ÷ 2000 rpm Clutch multiplate wet clutch Lubrication system Separate twin-sump lubrication with external reservoir Air filter with dry filtration cartridge Cooling Coolant Gearbox...
- Page 99 Drive chain endless (without master link) and with sealed links Fuel system electronic injection Diffuser Ø 38 mm (1.49 in) Fuel system premium unleaded petrol, minimum octane rating 95 (NORM) and 85 (NOMM) SXV 550 TECHNICAL DATA (ENGINE) Model 55SX125 ENGINE twin cylinder, 4-stroke with 4 valves per cylinder, single overhead...
- Page 100 Gearbox mechanical, 5 speeds with foot lever on the left hand side of the engine Gear ratio Primary: 22/56 = 1 : 2.545 Final: 16/46 = 1 : 2.875 13/30 = 1 : 2.307 (secondary) 1: 16.888 (total) 15/27 = 1 : 1.800 (secondary) 1: 13.172 (total) 16/23 = 1 : 1.437 (secondary) 1: 10.519 (total)
- Page 101 ELECTRICAL COMPONENTS Ignition Electronic Standard spark plug NGK CR8EB Spark plug electrode gap 0.7 ± 0.8 mm (0.028 in ± 0.031 in) Resistance 5 kΩ Battery 12V- 6 Ah Main fuse 30 A Auxiliary fuses 5A; 15A; 20A Alternator (permanent magnet 12 V - 350 W type) Low beam bulb...
- Page 102 Turn indicator warning light Overrevving warning light...
-
Page 103: Programmed Maintenance
SXV 450-550 Chap. 06 Programmed maintenance... -
Page 104: Scheduled Maintenance Table
Periodic maintenance chart for scooters in the original version (throttled) for road op- eration, CAUTION THE MAINTENANCE OPERATIONS LISTED MUST BE CARRIED OUT BY A DEALER OR AUTHORISED APRILIA WORKSHOP, OTHERWISE THE WARRAN- TY WILL BE VOIDED. NOTE CARRY OUT MAINTENANCE OPERATIONS AT HALF THE INTERVALS RECOM- MENDED IF THE VEHICLE IS USED IN WET OR DUSTY AREAS, OFF ROAD OR FOR SPORTING APPLICATIONS. - Page 105 Engine oil and engine oil filter - Change Oil pipes - Check condition and position Throttle cables - Adjustment Cold-start key - Adjustment Brake fluid level - Check Brake pipes - Check condition and tightness Brake system screws torque - Check Light operation/direction Electrical system operation - Check Tyre condition and pressure - Check...
- Page 106 Chain - lubricate 3000 (1864 VERY MILES Throttle body assembly bolt torque - check Throttle bodies - Synchronisation Air filter and filter case - Check and cleaning Fuel lines - Check condition and position Idle speed adjustment - Check Gearbox oil - Change Clutch springs - Check length Clutch discs - Check for wear Clutch control - Check and adjust...
- Page 107 Brake discs thickness - Check Brake pad thickness - Check Electrical contacts and switches - Treatment with contact activator spray Battery connections - Greasing Light operation/direction Electrical system operation - Check Exhaust system - Check for leaks and alignment Tyre condition and pressure - Check Wheel bearings - check Wheel spokes and rim coaxiality - Check tension Tightening of wheel pin nuts and screws - Check...
- Page 108 Steering bearings - Lubricate Clutch lever pin - Lubricate Throttle cables - Lubricate Rider footrest bolts - Lubricate Chain - lubricate Rear suspension linkage system - Lubricate Side stand bolt - Lubricate Front wheel bolt and bearings - Lubricate Rear fork bolt - Lubricate Rear wheel bolt and bearings - Lubricate 6000 (3728...
- Page 109 Connecting rods and main bushings - Check for wear Start-up gears - Check for wear Oil pump gears - Check Head lubrication nozzles - Cleaning Pistons and piston rings - Replacement Piston pin - Check Cam rockers - Radial check Valve lifter - Check Camshaft wear - Check Camshaft bearings - Check...
- Page 110 Crankshaft and connecting rod bearing clearance - Check Chain guide slider - Check for wear Chain guide eye - Check for wear Chain tightener roller - Check for wear Chain tightener slider - Check for wear EVERY YEAR Brake fluid - change Periodic maintenance chart for scooters in free version for hobby sports applications.
- Page 111 Engine oil and engine oil filter - Change Oil pipes - Check condition and position Throttle cables - Adjustment Cold-start key - Adjustment Brake fluid level - Check Brake pipes - Check condition and tightness Brake system screws torque - Check Light operation/direction Electrical system operation - Check Tyre condition and pressure - Check...
- Page 112 Chain - lubricate VERY HOURS OF OPERATION Throttle body assembly bolt torque - check Throttle bodies - Synchronisation Air filter and filter case - Check and cleaning Fuel lines - Check condition and position Idle speed adjustment - Check Gearbox oil - Change Clutch springs - Check length Clutch discs - Check for wear Clutch control - Check and adjust...
- Page 113 Brake discs thickness - Check Brake pad thickness - Check Electrical contacts and switches - Treatment with contact activator spray Battery connections - Greasing Light operation/direction Electrical system operation - Check Exhaust system - Check for leaks and alignment Tyre condition and pressure - Check Wheel bearings - check Wheel spokes and rim coaxiality - Check tension Tightening of wheel pin nuts and screws - Check...
- Page 114 Steering bearings - Lubricate Clutch lever pin - Lubricate Throttle cables - Lubricate Rider footrest bolts - Lubricate Chain - lubricate Rear suspension linkage system - Lubricate Side stand bolt - Lubricate Front wheel bolt and bearings - Lubricate Rear fork bolt - Lubricate Rear wheel bolt and bearings - Lubricate VERY HOURS OF OPERATION...
- Page 115 Connecting rods and main bushings - Check for wear Start-up gears - Check for wear Oil pump gears - Check Head lubrication nozzles - Cleaning Pistons and piston rings - Replacement Piston pin - Check Cam rockers - Radial check Valve lifter - Check Camshaft wear - Check Camshaft bearings - Check...
- Page 116 Crankshaft and connecting rod bearing clearance - Check Chain guide slider - Check for wear Chain guide eye - Check for wear Chain tightener roller - Check for wear Chain tightener slider - Check for wear EVERY YEAR Brake fluid - change Periodic maintenance chart for scooters in free version for competitive sports appli- cations.
- Page 117 Coolant level in radiator and expansion tank - Check Engine oil and engine oil filter - Change Oil pipes - Check condition and position Throttle cables - Adjustment Cold-start key - Adjustment Brake fluid level - Check Brake pipes - Check condition and tightness Brake system screws torque - Check Light operation/direction Electrical system operation - Check...
- Page 118 Sealed link, chain sprocket and chain guide - Check for wear Chain - lubricate VERY HOURS OF OPERATION Throttle body assembly bolt torque - check Throttle bodies - Synchronisation Air filter and filter case - Check and cleaning Fuel lines - Check condition and position Idle speed adjustment - Check Gearbox oil - Change Clutch springs - Check length...
- Page 119 Brake system screws torque - Check Brake discs thickness - Check Brake pad thickness - Check Electrical contacts and switches - Treatment with contact activator spray Battery connections - Greasing Light operation/direction Electrical system operation - Check Exhaust system - Check for leaks and alignment Tyre condition and pressure - Check Wheel bearings - check Wheel spokes and rim coaxiality - Check tension...
- Page 120 Sealed link, chain sprocket and chain guide - Check for wear Steering bearings - Lubricate Clutch lever pin - Lubricate Throttle cables - Lubricate Rider footrest bolts - Lubricate Chain - lubricate Rear suspension linkage system - Lubricate Side stand bolt - Lubricate Front wheel bolt and bearings - Lubricate Rear fork bolt - Lubricate Rear wheel bolt and bearings - Lubricate...
- Page 121 Cylinder liners - Check for wear Connecting rods and main bushings - Check for wear Start-up gears - Check for wear Oil pump gears - Check Head lubrication nozzles - Cleaning Pistons and piston rings - Replacement Piston pin - Check Cam rockers - Radial check Valve lifter - Check Camshaft wear - Check...
- Page 122 IF THE VEHICLE IS USED FOR COMPETITIONS, CARRY OUT THE 15-HOUR SERVICE AFTER EVERY RACE. NOTE - MAINTENANCE OPERATIONS BY THE SPECIALISED APRILIA WORKSHOP DO NOT REPLACE DAILY CHECKING BY THE RIDER! - IF DISTORTIONS, DAMAGES OR WEAR EXCEEDING THE TOLERATED VAL-...
- Page 123 RECOMMENDED PRODUCTS TABLE SXV 450 - 550 Product Description Specifications Engine oil 10W-60 Synthetic based lubricant for high performance SAE 10W60; JASO MA, MA2; API SG four-stroke engines. 75W-90 gear box and transmission oil Synthetic lubricant for gearboxes and SAE 75W-90; API GL4, GL5 transmissions.
-
Page 125: Special Fittings
SXV 450-550 Chap. 07 Special fittings... - Page 127 TABLE OF CONTENTS Tyres: 60 Air filter: 65 Engine oil: 10, 54, 56 Key switch: 27 Engine stop: 30 Use: 33 Battery: 11, 76 Maintenance: 53, 103, 104 Brake: 10, 69, 84 Fork: 40 Maintenance Table: 104 Fuel: 8 Manual: 31 Fuses: 77 Chain: 91–93 Clutch: 10...
- Page 128 The reliability of the vehicle also depends on its mechanical conditions. Checking the vehicle before riding, its regular maintenance and the use of Original aprilia Spare Parts only, are essential factors! For information about the nearest Official Dealer and/or Service Centre, consult the Yellow Pages or search directly on the inset map in our Official Website: www.aprilia.com...