Electro-Voice REV Operating Instructions Manual
Uhf wireless microphone system
Hide thumbs
Also See for REV:
- Brochure (8 pages) ,
- Specification sheet (4 pages) ,
- Operating instructions manual (32 pages)
Table of Contents
Advertisement
Advertisement
Table of Contents

Related Manuals for Electro-Voice REV


Summary of Contents for Electro-Voice REV
-
Page 1: Operating Instructions
Operating Instructions UHF WIRELESS MICROPHONE SYSTEM User Guide... -
Page 2: Table Of Contents
Handheld Transmitter, REV-PH ........ -
Page 3: Section 1 - Quick Set-Up
5, Part K and page 13, Part G). Transmitter “Quick Set-up” is complete. Quick set-up: System Operation With the transmitter and receiver on, monitor the REV Receiver main display screen. Note that the RF (1-100) Bar graph should indicate near the 100 mark. The AF Bar should show very little if any, indication until you talk or sing into the microphone. -
Page 4: Section 2 - System Description
Section 2 - System Description System Description The REV Wireless Microphone system combines frequency agility and ease of use like no other. The REV transmitters and receivers operate over a 24 MHz bandwidth in the UHF portion of the spectrum. -
Page 5: Section 3 - Detailed Component Description
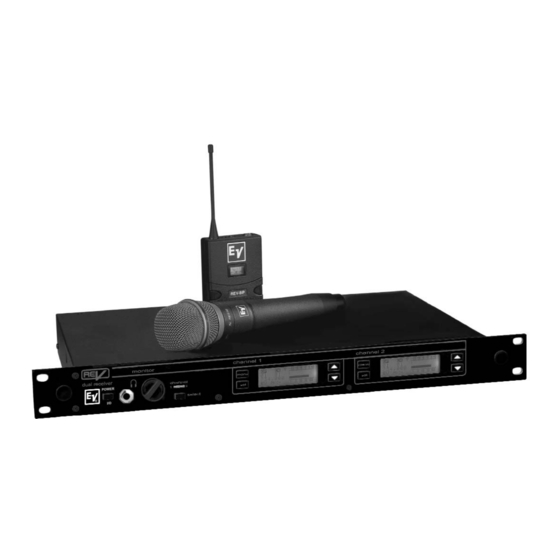
Figure 1 Front Panel Figure 2 Back Panel IEC Power Cord Connector XLR Balanced Audio Output Connector (two on REV-D) Unbalanced 1/4” Line Level Audio Output Connector (two on REV-D) TNC Antenna Input Connectors REV-D TNC Antenna Output connectors 10. CAN Bus RJ45 connectors (two in parallel) -
Page 6: 3.1 Receiver Setup And Operation
3.1 Receiver Setup and Operation A. Receiver Setup 1. Place the receiver and antennas where there is a clear line of sight to the area where the transmitter will be used. Rotate the antennas to separate them by 90 degrees. See Part 15 for more information. - Page 7 I. Continue Set Up: make certain the mixer or amplifier input used for the REV is muted or turned down to a minimum level. J. Plug an audio cable (not supplied) into the 3 pin XLR or 1/4 inch output of the receiver.
-
Page 8: Headphone Operation
DO NOT remove “dummy” loads unless connecting to another receiver. Figure 3 shows the connection diagram for 3 REV-DUAL units. 4. UP to 12 REV-DUAL units can be operated with just two antennas with the optional APD4+ antenna distribution unit (see Figure 4). Figure 3... - Page 9 To power in line antenna amplifiers, 12 volt power is available on the center pin of the antenna in jacks. This power is disabled when the REV leaves the factory but may be turned on by the installer. To turn on the 12 volts, first take off the cover of the radio by removing 14 screws.
-
Page 10: Handheld Transmitter, Rev-H
3.2 Handheld Transmitter REV-HXX REV-HXX Controls, Connectors, and Indicators Figure 6 Handheld Transmitter 1. Main Display - LCD (Channel, Frequency and Battery Level Gauge) Display backlight - flashes when battery is low 2. Power On/Off Switch 3. Control buttons - SET, UP, and DOWN... -
Page 11: Handheld Transmitter Setup And Operation
Handheld Transmitter REV-HXX A. Insert Batteries. Lower the battery cover by unscrewing it completely. Slide down the inner cover and insert two AA bat- teries, positive ends toward the display. B. Turning the transmitter On - With battery compartment still open, hold the unit so you can see the display and the con- trol panel. -
Page 12: Handheld Transmitter, Rev-Ph
3.3 Handheld Transmitter REV-PHXX REV-PHXX Controls, Connectors, and Indicators Figure 8 Handheld Transmitter 1. Main Display - LCD (Channel, Frequency and Battery Level Gauge) 2. Red Low battery LED indicator 3. Power On/Off Switch 4. SET control button 5. Channel/Frequency Up Switch... -
Page 13: Handheld Transmitter Setup And Operation
Handheld Transmitter REV-PHXX A. Insert Batteries. Remove the battery cover by unscrewing it completely. Insert a 9V battery terminal end first into the bat- tery compartment. NOTE: The HTU-2 unique design allows the battery to be inserted and used reqardless of the positive and negative terminal position. -
Page 14: Bodypack Transmitter, Rev-Bp
3.4 Bodypack Transmitter REV-BP Figure 10 Bodypack Transmitter Rev-BP Controls, Connectors, and Indicators Antenna - Flexible 1/4 wave antenna removable (replace- ment part - see Section 10) Power On/Off Switch Low Battery LED Indicator TA4 Audio Connector Figure 13 Belt Clip Attachment... -
Page 15: Bodypack Transmitter Setup And Operation
Group and Channel mode. G. Attach Microphone or Guitar/Instrument Microphone - plug the TA4 end of the microphone cable into the top panel of the REV-BP. Speak into the microphone and the Audio Meter bar graph should indicate audio signal pres- ence. -
Page 16: Bodypack Transmitter Rev-Wt
3.5 Bodypack Transmitter REV-WT Bodypack Transmitter REV-WT Controls, Connectors,and Indicators 1. Antenna Flexible wave (replacement part see Section 10) 2. Power On/Off Switch 3. Low Battery LED Indicator 4. TA4 Audio Connector 5. LCD Display (Channel or Frequency, Battery Level... -
Page 17: Bodypack Transmitter Setup And Operation
Bodypack Transmitter REV-WT A. Install antenna. The REV-WT is equipped with a detachable antenna. Screw in the antenna included with the system. See the accessories section at the end of this manual for option- al antennas. B. Insert Batteries. Pinch the battery door tabs inward and pull the door open. - Page 18 K. Change Lock-Out - Disables the SET button to protect settings 1. To engage change Lock press and hold the UP arrow key about four seconds until SECURE appears in the display. 2. To remove the Change Lock, press and hold the UP key until ACCESS appears in the display.
-
Page 19: Section 4 - Receiver Display Screens And Functions
Section 4 - Receiver Display Screens and Functions Main Operating Screen Display: Group Number Channel Number Microphone Label or Name Battery Status Audio Meter RF Signal Strength Antenna Diversity Status Edit Lockout Status Controls: [MENU] goes to next screen [UP] + [DOWN] for 3 seconds Sets / Resets Edit Lockout [SET] for 3 seconds to change to the alternate operating screen [SET] + [MENU] + [UP] + [DOWN] for 3 seconds for master reset [UP] or [DOWN] adjust LCD display contrast up and down... -
Page 20: Group/Channel Edit Screen
Group / Channel Edit Screen Display: Frequency Band Designation Group Number Channel Number TV Channel Transmit / Receive Frequency Controls: [MENU] goes to next screen [UP] + [DOWN] for 3 seconds Sets / Resets Edit Lockout If Edit Mode is not locked out: [SET] A. -
Page 21: Functions Screen
Functions Screen Controls: Use [UP] [DOWN] to select and view other functions Use [SET] to start the function ClearScan All: searches all defined frequency groups for the ones with the greatest number of receiver channels clear of interference. Once a group is selected an additional scan is made to determine the best frequencies in the group: After pressing [SET] Press [MENU] to abort... -
Page 22: Clearscan Group
ClearScan Group: scans channels within the currently selected frequency group and displays the channels that are clear of inter- ference. After pressing [SET] Press [MENU] to abort After scanning the currently selected group, ClearScan will dis- play the channels that are free of interference. These clear chan- nels are displayed on the right half of the screen. -
Page 23: Audio Edit
B. Selects setting and steps to next field [UP] and [DOWN] change setting that is flashing. Guitar Mode: When using the REV-BP as a wireless guitar system, the Bodypack transmitter and the receiver need to be set in Guitar mode for optimal performance. -
Page 24: Sound Check Screen
Sound Check Screen: Display: Battery Status Peak Audio level held while screen is displayed Range of RF Signal Strength Count Tone on or off indicator Squelch Break Counter Controls [MENU] goes to next screen [SET] clears screen display variables and restarts Sound Check [UP] turns on the Count Beep ( the beep off (... -
Page 25: Clear Group
Clear Group: Clear Group will delete all channels within the selected user group. Press [SET] to clear the group, and place the unit in the Group/Channel edit screen with Group=1, Channel=1. Group will be flashing to enable the selection of a new group. Press [MENU] to return radio the operating screen. -
Page 26: Can Bus Address
Press [SET] to edit address (address will flash). Press [UP/DOWN] to change address. REV-Dual has two addresses tied together. The Channel 1 is always even and Channel 2 is odd. Press [MENU] to return radio to its previous state. -
Page 27: Section 5 - Transmitter Screens And Detail Functions
Section 5 - Transmitter Screens and Detail Functions Transmitter Display and Controls: Display Mode: Group and Channel Frequency Transmitter Gain RF Transmit Power Bodypack only Voice/Guitar Mode Controls: Press SET once, GP will flash, use UP and DOWN to adjust Press SET again to accept GP, CH will flash, adjust with UP/DOWN Press SET again to accept CH and channel will be installed. -
Page 28: Section 6 - Guidelines For Best Performance
All channels in the REV factory set groups are designed to work together, so if channels from just one group are used, no further coordination is required. -
Page 29: Section 7 - Trouble Shooting Guide
Transmitter audio gain too high Receiver output too high Loud instrument or audio source Battery level low in transmitter Another REV system in the installa- tion is on the same channel or the signals are mixing Another wireless product in the... - Page 30 Trouble Shooting Guide (Continued) Problem Interference (continued) Short range or drop-outs Can’t change settings on receiver or transmitter Can’t change frequency setting for a channel Bodypack or Handheld transmitter will not turn off, display says On-Loc Possible Causes Receiver is too close to digital signal processor or similar device Strong electromagnetic field from stage lighting or other source near...
-
Page 31: Section 8 - Technical Specifications
Radiated Output ...........5mW or 50mW Selectable Microphone Head ElectroVoice 767A ......N/D 767a supercardioid dynamic ElectroVoice 967 . -
Page 32: Section 9 - Approval Information
Lincoln, NE 68507 U.S.A. Telephone: 1-402-467-5321 FAX: 1-402-467-3279 Signed: Charles E. Conner Title: Senior Project Engineer Date: April 23, 2008 OTHER APPROVAL INFORMATION DECLARATION OF CONFORMITY Model: Description REV-D Dual Receiver REV-S Single Receiver REV-PH Handheld Transmitter REV-H Handheld Transmitter REV-WT Beltpack Transmitter... -
Page 33: Section 10 - Factory Service
Section 10 - Factory Service If factory service is required, ship the unit prepaid in its original carton to: EV Audio Service c/o Telex Communications, Inc. 8601 East Cornhusker Highway Lincoln, NE 68507-9702 U.S.A. Tel: 402/467-5321 or 800-553-5992 Fax: 402/467-3279 Enclose a note describing the problem along with any other pertinent information and how to contact you. -
Page 34: Section 11 - Accessories And Parts
Section 11 - REV ACCESSORIES AND PARTS 1/2 Wave Colinear Rx Antenna C1, C2 D, E 1/2 Wave Flexible Rx Antenna C3, C5, D, E 1/2 Wave Antenna Bracket w/10 ft. Coax 1/4 Wave Rx Antenna C1, C2, C3, C5... - Page 35 REV ACCESSORIES AND PARTS (continued) Bodypack Pouch Guitar Cord 767a Dynamic Head 976 Dynamic Head RE410 Condenser Head RE510 Condenser Head Mic Stand Adapter for REV-H Mic Stand Adapter for REV-PH Omnidirectional MicroMini Unidirectional MicroMini Lightweight omni headworn Mic Headworn Cardioid Condenser Mic...
- Page 36 Made in U.S.A. MAY 2008 LIT000004TX Rev D...