
Related Manuals for Electro-Voice RE3-BPOL


Summary of Contents for Electro-Voice RE3-BPOL
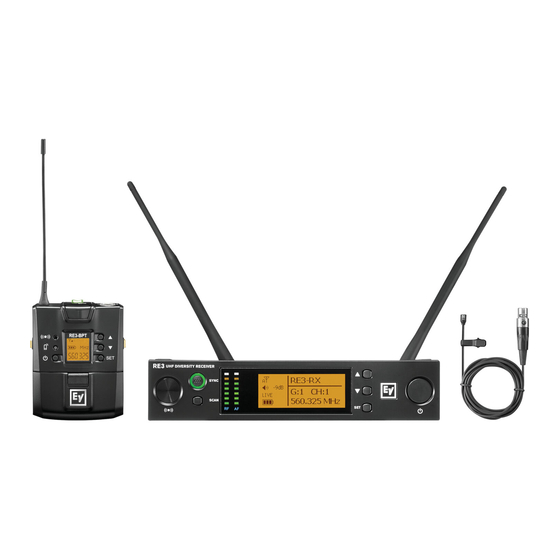
- Page 1 RE3 UHF Wireless RE3‑ND76, RE3‑ND86, RE3‑ND96, RE3‑RE420, RE3‑RE520, RE3‑BPOL, RE3‑BPCL, RE3‑BPHW, RE3‑BPGC, and RE3‑BPNID User Manual...
-
Page 3: Table Of Contents
Turning antenna power on and off 7.3.14 Keylock 7.3.15 Adjusting display options: contrast and brightness 7.3.16 System reset 7.3.17 Exit RE3-HHT handheld transmitter Product identification LCD display Installing batteries RE3-HHT setup menu Electro-Voice 02-2023 | 05 | F.01U.362.808 User Manual... - Page 4 RE3 UHF Wireless RE3-BPT bodypack transmitter Product identification LCD display Installing batteries RE3-BPT setup menu Accessories for RE3 Troubleshooting and FAQ 11.1 Troubleshooting 11.2 Frequently asked questions Technical data Frequency group / channel tables 02-2023 | 05 | F.01U.362.808 Electro-Voice User Manual...
-
Page 5: Safety, Precautions, And Notices
15. To reduce the risk of fire or electric shock, do not expose this apparatus to rain or moisture. The apparatus should not be exposed to dripping or splashing. Objects filled with liquids, such as vases should not be placed on apparatus. Electro-Voice 02-2023 | 05 | F.01U.362.808 User Manual... -
Page 6: Battery Precautions
All rights reserved. No part of this document may be reproduced or transmitted in any form by any means, electronic, mechanical, photocopying, recording, or otherwise, without the prior written permission of the publisher. For information on getting permission for reprints and excerpts, contact Electro-Voice. 02-2023 | 05 | F.01U.362.808 Electro-Voice... -
Page 7: Licensing, Certifications, Restrictions, And Manufacturers Declarations
IC: 1321A-RE3HHT488, 1321A-RE3HHT560, 1321A-RE3HHT653, 1321A-RE3BPT488, 1321A- RE3BPT560, and 1321A-RE3BPT653 This Class B digital apparatus complies with Canadian ICES-003. Cet appareil numérique de la classe B est conforme à la norme NMB-003 du Canada. Electro-Voice 02-2023 | 05 | F.01U.362.808 User Manual... -
Page 8: Licensing Information
Licensing of Electro-Voice wireless microphone equipment is the user’s responsibility, and licensability depends on the user’s classification and application, and upon the selected frequencies on which it will operate. Electro-Voice advises the user to contact the appropriate telecommunications authority concerning proper licensing, and before selecting and ordering frequency bands. -
Page 9: Au And Nz
Always consult your national authority before placing equipment into operation as requirements and spectrum usage can change. 1.4.5 AU and NZ This device operates under an ACMA class license and must comply with all the terms of that license including operating frequencies. Electro-Voice 02-2023 | 05 | F.01U.362.808 User Manual... -
Page 10: Short Information
Handheld set RE520 head 653-663 MHz RE3-RE520-8M Handheld set RE520 head 823-865 MHz RE3-RE520-T Handheld set RE520 head 803-806 MHz RE3-BPOL-5L Bodypack set, omni lavalier 488-524MHz RE3-BPOL-5H Bodypack set, omni lavalier 560-596 MHz RE3-BPOL-6M Bodypack set, omni lavalier 653-663 MHz... - Page 11 RE3-BPNID-5H Bodypack set, no input device 560-596 MHz RE3-BPNID-6M Bodypack set, no input device 653-663 MHz RE3-BPNID-8M Bodypack set, no input device 823-865 MHz RE3-BPNID-T Bodypack set, no input device 803-806 MHz Electro-Voice 02-2023 | 05 | F.01U.362.808 User Manual...
-
Page 12: Shipping Contents
RE3-ND86 contains 1 ND86-RC3 thread-on head and datasheet – RE3-ND96 contains 1 ND96-RC3 thread-on head and datasheet – RE3-RE420 contains 1 RE420-RC3 thread-on head and datasheet – RE3-RE520 contains 1 RE520-RC3 thread-on head and datasheet 02-2023 | 05 | F.01U.362.808 Electro-Voice User Manual... - Page 13 RE3 UHF Wireless Short information | en Bodypack sets (RE3-BPOL, RE3-BPCL, RE3-BPHW, RE3-BPGC, and RE3-BPNID) Quantity Component Bodypack transmitter AA alkaline batteries Input device Based on the set configuration, the package contains one input device from the following list: –...
-
Page 14: Description
Description Thank you for choosing an Electro-Voice wireless microphone product. Please take time to consult this manual to understand all the features and functions built into you Electro-Voice wireless set and fully utilize its performance capabilities. RE3 is a range of RF wireless microphone products operating in the UHF portion of the radio spectrum. -
Page 15: Glossary Of Terms
Abbreviation for megahertz denoting frequencies measuring in the millions of cycles per second. A common reference for wireless microphones using this shortened numerical expression could be 652.725 MHz (six-hundred fifty-two million, seven hundred twenty-five thousand cycles per second). Electro-Voice 02-2023 | 05 | F.01U.362.808 User Manual... - Page 16 When using multiple sets operating in the same frequency band, each set must be operating on a frequency-coordinated channel within the same group. 02-2023 | 05 | F.01U.362.808 Electro-Voice User Manual...
-
Page 17: Best Practices For Successful Operation
This is a good method to follow when maximizing a high channel count system potential. Based on RF conditions in the operating vicinity, select appropriate numbers of sets from available bands in your country to achieve a desired high channel count system. Electro-Voice 02-2023 | 05 | F.01U.362.808 User Manual... -
Page 18: Quick Setup
Press the sync button on the front of the receiver to begin the syncing process (green LED flashes on receiver). Hold the transmitter in place until the sync process is complete. Upon successful sync, the transmitter tunes to the receiver and ready for use. 02-2023 | 05 | F.01U.362.808 Electro-Voice User Manual... -
Page 19: Ensure Transmitter Input Sensitivity Is Set For Best Signal Level
LED lit on emphasis peaks. An occasional reed LED is OK, but a constant, solid red LED should be avoided. Adjust transmitter input sensitivity until step 2 is achieved. Upon successful completion of this section, your set is ready for operation. Electro-Voice 02-2023 | 05 | F.01U.362.808 User Manual... -
Page 20: Re3-Rx Receiver
The LED remains solid green after a successful sync operation. If sync fails, the LED flashes green slowly and constantly until a successful sync operation. 02-2023 | 05 | F.01U.362.808 Electro-Voice User Manual... - Page 21 ¼" audio output jack (1/4" TS). Using a standard unbalanced (unbalanced instrument cable, connect this to the balanced microphone input audio) jack (mic level) on a mixer, powered loudspeaker, or signal processor. Electro-Voice 02-2023 | 05 | F.01U.362.808 User Manual...
- Page 22 DC power jack Connection point for receiver's external power supply. This is where a DC distribution lead connects when using the optional AASP antenna splitter. 02-2023 | 05 | F.01U.362.808 Electro-Voice User Manual...
-
Page 23: Lcd Display
The portion of the receiver's tuned frequency to the left of the decimal in millions. Frequency in kHz The portion of the receiver's tuned frequency to the right of the decimal in thousands. Group number The group number of the receiver's tuned frequency. Electro-Voice 02-2023 | 05 | F.01U.362.808 User Manual... -
Page 24: Re3-Rx Setup Menu
7. RX Output Level 8. Antenna Power 9. Keylock a. Display Option b. Reset c. Exit Item Description 1 Scan Submenu selection to scan for open frequencies. Select to open the Scan submenu. 02-2023 | 05 | F.01U.362.808 Electro-Voice User Manual... -
Page 25: Scanning For Open Channels
Select 1 from the main menu to open the Scan submenu. Select 1. All Groups and press SET to begin the scan process. 1. All Groups 2. Result List 3. Current Group 4. Return Electro-Voice 02-2023 | 05 | F.01U.362.808 User Manual... - Page 26 NOTE: This group and channel must be set on the transmitter as well. Follow the SYNC operation steps to sync the transmitter to the receiver, or manually set the transmitter to this group and channel. 02-2023 | 05 | F.01U.362.808 Electro-Voice User Manual...
-
Page 27: Using The Result List During The Same Session
This selects that group and channel the set operates on. Result List Open Channel: 15 This also returns to the Result List on the scan menu. 1. All Groups 2. Result List 3. Current Group 4. Return Electro-Voice 02-2023 | 05 | F.01U.362.808 User Manual... -
Page 28: Scanning Current Group
Press SET to save. This selects that group and channel the set will operate on. Scan Current Group Push SET to Save. This return to Current Group on the scan menu. 1. All Groups 2. Result List 3. Current Group 4. Return 02-2023 | 05 | F.01U.362.808 Electro-Voice User Manual... -
Page 29: Return
Setting custom frequencies manually does not benefit from the scan function of locating clear channels. It is important to note that manually entered custom frequencies may experience interferences, which can be avoided by using the scan function. Electro-Voice 02-2023 | 05 | F.01U.362.808 User Manual... -
Page 30: Manually Setting Group And Channel
Press the ▼ button to scroll down to Group/Channel on the main menu. Select by pressing SET to enter the Setup Group screen. 1. Scan 2. Frequency 3. Group/Channel 4. Squelch 02-2023 | 05 | F.01U.362.808 Electro-Voice User Manual... -
Page 31: Adjusting Receiver Squelch
Press ▼ button to scroll down to Squelch on the main menu. Select by pressing SET to enter the Setup Squelch screen. 1. Scan 2. Frequency 3. Group/Channel 4. Squelch Electro-Voice 02-2023 | 05 | F.01U.362.808 User Manual... -
Page 32: Mic Config Submenu
Continue to scroll ▼ or ▲ to other items for editing. When finished, scroll to Save Settings and press SET to save settings to prevent settings being lost. Exit Without Save option exits to the main menu without save. 02-2023 | 05 | F.01U.362.808 Electro-Voice User Manual... - Page 33 ▲ buttons. Select or deselect using SET. RF Power AutoOFF KeyLock Save and Exit Save Settings Saves setting changes and exits to main menu. Exit Without Exits to the main menu without saving changes. Save Electro-Voice 02-2023 | 05 | F.01U.362.808 User Manual...
-
Page 34: Adjusting Receiver Volume
Either scroll ▼ to Exit and press SET, or briefly press SYNC on the receiver front panel to return to the home screen. 9. Keylock a. Display Option b. Reset c. Exit 02-2023 | 05 | F.01U.362.808 Electro-Voice User Manual... -
Page 35: Adjusting Receiver Output Level
The receiver antenna jacks can supply 12vDC booster feed to power the optional RFAMP booster, or ALPA active antenna. From the main menu, press ▼ button to scroll to Antenna Power. 5. Mic Config 6. Volume 7. RX Output Level 8. Antenna Power Electro-Voice 02-2023 | 05 | F.01U.362.808 User Manual... -
Page 36: Keylock
SET to enter the Keylock screen. 6. Volume 7. RX Output Level 8. Antenna Power 9. Keylock The display shows the setting of OFF. KeyLock Use the ▲ button to toggle from OFF to ON. KeyLock 02-2023 | 05 | F.01U.362.808 Electro-Voice User Manual... -
Page 37: Adjusting Display Options: Contrast And Brightness
Adjusting display options: contrast and brightness Adjustments to the display contrast and brightness are made in menu item a, Display Options. Press the ▼ button to scroll down to Display Options from the main menu. Electro-Voice 02-2023 | 05 | F.01U.362.808 User Manual... -
Page 38: System Reset
Resetting the receiver in menu item b, Reset restores all settings to factory default. Be very sure you want to do this as all custom settings will be erased. Press the ▼ button to scroll down to Reset from the main menu. 02-2023 | 05 | F.01U.362.808 Electro-Voice User Manual... -
Page 39: Exit
From the main menu, press the ▼ button to scroll down to Exit. Press SET. 9. Keylock a. Display Option b. Reset c. Exit The home screen displays. RE3-RX -10dB G:5 CH:12 LIVE 581.725 MHz Electro-Voice 02-2023 | 05 | F.01U.362.808 User Manual... -
Page 40: Re3-Hht Handheld Transmitter
RC3 , and RE520-RC3 . The heads are interchangeable via the easy-to- use thread-on connection. Transmitter This section provides a primary gripping and mounting area, and handle/battery serves as a sliding cover for the battery compartment. cover 02-2023 | 05 | F.01U.362.808 Electro-Voice User Manual... - Page 41 This menu navigation button adjusts the value of an editable parameter. Pressing the ▲ button will increase the displayed value of the current parameter, or the next state condition value above the displayed state value. Electro-Voice 02-2023 | 05 | F.01U.362.808 User Manual...
-
Page 42: Lcd Display
= between 20% and 39% charge remains. = between 10% and 19% charge remains. = below 10% charge remains. BATTLo appears on the display and the empty cell icon begins flashing when batteries are nearing empty. 02-2023 | 05 | F.01U.362.808 Electro-Voice User Manual... -
Page 43: Installing Batteries
▲ Increases frequency in increments of 1 kHz per press. 581.725 ▼ Decreases frequency in increments of 1 kHz per press. To save changes: Press SET while thousands is flashing; SAVE is displayed / returns to home screen. Electro-Voice 02-2023 | 05 | F.01U.362.808 User Manual... - Page 44 Low (RFPLo) and the antenna symbol with one bar to the not appear in RFPLo right will appear indicating low RF power. 8M Band menu routine SAVE is displayed briefly / returns to home screen. 02-2023 | 05 | F.01U.362.808 Electro-Voice User Manual...
- Page 45 While pressing and holding ▲, press and hold SET for two transmitter, or seconds to turn lock OFF. The lock icon will disappear and synced from transmitter is unlocked. the receiver in the receiver's Mic Config settings. Electro-Voice 02-2023 | 05 | F.01U.362.808 User Manual...
-
Page 46: Re3-Bpt Bodypack Transmitter
A direct line of sight is required. Maintain a distance between two inches and twelve inches (or between 5cm and 30cm) for best sync performance. The blue LED next to the 02-2023 | 05 | F.01U.362.808 Electro-Voice User Manual... - Page 47 BC2 battery charger and rechargeable cells. Charging contact Three charging contacts, one to the left side and two on the right (two) are for use when using the option BC2 battery charger and rechargeable cells. Electro-Voice 02-2023 | 05 | F.01U.362.808 User Manual...
-
Page 48: Lcd Display
Keylock icon Indicates transmitter is in lock mode. Image is visible the transmitter home screen is set to Freq. Image does not appear when the transmitter home screen is set to Group/Channel. 02-2023 | 05 | F.01U.362.808 Electro-Voice User Manual... -
Page 49: Installing Batteries
Press SET while thousands is flashing; SAVE is displayed / are in thousands returns to home screen. (kHz). Group setup G: # ▲ Increases the group number (1-8) in increments of one. Electro-Voice 02-2023 | 05 | F.01U.362.808 User Manual... - Page 50 Indication on display: Options are: Off, 1 minute, 10 minutes, and 30 minutes. AUToOF Displayed as OFF, 1, 10, or 30. Assigns a time period for the transmitter to automatically turn off 02-2023 | 05 | F.01U.362.808 Electro-Voice User Manual...
- Page 51 StorE is displayed / returns to home screen. LocOFF While pressing and holding ▲, press and hold SET for two seconds to turn lock OFF. The lock icon will disappear and transmitter is unlocked. Electro-Voice 02-2023 | 05 | F.01U.362.808 User Manual...
-
Page 52: Accessories For Re3
RE3 series bodypack transmitter input devices RE3-ACC-OL3 Omnidirectional lavalier mic with 4-pin mini plug RE3-ACC-CL3 Cardioid lavalier mic with 4-pin mini plug RE3-ACC-HW3 Headworn mic with 4-pin mini plug RE3-ACC-GC3 Instrument cable; ¼" to 4-pin mini plug 02-2023 | 05 | F.01U.362.808 Electro-Voice User Manual... - Page 53 75 foot, 50 ohm low loss BNC coax cable RE3-ACC-CXU100 100 foot, 50 ohm low loss BNC coax cable Battery charging RE3-ACC-BC2 2-up battery charger. Charges one or two transmitters with rechargeable cells at a time. Electro-Voice 02-2023 | 05 | F.01U.362.808 User Manual...
-
Page 54: Troubleshooting And Faq
The RE3 receiver power button is damaged. robust and durable, and is unlikely to fail. If other listed resolutions do not solve the problem, contact your local Electro-Voice service center. Transmitter will not turn Dead batteries. Replace with fresh, high quality alkaline batteries. - Page 55 Possible resolution Audible dropouts. Intermittent signal Check for fully connected connection at transmitter. microphone head or bodypack input device. Ensure proper connection. Determine if a short is causing dropout by shaking cable or Electro-Voice 02-2023 | 05 | F.01U.362.808 User Manual...
- Page 56 DC power (if receiver or AASP splitter. used) Receiver RF meter shows No transmitter turned on Turn on synced transmitter. If not no RF. or synced. synced, follow sync process. 02-2023 | 05 | F.01U.362.808 Electro-Voice User Manual...
- Page 57 Direct line of sight Ensure clean line of sight between between sync emitter and receiver sync emitter and the sync port is obstructed. transmitter sync port. Aim port directly at emitter. Electro-Voice 02-2023 | 05 | F.01U.362.808 User Manual...
-
Page 58: Frequently Asked Questions
50Ω BNC- terminated coax cable. The third thing to check is the receiver squelch. Many times, having the squelch set too high will greatly reduce system range. Try lowering the squelch (number value) 02-2023 | 05 | F.01U.362.808 Electro-Voice User Manual... - Page 59 Q - Will the lavalier microphone I have with my older RE-2 system work with RE3? A - Yes. Legacy Electro-Voice bodypack transmitter input devices with 4-pin mini connectors are compatible with RE3. Q - I want to put together an eight-channel RE3 system with two remote antennas on the stage feeding the receiver rack.
- Page 60 1.3 dB on the run, the 50-foot CXU50 will lose approximately 1.4 dB on the run, the 75-foot CXU75 will lose approximately 2.4 dB on the run, and the 100-foot CXU100 will 02-2023 | 05 | F.01U.362.808 Electro-Voice User Manual...
- Page 61 ON. If further transmitter audio signal gain reduction is necessary, locate the sensitivity setting in the menu and bring the sensitivity down a few dB as well. Electro-Voice 02-2023 | 05 | F.01U.362.808 User Manual...
-
Page 62: Technical Data
RX key lock, RX display contrast, RX display brightness, RX system reset. Sync data options: Frequency, group, channel, sensitivity level, attenuation status, RF power, auto off status, key lock status, transmitter display (freq or Gp/Ch). 02-2023 | 05 | F.01U.362.808 Electro-Voice User Manual... - Page 63 T (803-806 MHz): Low 10 mW/High 50 mW 8M (823-865 MHz): 10 mW Display by: LCD + LED Function controls: Power, mute, group, channel, frequency, sensitivity adjustment, RF power, auto off, key lock. RF stability: <±10 kHz at Fc Electro-Voice 02-2023 | 05 | F.01U.362.808 User Manual...
- Page 64 RF stability: <±10 kHz at Fc Modulation frequency shift: Wideband FM ±48 kHz deviation Harmonic radiation: <-50 dBc Input jack: 4-pin mini jack Battery: 2 x AA alkaline battery or NiMH rechargeable battery 02-2023 | 05 | F.01U.362.808 Electro-Voice User Manual...
- Page 65 Sensitivity: open circuit voltage at 1 kHz: 20 mV/Pascal (-34 dBV/Pa) Maximum SPL: 115 dB SPL Impedance: 3700 ohms Power requirements: 3-9 VDC Polarity: Positive pressure on diaphragm produces positive voltage at pin 2 relative to pin 1 Electro-Voice 02-2023 | 05 | F.01U.362.808 User Manual...
- Page 66 Material: Black stainless steel painted adjustable headband frame. Molded back facing connector joint with 2.5 mm jack for detachable cable, black textured PU. Black painted steel 100 mm x 4.5 mm flexible mic positing tube. 02-2023 | 05 | F.01U.362.808 Electro-Voice User Manual...
- Page 67 ND86-RC3 dynamic supercardioid microphone head Element type: Dynamic neodymium magnet structure Frequency response, close: 30 Hz - 17 kHz Frequency response, far: 70 Hz - 17 kHz Polar pattern: Supercardioid Sensitivity: open circuit voltage at 1 kHz: 5.6 mV/Pascal (-45 dBV/Pa) Electro-Voice 02-2023 | 05 | F.01U.362.808 User Manual...
- Page 68 Black polyurethane paint Material: Aluminum, steel, steel wire grille screen Dimensions, length: 83.5 mm (3.3 in.) Diameter: 50.5 mm (2.0 in.) RE420-RC3 condenser cardioid microphone head Element type: Self-biased condenser Frequency response, close: 50 Hz - 20 kHz 02-2023 | 05 | F.01U.362.808 Electro-Voice User Manual...
- Page 69 22 dB SPL "A" weighted (0 dB = 20 micropascals) Dynamic range: 117 dB Signal-to-noise ratio: 72 dB Power requirements: 4-8 VDC Polarity: Positive pressure on diaphragm produces positive voltage at center contact relative to ground contact Electrical contact: 3-ring/3-pin Electro-Voice 02-2023 | 05 | F.01U.362.808 User Manual...
- Page 70 | Technical data RE3 UHF Wireless Threaded coupling: 1.25 in. diameter 28 UN-2A Thread Pitch Finish: Black polyurethane paint Material: Aluminum, steel, steel wire grille screen Dimensions, length: 85.3 mm (3.36 in.) Diameter: 49.6 mm (1.95 in.) 02-2023 | 05 | F.01U.362.808 Electro-Voice User Manual...
-
Page 71: Frequency Group / Channel Tables
512.525 511.275 514.675 516.100 514.150 514.325 515.800 516.975 516.650 516.375 517.300 518.150 518.525 517.950 521.050 518.850 519.525 519.825 521.800 521.350 521.025 520.825 523.175 522.850 521.900 522.200 523.925 523.475 523.150 522.950 523.850 523.950 Electro-Voice 02-2023 | 05 | F.01U.362.808 User Manual... - Page 72 584.525 583.275 586.675 588.100 586.150 586.325 587.800 588.975 588.650 588.375 589.300 590.150 590.525 589.950 593.050 590.850 591.525 591.825 593.800 593.350 593.025 592.825 595.175 594.850 593.900 594.200 595.925 595.475 595.150 594.950 595.850 595.950 02-2023 | 05 | F.01U.362.808 Electro-Voice User Manual...
- Page 73 Group 7 Group 8 Frequency Frequency Frequency Frequency 803.050 803.125 803.200 803.150 803.425 803.600 803.575 803.550 804.000 804.650 804.175 804.125 804.750 805.000 804.950 804.900 805.325 805.525 805.550 805.500 805.675 805.875 805.900 805.850 Electro-Voice 02-2023 | 05 | F.01U.362.808 User Manual...
- Page 74 827.675 863.175 828.550 829.000 828.350 863.900 829.500 830.300 829.400 864.450 830.275 830.750 829.850 864.825 831.225 831.375 830.650 831.625 831.775 831.675 863.200 863.225 863.250 863.575 863.700 863.600 864.125 864.525 864.400 864.850 864.875 864.900 02-2023 | 05 | F.01U.362.808 Electro-Voice User Manual...
- Page 76 Bosch Sicherheitssysteme GmbH Bosch Security Systems, LLC Robert-Bosch-Ring 5 12000 Portland Avenue South 85630 Grasbrunn Burnsville MN 55337 Germany www.boschsecurity.com www.electrovoice.com © Bosch Sicherheitssysteme © Bosch Security Systems, GmbH, 2022 LLC, 2022 202302091940...